Table of Contents
Advertisement
Quick Links
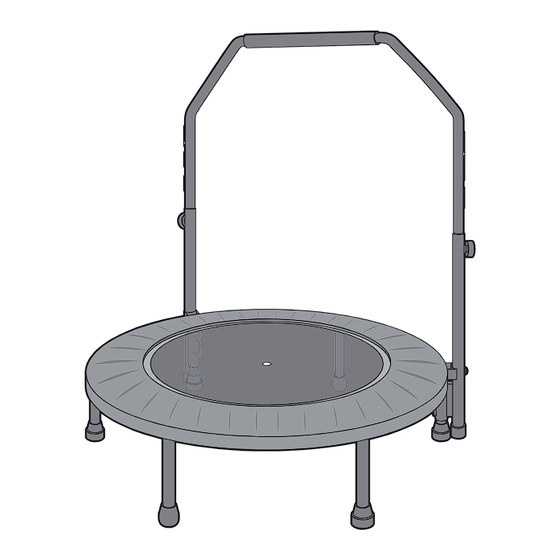
38 inches Fitness Trampoline
Assembly & User Instructions
Visit Facebook Page @PlenyFit
Online Assembly Video
Important - Please read these instructions fully before assembly or using
These instructions contain important information which will help
you get the best from your trampoline and ensure safe and
correct assembly, use and maintenance.
Advertisement
Table of Contents

Summary of Contents for PLENY 301
- Page 1 38 inches Fitness Trampoline Assembly & User Instructions Visit Facebook Page @PlenyFit Online Assembly Video Important - Please read these instructions fully before assembly or using These instructions contain important information which will help you get the best from your trampoline and ensure safe and correct assembly, use and maintenance.
-
Page 2: Parts Checklist
Parts Checklist Vertical Handrail Handle Bar Round Bottom Leg Flat Bottom Leg put in an inner white box) Longest Lean Bottom Leg Round Trampoline Bed (For Lean Trampoline Only) - Page 3 In the Hardware Pack Bolt Washer Fasten Bolt Allen Wrench Height Adjust Bolt Shortest Lean Bottom Leg (For Lean Trampoline Only)
-
Page 4: Assembly Instructions
Assembly Instructions Round Trampoline Bed Step 1: Pre-assembly Remove all the wrapper and keep away from children. Turn the Round Trampoline Bed (1) upside down on a soft, non-abrasive surface. Remove 6pcs of Plastic Caps covered on the thread head. NOTE: Caps are just for protection from transportation, keep away from children and throw it away as soon as possible. - Page 5 Normal Trampoline without Handle Bar Handrail Clip Handrail Clip Step 2 Attach 4pcs Flat Bottom Legs (4) and 2pcs Round Bottom Legs (5) to the positions as shown. Hand tighten only. Note: Identify the two Handrail Clips at the edge of the Round Trampoline Bed Frame. Make sure attach the Flat Bottom Legs (4) at this position.
- Page 6 Handrail Clip Step 3 Remove the Flat Rubber Buttom from the leg (4) at the Handrail Clip Position. Lift the trampoline and slowly slide the Vertical Handrail (3) up over that leg till the end, then put the removed flat rubber bottom back to the leg.
- Page 7 Step 4 Align the Flat Bottom Leg (4) and Vertical Handrail (3) as shown. Attach the Vertical Handrail to the Handrail Clip, using Bolt (A) and Washer (B). Tighten it using Allen Wrench (D). Repeat this step at the other vertical handrail.
- Page 8 Step 5 Note: There is a Yellow Arrow Sticker on the handrail as shown, make sure it’s towards outwards. Then insert Handle Bar (2) into Vertical Handrail. If you have trouble to insert, slightly adjust both Vertical Handrails towards left or right to make it vertically.
- Page 9 Lean Trampoline Assembly Lean Trampoline Handrail Clip Handrail Clip Step To change it to a lean trampoline, User should remove the whole Handrail Set and all of the 6pcs support legs first. Then turn the bed upside down on a soft, non-abrasive surface, attach the 2pcs Longest Lean Bottom Legs (6), 2pcs Round Bottom Legs (5), 2pcs Shortest Lean Bottom Legs (F) as exactly as the image shown.
- Page 10 1. One User At A Time. 2. Keep baby or pet out of your jumping area to avoid potentially injury. 3. The Handlebar is only intended to assist User with controlling their bounce and maintaining their balance on the trampoline. The handlebar should NOT be used for any other purpose or as a climbing, swing feature.
-
Page 11: Care And Maintenance
Care and Maintenance While every attempt is made to ensure the highest degree of protection in all equipment, we cannot guarantee free from injury. The user assumes all risks of injury due to use. All merchandise is sold on this condition, which no representative of the company can waive or change. - Page 12 5. Disposal Instructions - The trampoline can be safely disassembled and disposed without unreasonable hazards. Call your local recycle agency regarding details of recycling. For Toddlers and Kids, PLENY Fitness Brand have 36” Kids Trampoline on sale at the end of Oct, 2017. Go to http://www.plenyfitness.com and subscribe for email notice.
Need help?
Do you have a question about the 301 and is the answer not in the manual?
Questions and answers