Table of Contents
Advertisement
Available languages
Available languages
Advertisement
Chapters
Table of Contents

Related Manuals for ProLights SmartBat Plus


Summary of Contents for ProLights SmartBat Plus
- Page 1 plus PORTABLE BATTERY-POWERED UPLIGHTER MANUALE UTENTE USER MANUAL IT - EN...
- Page 2 Music & Lights S.r.l. si riserva ogni diritto di elaborazione in qualsiasi forma delle presenti istruzioni per l’uso. La riproduzione - anche parziale - per propri scopi commerciali è vietata. Al fine di migliorare la qualità dei prodotti, la Music&Lights S.r.l. si riserva la facoltà di modificare, in qualunque momento e senza preavviso, le specifiche menzionate nel presente manuale di istruzioni.
-
Page 3: Table Of Contents
SMARTBATPLUS INDICE Sicurezza Avvertenze generali Attenzioni e precauzioni per l’installazione 1 Introduzione 1. 1 Descrizione 1. 2 Specifiche tecniche 1. 3 Elementi di comando e di collegamento 2 Installazione 2. 1 Montaggio 3 Funzioni e impostazioni 3. 1 Funzionamento 3. 2 Impostazione base 3. -
Page 4: Sicurezza
SMARTBATPLUS ATTENZIONE! Prima di effettuare qualsiasi operazione con l’unità, leggere con attenzione questo manuale e conservarlo accuratamente per riferimenti futuri. Contiene informazioni importanti riguardo l’installazione, l’uso e la manutenzione dell’unità. SICUREZZA Avvertenze generali • I prodotti a cui questo manuale si riferisce sono conformi alle Direttive della Comunità Europea e per- tanto recano la sigla . -
Page 5: Introduzione
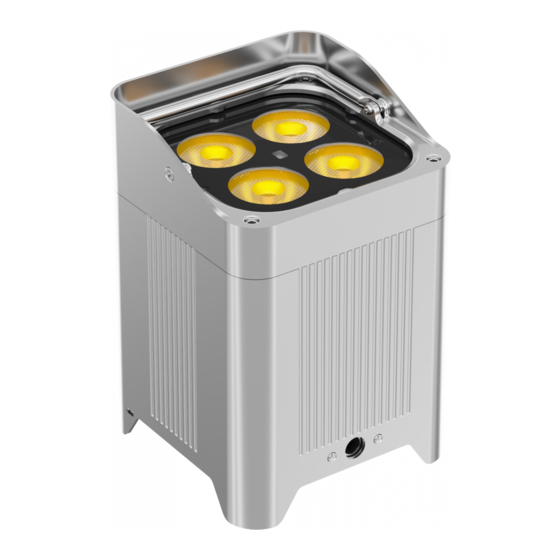
SMARTBATPLUS - 1 - INTRODUZIONE 1.1 DESCRIZIONE SMARTBATPLUS è la nuova versione outdoor IP54 del famoso SMARTBAT; estende il suo campo di applica- zione anche in luoghi all’aperto o in ambito architettonico. SMARTBATPLUS è munito di un pacco batteria al litio e di un modulo WiFi integrato per il funzionamento cable-free. Il design ultra-compatto e leggero rende questo proiettore veramente portatile e ricaricabile innumerevoli volte senza effetto “memoria”. - Page 6 SMARTBATPLUS • IR: Controllo remoto tramite IR ELETTRONICA • Dimmer: 0~100% lineare, Elettronico • Curve Dimmer: 4 Curve dimmer regolabili • Strobo/Shutter: 1-25 Hz, elettronico • Temperatura d’esercizio: 0° / 35° • Flicker: Flicker free ALIMENTAZIONE • Power Supply: 100-240V – 50/60Hz BATTERIA •...
-
Page 7: Elementi Di Comando E Di Collegamento
SMARTBATPLUS 1.3 ELEMENTI DI COMANDO E COLLEGAMENTI Fig.3 1. PANNELLO DI CONTROLLO con display OLED e 4 pulsanti per accesso e gestione delle diverse funzioni. 2. Piede estraibile per inclinazione tilt (fino a 20°). 3. Interruttore ON/OFF. 4. CONNETTORE per ricarica batteria 5. -
Page 8: Installazione
SMARTBATPLUS - 2 - INSTALLAZIONE 2.1 MONTAGGIO Lo SMARTBATPLUS può essere collocato su un piano solido. Inoltre, grazie alla possibilità di fissaggio me- diante il foro filettato presente sul cabinet (fig.4), l’unità può essere montata anche a testa in giù, su una traversa. -
Page 9: Processo Di Ricarica
SMARTBATPLUS MENU DOWN ENTER Per scorrere il menu Per scorrere attraverso le Per scorrere attraverso le Per entrare nel menu selezionato o principale o tornare ad diverse funzioni in ordine diverse funzioni in ordine confermare il valore attuale della una opzione del menu discendente o aumentare il ascendente o diminuire il funzione o l'opzione all'interno di... -
Page 10: Struttura Menu
SMARTBATPLUS 3.4 STRUTTURA MENU MENU ð ð Autoshow Auto 1 001 - 100 ð Auto 2 001 - 100 ð Auto 3 001 - 100 ð Auto 4 001 - 100 ð Auto 5 001 - 100 ð ð Static Fixed Color RGBW ð... -
Page 11: Autoshow
SMARTBATPLUS ð DMX Address 001 - 509 ð DMX Channel 4 Ch 6 Ch 10 Ch ð ð White Balance 125 - 255 ð 125 - 255 ð 125 - 255 ð ð Wireless Setting Receive On/Off ð Receive Reset ð... -
Page 12: Manual Color
SMARTBATPLUS 3.7 MANUAL COLOR Per impostare il bilanciamento personalizzato dei colori far riferimento alla seguente procedura: • Premere il tasto MENU fino a quando sul display non appare [Static]. • Premere il tasto ENTER per confermare. • Utilizzare i tasti UP/DOWN per selezionare [Manual Color]. •... -
Page 13: Impostazioni Wireless
SMARTBATPLUS 3.9 IMPOSTAZIONI WIRELESS • Per entrare nella modalità impostazione wireless premere il tasto MODE fino a quando sul display non appare Wireless Setting, quindi premere il tasto ENTER. • Selezionare la funzione Wireless Receive attraverso i tasti UP/DOWN, quindi premere il tasto ENTER. •... -
Page 14: Key Lock
SMARTBATPLUS 3.13 KEY LOCK Per attivare/disattivare la password di accesso: Premere il tasto MODE fino a quando sul display non appare Key Lock, quindi premere il tasto ENTER. • Selezionare ON oppure OFF a seconda che si voglia, rispettivamente, attivare o disattivare la password di accesso. -
Page 15: Canali Dmx
SMARTBATPLUS 3.14 CANALI DMX MODE MODE FUNCTION FUNCTION Value Value 10 Ch 10 Ch DIMMER Auto Program 5 0~100% 000 - 255 AUTO SPEED Speed slow to fast 000 - 255 0~100% 000 - 255 DIMMER CURVE GREEN Preset dimmer speed from display menu 000-051 0~100% 000 - 255... -
Page 16: Manutenzione
SMARTBATPLUS MODE MODE FUNCTION FUNCTION Value Value 0~100% 000 - 255 0~100% 000 - 255 SATURATION SATURATION 0~100% 000 - 255 0~100% 000 - 255 BRIGHTNESS VALUE INTENSITY 0~100% 000 - 255 0~100% 000 - 255 - 4 - MANUTENZIONE 4.1 MANUTENZIONE E PULIZIA DEL SISTEMA OTTICO •... - Page 17 SMARTBATPLUS Guida all’uso della batteria Inizializzazione di una nuova batteria Ogni nuovo faro contenente una batteria al litio, dovrebbe essere inizializzata al primo utilizzo per massimizzarne l’ e fficienza. Per fare questo: 1. Caricare completamente l’unità per un minimo di 5-6 ore. 2.
- Page 18 All rights reserved by Music & Lights S.r.l. No part of this instruction manual may be reproduced in any form or by any means for any commercial use. In order to improve the quality of products, Music&Lights S.r.l. reserves the right to modify the characteristics stated in this instruction manual at any time and without prior notice.
- Page 19 SMARTBATPLUS TABLE OF CONTENTS Safety General instructions Warnings and installation precautions 1 Introduction 1. 1 Description 1. 2 Technical specifications 1. 3 Operating elements and connections 2 Installation 2. 1 Mounting 3 Functions and settings 3. 1 Operation 3. 2 Basic setup 3.
-
Page 20: General Instructions
SMARTBATPLUS WARNING! Before carrying out any operations with the unit, carefully read this instruction manual and keep it with cure for future reference. It contains important information about the installation, usage and maintenance of the unit. SAFETY General instruction • The products referred to in this manual conform to the European Community Directives and are there- fore marked with . -
Page 21: Introduction
SMARTBATPLUS - 1 - INTRODUCTION 1.1 DESCRIPTION SMARTBATPLUS is the new outdoor IP65 version of the popular SMARTBAT, enlarging the possible applica- tion of this luminaire even in outdoor venues or for architectural applications. SMARTBATPLUS is equipped with a lithium battery pack and a built-in WiFi module for cable- free operation. The ultra- compact and lightweight design makes this projector truly portable and rechargeable countless times without “mem- ory effect “. - Page 22 SMARTBATPLUS ELECTRONICS • Dimmer: Linear 0~100% electronic dimmer • Dimmer Curves: 4 Different dimming curves available • Strobe/Shutter: 1-25 Hz, electronic • Operating Temperature: 0° / 35° • Flicker: Flicker free operation ELECTRICAL • Power Supply: 100-240V – 50/60Hz BATTERY •...
-
Page 23: Operating Elements And Connections
SMARTBATPLUS 1.3 OPERATING ELEMENTS AND CONNECTIONS Fig.3 1. CONTROL PANEL with display and 4 button used to access the control panel functions and manage them. 2. Adjustable foot support for tilt regulation (up to 20°). 3. ON/OFF SWITCH. 4. CHARGING CONTACT 5. -
Page 24: Installation
SMARTBATPLUS - 2 - INSTALLATION 2.1 MOUNTING SMARTBATPLUS may be set up on a solid and even surface. The unit can also be mounted upside down to a cross arm. For fixing, stable mounting clips are required. The mounting place must be of sufficient stabil- ity and be able to support a weight of 10 times of the unit’s weight. -
Page 25: Recharge
SMARTBATPLUS MENU DOWN ENTER Used to access the menu or Button to select the values Button to select the values Used to select and store the to return a previous menu in ascending order of the in descending order of the current menu or confirm the option function... -
Page 26: Menu Structure
SMARTBATPLUS 3.4 MENU STRUCTURE MENU ð ð Autoshow Auto 1 001 - 100 ð Auto 2 001 - 100 ð Auto 3 001 - 100 ð Auto 4 001 - 100 ð Auto 5 001 - 100 ð ð Static Static RGBW ð... -
Page 27: Auto Show
SMARTBATPLUS ð DMX Address 001 - 509 ð DMX Channel 4 Ch 6 Ch 10 Ch ð ð White Balance 125 - 255 ð 125 - 255 ð 125 - 255 ð ð Wireless Setting Receive On/Off ð Receive Reset ð... -
Page 28: Manual Color
SMARTBATPLUS 3.7 MANUAL COLOR To set the personal balance of the color refer to the following procedure: • Press the MENU button so many times until the display shows [Static] • Press the ENTER button to confirm. • Press the MENU button so many times until shows [Manual Color]. •... -
Page 29: Wireless Setting
SMARTBATPLUS 3.9 WIRELESS SETTING • To set the wireless mode refer to the following guide: • Press the MODE button until the display shows Wireless Setting, then press the ENTER button. • Use the UP/DOWN button until the display reads Wireless Receive, and then press the ENTER button and select the ON mode. -
Page 30: Key Lock
SMARTBATPLUS 3.13 KEY LOCK Enter the Key Lock mode to select whether the access password is on or off. • Press the button MODE so many times until show Key Lock and press the button ENTER to confirm. • Use UP/DOWN button to select: ON or OFF. •... -
Page 31: Dmx Channels
SMARTBATPLUS 3.14 DMX CHANNELS MODE MODE FUNCTION FUNCTION Value Value 10 Ch 10 Ch DIMMER Auto Program 5 0~100% 000 - 255 AUTO SPEED Speed slow to fast 000 - 255 0~100% 000 - 255 DIMMER CURVE GREEN Preset dimmer speed from display menu 000-051 0~100% 000 - 255... -
Page 32: Maintenance
SMARTBATPLUS MODE MODE FUNCTION FUNCTION Value Value 0~100% 000 - 255 0~100% 000 - 255 SATURATION SATURATION 0~100% 000 - 255 0~100% 000 - 255 BRIGHTNESS VALUE INTENSITY 0~100% 000 - 255 0~100% 000 - 255 - 4 - MAINTENANCE 4.1 MAINTENANCE AND CLEANING THE UNIT •... - Page 33 SMARTBATPLUS Battery Guide New Lithium Battery Initialisation Any new fixture containing a Lithium battery should be initialised when first purchased to maximise its battery life. To do this: 1. Fully charge the unit for a minimum of 5 to 6 hours. 2.
- Page 34 SMARTBATPLUS...
- Page 35 SMARTBATPLUS...
- Page 36 MUSIC & LIGHTS S.r.l. Via Appia, km 136,200 - 04020 Itri (LT) - ITALY Phone +39 0771 72190 - Fax +39 0771 721955 www.musiclights.it - email: info@musiclights.it ISO 9001:2008 Certified Company...
Need help?
Do you have a question about the SmartBat Plus and is the answer not in the manual?
Questions and answers