Table of Contents
Advertisement
Advertisement
Table of Contents

Related Manuals for Acon Mission


Summary of Contents for Acon Mission
- Page 2 ® Mission Cholesterol Monitoring System Important Safety Instructions If the meter is powered by AC adapter, unplug the equipment immediately after use. Misuse of electrical equipment can cause electrocution, burns, fire and other hazards. Do not place the equipment in liquid, nor put it where it could fall into liquid.
-
Page 3: Table Of Contents
Table of Contents Section 1 Introduction ................1 Section 2 Getting Started ..............2 Section 3 Components ................4 Meter ......................4 Test Devices ..................... 7 Control Devices ..................9 Control Solution ..................10 Section 4 Initial Setup ................ -
Page 4: Introduction
Use the code chip that is included in each box of test devices. ® ® Only use the Mission Cholesterol Test Devices with the Mission Cholesterol Meter. For in vitro diagnostic use only. Your blood cholesterol monitoring system is only to be used outside the body for testing purposes. -
Page 5: Getting Started
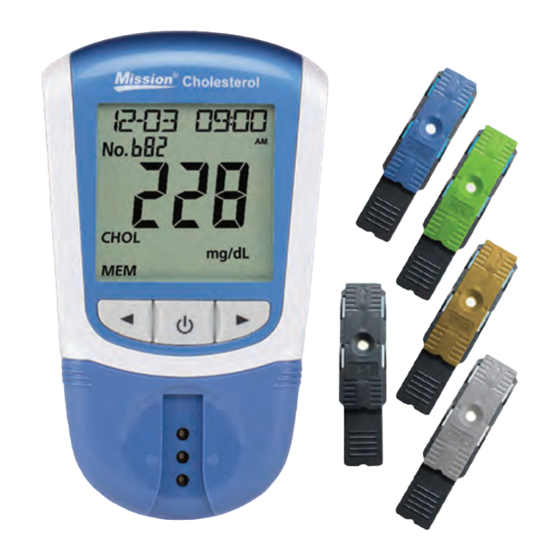
Getting Started Before testing, read the instructions carefully and learn about all the ® components of the Mission Cholesterol Monitoring System. Depending on the package type, some of the components may need to be purchased separately. Please check the list of contents on the outer box for details on which components are included with your purchase. - Page 6 Cholesterol Meter: Reads the test devices and displays the concentrations of CHOL, HDL, TRIG, and calculated LDL and CHOL/HDL values. Test Devices: Part of the system, these are inserted into the meter to measure the concentrations of CHOL, HDL, and TRIG, from which LDL and the CHOL/HDL ratio are calculated.
-
Page 7: Components
Section 3 Components ® The Mission Cholesterol Meter reads the test devices and displays the concentrations of CHOL, HDL, TRIG, the calculated value of LDL and the ratio of CHOL/HDL. Use the below diagram to become familiar with all the parts of the meter. - Page 8 Meter Display ® During testing, the Mission Cholesterol Meter will display icons showing the status, options available, and prompts for testing: Battery Icon Memory Indicator Sound Icon Code Date Measurement Units Test Number Test Item Blood Drop Symbol Systolic Blood Pressure...
- Page 9 Yes/No Option: Displays answer to yes/no questions during CHD risk analysis. Calculated CHD is for professional use only. Options for Gender, Smoker or Non-smoker, and MI: Displays answers to questions regarding gender, smoking status and history of heart attack (MI). Calculated CHD is for professional use only.
-
Page 10: Test Devices
® Mission Cholesterol Meter to measure the lipid concentration in whole blood, plasma and serum. Test device appears as shown below: The following test devices are currently available for use with the Mission ® Cholesterol Meter: 3-in-1 Lipid Panel ... - Page 11 Specimen Application For best results, fill the Specimen Application Area with the correct specimen volume (10µL for individual test devices or 35µL for 3-in-1 test devices). Incorrect results may occur if the specimen is not applied correctly or if the Specimen Application Area is not filled with the correct amount, as shown in the pictures below.
-
Page 12: Control Devices
® The Mission Cholesterol CTRL Control Devices are gray and black devices, ® which work with the Mission Cholesterol Meter to ensure the optical system is working properly. After the control device is inserted into the meter, the meter’s optical system detects the color intensity of the reference pad in the control device. -
Page 13: Control Solution
To confirm that the test device and meter are working together properly and that the test is being performed correctly, the ® control solution is applied to the specimen well of a Mission Cholesterol test device that has been inserted in the meter. Refer to the Quality Control... - Page 14 Level 1 Level 2 ® Note: The Mission Cholesterol Control Solution is intended for validating cholesterol testing while using the Mission ® Cholesterol Monitoring System. Both levels of control solutions must be tested and fall within the assigned values printed on the bottles.
- Page 15 Storage and Handling • Store the control solution either refrigerated or at room temperature 2 - 30°C (36 - 86°F). • Do not freeze. • If the control solution has been refrigerated, allow it to warm up to a temperature of 20 – 40°C (68 - 104ºF) before use. •...
-
Page 16: Initial Setup
Section 4 Initial Setup Before testing, ensure the following procedures are followed. Turn on Meter The meter can be operated using the certified AC Adapter or 4 AAA batteries (1.5V). To use the meter with batteries, insert 4 AAA batteries (1.5V) into the battery compartment on the back of the meter. - Page 17 code chip from the box with the code number printed on the test device foil pouch. Results may be inaccurate if the two numbers are not identical. Insert the new code chip into the code chip slot of the meter. It should easily snap into place.
-
Page 18: Meter Setup And Options
Section 5 Meter Setup and Options With the meter turned off, press and hold for 4 seconds to enter the Meter Setup mode, shown below. Press ◄ or ► to display several setup sub-modes: No. SEt Test number setup. The test number can be set from 1 to 99. Optical Check mode. -
Page 19: System Setup
Press ◄ or ► until the correct test number is displayed. To quickly cycle to the desired test number, press and hold ◄ or ►. Press to save and return to the Meter Setup screen. Note: Once the meter reaches test number 99, the next test number will be 1. - Page 20 Hour Setup The second option sets the clock to either 12 or 24 hour mode. Press ◄ or ► to switch between the two settings. Press to save and advance to Date Setup. Date Setup The third option sets the date to Y-M-D, M-D-Y or D-M-Y mode. Press ◄ or ►...
- Page 21 Press to save and enter the Month and Date Setup. Month and Date Setup The month and date will appear at the top of the display separated by a single dash (-), with the month flashing. M will also appear indicating month setup. Press ◄...
- Page 22 Press ◄ or ► until the correct hour is displayed. Press to save and proceed to Minutes. Note: The meter will display AM or PM if the 12H time setting is chosen. Minutes will flash. Press ◄ or ► until the correct Minutes are displayed. Press to save and proceed to Test Number Reset Setup.
- Page 23 CHD Setup Press ◄ or ► to set CHD to either On or OFF. When CHD is set to On, the meter can enter the Coronary Heart Disease risk evaluation. Press save and proceed to Specimen Type Setup. For professional use: Use this function to evaluate the 10-year CHD risk of your patients.
- Page 24 Note: bL means Whole Blood, SE means Plasma and Serum. SE is for professional use only. Press ◄ or ► until Elt is displayed. Press to exit the setup. The screen will briefly go blank and then display the Initial Screen.
-
Page 25: Testing
Section 6 Testing ® Before performing any test, the user should review the Mission Cholesterol Monitoring System’s User’s Manual for detailed instructions. The following steps show how to use each component to measure lipid concentrations. Specimen Collection For self-testing, use only fresh capillary blood from the fingertip. Please refer to Self-Testing on page 23 for details. - Page 26 Self-Testing (Testing with fingertip blood) Wipe away the first drop of blood. Collect capillary blood (10 μL for individual test, 35 μL for 3-in-1 test) using a capillary transfer tube or pipette. When collecting the blood sample into the capillary tube, it is important not to squeeze the bulb and/or cover the air vent.
- Page 27 Blood specimens for the 3-in-1 Lipid Panel or the individual tests can be obtained by using a safety lancet. . (For individual tests only, a lancing device may also be used.) Lancing Device (For individual tests only) Refer to the instructions below for details. For obtaining a drop of blood from the fingertip, adjust the penetration depth on the lancing device to reduce discomfort.
- Page 28 Carefully screw the cover back onto the lancing device. Avoid contact with the exposed needle. Make sure the cover is fully seated on the lancing device. Adjust the puncture depth by rotating the lancing device cover. There are a total of 6 puncture depth settings. To reduce discomfort, use the lowest setting that still produces an adequate drop of blood.
- Page 29 Prior to testing, make sure the patient‘s hand is warm and relaxed before collecting the capillary blood specimen. Use warm water to increase blood flow if necessary. Massage the hand from the wrist up to the fingertip a few times to encourage blood flow. Clean the testing site with an alcohol swab or by washing hands with warm soapy water and then dry the testing site thoroughly.
- Page 30 Note: Make sure the patient’s hand is warm and relaxed before collecting a capillary blood specimen. Use warm water to increase blood flow if necessary. Don’t use an infection swab containing iodine. This can give inaccurate results. Disposal of the Lancet Unscrew the lancing device cover.
-
Page 31: Test Processing
Test Processing Ensure the meter is set up properly, as described in previous sections. Turn the meter on. The screen will briefly display all of the LCD symbols. Observe the LCD at startup to ensure all segments and display elements are turned on. - Page 32 Testing Insert a test device into the Device Channel of the meter in the same direction as the arrow on the test device. Ensure that the test device is inserted all the way to the end of the Device Channel, until the position arrows on the test device are parallel with the two arrows on the Device Holder.
- Page 33 Results will be displayed within 2 minutes. Press ► to view the results. Note: The date in the display will be shown in the form of M-D or D-M according to the mode you previously selected. Remove the used test device. The meter will return to the Initial Screen and is ready for another test device to be inserted so a new test can be performed.
-
Page 34: Coronary Heart Disease (Chd) Risk Evaluation
(CHD) Risk Evaluation Note: This function is for professional use only. This function is not for self-testing use. If CHD is set to On during setup, the Mission ® Cholesterol Monitoring System will automatically evaluate a patient’s 10-year risk of Coronary Heart Disease, based on the results of their 3-in-1 Lipid Panel test. - Page 35 If FRA10 is chosen, Press to enter patient information regarding gender, age, smoker or non-smoker, Systolic Blood Pressure (SBP), and blood pressure treatment (BP TRE).
- Page 36 If PRO10 is chosen, Press to enter patient information regarding age, smoker or non-smoker, Diabetic (DB), Myocardial Infraction (MI), and Systolic Blood Pressure (SBP).
- Page 37 If ACC10 is chosen, Press to enter patient information regarding race (AA: African American, WH: White), gender, age, smoker or non-smoker, Diabetic (DB), Treatment for High Blood Pressure (T SBP), and Systolic Blood Pressure (SBP).
- Page 39 If ACCLF is chosen, Press to enter patient information regarding gender, age, smoker or non-smoker, Diabetic (DB), Treatment for High Blood Pressure (T SBP), and Systolic Blood Pressure (SBP).
- Page 40 Press to enter all the input. The CHD risk ratio will be displayed on the screen. Press and hold to return to the testing screen. For the PRO/FRA methods, the 10-year risk is categorized into three levels CHD<10%, low risk 10%<CHD<20%, medium risk CHD>20%, high risk...
-
Page 41: Data/Communication
Press to transmit the data to an external certified PC. After data transmission is complete, the meter will return to the Setup Menu. Data can also be printed using the Mission ® printer. Results can be printed directly after each test or printed from memory. Refer to the Printer Package Insert for more details. -
Page 42: Memory/Database
Press to enable data deletion, MEM will be displayed. Press until the meter returns to the Setup Menu. Memory/Database From the initial test screen, press ◄ or ► to enter the memory/database. Press ► to enter the EIt screen. Press to return to the testing screen. - Page 43 Press ◄ or ► to view the memory from corresponding tests: both individual and 3-in-1 tests. Press to enter the selected memory screen. The screen will show the latest results. Press ◄ or ► to choose the No. of results and view each record in the date/time sequence.
-
Page 44: Optical System Check
Section 9 Optical System Check Press ◄ or ► from the Setup Screen to select the Optical Check mode, as shown below. Note: The control device is intended to check the optical system. Allow the control devices and the meter to reach operating temperature (15-40°C or 59-104°F) prior to testing. - Page 45 If the meter displays no, check the control device for contamination or damage. If there are any visible signs of damage or contamination, discard the control device and retest using a new device. Press to return to the Setup Screen.
-
Page 46: Quality Control
Control Solution Testing Cholesterol Control Solution testing is performed in a very similar manner to ® blood tests. The Mission Cholesterol Control Solution is used instead of blood. Note: Make sure the control solution and all the test materials reach operating temperatures of 20 - 40°C (68 - 104°F) prior to testing. - Page 47 2. Insert the code chip into the meter. Refer to Coding the Meter in the User’s Manual for details. Make sure the control solution is tightly closed before use. 3. Compare the code number on the code chip with the code number printed on the test device pouch label and ensure the two numbers are identical to avoid inaccurate results.
-
Page 48: Interpreting Results
The results should fall within the range(s) printed on the bottle label and are specific for each lot of controls. If the results fall within the specified control ® range, it indicates the Mission Cholesterol Monitoring System is working correctly and the procedures are being performed properly. -
Page 49: Maintenance
Section 11 Maintenance Proper maintenance is recommended for best results. General Cleaning For best results, the meter should be cleaned after each day of testing. Meter Surface A cotton cloth can be used to clean the surface of the meter. Use a damp cotton cloth if necessary. -
Page 50: Disinfection Process
Note: Do not use bleach or alcohol to clean the Meter Sensor Area. This will cause damage to the meter. Disinfection Process The disinfection process should be performed before each test to prevent potential infectious disease transmissions through bloodborne pathogens. Cleaning Before Disinfection and How to Disinfect Cleaning and disinfection is a two-step process. -
Page 51: Replacing The Batteries
Replacing the Batteries When the battery icon is flashing, the batteries are low and should be replaced as soon as possible. An E-4 error message will appear if the batteries are too low to perform any more tests. The meter will not function until the batteries are replaced. -
Page 52: Precautions
Section 12 Precautions Follow the precautions listed below to ensure accurate results and proper operation of the meter. The protection provided by the equipment may be impaired if used in a manner not defined in this instruction manual. Wear gloves to avoid contact with potentially hazardous biological specimens during testing. -
Page 53: Troubleshooting
Section 13 Troubleshooting Display Causes Solution Ensure the sensor area is clean and that The sensor area is damaged, there are no objects covering the sensor dirty, or blocked when turned on, area. Refer to Maintenance. Restart such as a used test device left in the meter. - Page 54 Display Causes Solution Clean the Meter Sensor: remove Test Strip Holder, then wipe front and back side of holder, as well as Meter Sensor Area, No blood drop symbol flashing blood finally, slide Test Device Holder back into after inserting the test device drop the meter and repeat the test.
-
Page 55: Appendix 1 Meter Specifications
Appendix 1 Meter Specifications Feature Specifications Methodology Reflectance Photometer Test Time ≤ 2 min CHOL: 100-500 mg/dL (2.59-12.93 mmol/L,1 mmol/L=38.66 mg/dL) Measurement HDL: 15-100 mg/dL (0.39-2.59 mmol/L, 1 mmol/L=38.66 mg/dL) Range TRIG: 45-650 mg/dL (0.51-7.34 mmol/L, 1 mmol/L=88.6 mg/dL) Specimen Whole blood, plasma, and serum Specimen 10 μL for individual test;... -
Page 56: Appendix 2 Index Of Symbols
Appendix 2 Index of Symbols Consult instructions For in vitro diagnostic use only for use Catalog # Serial Number Authorized Manufacturer Representative Lot Number Use by Contains sufficient for Store between <n> tests 2 - 30°C (36 - 86ºF) Sterilized using Code Number irradiation Do not discard along... -
Page 57: Appendix 3 Warranty
ACON. Furthermore, ACON assumes no liability from malfunction or damage to meters caused by the use of devices other than devices manufactured by ACON. ACON reserves the right to make changes in the design of this meter without obligation to incorporate such changes into previously manufactured meters.
Need help?
Do you have a question about the Mission and is the answer not in the manual?
Questions and answers