
Summary of Contents for zoomer ZM11.1
- Page 1 User Manual and Warranty North America Edition Model: ZM11.1 Powered Folding Chair www.firststreetonline.com...
-
Page 2: Table Of Contents
1. Introduction………………………………………………………………………………………………………………………………………………………………………. 2. ZOOMER™ Layout Front View ……………………………………………………………………………………………………………………………………… 3. ZOOMER™ Layout Rear View……………………………………………………………………………………………………………………………………………. 4. Safety Warnings Signs……………………………………………………………..………………………………………………………………………………………… 9-10 5. Initial Set Up of the ZOOMER™……………………………………..………………………………………………………………………………………………….. 6. Unfolding and Folding the ZOOMER™………………………………………………………………………………………………………………………………… 12-13 7. Folding the ZOOMER™……………………………………………………………………………………………………………………………………………………….. 14-15 8. Installing the Battery…………………………………………………………………………………………………………………………………………………………. - Page 3 15. Safe Joystick Operation……………………………………………………………………………………………………………………….…………………………… 16. Stationary State………………………………………………………………………………………………………………………………………………………………. 17. LED Display and Joystick Control of the ZOOMER™………………………………………………………………………………………………………….. 23-24 18. Technical Specifications…………………………………………………………………………………………………………………………………………………… 25-27 19. Electromagnetic Interference Warning…………………………………………………………………………………………………………………….……… 20. Reminder Safety Tips………………………………………………………………………………………………………………………………………………………. 21. Weather Conditions to Avoid………………………………………………………………………………………………………………………………………….. 28-29 22. Transporting the ZOOMER™……………………………………………………………………………………………………………………………………..……. 23. Weight Distribution…………………………………………………………………………………………………………………………………………………………...
- Page 4 32. Removing the Battery…………………………………………………………………………………………………………………………………………………… 34-35 33. Over-Discharge Protector…………………………………………………………………………………………………………………………………………….. 34. Lifting the ZOOMER™…………………………………………………………………………………………………………………………………………………… 35. Troubleshooting………………………………………………………………………………………………………………………………………………………….. 37-40 36. Included Components…………………………………………………………………………………………………………………………………………………. Warranty……………………………………………………………………………………………………………………………………………………………………………..
-
Page 5: User Information And Zoomer™ General Information
The ZOOMER™ is a personal electric vehicle, not considered to be a medical device, and has not been submitted to the Food and Drug Administration for review of clearance. The ZOOMER™ is not intended for individuals fully restricted to a seated position. Specifications listed herein are approximates and not always exact and may be subject to change without notice. -
Page 6: Introduction
A Travel Companion. The ZOOMER is not only an excellent travel companion to take with you in the car, but due to its Lithium Ion battery, it is an airline safe mobility device. Just remove the battery from the ZOOMER before you board the plane. Lithium Ion batteries cannot travel in the cargo area of a plane, but the ZOOMER’s standard battery is safe as a carryon item. -
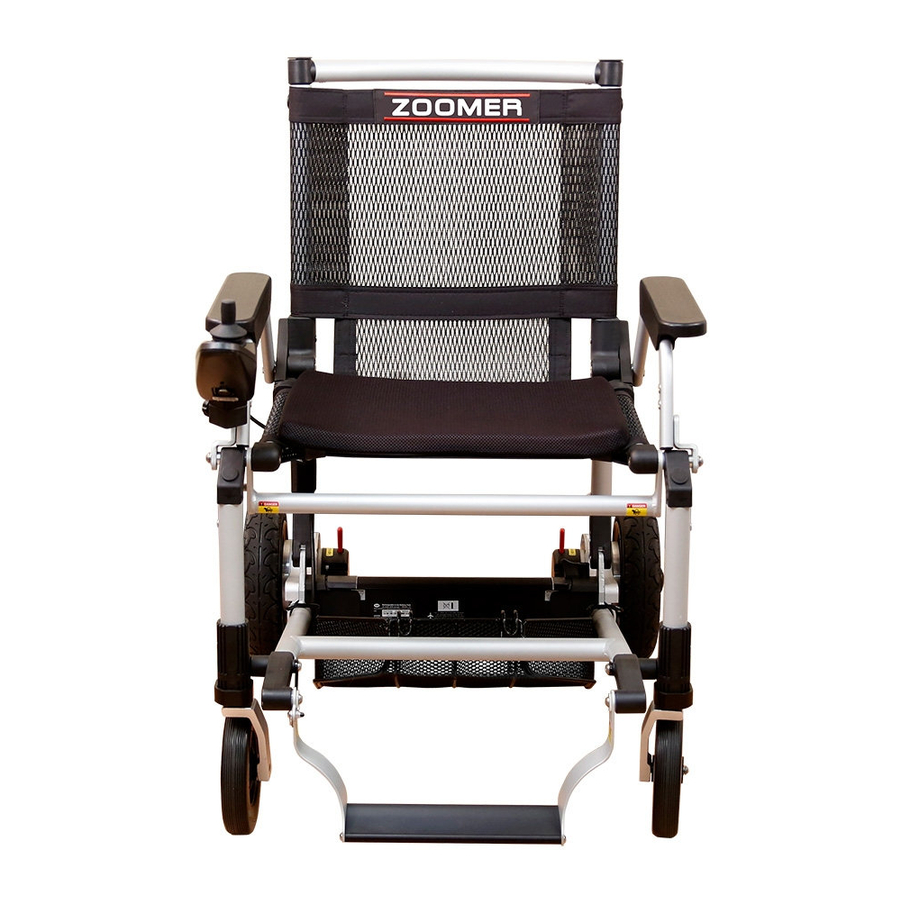
Page 7: Zoomer™ Layout Front View
2. ZOOMER™ Layout: Front View 1. Upper frame 2. Seat back and lower 3. Arm rest 4. Joystick Controller and Dashboard panel seat assembly 5. Front wheel frame 6. Seat Cushion 7. Foot rest 8. Front wheel 9. Rear Wheels... -
Page 8: Zoomer™ Layout Rear View
3. ZOOMER™ Layout: Rear View 10. Folding release cable 11. Anti-tip wheels 12. Electromagnetic brake levers 13. Controller box 14. Battery 15. Motors... -
Page 9: Safety Warnings Signs
4. Safety warning signs The following symbols are used to identify warnings, mandatory measures and prohibited actions. Before using the ZOOMER™ for the first time, please review and understand the signs below. Read and follow the instructions in this manual. - Page 10 Do not expose the battery to high heat for the risk of an explosion. Keep tools and other metal objects away from the battery connectors. It may cause a short circuit damaging the battery or electric shock causing injury. The battery contains flammable substances. Avoid contact with an open flame or sources that create sparks. Avoid transporting the battery with other flammable goods.
-
Page 11: Initial Set Up Of The Zoomer
Step 1: Lay the carton flat on the floor and carefully remove the ZOOMER™ from the box and its packaging. Step 2: Unfold the ZOOMER™ by pulling up on the cable on the back of the chair to disengage the locking pins, while at the same time pulling up on the seat back until the chair is in the fully upright position and the two locking pins click into position. -
Page 12: Unfolding And Folding The Zoomer
6. Unfolding and Folding the ZOOMER™ 1. Pull up on the collapsing cable to disengage the 2 latching pins. 2. Grab the frame at the same time and pull up to unfold the chair. - Page 13 3. Completely unfold the frame of the mobility chair until the 2 pins latch securely into their appropriate holes. Notice how the pins must be engaged into their holes. 4. Loosen the knob labeled “1” on each side of the mobility chair. Then pull the left and right anti-tilting wheels all the way out.
-
Page 14: Folding The Zoomer
7. Folding the ZOOMER ™ 1. Pull up on the collapsing cable to disengage the 2 latching pins. 2. As you continue to pull up on the collapsing cable, press down on the frame to collapse the frame. Continue collapsing the frame until the latching pins engage into their holes. - Page 15 3. Loosen the two knobs labeled “1” and slide the anti-tilting wheels “2” back into the frame. Then retighten the two knobs securely.
-
Page 16: Installing The Battery
8. Installing the Battery Hold the battery as shown and align it with the terminals as indicated in Figure E3. After aligning, slide the battery onto the terminals and downward. Press into the holder as shown in Figure E4. Then rotate the battery's holding knob into the middle position. (Figure E5). -
Page 17: Charging The Battery
9. Charging the Battery The battery is charged by standard AC power (AC 110-220V 50-60HZ). The charging port is located on the bottom of the control panel. Insert the 3 prong connector line into the charging port until the latch clicks indicating the connecter is inserted correctly. (Figure E6). Plug the charger into a 110 volt AC power outlet. -
Page 18: Electromagnetic Brake System
The ZOOMER™’s braking system has two modes: “Drive” and “Free Wheeling” which are labeled as “Lock” and “Unlock”, respectively on the ZOOMER™. Drive or Lock: When the brake lever is in the “Drive” position, the electromagnetic brake system is “On”. When the ZOOMER™ is moving, releasing the Joystick or moving it to a neutral position (center), the ZOOMER™... -
Page 19: Maximum Load Limit
ZOOMER™ the user double check to make sure that the wheels are not in Free Wheel mode and that the rear wheels do not freely turn. Do not step on the foot rest while entering or exiting the ZOOMER™. You should swing it back out of the way to allow you to have your feet on the floor as you... -
Page 20: Control Panel
13. Control panel Power button Press this button to turn on the power. Press again to turn the power off. Press this button to increase the speed of the mobility chair. There are 5 speed levels. Acceleration button “+” Maximum speed: 6 km/h Deceleration button Press this button to decrease the speed of the mobility chair. -
Page 21: Powering On The Zoomer
Powering On the ZOOMER™ After the control panel is mounted (see figure A1) and connected per the assembly instructions, and you are sitting in the ZOOMER , press the power button on ™ the control panel. The panel lights should come on. If not, check to ensure that control cable is correctly connected to the Joystick Controller and the battery is... -
Page 22: Safe Joystick Operation
™ 16. Stationary State When the mobility chair is not in use, the power should be switched off. (see Figure A2) This will help prevent unintentional movement of the ZOOMER ™ accidentally moving the joystick. This will also help prolong the battery charge. -
Page 23: Led Display And Joystick Control Of The Zoomer
Red LED light on the left side flashes Battery needs to be recharged Please charge the battery as soon as possible LED’s light up from left to right in order The ZOOMER has just been turned on ® one time... - Page 24 LED’s light up from left to right in order The mobility chair is still in the charging The joystick will not function when connected again and again. mode. to the charger. This is a safety feature. Activating the anti-theft mode: After switching on the power, press and hold the power button for 4 to 5 seconds. This will turn off the power supply and will activate the anti-theft mode.
-
Page 25: Technical Specifications
18. Technical specifications Specification Size unfolded: length x width x height 33.6 x 25.2 x 35.8 inches (855640910 mm) Size folded: length x width x height 43.9 x 25.2 x 12.6 inches (1115640320 mm) Suggested user weight 300 lb (136kg) maximum Gross weight Weight with battery: 49.8 lbs (22.6 kg) Weight without battery: 45.8 lbs (20.8 kg) - Page 26 Motors Type DC brushless motor Motor power 200 watts (x2) Input voltage 24 volts DC Number of motors 2 units Brake system Electromagnetic brake Braking distance Within 39.4 inches (100 cm) Battery Type Lithium battery Rated capacity 8.7 Ah Output voltage 24 volts DC Controller Type...
-
Page 27: Electromagnetic Interference Warning
Number of wheels 2 wheels 19. Electromagnetic interference warning Exposure to excessive amounts of electromagnetic interference (EMI) may affect the function of the ZOOMER or possibly cause damage to the braking system ™ and control system. Some examples of devices that emit large amounts of EMI radiation are large AC motors, large DC motors, etc. -
Page 28: Reminder Safety Tips
For safety reasons and to help prevent equipment failure, please follow the guidelines below: Do not operate the ZOOMER in the rain, snow or icy conditions. This type of weather can seriously hamper your ability to control the motion of the ZOOMER ™... -
Page 29: Transporting The Zoomer
You could lose traction and therefore lose control of the mobility chair, especially if the surface is an ™ inclined surface. Note: If the mobility chair does accidently get exposed to water (or heavy moisture), remove the battery, wipe the battery and the ZOOMER down with a dry ™... -
Page 30: Weight Distribution
24. Recommended Surfaces and Street Crossing The ZOOMER is designed to operate on dry surfaces such as flooring, level sidewalks, low angle dry inclines, etc. Please do not use the ZOOMER on the sand, ™ ™... -
Page 31: Using The Zoomer™ On A Ramp
It is recommended not to drive on continuous uphill or downhill paths. 27. Operating the ZOOMER™ in Reverse Be cautious and go slow when driving the mobility chair in reverse. Be aware of uneven surfaces and obstacles. Do not drive the ZOOMER backwards on a ™... -
Page 32: Avoiding Stairs, Steps And Escalators
ZOOMER should not be used to travel upstairs, downstairs or on escalators! ™ Doing so could cause serious damage to you and the ZOOMER ™ 29. Battery Safety and Warnings Keep metal tools and other metal items away from the battery terminals. Contact with them may cause a short circuit or an electric shock. -
Page 33: Battery Maintenance
5 to 6 hours to charge. The LED light on the charger will turn green when the battery is fully charged. When not using the ZOOMER for long periods of time you should charge the battery every 2 months to prevent a fully expired battery. Failure to ™... -
Page 34: Over-Discharge Protector
When the lithium battery is close to being exhausted the protector will automatically cut off the circuit, and the controller will stop working. So when you see the red LED light flickering, you need to charge the battery. Once you see the red light flickering, please charge the ZOOMER battery within one week. -
Page 35: Lifting The Zoomer
When lifting the mobility chair, first check to see that the two locking pins are engaged into their holes. Then place your hands on the frame as shown below. Lift the ZOOMER using your legs and keeping your back straight. ™ Important note: This procedure is intended for individuals who are able to lift the weight of the ZOOMER (approximately 50 lbs or 22.6 kg) ™ Lift here... -
Page 36: Troubleshooting
When a problem occurs, refer to the table below for the appropriate flashing light fault code. When a "fault code" LED light is flashing, first shut down the ZOOMER and restart. If the flashing "fault code" LED light is still flashing, please refer to the table ™... - Page 37 Potential Malfunctions Malfunction Explanation Solution for malfunction The left motor Hall sensor is malfunctioning Contact your local dealer for service support. light flashes The right motor Hall sensor is malfunctioning Contact your local dealer for service support. The 2nd light flashes Battery is malfunctioning Charge the battery.
- Page 38 The right motor is malfunctioning Check for a loose terminal connection on the motor. The 5th light flashes The left electric brake is malfunctioning Check whether the left electric brake is in the “Free Wheeling” position. If so, move the left lever to the “Engage Drive” position. Also check for loose terminal connections.
- Page 39 - contact your local dealer for service. Battery power display The ZOOMER is in the anti-theft mode Press the power button to turn on the ZOOMER . Then press the acceleration ™ ® button “+” 3 times within 10 seconds to unlock the mobility chair.
-
Page 40: Included Components
36. Included Components Name Quantity Remarks Mobility Chair Lithium battery Joystick controller Charger Owner’s manual... -
Page 41: Warranty
Boomers and Beyond, Inc.’s sole obligation and your exclusive remedy claims is through the dealer from which the ZOOMER was purchased. This warranty gives you under this warranty shall be limited to such repaired or replaced product. Contact firstSTREET for specific legal rights and you may also have other legal rights which may vary from place to place.
Need help?
Do you have a question about the ZM11.1 and is the answer not in the manual?
Questions and answers
I have replaced battery and the controller. The 7th light is on. Ziomer will not do anything
The 7th light indicates a controller malfunction. Since the controller has already been replaced, the issue may be caused by a loose terminal connection or another underlying electrical problem. It is recommended to check all terminal connections and, if the issue persists, contact a local dealer for maintenance.
This answer is automatically generated
the left rear wheel will not turn when trying to go forward
The left rear wheel of the Zoomer ZM11.1 may not turn when going forward due to one of the following reasons:
1. The electromagnetic brake is in the "Free Wheeling" position. In this mode, the wheel will not move unless the joystick is used and the brake is engaged.
2. A malfunction in the left motor or its connections. This could include a loose terminal or a faulty Hall sensor.
3. The left electric brake is malfunctioning or is still in the “Free Wheeling” position.
Check the brake lever position, ensure all motor connections are secure, and refer to fault code indicators for further diagnosis.
This answer is automatically generated