Advertisement
Table of Contents
- 1 Table of Contents
- 2 Important Safety Information
- 3 Components
- 4 How the Fence Works
- 5 How the Remote Trainer Works
- 6 Fence Transmitter
- 7 Handheld Remote
- 8 Collar Receiver
- 9 Contact Probe Wrench
- 10 Setting up the Fence System
- 11 Examples of Various Dog Fence Layouts
- 12 Fence System Training Guide
- 13 Setting up Multi-Dog Training
- 14 Troubleshooting Guide
- Download this manual
Advertisement
Table of Contents

Related Manuals for Extreme Dog Fence Contain and Train

Summary of Contents for Extreme Dog Fence Contain and Train
- Page 1 1-800-305-6116 1-800-305-6116 1-800-305-6116 1-800-305-6116 electric dog fence Remote Trainer-Combo Owner’s Manual Contain and train www.extremedogfence.com...
- Page 2 CONGRATULATIONS Register Your New eXtreme Dog Fence® Containment System within 30 Days of Purchase Activate your 10 Year Warranty Activate Your 5 Year Warranty You will need the following information ready to register: 1. Order # 2. Date of Purchase 3.
- Page 3 Train. We know that your pets are close to your heart, and you are doing what you can to keep them safely contained in your yard. The eXtreme Dog Fence Contain and Train is both simple to install and effortless to operate. We have designed our fence to be both, reliable and effective while allowing your dog the most out of your usable yard space.
-
Page 4: Table Of Contents
Table of contents Important Safety Information ......Components ........How the Fence Works . -
Page 5: Important Safety Information
Important Safety Information Explanation of Attention Words and Symbols Used in this Guide This is the safety alert symbol. It is used to alert you to potential personal injury hazards. Obey all safety messages that follow this symbol, to avoid possible injury or death. WARNING WARNING, used with the safety alert symbol, indicates a hazardous situation which, if not avoided, could result in serious injury or death. - Page 6 You will have to reset the GFCI to restore power. • This eXtreme Dog Fence brand underground dog fence is NOT a solid barrier. The system is designed to act as a deterrent to remind dogs, by stimulation, to remain in the established boundary. It is important that you reinforce training with your dog on a regular basis.
- Page 7 NOT rely solely upon the eXtreme Dog Fence brand underground dog fence to confine your dog. eXtreme Dog Fence shall not be liable for any property damage, economic loss or any consequential damages, sustained as a result of any animal crossing the boundary.
- Page 8 You may need to trim the hair in the area of the contact probes, or switch to longer contact probes to ensure consistent contact with the skin. Never shave a dog’s neck, as this may lead to a rash or infection. CAUTION To prevent an unintended correction: •...
- Page 9 • Consult the dealer or an experienced radio/TV technician for help Caution: Changes or modifications to any component, not expressly approved by eXtreme Dog Fence, could void the user’s authority to operate this equipment. Congratulations! You have purchased the eXtreme Dog Fence brand underground containment system and handheld remote trainer combo solution.
-
Page 10: Components
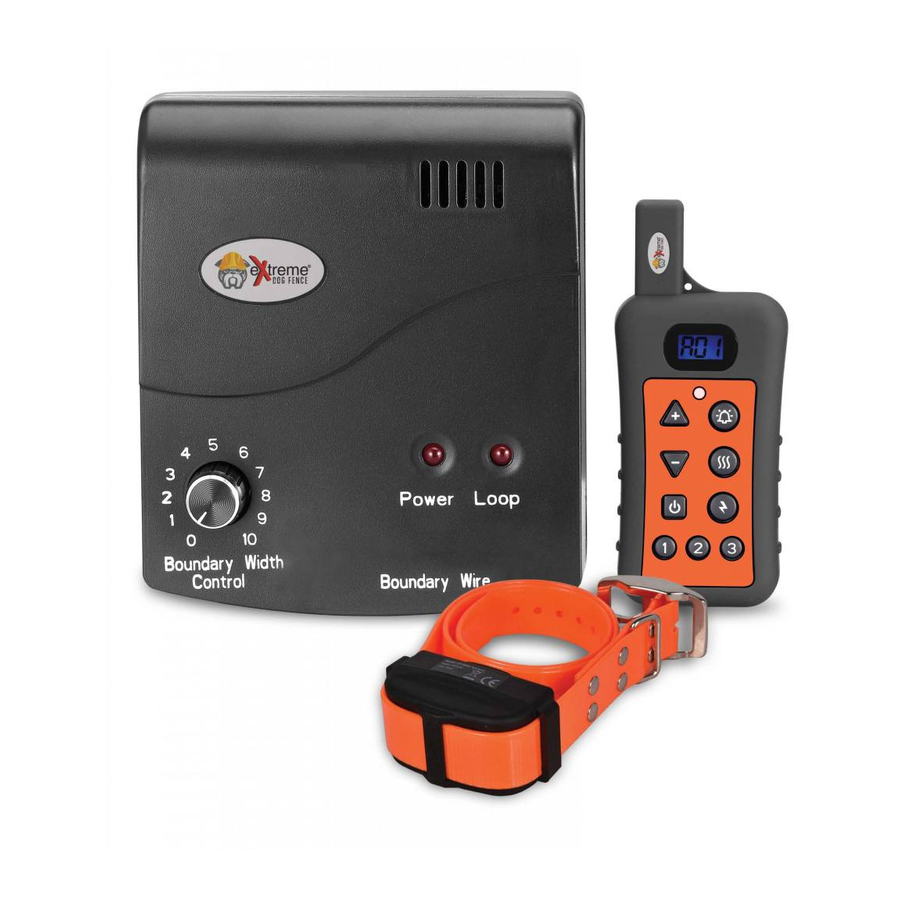
Components Handheld remote Resistor Collar receiver Test light Installation/training manual Contact probe wrench Lanyard Long contact probes Fence transmitter 5V DC adaptor Boundary wire 18V DC adaptor Training flags USB cable Wire splice kits... -
Page 11: How The Fence Works
How the Fence Works The eXtreme Dog Fence Contain and Train system has been tested and proven safe, comfortable and effective for dogs from 40 to 180 pounds. To begin, you will call 811 and schedule them to come out and mark all of your underground utilities (which will help you avoid setting up your wire where you will get interference). -
Page 12: How The Remote Trainer Works
to achieve maximum range. Terrain, weather, vegetation, vehicle, buildings, transmission from other radio devices, and other factors may affect the range of your remote trainer. How the Remote Trainer Works Charge up the handheld remote and collar(s) for 8 hours, initially. Future charging should take no more than 2 hours. -
Page 13: Fence Transmitter
Fence Transmitter Power Jack Power Light Loop Indicator Light Boundary Width Boundary Wire Terminals Control Switch Boundary Width Control Dial This dial allows you to adjust the signal field width, which is the combination of warning zone and vibration and static correction zone. Boundary Wire Terminals These terminals are where the boundary wire connect to the fence transmitter in order to form a continuous loop, defining the containment... - Page 14 Power Light This light indicates if the system is on or off. If the light is illuminated, the system is on and functioning. Loop Indicator Light This light indicates whether or not the boundary wire is forming a complete loop, enabling the signal to be transmitted. If the light is glowing, a continuous loop has been formed.
-
Page 15: Handheld Remote
Handheld Remote Antenna LCD display LED Light Buzz Button Stimulation Level Adjustment Button Vibration Button Static Shock On/Off Button Button Dog Selection Button DC Jack Cover Handheld Remote Key – These buttons are the stimulation adjustment settings. Press up or down to adjust the correction intensity and vibration from level 1 through 10. - Page 16 dog receives the stimulation by pressing the channel buttons 1, 2, or 3 at the bottom of the remote. To switch the power off, hold the On/Off button for 2 seconds and the power light indicator will switch off. This button initiates the no- stimulation warning beep. This button initiates the vibration warning.
-
Page 17: Collar Receiver
Collar Receiver LED Light Contact Probe This indicates the working status, Choose the short or longer contact low battery, and charging status probes to match your dog’s coat type DC Jack Cover On/Off Button To charge, open the Press and hold for 4 seconds to power off the receiver. -
Page 18: Contact Probe Wrench
Switch On/Off Single Mode and Dual Mode Single Mode: Fence function only. When collar receiver is powered on, the LED will flash twice every 5 seconds. Dual Mode: Fence and remote trainer function. When collar receiver is powered on, the LED will flash once every 5 seconds. Changing Modes: The functional mode can be changed by pressing the power button on the collar receiver until the LED light... -
Page 19: Setting Up The Fence System
Setting Up The Fence System In order to avoid any unnecessary frustration, please ensure that you follow all the steps required for fence setup: 1. Identify Underground Utilities Call 811 and schedule having your underground utilities marked by your local utility companies. They will come out and flag the utility lines, typically within 2-3 days. - Page 20 Important: Running the boundary wire parallel to + within 4-5 feet of electrical wires, neighboring containment systems, telephone wires, television or antenna cables, or satellite dishes will cause an inconsistent signal. If you must cross any of these, do so at a 90 degree angle to avoid these inconsistencies.
- Page 21 will be faint, as it’s designed for a dog’s ears, but you should hear it in a moderately quiet environment. If the collar is not activating at your desired range, use the Boundary Width Control dial to adjust the signal field. Turning clockwise will increase the distance from the wire, while turning counterclockwise to decrease the distance.
- Page 22 your traditional fence is metal but not galvanized, it could interfere with the transmitter’s signal field and you should try to avoid proximity to the metal fence by at least 4’ (more, if you want a wide signal field). 9. Place the Training Flags The training flags are visual reminders for your pet, indicating where the warning zone begins.
-
Page 23: Examples Of Various Dog Fence Layouts
Examples of Various Dog Fence Layouts Wire separated by 2-4 feet to avoid cancellation Twisted cable Transmitter Transmitter Back and Front Double Loop Wire separated by 2-4 feet to avoid cancellation Gutters Back Yard Back Yard Transmitter Transmitter Pinch Hourglass Wire separated by 2-4 feet to avoid cancellation... - Page 24 Important: If you are experiencing any issues with collars beeping or vibrating randomly when they are not near the wire perimeter, this may be an interference issue caused by your perimeter setup and you need to add a resistor unit as per instructions below to rectify the situation.
-
Page 25: Fence System Training Guide
To make the training fun—so your dog will enjoy staying and playing on your property. Completely trusting your dog with his eXtreme Dog Fence® will take place over the course of about 1-3 weeks. The training is a small part of this process. - Page 26 • A training session includes putting the eXtreme Dog Fence® collar on your dog, making sure that the collar has the proper fit (high on the dog’s neck) and is making contact with the dog’s skin.
- Page 27 boundary, but there is no chance of correction. You can introduce a correction level (“1”) in lesson 2 of the training. Put the electronic training collar on your dog and make sure the wall mount transmitter is turned on. The first lesson is to introduce your dog to the boundary and to help him/ her understand to back away from the fence when the warning tone is heard.
- Page 28 For the next lesson, you will need to introduce the static correction to your dog. Change the collar’s correction level from “00” (beep only) to “01” (the lowest static correction level). See “Setting Up The Fence System” on page 19 for instructions. With your dog still on a lead, walk to the boundary with your dog.
- Page 29 This lesson teaches your dog that he must resist all temptations to leave the yard. You can’t assume that if your dog won’t chase a ball out of the yard, he won’t chase a bicycle or your favorite neighbor. Interesting distractions you can employ can be anything that your dog could get excited about.
- Page 30 Lesson 5: Off Lead Unsupervised When your dog resists all manner of distractions, both on and off the lead, he can be left unattended in the yard. Keep a close eye on your dog for two weeks, from inside the house. Ensure that your pet is not conscious of your watchful eye.
- Page 31 Dog Pass Through Fence System Mode Our eXtreme Dog Fence Contain and Train fence system allows you to set up safe mode, allowing your dog to pass through the fence without...
-
Page 32: Setting Up Multi-Dog Training
Setting Up Multi-Dog Training Our eXtreme Dog Fence Contain and Train remote trainer allows you to expand your system into a multi-dog training solution by simply purchasing additional collar receivers and programming them to work with your system. - Page 33 Step 3: Press and hold the button and button at the same time, until the digital number on the LCD display begins changing automatically, then release. (The numbers changing will look something like “08, 09, 10, 11…”, increasing automatically.) Step 4: Place the collar receiver within 1-3 inches of the remote and then press the dog selection channel button of your preference.
- Page 34 Step 4: Place the unmatched collar receiver within 1-3 inches of the transmitter. Step 5: Press and hold on the dog selection channel button of your choice. Press and hold to match the collar receiver as the #1 dog, press and hold to match the collar receiver as the #2 dog, or press and hold to match the collar as the #3 dog.
- Page 35 Setting the stimulation level Your remote trainer has many levels of intensity, so you can find the best level for your dog’s temperament. You may also select either shock or vibrate stimulation, depending on your dog’s temperament and your training purposes. –...
- Page 36 To cycle between Single Mode and Dual Mode, do the following: Press and hold the collar receiver’s power button (while the collar is powered up) until the LED lights up red, and immediately release.” Your collar receiver will now be in the alternate mode, indicated by the LED flashing either once (for Dual Mode) or twice (for Single Mode), every 5 seconds.
- Page 37 The green LED light will replace the red light when the collar receiver is fully charged, but always make sure you charge it for 2 hours at a time (8-10 hours before first use), to make sure it is fully charged even if the light is showing green.
-
Page 38: Troubleshooting Guide
Troubleshooting Guide Problem #1: No stimulation when remote trainer button is pressed • The collar receiver has not been activated. Remember that the collar receiver must be turned on before use. • The collar receiver has not been set to your remote trainer. Follow the instructions above for directions. - Page 39 Problem #6: The collar receiver doesn’t appear to be receiving any signal, or doesn’t work at all • Check the collar receiver on/off button, make sure the collar receiver is turned on. • Check the remote trainer battery, it’s power may be low. •...
- Page 40 1-800-305-6116 www.extremedogfence.com support@extremedogfence.com...
Need help?
Do you have a question about the Contain and Train and is the answer not in the manual?
Questions and answers