Table of Contents
Advertisement
Advertisement
Table of Contents

Summary of Contents for Transtech PQI 301
- Page 1 Pavement Quality Indicator Model 301 Operators Handbook...
-
Page 2: Table Of Contents
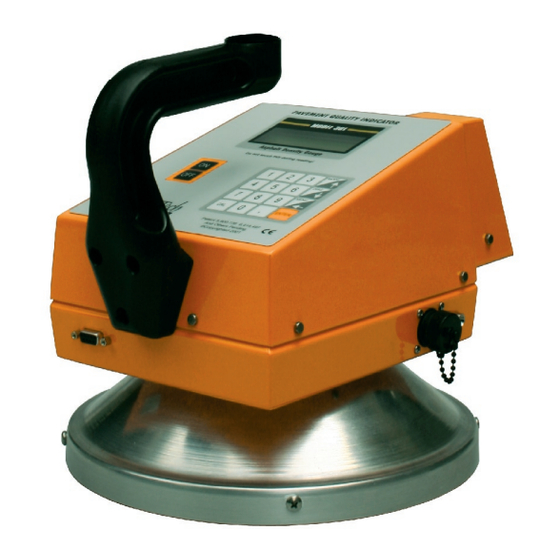
Table of Contents 1.0 Introduction 1.1 Asphalt Pavement Quality Indicator™ Features 1.2 Purpose of this Handbook 1.2 Purpose of this Handbook 1.2 Purpose of this Handbook 1.3 Application Summary 1.3 Application Summary 1.4 Safety 1.4 Safety 2.0 Controls and Components 2.1 External Controls and Components 2.2 Receipt 2.2 Receipt... -
Page 3: Introduction
1.2 Purpose of this Handbook This handbook is intended to be both a training manual and a reference source for the operation, care and maintenance of the TransTech Pavement Quality Indicator. You must read through the entire manual completely to familiarize yourself with the unit’s features, controls and operating modes before starting to... -
Page 4: Safety
1.4 Safety Every effort has been made to make the Pavement Quality Indicator convenient to use and inherently safe. The PQI uses no nuclear elements, and is instead based on a safe, low-voltage direct current electrical measurement techniques. Like any instrument, however, the user should exercise care and common sense in its use to prevent mishaps. -
Page 5: Receipt
2.2 Receipt The PQI shipment package includes the items listed below. Report any shipping damage to the carrier. Contact TransTech Systems Inc. Customer Service if any of the parts are missing. • One storage case • Operating handbook. • One PQI unit . -
Page 6: Operation Of The Pqi Unit
PQI unit is ready to do or indicates that a reading is being taken or that more key setting information is needed from the operator. Pressing a key causes the PQI to beep indicating that the keystroke has been entered. TransTech Systems PQI V3.3ae1 Initializing………... - Page 7 Figure 3.2 Keypad A summary of the keypad codes used to set date and time, change measurement modes, enter values for the Maximum Theoretical Density (MTD) value and enter data are shown below. Each key function is discussed in more detail in the following sections of this handbook.
-
Page 8: Starting And Self Test
3) 9-15 mm (Top) B. The PQI will prompt the user for the correct unit of measurement either inches or mm. The PQI 301 asks the user to input the depth of the pavement being laid out by the paver. -
Page 9: Setting The Date And Time
1) Date/Time 2) Mix Information 3) Displayed Units ENT) Exit (Scroll) D. Press the Down arrow to show the second MAIN MENU page. 4) Data Log 5) View Parameters 6) Remote Menu ENT) Exit (Scroll) E. Press ENT) Exit or (Scroll) Press the Down arrow to return the display to the first page of the MAIN MENU as above. - Page 10 The DD is the second portion of a two digit day indication with a value from 01 to 31. The YYYY is the third portion of the date representing a four digit year. For example, 1999, 2000 or 2001. B. Notice the flashing cursor beneath the MM letters. Using number keys enter the value for the current month, 01, 02, etc.
-
Page 11: Setting The Mix Information
C. The underline cursor has moved to the MM letters. Use the number keys to enter a new minute value. Using the ← (backspace) key will move the cursor between the two paces so that the minute value can be changed if a mistake is made. - Page 12 Set MTD (150.0 Lb/CuFt) New: C. At this display, if the ENTER key is pressed a 0.0 MTD value will occur and the display will return to the Main Menu. D. Use the keypad to enter a new 4 digit MTD value. At this time the ← key can be used to back space and change any of the digits.
-
Page 13: Changing Displayed Units
At this display, choose option 1,2, or 3 depending on the type of pavement/stone size being used. After choosing an option, the display will return to the Mix Information Menu. Pressing ENTER returns the PQI to the Main Menu Screen 1) Date/Time 2) Mix Information 3) Displayed Units... -
Page 14: Calibration
3.6 Calibration Calibration is necessary for accurate and consistent readings. The PQI must be calibrated for each asphalt mat at each job site. The PQI determines HMA density by measuring a property of the HMA mat and comparing it to a measurement of that property at a known density. The property that the PQI measures varies for different HMA mixes. - Page 15 Normal Mode 3.6.1 Preparation Pick a location on the asphalt that is dry. Designate an area approximate 10 feet long and 5 feet wide on the asphalt mat. Divide the area into five data locations. See Fig. 3.6.1. 3.6.2 Calibration Readings Use the PQI in the Single Reading Mode.
- Page 16 3.6.3 Calibration Comparison A. Arrange to have physical core samples taken from the center of each marked circle location in the 10 foot strip. B. Enter the density value from each core sample on the data table. C. Calculate the numeric difference between the average PQI readings and the core density lab reports.
- Page 17 After entering the adjustment, the following screen will be displayed to confirm your entry. The adjustment amount you entered will be shown (the value will be negative if you said that the PQI was reading too high), along with the new offset value.
- Page 18 One Point Method Place PQI on Unrolled Mat & Press ENT At this point, you should place the PQI on a fresh unrolled portion of the mat, press the ENT key, and remove your hand from the PQI. Follow the pattern in figure 3.6.2 in order to obtain 5 readings.
-
Page 19: The Operating Modes
Manual Slope (Factory Use Only) The Manual Slope Method allows you to type in a numeric value for the slope calibration constant. This is especially useful when reusing a mix that was previously calibrated because you can simply reenter the slope that was previously used. - Page 20 Continuous Mode [B] Batt: 12.7V H2O: 3.2 187.6 F D: 156.5 Lb (87.8%) Example of Continuous Mode Screen Line 1: Always reads “Continuous Mode”. [ ] Indicate pavement type selected. Line 2: Displays the battery voltage. A fully charged battery will usually read approximately 13.8 V and the voltage will decrease as the battery is discharged.
- Page 21 Single Mode Press ENT to Read Example of Single Mode Screen 3.7.3 Average Reading Mode The average reading mode allows the PQI to perform calculations to determine the average density of five readings from one location on the mat. This mode allows the operator to select data logging of recorded averages.
- Page 22 Avg Mode (5) ENT) Continue H2O: 3.2 187.6 F D: 155.5 Lb (87.0%) Log the last avg? (23 points in log) 1) Yes 2) No Logging the average allows the user to enter a station location. For example; the Station Number from a site map may be give as “300 + 050.“ Enter 300 as the first# press Enter, enter 50 as the second#.
- Page 23 Press Key 4 once to display the DATA LOG CONTROL screen 1) Clear Data Log 2) View Data Log ENT) Exit Warning!!!! Pressing key 1 will clear all the readings from the Data Logger Press key 2 to view all the data in the data log on the PQI display screen. Data Log Size: 22 Up/Down to select ENT to exit...
- Page 24 The first screen you will see in Segregation Mode appears as follows: Segregation Mode 1) Read 2) Calc. The code at the end of the first line tells which location and reading are about to be performed. For example, the “1A” on the previous screen indicates that you are at the first location and are taking the first, or ‘A’, reading there.
-
Page 25: Moisture Correcting & Temperature Correction
From this screen you can press ‘1’ to display the lowest density reading, highest density reading, average density, and each of the individual readings. (These readings can also be transferred to a personal computer using the PQI’s Remote Mode). Pressing ‘2’ will complete the set of readings and display the starting screen with the location/reading reset to ‘1A’. -
Page 26: Power Save/Auto Shutoff
3.9 Power Save Mode/Auto Shutoff The PQI Model 301 has a built in power saving mode when using the PQI in the Continuous Operating Mode, if no key is pressed after approximately 5 minutes the unit will go into a power saving mode. Pressing any key will “Wake” the PQI up for continued use. -
Page 27: Routine Operation
Once connected, you may press any of the following one-letter (upper or lower case) commands: C: Clear (erase) the PQI’s Data Log N: Print the number of entries in the PQI’s Data Log L: Print all Data Log entries in a readable format X: Print all Data Log entries in a spreadsheet-readable format so the data can be easily imported into a spreadsheet such as Microsoft Excel. - Page 28 Watch for suspicious readings If a reading seems unusual or suspicious, check for possible measurement errors (dirty surface, wet surface, low battery voltage) and retake the reading. Best results are obtained when moisture levels for a series of readings are kept relatively constant.
-
Page 29: Maintenance And Trouble Shooting
6.0 Maintenance and Trouble Shooting 6.1 General Care and Maintenance The PQI has been designed to require a minimum of maintenance or service. Normal care in use should insure long and trouble free operation. The bottom of the sensing probe is protected by a durable bottom. This material was chosen as it is resistant to adhesion of pavement particles. -
Page 30: Warranty
No warranty of merchantability or of fitness for purpose shall apply. Unauthorized service shall void this warranty. Factory authorized service and replacement items may be obtained directly from TransTech’s factory or through an authorized representative. For further information contact TransTech Customer Service: Telephone... -
Page 31: Measurement Tables
8.0 Measurement Tables Company Name Date Job Site Asphalt Mix MTD Value Core Comparison Calibration Work Sheet PQI Readings Position Position Position Position Position Position Location1 Location1 Location1 Location1 Location1 Location1 Location2 Location2 Location2 Location2 Location2 Location2 Location3 Location3 Location3 Location3 Location3 Location3... - Page 32 PQI 301 Two Point Calibration Worksheet FACTORY USE ONLY!!!!! Enter MTD in PQI and record here Display the Setup Menu either by * Pressing ‘1’ for “Setup Menu” at the Startup Menu or * Pressing the ‘Menu” key while in any Run Mode 2.
- Page 33 Worksheet to Calculate MTD Density Enter Maximum Theoretical, Targets rice gravity in (A) Lab values are commonly in gcc ( i.e. 2.54) Convert to lbft pounds per cubic foot ( i.e. 158.50) (A) x 62.4 Enter Density Target (B) In PQI “See Entering MTD in Manual”...
-
Page 34: Faq's
Can I use the PQI 301 on soils, or stone base? At this time the PQI 301 is only designed for use on Asphalt Pavement. How can I charge the PQI 301 in my car? We suggest that you purchase a 12 volt DC to 120 volt AC power inverter from a local retailer and plug the PQI charger into the inverter. - Page 35 Replacement Parts Order parts online at www.transtechsys.com/opencart 4000-0021 Thermal Printer DC Vehicle Cord 8000-0039 PQI 301 Mobile Thermal Printer 2000-0002 Thermal Printer Paper 1400-0028 SDG 200 StrongHold Carry Case 7500-0235 SDG 200 Extension Handle Kit 8000-0032 PQI 301 Test Block...
- Page 36 ����������������� ��������������������� ������������������������� ����������������� ��������������������������������� ������������������������� ����������������������������������� ������������...
Need help?
Do you have a question about the PQI 301 and is the answer not in the manual?
Questions and answers