Table of Contents
Advertisement
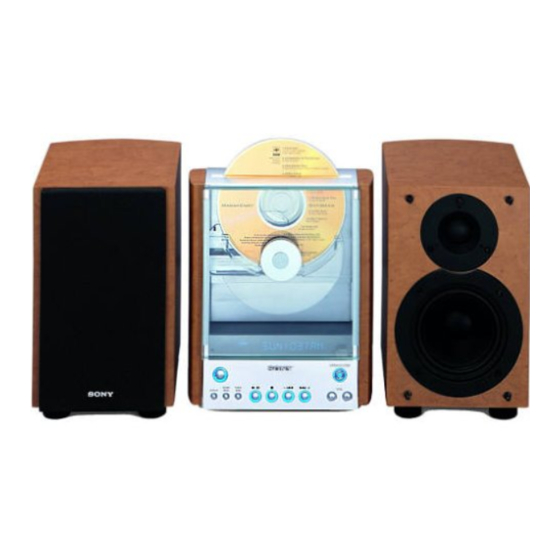
Compact
Component
System
Operating Instructions
Owner's Record
The model and serial numbers are located on the rear of the system. Record the serial
number in the space provided below. Refer to them whenever you call upon your Sony
dealer regarding this product.
Model No.
CMT-EX1
©1999 Sony Corporation
3-867-450-13(1)
Serial No.
Advertisement
Table of Contents

Related Manuals for Sony CMT-EX1


Summary of Contents for Sony CMT-EX1
-
Page 1: Operating Instructions
Operating Instructions Owner’s Record The model and serial numbers are located on the rear of the system. Record the serial number in the space provided below. Refer to them whenever you call upon your Sony dealer regarding this product. Model No. - Page 2 WARNING To prevent fire or shock hazard, do not expose the unit to rain or moisture. To avoid electrical shock, do not open the cabinet. Refer servicing to qualified personnel only. Do not install the appliance in a confined space, such as a bookcase or built-in cabinet.
-
Page 3: Table Of Contents
Table of Contents Getting Started Step 1: Hooking up the system ... 4 Step 2: Setting the time ... 6 Step 3: Presetting radio stations ... 7 Saving the power in standby mode ... 8 Basic Operations Playing a CD ... 9 Listening to the radio ... -
Page 4: Getting Started
Getting Started Step 1: Hooking up the system Perform the following procedures 1 to 5 to hook up your system using the supplied cords and accessories. The front cover is made of tempered glass. Please remember to handle this unit carefully. Rear cover Remove the rear cover. -
Page 5: Inserting Two R6 (Size Aa) Batteries Into The Remote
Connect the AM antenna. Set up the AM loop antenna, then connect it. Connect the white cord to the U terminal, and the red cord to the other terminal. AM loop antenna Note Keep the antenna away from the speaker cords to prevent noise. -
Page 6: Step 2: Setting The Time
Step 2: Setting the time You must set the time before you can use the timer functions. The clock is on a 24-hour system for the European model, and a 12-hour system for other models. The 24-hour system model is used for illustration purpose. -
Page 7: Step 3: Presetting Radio Stations
Step 3: Presetting radio stations You can preset the following number of stations: – 20 for FM, 10 for AM. Press ?/1 to turn on the system. Press TUNER/BAND repeatedly until the band you want appears in the display. Each time you press the button, the band changes as follows: FM y AM Press TUNING MODE repeatedly until... -
Page 8: Saving The Power In Standby Mode
Step 3: Presetting radio stations (continued) To change the AM tuning interval (except for European model) The AM tuning interval is factory-set to 9 kHz (10 kHz in some areas). To change the AM tuning interval, tune in any AM station first, then turn off the power. -
Page 9: Basic Operations
Basic Operations Playing a CD To turn on the system, press ?/1 . "/1 (Power) > ./> OPEN/ CLOSE CD H Touch Z (or press OPEN/CLOSE on the remote) to raise the disc tray. Place a CD vertically in the tray. VOL –/+ "/1 (Power) To lower the disc tray, touch Z (or press... -
Page 10: The Cd Player
Playing a CD (continued) Do this Press x. Stop play Press NX (or S on the Pause remote). Press again to resume play. Press ./> repeatedly Select a track until you find the desired track. Find a point in Press and hold m/M a track during play, and release it at the desired point. - Page 11 Press TUNER/BAND repeatedly until the band you want appears. Each time you press the button, the band changes as follows: FM y AM AUTO TUNED STEREO Press TUNING MODE repeatedly until “PRESET” appears. PRESET TUNED STEREO Press l/L to select the desired station’s preset number.
-
Page 12: The Cd Player
The CD Player Playing the CD tracks in random order You can play all the tracks on a CD in random order. Press FUNCTION repeatedly until “CD” appears. Press CD PLAY MODE repeatedly until “SHUF” appears. Press CD H. Shuffle Play starts. “;” appears, and all the tracks play in random order. -
Page 13: Programing The Cd Tracks -- Program Play
Programing the CD tracks –– Program Play You can make a program up to 24 tracks in the order you want them to be played. Press FUNCTION repeatedly until “CD” appears. Press CD PLAY MODE repeatedly until “PGM” appears. Press l/L until the desired track number appears, then press ENTER. -
Page 14: Playing The Cd Tracks Repeatedly -- Repeat Play
Playing the CD tracks repeatedly –– Repeat Play You can repeat a CD in normal play, Shuffle Play and Program Play. Press FUNCTION repeatedly until “CD” appears. Press REPEAT during play until “REP” or “REP 1” appears. REP: For all the tracks on the CD; Play mode Repeat Normal... -
Page 15: Using The Cd Display
Using the CD display You can check the total number of tracks, the total playing time, and the remaining time of the track or the CD. When a CD TEXT disc is loaded, you can check the information stored on the CD, such as the titles or artist names. -
Page 16: Other Features
Other Features Generating a more dynamic sound The Dynamic Sound Generator (DSG) automatically enhances your music to produce a more powerful sound. , Press DSG. Each time you press the button, the display changes as follows: t DSG 1 t DSG 2 t DSG OFF When DSG is ON, “DSG”... -
Page 17: Using The Radio Data System (Rds)
Using the Radio Data System (RDS) (European model only) What is the Radio Data System? Radio Data System (RDS) is a broadcasting service that allows radio stations to send additional information along with the regular program signal. Note RDS may not work properly if the station you have tuned in is not transmitting the RDS signal properly or if the signal is weak. -
Page 18: Waking Up To Music - Daily Timer
Falling asleep to music (continued) To check the remaining time Press SLEEP once. To change the remaining time Press SLEEP repeatedly to select the time you want. To cancel the Sleep Timer function Press SLEEP repeatedly until “OFF” appears. You can use the Sleep Timer, even if you have not set the clock. -
Page 19: To Cancel The Timer
Press +/– repeatedly until “TIMER SET” appears then press ENTER. The hour indication flashes. Set the time to start playback. Press +/– to set the hour, then press ENTER. The minute indication flashes. Press +/– to set the minute, then press ENTER. -
Page 20: Optional Components
Optional Components Connecting audio components To enhance your system, you can connect optional components. Refer to the instructions of each component. To connect optional components, remove the small rear cover first. Connecting an MD deck for digital recording You can record from CD into the MD deck digitally by connecting an optional cable (not supplied). -
Page 21: Connecting Headphones
Connecting headphones Connect headphones to the PHONES jack. PHONES jack Listening to the sound of connected components Prepare the audio components. Press FUNCTION repeatedly until “TAPE” appears. Each time you press the button, the function display changes as follows: t TUNER t TAPE t CD To attenuate the distortion from the connected components You can change the audio input level for the... -
Page 22: Recording A Cd On An Md/A Tape
Recording a CD on an MD/a tape For the operations of the connected components, refer to the instructions of each component. Prepare the recording component for recording. Press FUNCTION repeatedly until “CD” appears. Start recording. Press CD H. Play starts. Connecting external antennas Remove the rear cover and connect an external... -
Page 23: Additional Information
Important If you connect an external antenna, connect the ground wire and the AM antenna to the U terminal. To prevent a gas explosion, do not connect the ground wire to a gas pipe. Additional Information Precautions The nameplate is located on the bottom exterior. On safety •... -
Page 24: Troubleshooting
Remove the CD and leave the system turned on for about 2 hours until the moisture evaporates. If you have any questions or problems concerning your system, please consult your nearest Sony dealer. On the speaker system This speaker system is magnetically shielded and can be used near TV sets. - Page 25 CD Player The CD cannot be read. • The CD was not placed in the disc tray properly. Place a CD vertically in the tray. The CD will not eject. • The CD has tape, stickers, or paste on it. The CD will not play.
-
Page 26: Specifications
Specifications Amplifier section For the U.S. model AUDIO POWER SPECIFICATIONS POWER OUTPUT AND TOTAL HARMONIC DISTORTION: With 4 ohm loads both channels driven, from 70 – 20,000 Hz; rated 10 watts per channel minimum RMS power, with no more than 0.9% total harmonic distortion from 250 milliwatts to rated output. - Page 27 Speaker Speaker system 2-way, bass-reflex type Speaker units Woofer: 9 cm (3 in) dia., cone type Tweeter: 2 cm ( in) dia., balanced drive Impedance 4 ohms Dimensions 216 183 mm (w/h/d, incl. projecting parts and controls) Mass Approx 1.8 kg (3 lb 15 oz.) net per speaker General Power requirements...
-
Page 28: Index
DSG (Dynamic Sound Generator) 16 H, I, J, K Hooking up optional components 20 the antennas 5, 22 the speaker 4 Sony Corporation Printed in China Listening to the radio 10 the sound of connected components 21 Manual Tuning 7, 11...
Need help?
Do you have a question about the CMT-EX1 and is the answer not in the manual?
Questions and answers