Table of Contents
Advertisement
Operating and Installation Instructions
1.0 General information on operating instructions...................................................................................... 3
2.0 Notes on possible dangers ...................................................................................................................... 3
2.1 Significance of symbols ......................................................................................................................... 3
2.2 Explanatory notes on safety information ................................................................................................. 4
3.0 Storage and transport............................................................................................................................... 4
4.0 Description ................................................................................................................................................ 5
4.1 Field of application .................................................................................................................................. 5
4.2 Method of functioning.............................................................................................................................. 5
4.3 Diagram .................................................................................................................................................. 6
4.3.1 ARI-PREMIO 2,2 - 5 kN........................................................................................................................ 6
4.3.2 ARI-PREMIO 12 - 15 kN....................................................................................................................... 7
4.3.3 Parts list................................................................................................................................................ 8
4.4 Technical data ......................................................................................................................................... 9
4.5 Dimensions ............................................................................................................................................11
5.0 Installation .............................................................................................................................................. 12
5.1 General installation data ....................................................................................................................... 12
5.2 Manual operation .................................................................................................................................. 14
5.2.1 ARI-PREMIO 2.2 - 5 kN ..................................................................................................................... 14
5.2.2 ARI-PREMIO 12 - 15 kN .................................................................................................................... 15
Thrust actuator ARI-PREMIO
Contents
Rev. 0040501000 4706 englisch
Advertisement
Table of Contents
Troubleshooting

Related Manuals for ARI-Armaturen Ari-Premio 2,2 kN


Summary of Contents for ARI-Armaturen Ari-Premio 2,2 kN
-
Page 1: Table Of Contents
Operating and Installation Instructions Thrust actuator ARI-PREMIO Contents 1.0 General information on operating instructions..................3 2.0 Notes on possible dangers ........................3 2.1 Significance of symbols ......................... 3 2.2 Explanatory notes on safety information ....................4 3.0 Storage and transport..........................4 4.0 Description .............................. - Page 2 5.3 Installation instructions for mounting to valves..................16 5.3.1 Mounting for valve-lift up to 30 mm (yoke version)................16 5.3.2 Mounting for valve lift over 30 mm to 80 mm (column version) ............18 5.4 Electrical connection ..........................20 5.4.1 Wiring diagram ARI-PREMIO 2.2 - 5 kN .................... 20 5.4.2 Wiring diagram ARI-PREMIO 12 - 15 kN ...................
-
Page 3: General Information On Operating Instructions
Operating and installation instructions Thrust actuator ARI-PREMIO 1.0 General information on operating instructions These operating instructions provide information on mounting and maintaining the fittings. Please contact the supplier or the manufacturer in case of problems which cannot be solved by reference to the operating instructions. They are binding on the transport, storage, installation, start-up, operation, maintenance and repair. -
Page 4: Explanatory Notes On Safety Information
Operating and installation instructions Thrust actuator ARI-PREMIO 2.2 Explanatory notes on safety information In these Operating and Installation Instructions dangers, risks and items of safety information are highlighted to attract special attention. Information marked with the above symbol and “ATTENTION ! ” describe practices, a failure to comply with which can result in serious injury or danger of death for users or third parties or in material damage to the system or the environment. -
Page 5: Description
Operating and installation instructions Thrust actuator ARI-PREMIO 4.0 Description 4.1 Field of application ARI-PREMIO linear thrust actuators are employed to actuate control or shut-off valves requiring a nominal linear stroke distance of up to 80 mm and thrust from 2.2 kN to 15 kN. The thrust actuators are set to the thrust forces specified in the technical data. -
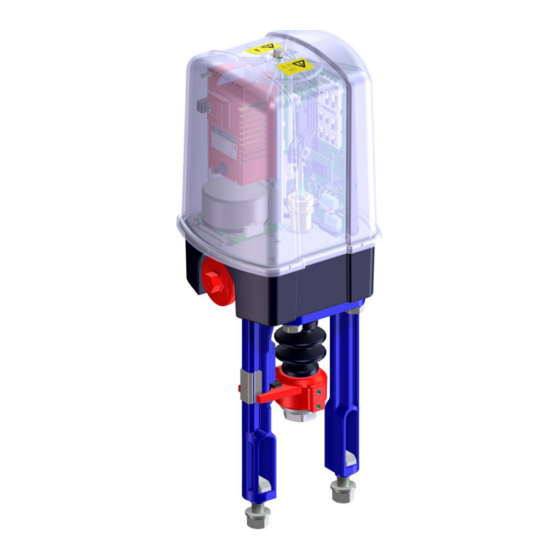
Page 6: Diagram
Operating and installation instructions Thrust actuator ARI-PREMIO 4.3 Diagram 4.3.1 ARI-PREMIO 2,2 - 5 kN Yoke Version Column Version Fig. 1 Page 6 0040501000 4706... -
Page 7: Ari-Premio 12 - 15 Kn
Operating and installation instructions Thrust actuator ARI-PREMIO 4.3.2 ARI-PREMIO 12 - 15 kN Fig. 2 0040501000 4706 Page 7... -
Page 8: Parts List
Operating and installation instructions Thrust actuator ARI-PREMIO 4.3.3 Parts list Pos. Designation Pos. Designation 50.1 Gearbox 50.35 Grub screw DIN ISO 4766 - M6 50.1.1 Gearbox cover plate 50.36 Set collar Cable gland 50.37 Grub screw DIN 913-M3x5 2.2 - 5kN: 2 x M16x1,5 50.38 Guide spindle 50.2... -
Page 9: Technical Data
Operating and installation instructions Thrust actuator ARI-PREMIO 4.4 Technical data Type ARI-PREMIO Thrust force 12,0 15,0 Stroke distance max. Duty classification acc. to EN S3 80% 1200 c/h S3 50% 1200 c/h 60034-1/A11 Control speed mm/sec. 0.25 0.38 0.38 0.79 0.38 Motor voltage 230V - 50Hz / 60Hz *... - Page 10 Operating and installation instructions Thrust actuator ARI-PREMIO Accessories Type ARI-PREMIO Thrust force 12,0 15,0 2 additional travel switches, zero potential, Additional travel switches Switching capacity 10A, 250V ~ 2 additional travel switches, zero potential, with gold contacts, Additional travel switches for for low switching capacities and at aggressive atmosphere, low-voltage / electronic system switching capacity max.
-
Page 11: Dimensions
Operating and installation instructions Thrust actuator ARI-PREMIO 4.5 Dimensions Fig. 3 0040501000 4706 Page 11... -
Page 12: Installation
Operating and installation instructions Thrust actuator ARI-PREMIO 5.0 Installation ATTENTION ! - Work on electrical systems or equipment must only be carried out by qualified electricians or by trained individuals under the guidance and supervision of a qualified electrician in compliance with regional electrical safety requirements and regulations. - Page 13 Operating and installation instructions Thrust actuator ARI-PREMIO - Mains fuse rating max. 6A. - Circuit breakers in the plant to cut off the mains supply to the actuator. - Conformity of technical data on thrust actuator with field conditions. - Mains voltage in accordance with data specified on rating plate of thrust actuator. - Thrust actuator complete with yoke or distance columns and coupling parts intended for mounting to the corresponding valve.
-
Page 14: Manual Operation
Operating and installation instructions Thrust actuator ARI-PREMIO 5.2 Manual operation 5.2.1 ARI-PREMIO 2.2 - 5 kN ATTENTION ! - The handwheel always rotates during motor-driven operation (running indicator). Never activate manual operation while the motor is running. Injury hazard! - In the manual operating mode pay careful attention in the final positions that the handwheel is only turned to the point where the torque switch trips (audible click) as otherwise damage will be caused to the thrust actuator! Since the handwheel always follows during motor-driven operation (running indication),... -
Page 15: Ari-Premio 12 - 15 Kn
Operating and installation instructions Thrust actuator ARI-PREMIO 5.2.2 ARI-PREMIO 12 - 15 kN ATTENTION ! - Do not attempt to engage manual operation until the motor has stopped. Switching over while the motor is running may damage the thrust actuator. - In the manual operating mode pay careful attention in the final positions that the handwheel is only turned to the point where the torque switch trips (audible click) as otherwise damage will be caused to the thrust actuator! -
Page 16: Installation Instructions For Mounting To Valves
Operating and installation instructions Thrust actuator ARI-PREMIO 5.3 Installation instructions for mounting to valves 5.3.1 Mounting for valve-lift up to 30 mm (yoke version) turn Hexagon nut Hexagon nut Valve spindle Valve spindle Fig. 7 To mount the thrust actuator to a valve having a nominal lift of up to 30mm, proceed as follows: - Screw coupling (pos. - Page 17 Operating and installation instructions Thrust actuator ARI-PREMIO Fig. F: - Screw the coupling (pos. 50.27) firmly into the torsion safety feature (pos. 50.32) and secure in place using grub screw M6 (pos. 50.35). - Run valve to lowest position. - Clip lift dial (pos. 50.23) onto yoke in such a way that top edge of torsion safety feature is in alignment with tip of arrow mark on lift dial.
-
Page 18: Mounting For Valve Lift Over 30 Mm To 80 Mm (Column Version)
Operating and installation instructions Thrust actuator ARI-PREMIO 5.3.2 Mounting for valve lift over 30 mm to 80 mm (column version) turn Hexagon nut Hexagon nut Valve spindle Valve spindle Fig. 8 To mount the thrust actuator to a valve having a nominal lift of over 30mm to 50mm, proceed as follows: - Screw coupling (pos. - Page 19 Operating and installation instructions Thrust actuator ARI-PREMIO Fig. C: - Slip 2-ear clamp (pos. 50.26) onto a distance column (pos. 50.24) press on very lightly. - Screw distance column with 2-ear clamps on opposite side of handwheel into the flange in such a way that one of the 2-ear clamps is situated above the torsion safety feature (pos.
-
Page 20: Electrical Connection
Operating and installation instructions Thrust actuator ARI-PREMIO 5.4 Electrical connection 5.4.1 Wiring diagram ARI-PREMIO 2.2 - 5 kN Fig. 9 Page 20 0040501000 4706... -
Page 21: Wiring Diagram Ari-Premio 12 - 15 Kn
Operating and installation instructions Thrust actuator ARI-PREMIO 5.4.2 Wiring diagram ARI-PREMIO 12 - 15 kN 5.4.2.1 ARI-PREMIO 12 - 15 kN 1 Ph~ / 3 Ph~ without reversing contactor Fig. 10 0040501000 4706 Page 21... -
Page 22: Ari-Premio 12 - 15 Kn 1 Ph~ / 3 Ph~ With Reversing Contactor
Operating and installation instructions Thrust actuator ARI-PREMIO 5.4.2.2 ARI-PREMIO 12 - 15 kN 1 Ph~ / 3 Ph~ with reversing contactor Fig. 11 Page 22 0040501000 4706... -
Page 23: Connection
Operating and installation instructions Thrust actuator ARI-PREMIO 5.4.3 Connection ATTENTION ! - Work on electrical systems or equipment must only be carried out by qualified electricians or by trained individuals under the guidance and supervision of a qualified electrician in compliance with regional electrical requirement and regulations. -
Page 24: Settings
Operating and installation instructions Thrust actuator ARI-PREMIO 5.5 Settings ATTENTION ! - The thrust actuator may only be operated for a short time without the hood for unavoidable setting operations to the potentiometers, travel switches and the electrical options. While these operations are in progress, the thrust actuator has hazardous, live, uninsulated parts exposed as well as moving and rotating parts. -
Page 25: Travel Switch
Operating and installation instructions Thrust actuator ARI-PREMIO The optional boards may only be installed at the factory due to the switching points of the load-dependent switches having to be reset following installation of these boards! ATTENTION ! - When using optional boards PA or NA, it must be warranted - due to the operator’s individual circuitry- that, when switching the load-dependent travel switches S11/21, S12/S22 and S13/S23 the motor of the thrust actuator comes to a standstill without delay. - Page 26 Operating and installation instructions Thrust actuator ARI-PREMIO - Proceed to strip the connecting cable that has been led in through the cable inlet and fastened, and connect the individual conductors to the terminal strip in accordance with the desired circuitry and the wiring diagram. - Set switch points on travel switches in accordance with section 5.5.3.3 Setting the additional travel switches (S4/S5 and S24/S25) - Insert motor connection plug in jack strip (pos.
-
Page 27: Setting Of Standard Travel Switch (S3)
Operating and installation instructions Thrust actuator ARI-PREMIO 5.5.3.2 Setting of standard travel switch (S3) On delivery of the thrust actuator, the standard travel switch (S3) is already set to the existing valve-lift and the setting spindle for the travel switch S3 (pos. 50.51) is sealed with screw glyptal. -
Page 28: Setting The Additional Travel Switches (S4/S5 And S24/S25)
Operating and installation instructions Thrust actuator ARI-PREMIO 5.5.3.3 Setting the additional travel switches (S4/S5 and S24/S25) The two additional travel switches can be freely set in both lift directions for indicating certain valve positions. To do this, proceed as follows: - Run valve to desired position due to be indicated by the corresponding switch. -
Page 29: Potentiometers
Operating and installation instructions Thrust actuator ARI-PREMIO 5.5.4 Potentiometers The potentiometers are used for electrical position acknowledgement on the facility control system or for the options - electronic position controller ES11 or electronic position indicator RI21 A maximum of 2 potentiometers can be installed (= 1 double potentiometer). The potentiometers can be supplied with different resistance values (see point „4.4 Technical data“). - Page 30 Operating and installation instructions Thrust actuator ARI-PREMIO - Set potentiometer (see point 5.5.4.2). - Place hood carefully onto thrust actuator and fasten it on the actuator with rubber gasket and countersunk screw. grey grey yellow yellow Fig. 13 Fig. 14: Switchgear and indicating feature ARI-PREMIO 2.2 - 5 kN Pos.
-
Page 31: Setting The Potentiometer
Operating and installation instructions Thrust actuator ARI-PREMIO 5.5.4.2 Setting the potentiometer To set the potentiometer, proceed as follows: - Move thrust actuator to extended position. - Switch off mains voltage and safeguard to prevent it from being switched back on again accidentally. -
Page 32: Error-Proof Potentiometer For Single-Channel, Error-Proof Position Feedback
Operating and installation instructions Thrust actuator ARI-PREMIO 5.5.5 Error-proof potentiometer for single-channel, error-proof position feedback The TÜV certified potentiometer on conductive plastic basis is used for single-channel, error-proof position feedback in connection with error-proof, electronic group monitoring systems for the regulation of fuel -, air and exhaust gas streams. A maximum of 2 potentiometers can be installed (=1 double potentiometer). - Page 33 Operating and installation instructions Thrust actuator ARI-PREMIO - The resistance values thus measured need to be taken into account for the settings to the facility control system. Fig. 15: Error-proof potentiometer ARI-PREMIO 2,2 - 5 kN Designation Designation Pos. Pos. Guide spindle Head cap screw 50.38...
-
Page 34: Heating
Operating and installation instructions Thrust actuator ARI-PREMIO 5.5.6 Heating A heating resistor should be fitted as a means of protection against the formation of condensation water in cases involving widely varying ambient temperatures, high atmospheric humidity (outdoor use) and temperatures below the freezing point. The heating resistor is self-regulating so that a continuous supply of current merely needs to be connected up. -
Page 35: Electronic Position Indicator Ri21
Operating and installation instructions Thrust actuator ARI-PREMIO 5.5.7 Electronic position indicator RI21 The electronic position indicator RI21 converts the resistance of the 1000 ohm potentiometer corresponding to the lift into an optional output control signal 0 (2) ...10V DC or 0 (4) ...20mA DC. For installing and setting the electronic position indicator RI21 the operating instructions applicable to this unit must be observed in the appropriate valid version. -
Page 36: Electronic Position Indicator (Ri21) And Position Controller (Es11) Together In The Actuator
Operating and installation instructions Thrust actuator ARI-PREMIO 5.5.9 Electronic position indicator (RI21) and position controller (ES11) together in the actuator Except or the 5 kN, 12 kN and 15 kN type in 24V version, the electronic position indicator RI21 and the electronic position controller ES11 can be build-in together in the ARI- PREMIO. -
Page 37: Integrated Temperature Controller Dtron 316
Operating and installation instructions Thrust actuator ARI-PREMIO 5.5.10 Integrated temperature controller dTRON 316 The integrated temperature controller controls temperatures, which are measured by input- connected temperature sensors, to a manual given setpoint by means of a three-step output connected with the actuator. 5.5.10.1 Installation of the dTRON 316 The dTRON 316 can be mounted in the ARI-PREMIO as a complete unit with a mounting kit. -
Page 38: Integrated Reversing Contactor
Operating and installation instructions Thrust actuator ARI-PREMIO 5.5.11 Integrated reversing contactor The integrated reversing contactor is actuated using a 3-step input signal. The reversing contactor swaps over phases L1, L2 and L3 to achieve the desired direction of rotation of the three-phase motor. 5.5.11.1 Installing the reversing contactor The reversing contactor can be mounted in the ARI-PREMIO as a complete unit using a mounting kit. -
Page 39: Phase Control Relay
Operating and installation instructions Thrust actuator ARI-PREMIO 5.5.12 Phase control relay The phase control relay monitors phases L1, L2 and L3 in the mains input supply. The reversing contactor is only activated by the phase control relay providing phases L1, L2 and L3 are connected correctly. -
Page 40: Dc-Module
Operating and installation instructions Thrust actuator ARI-PREMIO 5.5.13 DC-MODULE Three-step converter for control of electric thrust actuator ARI-PREMIO 230V 50Hz 2.2 to 5 kN, with 24V DC voltage. The DC MODULE converts a 24V input DC voltage into a 230V 50Hz 3-step output signal depending on polarity. - Page 41 Operating and installation instructions Thrust actuator ARI-PREMIO Fig. 21: DC Module Option ARI-PREMIO 2,2 - 5 kN Pos. Designation Pos. Designation 50.16 Lock washers 50.120.3 Head cap screw M4 x 12 50.120 DC module complete 50.120.4 Body 50.120.1 Retaining plate 50.120.5 Cover 50.120.2 Hexagon bolt M10 x 45...
-
Page 42: Technical Data - Dc-Module
Operating and installation instructions Thrust actuator ARI-PREMIO 5.5.13.2 Technical data - DC-Module Type DC-Module Supply voltage 24V DC voltage, +10%/-20% (smoothed) Current consumption 1 - 5 A (5 A at full load), approx. 0.5 A at no-load Operating mode EN 60034-1/ S1 –... -
Page 43: Wiring Diagram Ari-Premio 2.2 - 5 Kn + 3-Step Dc Module
Operating and installation instructions Thrust actuator ARI-PREMIO 5.5.13.3 Wiring diagram ARI-PREMIO 2.2 - 5 kN + 3-step DC module Fig. 22 0040501000 4706 Page 43... -
Page 44: Wiring Diagram Ari-Premio 2.2 - 5 Kn + Dc Module
Operating and installation instructions Thrust actuator ARI-PREMIO 5.5.13.4 Wiring diagram ARI-PREMIO 2.2 - 5 kN + DC module Fig. 23 Page 44 0040501000 4706... -
Page 45: Electronic Position Indicator Ri32
Operating and installation instructions Thrust actuator ARI-PREMIO 5.5.14 Electronic position indicator RI32 The RI32 electronic indicator transforms a resistance change into a 4...20mA or 2...10V standardised control signal. The RI32 position indicator can be operated by 24V DC voltage or 24V AC voltage. It is possible to link into a current loop without an additional power supply. -
Page 46: Electronic Position Indicator (Ri32) And Position Controller (Es11) Together In The Actuator
Operating and installation instructions Thrust actuator ARI-PREMIO 5.5.14.3 Electronic position indicator (RI32) and position controller (ES11) together in the actuator The electronic position indicator RI32 and the electronic position controller ES11 can be build-in together in the ARI-PREMIO. It must be used a double potentiometer with 1000/1000 Ohm. To install the RI32 and ES11 proceed as follows: - Switch off mains voltage and safeguard to prevent it from being switched back on again accidentally. -
Page 47: Technical Data - Position Indicator Ri32
Operating and installation instructions Thrust actuator ARI-PREMIO 5.5.14.4 Technical data - Position indicator RI32 Type RI 32 Position indicator Supply voltage 24V DC / AC 50...60Hz Ω Potentiometer input 1 kOhm ... 10 kOhm three-conductor connection, suitable for conductive plastic potentiometer Control signal output, 2...10 V DC with (control signal output with supply voltage voltage... -
Page 48: Wiring Diagram
When the valve is shut approx. 0 ohm are applied between Rb and Rc. Appropriate conductor cross-sections for terminal connections are 0.2 to 2.5 mm To achieve electromagnetic compatibility is recommended that shielded conductors be used for longer routings. Please request technical information direct from ARI-Armaturen. Page 48 0040501000 4706... -
Page 49: Setting Zero Point And Slope Span
Operating and installation instructions Thrust actuator ARI-PREMIO 5.5.14.8 Setting zero point and slope span The 4...20mA or 2...10V output control signal is adjusted to the potentiometer stroke by miniature potentiometers S (slope) and N (zero). Zero point setting - The zero point setting is always made before the slope span setting. Ω... -
Page 50: Putting The Actuator Into Operation
Operating and installation instructions Thrust actuator ARI-PREMIO 6.0 Putting the actuator into operation ATTENTION ! - Actuator components which rotate or move during operation are coloured red. Crushing or injury hazard! Before putting a new plant into operation or restarting a plant after repairs or modification, always make sure that: - all works has been completed! - Regional safety instructions must be observed as a matter of policy. -
Page 51: Troubleshooting Table
Operating and installation instructions Thrust actuator ARI-PREMIO 9.0 Troubleshooting table ATTENTION ! - read point 10.0 and 11.0 prior to dismantling and repair work! - read point 6.0 before restarting the plant ! Fault Possible Causes Remedy Thrust actuator fails to move Power failure Ascertain and eliminate cause Fuse has blown... -
Page 52: Dismantlement Of Thrust Actuator
Technology for the Future. GERMAN QUALITY VALVES ARI-Armaturen Albert Richter GmbH & Co. KG, D-33756 Schloß Holte-Stukenbrock Telephone (+49 5207) 994-0 Telefax (+49 5207) 994-158 or 159 Internet: http://www.ari-armaturen.com E-mail: info.vertrieb@ari-armaturen.com... -
Page 53: Ec Declaration Of Conformity
Declaration of the manufacturer as defined by the Machinery Directive 98/37/EC Herewith we declare, ARI-Armaturen Albert Richter GmbH & Co. KG, Mergelheide 56-60, 33756 Schloß Holte-Stukenbrock that the supplied model of electric thrust actuator ARI-PREMIO in the delivered version complies with the following regulations:... - Page 54 Operating and installation instructions Thrust actuator ARI-PREMIO 0040501000 4706 Page 54...
Need help?
Do you have a question about the Ari-Premio 2,2 kN and is the answer not in the manual?
Questions and answers