Table of Contents
Advertisement
Quick Links
Traka32 USER GUIDE
UD0089
14/08/19
VERSION 3.5
V2.6 06-Oct-17
UD0089
1
This Document is uncontrolled unless over stamped "CONTROLLED DOCUMENT"
Advertisement
Table of Contents
Troubleshooting

Related Manuals for Assa Abloy TRAKA32


Summary of Contents for Assa Abloy TRAKA32
- Page 1 TRAKA32 USER GUIDE UD0089 14/08/19 VERSION 3.5 V2.6 06-Oct-17 UD0089 This Document is uncontrolled unless over stamped "CONTROLLED DOCUMENT"...
- Page 2 VERSION HISTORY Version Date Description of Changes Approved By 25/07/16 Initial version of document Notes added for receptor cable routing in Hardware 01/08/16 Installation – ‘S-Series Extension Cabinets’ and ‘L-Series Extension Cabinets’ sections. Added ‘Lockers’ section in ‘Traka Systems’. Edited and renamed ‘Modular Lockers Overview’...
-
Page 3: Table Of Contents
2.4.4 Ethernet Installation ........................74 2.4.5 GPRS Communication ....................... 106 Software Installation ........................114 2.5.1 Traka32 Minimum PC Requirements ................... 114 2.5.2 Traka32 License ........................115 V3.5 14/08/19 UD0089 Page 3 This Document is uncontrolled unless over stamped "CONTROLLED DOCUMENT"... -
Page 4: Table Of Contents
Configuring iFobs ........................152 2.6.6 Configuring a User ........................155 2.6.7 Final Testing ..........................160 Traka32 Software ..........................162 Traka32 Software Overview ......................162 Read All Systems Data ........................164 Languages ............................ 165 System Settings ..........................166 3.4.1 Adding Systems ........................166 3.4.2... -
Page 5: Table Of Contents
3.7.4 Editing Keys ..........................223 3.7.5 Deleting / Removing Keys ......................224 3.7.6 Key Details ..........................226 User Details ..........................229 3.8.1 User List ..........................229 3.8.2 Adding Users ........................... 230 3.8.3 Editing Users ........................... 232 3.8.4 GDPR Statement ........................233 3.8.5 Deleting Users ......................... -
Page 6: Table Of Contents
3.13.7 Import 32bit Database ......................351 3.13.8 Extract User Details ........................355 3.13.9 Extract iFob Details ........................356 3.13.10 Import Users from a Spreadsheet ....................357 3.13.11 Import Keys from a Spreadsheet....................360 3.13.12 Extract Users and Items for Traka Touch ..................361 3.13.13 Repair &... -
Page 7: Table Of Contents
3.17.3 Software Access using a Microsoft SQL Server Database ............... 392 3.18 Message Notification System ......................398 3.18.1 Notifications Overview ......................398 3.18.2 Message Rules and Triggers ...................... 399 3.18.3 Creating Message Templates ..................... 402 3.18.4 Creating Notification Messages ....................408 3.18.5 Email Response Codes ...................... -
Page 8: Table Of Contents
3.20.10 Configure Firmware ........................672 3.21 Traka32 as a Windows Service ......................697 3.21.1 Traka32 as a Windows Service (TAAS) Overview ................697 3.21.2 Traka as a Service Installation Prerequisites ................698 3.21.3 Traka as a Service Installation ....................699 3.21.4... -
Page 9: Table Of Contents
16bit Configuration Menu ........................ 729 16-bit System File Types ........................ 732 iFob Search Facility ........................733 4.8.1 Simple iFob Search ........................733 4.8.2 Advanced iFob Search....................... 734 Emergency iFob Release ......................... 739 4.9.1 Emergency iFob Release ......................739 4.9.2 Total System Failure ......................... 740 4.9.3 Manual iFob Release ......................... -
Page 10: Table Of Contents
4.14.6 TSSI Biometrics - Backing up the Templates ................798 4.15 GSM Module ..........................799 4.15.1 GSM Module Overview ......................799 4.15.2 Configuring the GSM Module ...................... 800 4.15.3 Installing the GSM Module ......................801 4.15.4 Remote iFob Release via SMS ....................804 4.15.5 Event Information via SMS ...................... -
Page 11: Table Of Contents
5.1.1 8bit Control PCB ........................855 5.1.2 16bit Control PCB ........................863 Traka Receptor Strips ........................893 5.2.1 Receptor Layout ........................893 5.2.2 Receptor Selector Settings ......................894 5.2.3 Adding Extra Receptor Strips ..................... 896 5.2.4 Locking Receptor Strip ......................899 5.2.5 Non-Locking Receptor Strip ....................... -
Page 12: This Document Is Uncontrolled Unless Over Stamped "Controlled Document
GDPR COMPLIANCE INFO RMATION Traka supplies Key Cabinets and intelligent Locker systems. These products keep keys & assets safe from unauthorised access, and allow only authorised users to remove and return the keys/assets they are entitled to. Traka systems give full accountability of who has (or had) which keys/assets and at what time and date. This is usually managed by software that runs on either the Traka product and/or the client’s computer network. -
Page 13: Traka - Intelligent Access Management
TRAKA - INTELLIGENT ACCESS MANAGEMENT WELCOME Welcome to Traka This user guide has been prepared in order to assist you with every aspect of Traka ranging from planning to advanced features of all the Traka systems. The content of this guide is based upon the following software and firmware versions... Software Version 02.42.0000 8bit Firmware Version 06.08.41 and below 16bit Firmware Version 04.00.12 and below... -
Page 14: Traka Overview
TRAKA OVERVIEW The Traka Item Management System has been designed to provide a quick and easy method of issuing and controlling keys. In addition, Traka provides instant information as to the current user of an item, the previous user as well as a complete history of the asset usage. -
Page 15: Copyright
COPYRIGHT This manual and the programs to which it refers are copyrighted and all rights reserved. You are not permitted to: Copy this manual by any means Allow other people to have copies of the programs Use the programs on more than one machine at a time Any such actions may be regarded as intent to defraud and action may be taken. -
Page 16: Caution
CAUTION Great care has been taken to ensure that the Traka hardware and software works correctly but it is impossible to guarantee that there are no errors in a computer program or that hardware failures will not occur. Remember also that if someone enters the wrong information errors may also occur and careless use of the hardware can cause damage that no design can withstand. -
Page 17: Contact
Telephone: 0333 355 3641 Postal Address You can also write to us. Address: Traka 30 Stilebrook Road Olney Buckinghamshire MK46 5EA United Kingdom An ASSA ABLOY Group Company V3.5 14/08/19 UD0089 Page 17 This Document is uncontrolled unless over stamped "CONTROLLED DOCUMENT"... -
Page 18: Warranty Terms And Conditions
WARRANTY TERMS AND C ONDITIONS Traka UK Warranty and Annual Maintenance and Support Agreement Traka cabinets are provided with a 12-month warranty, starting on the day of installation. During this warranty period Traka will provide parts and labour to repair any fault caused though manufacturing defect. After the expiry of the warranty period, an annual maintenance and support agreement may be purchased, which covers the cost of parts and labour to repair on a planned next working day response any fault caused through normal use of the equipment. - Page 19 Ensure that the Traka hardware and software is used in a proper manner by competent trained employees only and in accordance with the Traka User Guides. Provide the Traka support engineer full access to the Traka cabinet and Traka32 software. This may include making available access keys and passwords.
-
Page 20: Installation
Please take into consideration any disabled people that may have to use the Traka system. Administration and serviceability Ideally you should locate a PC Workstation that will be running a copy of Traka32 as close as possible to the Traka System as this will make system administration much easier. ... -
Page 21: Standalone Systems
STANDALONE SYSTEMS Standalone Traka systems are supported with easy to use Windows software called Traka32. The software does not need to be running every time you use Traka but it is essential that it is used to configure and maintain Traka. -
Page 22: Network Systems
2.1.3 NETWORK SYSTEMS Networked Traka systems are supported with easy to use Windows software. The software does not need to be running every time you use Traka but it is essential that it is used to configure and maintain Traka. Therefore the computer ideally needs to be permanently connected using an RS485 or Ethernet network connection. -
Page 23: Database Overview
2.1.4 DATABASE OVERVIEW Traka32 can work with two database formats, Microsoft Access and Microsoft SQL. Microsoft Access Access is ideal for standalone or small network users with small amounts of data. It is very simple to install and maintain through the Traka32 software. -
Page 24: Communications
2.1.5 COMMUNICATIONS 2.1.5.1 COMMUNICATIONS OVERVIEW Each Traka System is administered from one or more copies of the Traka32 software. There are several ways of communicating between the Traka32 software and the Traka Systems... V3.5 14/08/19 UD0089 Page 24 This Document is uncontrolled unless over stamped "CONTROLLED DOCUMENT"... - Page 25 2.1.5.2 RS232 RS-232 (or serial as it is also known) is the simplest form of communications between the Traka32 software and a Traka System. This is most commonly used where only a single Traka System is administered by a single copy of the Traka32 software.
- Page 26 RS-485 is most commonly used where multiple Traka Systems are administrated from a single copy of the Traka32 software. It is also possible to combine the RS485 communications with Ethernet to allow a single Traka32 client to administer the Traka Systems and as many additional 'view only' Traka32 clients as is required.
- Page 27 2.1.5.4 MODEM A modem can be used to communicate to a remote Traka Systems. Please refer to your modem user guide. V3.5 14/08/19 UD0089 Page 27 This Document is uncontrolled unless over stamped "CONTROLLED DOCUMENT"...
-
Page 28: Ethernet
Ethernet is the most popular form of communication allowing multiple Traka Systems to be administered from multiple copies of the Traka32 software using an existing Ethernet. At present Traka uses a Traka Ethernet Device (TED) to connect to connect a Traka System to an Ethernet. There are currently two types of TED available... -
Page 29: Hardware Installation
HARDWARE INSTALLATIO N 2.3.1 ANTI STATIC PRECAUTI ONS When installing or maintaining the Traka systems you must take appropriate precautions against static discharge. This normally involves connecting yourself to an earth source via a wrist strap, so that any static generated is immediately discharged to earth. -
Page 30: What You Should Have
2.3.2 WHAT YOU SHOULD HAVE Every care is taken to ensure all parts necessary are shipped with your order. If you find any items missing from the checklist below please contact Traka immediately. Traka System – Your Traka system will be supplied with the correct number of receptor strips or locker compartments as per your order. -
Page 31: What You Will Need
2.3.3 WHAT YOU WILL NEED Prior to you installing the Traka System, you should ensure that the items below are in place and functioning before you continue. A mains power supply – The Traka system should be powered by an isolated Non Switched fused 13-amp spur with a 3-amp fuse fitted. -
Page 32: Serial Number / Rating Plate
2.3.4 SERIAL NUMBER / RATI NG PLATE All Traka Systems are fitted with a Serial Number / Rating Plate. This can be found in the following location... For the Traka M-Series the Rating Plate is located on the inside, you will need to remove the control panel in order to view the Rating Plate. -
Page 33: M-Series
For more details on the various PCB connections, please refer to the 8bit Control PCB Diagrams 16bit I/O PCB layout section of the Traka32 Help Guide. Completely remove the control panel and put in a safe place until needed. V3.5 14/08/19 UD0089 Page 33 This Document is uncontrolled unless over stamped "CONTROLLED DOCUMENT"... - Page 34 For more details on the various PCB connections, please refer to the 8bit Control PCB Diagrams 16bit I/O PCB layout section of the Traka32 Help Guide. V3.5 14/08/19 UD0089 Page 34 This Document is uncontrolled unless over stamped "CONTROLLED DOCUMENT"...
- Page 35 Using an Allen Key remove the 4 screws to remove the 16bit Control PCB Plate or the 8bit Control PCB (depending on your system type). 10. The above preparation will have now revealed the 4 fixing holes that can be used to fix the system to a suitable wall with suitable fixings.
- Page 36 PCB Diagrams 16bit I/O PCB layout section of the Traka32 Help Guide. Replace all the receptor strips reconnecting the receptor ribbon cable. Using a large flat bladed screwdriver, secure the receptor strips in place with the fixings and removed earlier.
- Page 37 For more details on the various PCB connections, please refer to the 8bit Control PCB Diagrams 16bit I/O PCB layout section of the Traka32 Help Guide. Insert the Battery into the base of the Pod and connect to the Control PCB. 10. Switch the On/Off switch on the 8bit Control PCB 16bit I/O PCB to On.
-
Page 38: S-Series
2.3.6 S-SERIES 2.3.6.1 S-SERIES PREPARATION Before attaching an S-Series Traka system to the wall you will need to remove various parts in order to access the various fixing holes. Please refer to the anti static precautions before preparing the system. NOTE: Any plastic protective film should be removed after installation in order to protect the stainless steel finish and polycarbonate door. - Page 39 Disconnect the Green & Yellow Earth cable connector linking the Receptor Frame to the main cabinet. Using a 2.5mm Allen Key, remove the screws holding the Receptor Frame in place. Carefully slide the Receptor Frame to the right to free from the main cabinet and remove. NOTE: The receptor frame is heavy especially when fully loaded with keys.
- Page 40 For more details on the various PCB connections, please refer to the 8bit Control PCB Diagrams 16bit I/O PCB layout section of the Traka32 Help Guide. V3.5 14/08/19 UD0089 Page 40 This Document is uncontrolled unless over stamped "CONTROLLED DOCUMENT"...
- Page 41 Re-connect the Green & Yellow Earth cable connector. Insert the Battery into the base of the Pod and connect to the 8bit Control PCB 16bit I/O PCB. 10. Switch the On/Off switch on the 8bit Control PCB 16bit I/O PCB to On.
- Page 42 2.3.6.3 S-SERIES EXTENSION CABINETS Additional cabinets can be installed with or added later to the S-Series Traka system. For example... or... The S-Series extension cabinets are installed in exactly the same way as the standard S-Series cabinets except for the way in which they connect.
- Page 43 All the other cabinets must not have the link across J1. Please refer to the 8bit Control PCB Diagrams 16bit I/O PCB layout Interface PCB Diagram of the Traka32 Help Guide to locate the various connections. V3.5 14/08/19 UD0089 Page 43 This Document is uncontrolled unless over stamped "CONTROLLED DOCUMENT"...
- Page 44 2.3.6.4 S-SERIES SERVICING To access the internal part of the S-Series Traka System follow the procedure below... To open the Control Panel Door... Ensure the system is disconnected from the mains power before continuing. The Control Panel is hooked in at the bottom and locked at the top. Using the Master Key, unlock the Control Panel Cam Lock.
- Page 45 Undo the plastic Wing Bolt then close and lock the Control Panel. You will now be able to swing open the Control Panel Door. To further open the Receptor Frame... Fit the Receptor Frame Hinge into the locating slots at the top and bottom of the cabinet by inserting the top first and then the bottom.
- Page 46 Carefully slide the frame to the right aligning the holes in the Receptor Frame Hinge with those in the frame itself. Fit two plastic Wing Bolts attaching the Receptor Frame Hinge to the Receptor Frame. Slowly open the Receptor Frame. V3.5 14/08/19 UD0089 Page 46...
-
Page 47: L-Series
2.3.7 L-SERIES 2.3.7.1 L-SERIES CABINET PREPARATION Before attaching an L-Series Traka system to the wall you will need to remove various parts in order to access the various fixing holes. Please refer to the anti static precautions before preparing the system. NOTE: Any plastic protective film should be removed after installation in order to protect the stainless steel finish and polycarbonate door. - Page 48 Using a 10mm Nut Spinner, carefully remove the top and bottom 1U blanking panels. The above preparation will have now revealed 5 fixing holes. You will find the following cables hanging in the back of the cabinet. Carefully thread these cables through the pre-drilled hole in the right hand side of the cabinet.
- Page 49 For more details on the various PCB connections, please refer to the 8bit Control PCB Diagrams 16bit I/O PCB layout 16bit Control PCB Layout sections of the Traka32 Help Guide. V3.5 14/08/19 UD0089 Page 49 This Document is uncontrolled unless over stamped "CONTROLLED DOCUMENT"...
- Page 50 Completely remove the control panel and put in a safe place until needed. The above preparation will have now revealed the 4 fixing holes that can be used to fix the pod to a suitable wall with suitable fixings. Now refer to the L-Series Installation section.
- Page 51 2.3.7.3 L-SERIES INSTALLATION Before attaching an L-Series Traka system to the wall you will need to remove various parts in order to access the various fixing holes, please refer to the L-Series Preparation section first followed by the Pod Preparation section.
- Page 52 For more details on the various PCB connections, please refer to the 8bit Control PCB Diagrams 16bit I/O PCB layout section of the Traka32 Help Guide. V3.5 14/08/19 UD0089 Page 52 This Document is uncontrolled unless over stamped "CONTROLLED DOCUMENT"...
- Page 53 11. Insert the Battery into the base of the Pod and connect to the 8bit Control PCB 16bit I/O PCB respectively. 12. Switch the On/Off switch on the 8bit Control PCB 16bit I/O PCB to On. You should hear a double beep and the LCD should light up and start to display text. If this does not happen then switch Off the On/Off switch and double check your connections.
- Page 54 2.3.7.4 L-SERIES EXTENSION CABINETS Additional cabinets can be installed with or added later to an L-Series Traka system. The L-Series extension cabinets are installed in exactly the same way as the main L-Series cabinets except for the way in which they connect. Please refer to the preparation and installation sections on how to fix an L-Series cabinet to the wall along with the details below on how to connect the cabinets together.
- Page 55 All the other cabinets must not have the link across J1. Please refer to the 8bit Control PCB Diagrams 16bit I/O PCB layout Interface PCB Diagram of the Traka32 Help Guide to locate the various connections. V3.5 14/08/19 UD0089 Page 55 This Document is uncontrolled unless over stamped "CONTROLLED DOCUMENT"...
-
Page 56: Lockers
2.3.8 LOCKERS 2.3.8.1 TRAKA MODULAR LOCKERS 2.3.8.1.1 MODULAR LOCKER PREPARATION NOTE: Traka Modular Lockers are designed specifically to suit a customer's requirements. Therefore the images displayed in this guide may differ to the system you are installing, however the same principles apply. - Page 57 Depending on your system configuration it's possible that lock cables and RFID cables from adjacent modules may also be connected to the PCB. If this is the case then these cables must also be disconnected to allow the module to be freely removed. All lock cables and RFID cables are labelled 0-9 according to the position number they connect to on the PCB (C0-C9).
- Page 58 Pod Preparation... The Control Panel is hooked in at the bottom of the Pod and locked at the top. Using the Master Key, unlock the Cam Lock. Carefully tilt the Control Panel towards you leaving the bottom hooked in. You will see that there are several cables connected to the PCB that are attached to the control panel.
- Page 59 For more details on the various PCB connections, please refer to the 8bit Control PCB Diagrams 16bit I/O PCB layout section of the Traka32 Help Guide. Completely remove the control panel and put in a safe place until needed. V3.5 14/08/19 UD0089 Page 59 This Document is uncontrolled unless over stamped "CONTROLLED DOCUMENT"...
- Page 60 The above preparation will have now revealed the 4 fixing holes that can be used to fix the pod to a suitable wall with the appropriate fixings. Please now refer to the Modular Locker Installation section. V3.5 14/08/19 UD0089 Page 60 This Document is uncontrolled unless over stamped "CONTROLLED DOCUMENT"...
- Page 61 2.3.8.1.2 MODULAR LOCKER INSTALLATION Before attaching a Traka Locker system to the wall you will need to remove various parts of the system in order to access the various fixing holes, please refer to the Modular Locker Preparation section. NOTE: Traka systems can be quite heavy, typically weighing 40kg+ and therefore need a strong wall to fix to.
- Page 62 NOTE: The specification of the Power Bars will have been determined based on a specific type of charger and quantity intended to be used in the system. Details of this and the power requirements for the Power Bars can be found on the system drawing. If the system requires chargers to be installed, the compartment will have been designed specifically to incorporate them.
- Page 63 For more details on the various PCB connections, please refer to the 8bit Control PCB Diagrams 16bit I/O PCB layout section of the Traka32 Help Guide. 10. Insert the Battery into the base of the Pod and connect to the 8bit Control PCB 16bit I/O PCB respectively.
-
Page 64: Mains Power Supply & Battery Information
2.3.9 MAINS POWER SUPPLY & BATTERY INFORMATION 2.3.9.1 MAINS POWER SUPPLY ENCLOSURE The Traka power supply is housed within a metal enclosure that ensures people cannot touch the live power terminals if they gain access to the systems electronics. Older versions of the power supply aren't completely enclosed but do have a plastic guard covering the terminals as shown below. - Page 65 2.3.9.2 CONNECTING THE MAINS POWER SUPPLY GB - Traka Key Control and Intelligent Locker products are supplied without a plug and will need to be wired into a non-switched fused spur. FR - Les armoires de gestion de clefs et les casiers intelligents sont fournis sans prise électrique, ils devront être raccordés à...
- Page 66 2.3.9.3 BATTERY CONNECTION DETAILS WARNING: All Traka Systems have two power sources, mains and battery. Before installing or servicing a Traka System, please ensure both mains and battery power sources are disconnected from the system. This section will explain how to disconnect the battery from 8bit and 16bit systems. Battery Disconnection Open the control pod/panel of the system using the master key.
-
Page 67: Communication Installation
8bit Control PCB Layout diagrams to locate the RS232 Connector. In Traka32, right click on the Control Pod and select Configure System. Select the Comms tab. Select which serial port the RS232 cable is connected to on the PC and then specify the Baud Rate as 19200,N,8,1. - Page 68 Using the supplied RS232 cable, connect the male end to the RS232 link cable, and the female end to an available serial port on the chosen PC. In Traka32, right click on the Control Pod and select Configure System. Select the Comms tab.
-
Page 69: Rs485 Installation
2.4.2 RS485 INSTALLATION The main Traka network cable simply needs to run from the PC that controls the Traka network to each Traka in a daisy chain configuration... It is recommended that you install the RJ45 Wall ports behind the Traka Control Panels to prevent anyone from tampering with the connections. - Page 70 Connect as follows... When all the connections are made, place the cover over the RJ45 Wall Port and connect the Traka and PC Patch Cables. Refer to the Configuration and Connection section below. Configuration and Connection Please refer to the Anti Static Precautions before configuring the Traka systems.
- Page 71 KK Systems K2 Converter DIP Switch Settings Here are the default DIP Switch settings used on the KK Systems K2 RS-232 to RS-485 converter used on the cable connecting the PC to the RS485 network: K2 Off RXEN On ...
-
Page 72: Modem Installation
2.4.3 MODEM INSTALLATION When using a modem with Traka you will require a Modem in each Traka system and one connected to your PC. To install a modem in Traka please follow the instructions below. To attach a modem to your PC, please refer to the user guide supplied with your modem. - Page 73 If your system is 8bit, ensure the jumper settings are set to RS232 on the Control PCB. Refer to the 8bit Control PCB Communication Jumper Settings. Connect the Serial Lead between the Modem Serial Port and the Traka RS232 Port. Connect the Power Lead from the Modem Power Port to the Power Output connector on the Traka Control PCB or to an external power source depending on the modem type.
-
Page 74: Ethernet Installation
2.4.4 ETHERNET INSTALLATIO N 2.4.4.1 MOXA 2.4.4.1.1 MOXA INSTALLATION In order to set up and configure the Traka Moxa Ethernet Device (TMED) you must first connect them to the network and Traka. Please refer to the Anti Static Precautions before configuring the Traka systems. Using the Master Key, unlock the Control Panel and tilt forward to gain access to the system electronics. - Page 75 Once you have obtained the configuration details you can configure the TMED. The TMED cannot be set up through the Traka32 software and has to be configured either by using Telnet Moxa PComm Terminal Emulator. If you are not experienced with networks we suggest you ask your Network Administrator or Local Traka Engineer to set up the TMED.
- Page 76 When the Telnet window opens, using the keyboard type 1 followed by Enter to select ansi/vt100. Please note, if the following text "Console terminal type (1: ansi/vt100, 2: vt52) : 1" does not appear on the screen then check the default IP Address is within range of the IP Address that you are running telnet from. The default subnet mask of the TMED is 255.255.255.0 with no gateway.
- Page 77 Once installed, click on Start>Programs>PComm Lite 2.5>Terminal Emulator. Using the Master Key, unlock the Control Panel and tilt forward to gain access to the system electronics. Disconnect the Traka from the RS232 Port of the TMED. Connect the RS232 Port of the TMED to a spare RS232 Port on your PC using a 9-Pin Male to 9-Pin Female Serial Cable or 9-Pin Male to 25-Pin Female Serial Cable depending on your PC.
- Page 78 12. From the Property window's Terminal page, select set the Terminal Type to VT100. 13. Again from the Property window, click on OK and after a few seconds the following screen should appear... Please note, if the following text "Console terminal type (1: ansi/vt100, 2: vt52) : 1" does not appear on the screen then try powering down the TMED, waiting 5 seconds and powering back up again.
- Page 79 Configuration Use the keyboard arrow keys to highlight [serverConfig] and press Enter. If you are using telnet from Windows 9x and you cannot use the arrow keys, click on Terminal followed Preferences and set the VT100 Arrows option. Using the keyboard set the following options... DHCP [Disable] (press enter to select options) IP Address [enter your IP Address here] (press space to clear unwanted text) Netmask [enter your Subnet Mask here]...
- Page 80 Using the keyboard highlight [Select for more settings] and press Enter. Using the keyboard set the following options... Make a note of the TCP Port number, as you need this to configure Traka32. It is usually 4001 but you can alter this if required.
- Page 81 Use the keyboard arrow keys to highlight [Serialport] and press Enter. 10. Using the keyboard set the following options... Baud Rate [9600] or [19200] Set [9600] if the Control PCB is fitted with a 3MHz crystal or set [19200] if the Control PCB is fitted with a 7MHz crystal.
- Page 82 13. Press Enter again to confirm your changes. 14. Disconnect the TMED from your PC and re-connect to the Traka System. 15. Check that the DIP Switch Settings on the TMED are all set to Off. 16. Finally, close the Control Panel carefully and lock with the Master Key. V3.5 14/08/19 UD0089 Page 82...
- Page 83 2.4.4.1.3 MOXA DIP SWITCH SETTINGS V3.5 14/08/19 UD0089 Page 83 This Document is uncontrolled unless over stamped "CONTROLLED DOCUMENT"...
- Page 84 2.4.4.1.4 MOXA LED INDICATORS V3.5 14/08/19 UD0089 Page 84 This Document is uncontrolled unless over stamped "CONTROLLED DOCUMENT"...
- Page 85 2.4.4.2 XPORT 2.4.4.2.1 XPORT CONNECTIVITY & BANDWIDTH Protocol: TCP/IP Connectivity: 10/100Mb/s Auto Sense IP Address: Static and must be supplied by the customer. Port: The default is 10001 but can be changed as required. NOTE: When using with the Remote Host option, each Traka System must use a different port number e.g. 10001, 10002, 10003 etc.
- Page 86 Firmware Upgrade Peak 525 bytes per second and averaging down to 245 bytes per second when synchronising iFobs and User records. V3.5 14/08/19 UD0089 Page 86 This Document is uncontrolled unless over stamped "CONTROLLED DOCUMENT"...
- Page 87 2.4.4.2.2 XPORT INSTALLATION The Traka XPort Ethernet Device (TXED) is an optional device that comes pre-installed on Control PCBs. If the device is not fitted, please contact Traka for advice. In order to set up and configure the TXED you must first connect them to the network. Please refer to the Anti Static Precautions before configuring the Traka systems.
- Page 88 Telnet or using the Diagnostics Tool within Traka32. If you are not experienced with networks we suggest you ask your Network Administrator or Local Traka Engineer to set up the TXED. Using Telnet NOTE: Windows Vista operating system does not have the Telnet client installed by default. Please refer to Installing Telnet on Windows Vista if using this operating system and have not already installed Telnet.
- Page 89 When the following window appears, press Enter quickly to go into the Setup mode… Now refer to the Configuration later in this topic. Using Traka32 Diagnostics Please refer to the Anti Static Precautions before configuring the Traka systems. Using the Master Key, unlock the Control Panel and tilt forward to gain access to the system electronics.
- Page 90 Open the Traka32 software by double clicking on the icon. If you are prompted for a login, please login as an Engineer. Please refer to the Engineers section for further details. Click on the Engineers menu followed by Diagnostics. Click on the Serial tab, if not already selected.
- Page 91 Press Enter quickly to go into the Set-up mode. Now refer to the Configuration section further below. When complete, close the Diagnostics window in Traka32. Disconnect the RS232 cable. Set the jumper settings on the 8-bit Control PCB to Ethernet. Please refer to the Communications section for details of the jumper settings.
- Page 92 Now refer to the Configuration section below. When complete, close the Diagnostics window in Traka32. Disconnect the RS232 cable. Press '*' on the keypad to exit the XPort terminal. m. Press '*' 3 more times to exit the Setup Menu.
- Page 93 Connect Mode : C0 Disconn Mode: 00 Flush Mode : 00 *************** Expert ***************** TCP Keepalive : 45s ARP cache timeout: 600s *************** E-mail ***************** Mail server: 0.0.0.0 Unit : Domain : Recipient 1: Recipient 2: *** Trigger 1 Serial Sequence: 00,00 CP1: X CP2: X CP3: X...
- Page 94 I/F Mode (4C) ? Flow (00) ? 10. Make a note of the Port No, as you need this to configure Traka32. It is usually 10001 but you can alter this if required. 11. If you will be using the XPort Remote Host feature on more than one Traka System, a different Port No.
- Page 95 XPort device is to use the Diagnostics Tool within Traka32. Disable Telnet Setup (N) Y 17. For the next two settings please keep the default settings as shown below. If you do not want to change a value, just press Enter to skip.
- Page 96 2.4.4.2.4 XPORT LED INDICATORS Part Number XP1001000-01 (Shipped prior to August 2004)... Part Number XP1001000-03 (Shipped after August 2004)... V3.5 14/08/19 UD0089 Page 96 This Document is uncontrolled unless over stamped "CONTROLLED DOCUMENT"...
- Page 97 2.4.4.2.5 AES256 ENCRYPTION AES-256 Encryption prevents data from being captured when travelling over the network wire between the Traka32 application and the customer database. This will prevent unauthorised access to personal information that could inherently provide unauthorised access to high security keys held in the Traka key cabinets.
- Page 98 Press (Y) then Enter key to enable encryption NOTE: You can change this to N to turn off encryption however Traka32 will require the ‘Encrypt communications to AES256’ tick-box to be un-ticked before it will communicate. You will then be prompted to enter 'Key length in bits (0)'. Type in 256 then press the Enter key.
- Page 99 Connect to the XPort device using either Telnet or the Diagnostics Tool within Traka32. NOTE: If you are not experienced with networks and e-mail we suggest you ask your Network Administrator or Local Traka Engineer to set up the XPort.
- Page 100 Unit : Domain : Recipient 1: Recipient 2: *** Trigger 1 Serial Sequence: 00,00 CP1: X CP2: X CP3: X Message : Priority: L Min. notification interval: 0 s Re-notification interval : 0 s *** Trigger 2 Serial Sequence: 00,00 CP1: X CP2: X CP3: X...
- Page 101 Recipient 1 (): support@traka.com Type the Trigger 1, Serial Sequence followed by Enter. Serial Sequence (00,00): 69,<Alarm_Code> This must be entered in the following format. Type 69, followed by an alarm code. For example, to send an e- mail if when alarm code 6 (iFob Forced From System) occurs type 69,06. NOTE: Two digits must be entered for the alarm code.
- Page 102 Traka32 software and the Traka System. Only one network port can be opened on a Traka system at any one time. This means that if one copy of the Traka32 software is Online, no other copies of the Traka32 software can communicate with the Traka system.
- Page 103 If you already have an existing Traka system/s with previously configured XPorts, then you will need to change the Connect Mode of the XPort. To change the Connect mode, from the Traka32 software select Engineers>Diagnostics. From the Diagnostics window select the XPort Utilities tab and click the Search button. A list of active XPort devices will be displayed along with the MAC address of each XPort and the device's IP address.
- Page 104 2.4.4.3 LANTRONIX UDS2100 For some applications it is necessary to use the Lantronix UDS2100 dual serial to Ethernet device server. This is provided as an alternative to the standard Lantronix XPort device. The difference between the UDS2100 and the XPort is that the UDS2100 has 2 serial ports available (as opposed to just one).
- Page 105 2.4.4.4 INSTALLING TELNET ON WINDOWS VISTA Telnet Client can be used to configure a Traka Ethernet Device (TED) across an Ethernet. However it is important to note that by default, Telnet is not installed with Windows Vista, but you can install it by following the steps below. To install Telnet Client...
-
Page 106: Gprs Communication
2.4.5 GPRS COMMUNICATION With the increasing need to administer Traka Cabinets remotely, it is now possible to communicate to your Traka cabinet via GPRS. NOTE: This does not currently work with the SMS Text messaging capability on the Traka systems. Hardware The GPRS Communication hardware consists of... - Page 107 Once disconnected form the control board you will need to plug the Data cable in to a spare port on your PC (if you do not have a serial port for the Data cable you will need a Serial to USB converter which Traka can supply for you). If you wish to use a separate power supply instead of the control boards power output, then this can be wired and configured at a later stage.
- Page 108 From your Windows start button in the bottom left of the computer screen click Start>All Programs>Accessories>Communications>HyperTerminal. You will be confronted with a message which recommends that you make the HyperTerminal your default telnet program. Select the desired option and continue. You will then be asked to give the connection a description name and you will also have the choice of different icon images displayed at the bottom.
- Page 109 In the next window configure the HyperTerminal to connect to the COM port that the Fastrack Supreme is connected to. After selecting the appropriate COM port, set the Baud Rate to either 19,200 (8bit) or 38,400 (16bit) depending on what control board you have. Ensure all the other settings are as follows. Baud Rate: 19,200 or 38,400 Data Bits: 8 Parity: None...
- Page 110 Switch on the GPRS module by powering on the 8bit/16bit control board. You will see the following text appear in the HyperTerminal. Then quickly type +++ and then wait 1 second to enter 'Command Mode'. If successful, the Fastrack Supreme should output 'OK'. Certain parameters need to be configured in order to connect to the GPRS network.
- Page 111 11. Power down the Fastrack Supreme and power back up. Upon power up, the Fastrack Supreme should output: +CREG: 0 +CGREG: 0 On power up the Fastrack Supreme will then automatically connect to the GPRS network ready for communication. Provided there is an antenna connected and a signal received, once a connection has been made the Red LED on the module will start to flash.
- Page 112 RS232. The Fixed IP Address SIM Card will have been supplied with Public IP Address. To configure Traka32 to talk to the Fastrack Supreme, set the Communications Settings to Network and set the IP Address to be the Public IP Address.
- Page 113 IP Address: 91.195.123.225 Port: 4001 NOTE: The PC running Traka32 will have to be connected to the Internet in order to communicate with the Fastrack Supreme. This may also require configuration of a firewall to allow this to work. V3.5 14/08/19...
-
Page 114: Software Installation
TRAKA32 MINIMUM PC R EQUIREMENTS Traka32 requires a minimum of 650MB free space from your host machine. This is the same for every operating system Traka supports to date. The Traka CD also contains 64-bit versions of the Sagem USB Fingerprint reader and Desktop Programmer. -
Page 115: Traka32 License
The Software supplied under this agreement shall be subject to the following terms and conditions… Definitions "Company" shall mean ASSA ABLOY Ltd trading as Traka and shall include the Company's successors and assigns. "Customer" shall mean the person, firm or company with whom this agreement is made. - Page 116 Annual Maintenance Fee The Annual Maintenance Fee specified will, if chosen, be payable upon expiry of the first year following installation of the Traka system and at yearly intervals thereafter. Payment of such invoices shall be as specified above. The payment of the invoice will entitle the Customer to the services specified under Clause 8 (maintenance and support) for a further year from the date of the Annual Maintenance invoice.
- Page 117 Software, and that no statements or representations made by either party have been relied on by the other in agreeing to enter into the Agreement. Copyright © 1997 - 2019 ASSA ABLOY Ltd trading as Traka. All rights reserved. All brand or product names are trademarks of their respective holders.
-
Page 118: Traka32 Installation
TRAKA32 INSTALLATION Before installing the Traka32 software, please check that the PC you are going to install the software on meets the minimum requirements otherwise you may face problems during the installation or use of the software. Please refer to minimum PC requirements section for more details. - Page 119 Also Read & Write permissions must be granted for the following registry key and sub keys... HKEY_CURRENT_USER\Software\VB and VBA Program Settings\Traka32 You now have the ability to change where the writable folders are kept. By default Traka32 always looks for the following folders in C:\Users\Public\Traka\Traka32:...
- Page 120 Open Traka32 whilst holding F11 on your keyboard to open the Traka32 Properties window. Point the database & settings files to their new locations by clicking the browse button.
-
Page 121: Traka32 Registration
Traka32 is registered on a concurrent user basis, so effectively you have to register your database. Once you have registered the Traka32 software you can install as many copies of the software as you wish but you will only be allowed to have a certain number of copies loaded at any one time. -
Page 122: Database Installation
2.5.5.1 MICROSOFT ACCESS DATABASE INSTALLATION Whenever a copy of Traka32 is installed on a Workstation, a blank database will be installed. If you are upgrading a previous installation the current database will not be overwritten. The default file path for the database is 'C:\Users\Public\Traka\Traka32\Database\T32Database.mdb'. - Page 123 2.5.5.2 MICROSOFT SQL 2.5.5.2.1 MICROSOFT SQL SERVER OVERVIEW In addition to Microsoft Access, Traka32 supports all versions of Microsoft SQL Server as the database back-end. Microsoft SQL Server delivers security, reliability and scalability for customers with multiple cabinets and/or installations of the client software.
- Page 124 INTEGRATED SECURITY When a user logs into Traka32 that is connecting to a SQL Server, the user must have the appropriate authorisation to connect to the database. This is in order to maintain the highest level of security of the SQL Server and the database.
- Page 125 Bandwidth: The minimum acceptable bandwidth is 4M bits (512K bytes) per second. (See below) Key List This is based upon 5,278 Key Records being displayed in the Traka32 key list. This transposes to 1,698.51K bytes of data being sent by the SQL Server to Traka32.
- Page 126 With a restricted 2M bits (256K byte) per second connection it takes 11 seconds to transfer the data. With a restricted 0.5M bits (64K byte) per second connection it takes 31 seconds to transfer the data. V3.5 14/08/19 UD0089 Page 126 This Document is uncontrolled unless over stamped "CONTROLLED DOCUMENT"...
- Page 127 Standard Event Report This is based upon 23,600 Event Records being displayed in the Traka32 crystal report viewer. This transposes to 3,139.84K bytes of data being sent by the SQL Server to Traka32. With an unrestricted 100M bits (12,800K byte) per second connection it takes 2 seconds to transfer the data.
- Page 128 With a restricted 2M bits (256K byte) per second connection it takes 12 seconds to transfer the data. With a restricted 0.5M bits (64K byte) per second connection it takes 45 seconds to transfer the data. V3.5 14/08/19 UD0089 Page 128 This Document is uncontrolled unless over stamped "CONTROLLED DOCUMENT"...
- Page 129 XPort Connectivity & Bandwidth section for details. When editing user records it takes minimal time to open the data within Traka32 and save the changes back to the database. With an unrestricted 100M bits (12,800K byte) per second connection: With a restricted 4M bits (512K byte) per second connection: V3.5 14/08/19...
- Page 130 With a restricted 2M bits (256K byte) per second connection: With a restricted 0.5M bits (64K byte) per second connection: V3.5 14/08/19 UD0089 Page 130 This Document is uncontrolled unless over stamped "CONTROLLED DOCUMENT"...
- Page 131 2.5.5.2.4 SQL SERVER 2.5.5.2.4.1 MICROSOFT SQL INSTALLATION This section provides a guide for configuring an installation of Traka32 for use with SQL Server. It assumes the reader is already familiar with the Traka32 software, SQL Server Management Studio and SQL Server security.
- Page 132 Remove the Blank Database from the setup and include Microsoft SQL Server Tools: Complete the set-up as usual. When the installation has finished, uncheck the Launch application now checkbox and click on Finish. Connecting to SQL Server and Creating a Database Click SQL Server Manager from the Traka program group in the Start menu to open the Traka SQL Server Manager: Select File>Properties.
- Page 133 Click the selector button (...) next to the SQL Server box and select the installation of SQL Server where the Traka database is located and click OK: If you are using Integrated Security or SQL Connection Encryption tick the appropriate boxes. Click the selector button (...) next to the Traka Database box, noting that if Integrated Security is not being used, you will be prompted for your SQL logon details and select the appropriate database and click the OK button:...
- Page 134 Confirm the Current Release is correct and click the Initialise Database button. The actions performed should be displayed as follows: Close this dialog and the main window should appear as follows: 10. The initialisation is now completed and the database is ready for use with Traka. The Manager tool can also be used to query the state of the database by clicking the Details...
- Page 135 Configuring and Starting Traka32 Before Traka can be started, it needs to be pointed to SQL Server. To achieve this, single-click the Traka32 icon on the desktop, press-and-hold the F11 key, and then double-click the Traka32 icon. The Traka32 Properties... dialog should appear (you can release F11 key when it does): Change the Database Provider to Microsoft SQL Server and enter the appropriate Server Name and Database Name.
- Page 136 NOT cover this scenario. The version of the Traka32 software that is used with the Access database MUST be the exact same version as that being used with the SQL database. If the versions are different, upgrade the Traka32 software that is used with the Access database to the same version as going to be used with SQL prior to migrating.
- Page 137 3.9.1 for more information. If TLS 1.0 is turned off on the server that hosts the SQL Server Database and you attempt to connect Traka32 using the default connection properties, the following message will be displayed: If you have selected the Support for non-TLS 1.0 enabled servers option, and when connecting to the database, you receive the following message: You will need to install one of the following Native Clients;...
- Page 138 NOTE: If Traka32 hasn’t been installed in the default location, you will be required to change the path to where the SQL scripts have been installed prior to adding or updating the database schema.
- Page 139 If the Native client has not been installed when you launch Traka32, you will receive the following error message: Refer to note 2 of this section for details on installing the SQL Server 2012 Native Client. V3.5 14/08/19 UD0089 Page 139...
-
Page 140: Commissioning
COMMISSIONING 2.6.1 COMMISSIONING OVERVI EW Hopefully by this stage you will have installed your Traka systems and have at least one copy of the Traka32 software installed. If not please refer to the following sections... Planning Hardware Installation ... -
Page 141: Configuring Systems
If you have not configured your database path yet, please refer to the database installation section. When Traka32 has loaded for the first time you will be presented with a grey screen. V3.5 14/08/19 UD0089 Page 141 This Document is uncontrolled unless over stamped "CONTROLLED DOCUMENT"... - Page 142 Click on the Tools menu followed by Configure Systems and you will be presented with the System List. Click on the Systems Menu followed by Add New and you will be presented with a new System Settings window. Enter a System Title to represent the system you are adding for example Reception or Basement. Enter the Serial Number of the system for reference.
- Page 143 11. Click on the System Config tab. 12. You will see a list of cabinets that are attached to the system. A system comprises of a control pod and one or more cabinets. By default there is one cabinet that has 6 receptor strips or rows. You must alter the cabinet configuration to match that of your physical system as follows.
- Page 144 13. Click on the Comms tab. 14. You will see a Comms Type drop down menu. From this you can select: Serial for RS232 or RS485. Modem. Network for Ethernet. 15. Select the appropriate communication setting. 16. If you have chosen Serial, select the following options: Serial Port Select the Serial Port of the PC that you have connected the Traka System to.
- Page 145 17. If you have chosen Modem, select the following options: Serial Port Number Select the Serial Port of the PC that you have connected the Traka System to. Serial Port Settings Select the appropriate serial port settings. For an 8bit system, the setting depends upon the type of crystal your Traka system Control hardware has been fitted with.
- Page 146 Port Enter the Port number of the Ethernet device, this is usually 4001 for the Moxa device and 10001 for the XPort device. Logon This is not currently required for the commonly used Ethernet devices but is available if a different type of device is required.
-
Page 147: Adding A New 16Bit System
Control PCB. The communications between Traka32 and the Traka System will also be possible for up to 30 days, but every time communications is initiated, Traka32 will prompt for a configuration file first. - Page 148 The CPSN window is displayed confirming the Serial Number, CPSN Read from Hardware, the Hardware and Code versions and also the Traka32 version the firmware was tested with. You will need to contact your distributor quoting the CPSN Read from Hardware. The distributor will them be able to e-mail you with a configuration file for your hardware.
- Page 149 NOTE: This indicates it has been loaded into the Traka32 database only at this stage and not yet applied to the cabinet. If the configuration file was incorrect, check that you have the correct file via the file name and try again. An...
-
Page 150: Initialising Systems
2.6.4 INITIALISIN G SYSTEMS When Traka Systems are delivered the memory within the system can become corrupt especially if x-ray machines are used to check the packages. To ensure there is no corrupt data within the system you must reset the memory and set the date and time. - Page 151 You will be asked if you wish to read all system data. Click on No. When asked if you are sure you want to continue, click on Yes. The software will then communicate with the Traka System. This should only take a few seconds. If the communications fails, check the communications settings and installation.
-
Page 152: Configuring Ifobs
(unless using the custom Random Return option - see note below). By default the system will not know where each iFob should go therefore the iFob serial numbers must be associated with the position in the system and the Traka32 software. NOTE: If your system is setup for Random Return to Multiple Systems (RRMS) this process does not apply. - Page 153 To configure the iFob serial numbers, simply click with the right mouse button over the picture of the system and click on Engineers followed by Synchronise iFobs. You will be asked if you wish to download all transaction and alarms. Click on No. When asked if you are sure you want to continue, click on Yes.
- Page 154 The software will then communicate with the Traka System. This should only take a few seconds. If the communications fails, check the communications settings and installation. If communications still fails you will need to contact your supplier for further help. Your system viewer should now contain the iFobs.
-
Page 155: Configuring A User
2.6.6 CONFIGURING A USER Click on the View menu followed by User List and you will be presented with the User List. Click on the Users menu followed by Add New. You will be presented with a new User Details window. - Page 156 Click on the System Access tab. The system access tab allows you to define the user’s access code, the period of validity and the times of access. Enter a PIN or Card ID for the user. For a Keypad entry Traka System, enter the Primary Personal Identification Number (PIN). ...
- Page 157 Click on Yes to allocate the Card Number to the user and you will see a series of **** in the PIN or Card ID field. Click on the iFob Access tab. In order to test the system you will need access to the iFobs. By default all iFobs are configured with Access Level 1 unless otherwise specified.
- Page 158 All the other fields and tabs in the User Details window are not required for the commissioning stage. For more in-depth information on configuring the user details please refer to the User Details section. V3.5 14/08/19 UD0089 Page 158 This Document is uncontrolled unless over stamped "CONTROLLED DOCUMENT"...
- Page 159 10. When you are happy with your configuration click on and the details will be written to the database and to the relevant Traka Systems. 11. Now refer to the Final Testing section. V3.5 14/08/19 UD0089 Page 159 This Document is uncontrolled unless over stamped "CONTROLLED DOCUMENT"...
-
Page 160: Final Testing
DOOR'. If this happens simply close the door and then log back into the system to continue testing the iFobs. Once you have finished testing all of the iFobs in the system, close the door. Return to the Traka32 software. 10. Select the appropriate system from the drop down menu. - Page 161 11. Click on the button highlighted below to read data from the selected system. 12. Check that Traka32 downloads an appropriate number of transactions and that the transactions appear in the iFob History tab. 13. This completes the basic installation and testing. Please refer to the main user guide for more in depth information on the various features and options of Traka.
-
Page 162: Traka32 Software Overview
TRAKA32 SOFTWARE OVE RVIEW All Traka products that use 8bit or 16bit hardware are supported by the Traka32 Windows software, this is essential to configure the Traka Systems. Traka32 allows you to view and manage your Traka system through an 'easy to use' software interface. - Page 163 Windows Server 2012 Windows Server 2012 R2 Oracle Database Oracle 10G Oracle 11G Traka32 must be run on a Windows XP or later computer. Traka32 is designed for multi-lingual support with several European languages already available. V3.5 14/08/19 UD0089 Page 163...
-
Page 164: Read All Systems Data
READ ALL SYSTEMS DATA The transactions, alarms and events reports available from the Traka32 software are only as up to date as the last time the system data was read. To update the data from a single system, select the required system from the drop down menu and click on (shortcut key F9). -
Page 165: Languages
LANGUAGES Languages on 8bit Systems 8bit systems currently can only display one language per system. Please see the below list of supported languages. Languages on 16bit Systems 16bit systems have the ability to display a different language for each user in the database. This allows each user to login to the cabinet/locker and have their own language displayed whilst they use the system. -
Page 166: System Settings
SYSTEM SETTINGS 3.4.1 ADDING SYSTEMS From the main screen click on Tools, Configure Systems and a list of the current systems will be shown. From the system list click on the Systems menu followed by Add New. NOTE: If you already have a system record open you can create a new record by simply clicking on button. -
Page 167: Editing Systems
3.4.2 EDITING SYSTEMS From the main screen click on Tools, Configure Systems and a list of the current systems will be shown. From the system list simply double click on the system record you wish to edit or click on the Systems menu followed by Edit System. -
Page 168: Deleting Systems
3.4.3 DELETING SYSTEMS From the main screen click on Tools, Configure Systems and a list of the current systems will be shown. From the system list simply click on the system record you wish to delete, click on the Systems menu followed by Remove. - Page 169 3.4.4 SYSTEM SETTINGS Right click the Pod and select Configure System to access the System Settings. The System Settings window allows you to add and edit the system details. System Details Firmware Version This field shows the current firmware version of the system. NOTE: This field will automatically be filled in when you communicate with the Traka System.
- Page 170 PC’s date and time before adjusting the Traka32 settings. Adjust for daylight saving time Select this option if you want Traka32 to adjust the local time of the Traka System in accordance with the daylight saving rules for the selected time zone.
- Page 171 Number of Access Levels Each system can now have the number of usable access levels defined. The default number of access levels is show below: System Type Number of Access Levels 16bit systems - Key Cabinets 2560 16bit systems - Locker Systems 8bit Key Cabinets and Locker Systems 8bit with Half Reduced User Security 8bit with Full Reduced User Security...
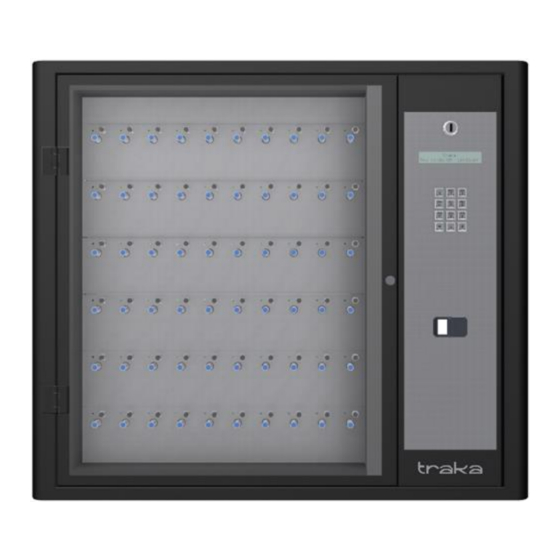
- Page 172 Choose your System Type, and then simply edit the Number of Rows and Columns if required to match that of the Cabinet in the System. When you select the 'Cabinet Style' an image will be displayed at the bottom of the configuration window. This will show you what the system is going to look like, and makes it easier to identify the system.
- Page 173 Serial Serial Port Number Select the Serial Port of the PC that you have connected the Traka system too. Serial Port Settings For an 8bit system the setting depends upon the type of crystal your Traka system has been fitted with. Set 9600,N,8,1 if the 8bit Control PCB is fitted with a 3MHz crystal or set 19200,N,8,1 if the 8bit Control PCB is fitted with a 7MHz crystal.
- Page 174 Network IP Address Enter the IP Address of the Ethernet device, for example 10.0.0.215. NOTE: Traka32 supports the input of IPv6 addresses. For this to work, IPv6 compatible Traka hardware must be present in the systems. V3.5 14/08/19 UD0089 Page 174...
- Page 175 AES-256 Encryption topic. Auto Communication This allows the automatic communication between the Traka system and the supporting Traka32 software. NOTE: For the Auto ’Communication’ to operate you must set the Auto Communication drop down to either Interval, Specific Time of Day, Online or...
- Page 176 If the card is valid, the access control system would send a packet of data containing details of the user via TCP/IP to the Traka32 software. Traka32 would decode the incoming packet, again verify the user details and if valid would send a command to the Traka System to open the door.
- Page 177 TCP/IP to the access control system to say the user 'xyz' has one or more keys/items in their possession. Traka32 will know if it has sent a command to the Access Control System for a particular user so if that user takes subsequent keys/items further commands are not sent.
-
Page 178: System Configuration
3.4.5 SYSTEM CONFIGURATION The System Configuration window allows you to add and edit the cabinet details. System Number This is a reference number for the cabinet attached to the system. It is possible to have from 1 to 255 cabinets per system. - Page 179 Key Control: M-Series (3rd Edition) Lockers: Modular Lockers Group 4 (31 way) V3.5 14/08/19 UD0089 Page 179 This Document is uncontrolled unless over stamped "CONTROLLED DOCUMENT"...
- Page 180 Other: Traka Handheld Device Number of Rows Select the number of rows within the cabinet. The number of rows selectable will depend on the System Style selected. Number of Columns Select the number of columns within the cabinet. The number of columns selectable will depend on the System Style selected.
-
Page 181: System Viewer
SYSTEM VIEWER 3.5.1 SYSTEM VIEWER OVERVI EW The System Viewer allows you to see a representation of the Traka System on your PC. It appears every time that you open the software. Only one system is shown at a time and can be selected from the system selection drop down menu on the main toolbar. - Page 182 System Display The colours of the iFob/Keys in the system viewer change colour depending on their current status... V3.5 14/08/19 UD0089 Page 182 This Document is uncontrolled unless over stamped "CONTROLLED DOCUMENT"...
- Page 183 Information The system viewer shows when the system was last updated with data from the Traka software. Always check to ensure you are looking at the latest information. By clicking over an iFob on the system viewer, the status of the iFob is clearly shown.
- Page 184 Overdue etc. This method gives much greater flexibility so that all the relevant history such as alarm and transaction information is shown together in one report making it much easier to see what is going on. iFob Events The iFob events tab displays the last month's events for the selected iFob. For more detailed reports and charts on the iFob history, click on Report, Crystal Reports, and iFobs from the main menu.
-
Page 185: Ifob Menu
3.5.2 IFOB MENU 3.5.2.1 IFOB MENU The iFob menu allows you to administer the selected iFob and attached Keys. To access the System Menu, from the System Viewer, simply click with the right mouse button over the picture of the iFob. Position This field displays the position of the iFob you have clicked on. - Page 186 Grant Access To User... By selecting Security > Grant Access > To User , you are able to permit a user to have access to the selected iFob. You will now be presented with a window that lets you search for the user that you require. To Group...
- Page 187 NOTE: If you allow a User or Group to have access to a particular iFob, you are effectively giving them the access level of the iFob without going into their User Details. This is particularly beneficial if you have many users in a Group and wish to assign them the same access level, this method is much quicker than editing their individual User Details.
- Page 188 NOTE: If you revoke a User or Group from having access to a particular iFob, you are effectively taking the access level of the iFob away from them without going into their User Details. This is particularly beneficial if you have many users in a Group and wish to remove an access level that they all have, this method is much quicker than editing their individual User Details.
- Page 189 Micro Traka iFobs Program Priority iFob Program Service iFob Program Blacklist iFob Program Data/Time iFob Click on the type of iFob that is to be programmed for use with Micro Traka. Please refer to the Micro Traka Special iFobs section for more details. History iFobs Program Program the selected iFob as a History iFob for use with Micro Traka.
- Page 190 You cannot release an iFob if the user that you are releasing the iFob to does not have the appropriate access. NOTE: It is possible to hide this option within Traka32. If you require this feature to be hidden please contact Traka or your distributor. V3.5 14/08/19...
- Page 191 Emergency Release This opens the relevant cabinet door and releases the solenoid for the selected iFob for a maximum of 30 seconds. As soon as the iFob is removed, the user will be instructed to close the door and no further iFobs will be able to be removed.
-
Page 192: System Menu
System. Clearing this option only lasts for the time the user is logged in to Traka32, once a user logs out and back in again the option will by default be enabled. There is an option 'Preserve the State of Auto-Comms Online Mode' that whilst enabled, will keep auto synchronisation disabled. - Page 193 This option applies to only the selected System and is selected by default whenever Traka32 is loaded. If you want to set this option on all systems, this can be done from the Tools menu. Configure System Click on Configure System to edit details of the selected system.
- Page 194 Simply select the name of a user of whom you wish to give access to the system and click OK. NOTE: You cannot give access if the user does not have the appropriate access. Biometrics Admin NOTE: This option will only show if the selected system has a Traka Biometrics Reader fitted. Backup Templates Click this option to backup all of the fingerprint templates to the database.
- Page 195 NOTE: Use with caution! Resetting the biometrics reader will reset the reader's entire memory. As part of the reset procedure it will request that you backup the templates before the restoring. To backup the templates, first click on Yes. Once successfully backed up, you will be prompted to reset the templates, to reset click on Yes.
- Page 196 Check Version This communicates directly with the selected system to show the firmware version. Check Serial Number This communicates directly with the selected system to show the system serial number. NOTE: This option is only available with a firmware version of 6.06.01 or above. Update iFob Status This option will examine the state of each iFob in the system and update state information about each iFob using transaction information.
- Page 197 From the main screen select the required system from the dropdown and from the system viewer right click over the picture of the pod and click Set System Date & Time. Traka32 will read the current date and time from the system and display it along with the local PC's date and time.
- Page 198 3.5.3.3 ASSIGN IFOB ACCESS LEVELS This dialogue will assign new Access Levels to existing iFobs in the system, overwriting any current values. NOTE: Any access rights defined for Users or Security Groups will not be updated to reflect the changes made.
-
Page 199: Ifob Details
IFOB DETAILS 3.6.1 EDITING IFOBS The quickest way to add a new iFob into a system is from the System Viewer. From the main screen select the system from the drop down menu in the main toolbar, and from the system viewer right click over the picture of the relevant position and click on Edit iFob Details. - Page 200 If the software was unable to update one or more of the systems the following message will be shown... Click on Yes if you wish to save the changes to the database only. You can update the relevant systems at a later date using the Synchronise System option from the System Viewer.
-
Page 201: Adding / Replacing Ifobs
By default the system will not know where an iFob should go therefore the iFob serial number must be assigned to the position in the system and the Traka32 software. Go to the system that you wish to assign the iFob to. If the system has one or more doors, access the system in the normal way. - Page 202 Click on Read Serial Number. Traka32 will communicate to the selected system and read the iFobs serial number. If the system successfully reads the serial number, click on Yes to allocate the serial number to the iFob Details record. If the system could not detect an iFob...
- Page 203 You must first deallocate or remove this iFob from Traka32 before reallocating it again. Please refer to the De-allocating iFobs Removing iFobs section. Edit any of the other appropriate details. For more details refer to the iFob Details section. To Save your changes, simply click on 10.
-
Page 204: Adding / Replacing Ifobs Using A Desktop Programmer
It is very important to ensure that the correct System and Position is selected for the iFob you are about to assign using the desktop programmer. The selected iFob record will open. Click on the button highlighted below. Traka32 will communicate to the desktop programmer and read the iFobs serial number. V3.5 14/08/19... - Page 205 If the system detects that the iFob is already in use... You must first deallocate or remove this iFob from Traka32 before reallocating it again. Please refer to the De-allocating iFobs Removing iFobs section.
- Page 206 If the software was unable to update one or more of the systems the following message will be shown... Click on Yes if you wish to save the changes to the database only. You can update the relevant systems at a later date using the Synchronise System option from the System Viewer.
-
Page 207: Removing Ifobs
3.6.4 REMOVING IFOBS The quickest way to remove an iFob from a system is from the System Viewer. From the main screen select the system from the drop down in the main toolbar and from the system viewer right click over the picture of the relevant position and click on Edit iFob Details. You can also remove an iFob from the iFob List. - Page 208 To remove the iFob click on Yes. The software will automatically update the Traka System. If successful you will be prompted to physically remove the iFob from the system. If the software was unable to update the system the following message will be shown... Click on Yes if you wish to save the changes to the database only.
- Page 209 3.6.5 IFOB DETAILS The iFob Details window allows you to add and edit the iFob details. iFob Access Here you define the accessibility of the iFobs. System and Position The System and Position fields show where the iFob is located. These are for reference only unless you are adding a new iFob in which case you will have to pick the system and position you want to allocate the iFob Status The status of the iFob simply shows whether the iFob is currently...
- Page 210 Serial Number The serial number field shows serial number of the iFob allocated to the selected position. To assign an iFob serial number, refer to the sections Adding/Replacing iFobs Adding/Replacing iFobs using a Desktop Programmer. Access Level As supplied every iFob is given access level 001 and every user is given access to all iFobs with access level 001.
- Page 211 Pair You may choose to relate one iFob to another. A related iFob must be replaced before the selected iFob can be removed. To relate an iFob, simply complete the number in the Pair field. You may have one iFob related to another iFob but you do not have to have the second iFob related back to the first.
- Page 212 iFob Details Here you can view and edit optional iFob details. Description This field shows the current key description associated to the iFob. A description of up to 70 characters can be used. NOTE: When using the 'Random Return to Multiple Systems' option, the description field can only have up to 10 characters.
- Page 213 Here you can configure emails to be sent automatically whenever certain events occur for the selected iFob. NOTE: This basic messaging system has now been superseded by the comprehensive Message Notification System from Traka32 Version 02.006.002. V3.5 14/08/19 UD0089 Page 213 This Document is uncontrolled unless over stamped "CONTROLLED DOCUMENT"...
- Page 214 Send Email when iFob is taken Select this option to enable Traka32 to send an email each time the selected iFob is taken. The email will be sent to each address listed in the recipient list below. Send Email when iFob is returned Select this option to enable Traka32 to send an email each time the selected iFob is returned.
- Page 215 NetSend when iFob is taken Select this option to enable Traka32 to send a message each time the selected iFob is taken. The message will be sent to each user listed in the recipient list below. NetSend when iFob is returned Select this option to enable Traka32 to send a message each time the selected iFob is returned.
- Page 216 GSM Module NOTE: This tab will only show if the firmware of the selected system has the GSM Module Interface enabled. Send SMS when iFob is taken Select the Send SMS when iFob is taken option to allow the Traka Cabinet to send a SMS each time the selected iFob is taken from the Cabinet.
-
Page 217: De-Allocating Ifobs
3.6.6 DE-ALLOCATING IFOBS iFobs can be de-allocated from a System without being deleted. De-allocated iFob can then be re-allocated again in the future. This is very useful if you want to transfer an iFob from one slot to another or one cabinet to another. To De-Allocate an iFob Edit the record of the iFob that your require to de-allocate. -
Page 218: Key Details
KEY DETAILS 3.7.1 KEY LIST The Traka system allows you to define as many keys as you wish to attach to each iFob. You may also define keys that are not currently attached to any iFob. However, as soon as the key is attached to an iFob, the Traka system will monitor the activity of the key, recording every usage, even if the key is moved from one iFob to another. - Page 219 Below is a screen shot showing a security group being assigned to a selection of keys: V3.5 14/08/19 UD0089 Page 219 This Document is uncontrolled unless over stamped "CONTROLLED DOCUMENT"...
- Page 220 V3.5 14/08/19 UD0089 Page 220 This Document is uncontrolled unless over stamped "CONTROLLED DOCUMENT"...
-
Page 221: Key Tree
3.7.2 KEY TREE The Key List comprises of a list of all the keys and a tree view of how the keys have been attached to the iFobs. Keys can be moved from iFob to iFob or placed in the Non-Allocated Keys Bin at the bottom of the tree. From the key tree, click on the required key, press and hold down the Shift key and then drag the key to the required iFob. -
Page 222: Adding Keys
3.7.3 ADDING KEYS From the main screen click on Key List and a list of the current keys will be shown. From the key list click on the Keys menu followed by Add New. If you already have a key record open you can create a new record by simply clicking on the button. -
Page 223: Editing Keys
3.7.4 EDITING KEYS From the main screen click on Key List and a list of the current keys will be shown. From the key list simply double click on the key record you wish to edit or click on the Keys menu followed by Edit Key. -
Page 224: Deleting / Removing Keys
DELETING / REMOVING KEYS There is a fundamental difference between deleting a key record and removing the key from a system. Traka32 has the ability to store the records of keys even if they are not attached or assigned to an iFob in a Traka system. - Page 225 To remove a key from an iFob simply click on the button. To Save your changes, simply click on To Cancel your changes, simply close the window and click No when asked if you want to save the changes. V3.5 14/08/19 UD0089 Page 225 This Document is uncontrolled unless over stamped "CONTROLLED DOCUMENT"...
- Page 226 On the Key Details tab there are ten user definable fields and one notes field available to store details about the key. These fields are only used within the Traka32 software for reporting on keys. The heading for the user definable fields...
- Page 227 In applications where there is a large turnover of key records such as the motor trade, it may be important to check if there is already a record for that key. Traka32 can automatically check the individual fields of all the key records against the one you are adding or editing to check for duplications.
- Page 228 Service This tab is called 'Service' by default, however it can be renamed along with the 4 fields to suit customer requirements. To rename this tab and the fields refer to the Service section of the Key Details in the Properties window.
-
Page 229: User Details
USER DETAILS 3.8.1 USER LIST User List The user list shows a list of all the users in the Traka32 database. By double clicking on a user or right clicking a user you can edit their individual user details. Additionally you can highlight multiple users and edit them at the same time. To do this simply click on a user and with the left mouse still pressed drag and highlight all the desired users then release the mouse. -
Page 230: Adding Users
3.8.2 ADDING USERS From the main screen click on User List and a list of the current users will be shown. From the user list click on the Users menu followed by Add New. NOTE: If you already have a user record open you can create a new record by simply clicking on button. - Page 231 If the software was unable to update one or more of the systems the following message will be shown… Click on OK and the following message will be shown… Click OK. V3.5 14/08/19 UD0089 Page 231 This Document is uncontrolled unless over stamped "CONTROLLED DOCUMENT"...
-
Page 232: Editing Users
3.8.3 EDITING USERS From the main screen click on User List and a list of the current users will be shown. From the user list simply double click on the user record you wish to edit or select the record and click on the Users menu followed by Edit User. -
Page 233: Gdpr Statement
3.8.4 GDPR STATEMENT To retain the audit history, such as a sequence of activity that has affected a specific operation, procedure or event, it is recommended that the User details are maintained & not fully deleted from the database. With this in mind the preferred option to remove a User from a Traka system is as follows: ... -
Page 234: Deleting Users
3.8.5 DELETING USERS From the main screen click on User List and a list of the current users will be shown. From the user list simply click on the user record you wish to delete, click on the Users menu followed by Delete. -
Page 235: Anonymise Deleted User Records – Gdpr
ANONYMISE DELETED USER RECORDS – GDPR In addition to the GDPR statement regarding Users, this section covers the 'Anonymising' of deleted Users in relation to GDPR compliancy. Within the Traka32 Properties/User Info screen, an additional checkbox can now be located for 'Anonymise Deleted Users'. - Page 236 A window will appear asking for confirmation that you wish to Anonymise all deleted User Records. NOTE: This option can be used independently to having the Anonymising Deleted Users checkbox enabled. Click on the ‘Yes’ button to proceed. A progress bar will be displayed during the process. Once completed, a window will appear confirming that all the deleted Users have been Anonymised.
- Page 237 Forename & Surname Enter the name of the user. It is essential that these fields are completed. Tip: You may include a telephone extension number or bleeper reference within the Surname field. This will show whenever the user name is presented on the LCD screen. V3.5 14/08/19 UD0089 Page 237...
- Page 238 There are ten user definable fields and one notes field available to store details about the user. These fields are only used within the Traka32 software for reporting on users. The heading for the user definable fields can be altered from the...
- Page 239 System / Apply to All Systems When configuring the System Access and iFob Access, it is possible to configure the access individually for each Traka System. If the access settings are the same for each system, then click the Apply to All Systems button to copy the access settings for the current system in view to all Traka systems.
- Page 240 PIN or Card ID For a Keypad entry Traka System, enter the primary Personal Identification Number (PIN). NOTE: Different Users can have the same PIN (primary and secondary) as long as they are in different regions. For a Card Reader entry Traka System, enter the Card ID. If you do not know the Card ID:- Swipe the card through the reader fitted to one of the Traka systems.
- Page 241 Status The Active / Inactive Status allows or denies a user access to one or all Traka Systems. Setting the user’s status to Active allows access to the relevant Traka System whilst setting to Inactive will deny access. Active / Expiry Dates The Active and Expiry Dates allow the user access to one or all Traka Systems between the two dates.
- Page 242 However, when using TACLS and the server is unavailable the default behaviour is to release the iFob. Because the default behaviour between these two systems was different, a tick box has been added into the Product Wizard and Traka32 to set whether the iFob allowance should be ignored if either options didn't reply in time.
- Page 243 iFob Allowance per Access Level iFob allowance per access level when enabled, will allow a user to remove a certain amount of iFobs for each access level they have.iFob Allowance per Access Level is only compatible with the 16bit Board, Firmware Version v2.00.20 and Software Version v02.08.0008 and above.
- Page 244 Authorisation This option will only be enabled if the firmware of the selected system has X System Authorisers enabled. Refer to the X System Authorisers section for more details. Available / Current Access Levels Each iFob in a system has an Access Level assigned to it. For a user to be able to take an iFob, the user must have that access in their Current Access Levels list.
- Page 245 Active Status and Access Levels When selected from the drop down list, the access levels that apply to the specific user and the security groups to which a user belongs are displayed. Time / Date Access Settings When selected from the drop down list, the time/date access settings for the user and the security groups to which a user belongs are displayed.
- Page 246 Available / Chosen Security Groups To Add All available Security Groups to the Current List, click on To Add Selected Security Groups, select the appropriate levels from the Available List and click on To Remove Selected Security Groups, select the security groups from the Current List and click on To Remove All security groups from the Current List, click on Tips: ...
- Page 247 Allow Software Access If the user needs access to the Traka32 Software, click on the Allow Software Access check box. If the box is un-checked, the user will not be able to access the software. NOTE: If no users are given software access, the software will not request a login and allow entry for any use.
- Page 248 Login / Verify Password The Login Password is required in order for the user to log into the Traka32 Software. If the Login Password is hidden by ***** then the password will have to be re-typed into the Verify Password field.
- Page 249 Microsoft SQL Database To grant user’s access to Traka, you must first create a user record in the Traka database and then associate a SQL Login to that user. NOTE: The user in Traka does not need to be granted access to any cabinets. SQL Server Login Enter the appropriate SQL Login used to access the database.
- Page 250 Authorisation If the User has been allowed software access, they can be configured to require authorisation from none, 1 or 2 Authorisers before they are granted access to Traka 32. Select none, 1 or 2 from the Authorisation drop down box. Authoriser User ID When configuring the User as an Authoriser, this field must be completed with a User ID.
- Page 251 Allow user to auto open all locker doors Select this option to open all locker doors the User has access to. For example if a user has access to lockers 1-10 only, upon authorising themselves to the system (e.g swiping their ID card) lockers 1-10 will all open in turn.
-
Page 252: User Access Grid
3.8.8 USER ACCESS GRID 3.8.8.1 USER ACCESS GRID OVERVIEW The user access grid can be used to edit a user's access levels. By selecting the Access Grid tab, the user list shows a grid of all the user and access levels and places an X in the grid for every access level assigned. To view the User Access Grid, click View, User List which will open the User List. - Page 253 3.8.8.2 USER ACCESS GRID FILTERING Prior to v02.006.002 the User Access Grid lists only the users who have access to the system currently selected from the system selection drop down menu in the main toolbar. From v02.006.002 the Users can be filtered to show who is Active and who is Inactive on the currently selected system: Click on Filter and select either: Active Users to display all Users who have access to the selected system.
- Page 254 It is possible to query why a User does not have access to the selected system: Filter the list for Inactive Users. Right click over a User and click on Show Inactive Reason. The Inactive Reason(s) are displayed. For a user to have access to a cabinet they must have the following... ...
- Page 255 3.8.8.3 EDITING ACCESS LEVELS FROM THE ACCESS GRID It is possible to edit a user’s access levels from the grid. A pop-up menu is available on the Access Grid by right clicking over the grid. The pop-up menu can be used to highlight rows and columns on the grid, toggle access level statuses for the highlighted rows and columns and also save and discard any changes.
- Page 256 Copy Selection to Column In Traka32 version 02.10.0013 and above, it is possible to copy a selection of access levels from one column and/or row to another. This works across multiple users and is a very efficient way of assigning access levels.
- Page 257 Saving Changes When changes are saved to the database, Traka32 will automatically communicate the changes to the Traka System. Discard All Access Level Changes At any point it is possible to undo any unsaved changes made to the grid. Simply right click and click on Discard All Access Level Changes, and click on Yes when prompted.
-
Page 258: File
User specific settings are stored in the registry at HKEY_CURRENT_USER\Software\VB and VBA Program Settings\Traka32. If a setting does not exist in the registry it will be extracted from the T32Settings.ini file and if there is no entry in the T32Settings.ini file a default entry is selected. - Page 259 Microsoft SQL Database Settings File This section allows you select the path for the T32Settings.ini file. The Settings File is Customisable and allows certain applications to be active or inactive within Traka32. V3.5 14/08/19 UD0089 Page 259...
- Page 260 Select this option to allow integrated security. Match user via database When using integrated security, select this option so that Traka32 matches the SQL Server Login entered into the user details window to the user name returned by the SQL Server. If the user logging is has administrative rights to the SQL Server (direct or inherited) then they will be given full unrestricted access to the Traka32 software.
- Page 261 T.A.S application to make a communication. Auto Communication This allows the automatic communication between the Traka system and the supporting Traka32 software. By automatically communicating you ensure that the transactions recorded by the Traka system are always backed up to the PC.
- Page 262 Specific Time of Day By selecting specific time of the day you may specify exact times of each day that Traka32 should communicate with the systems. To add a time, enter the required time and click on Add. The time will appear in the list opposite.
- Page 263 Nominate a PC to auto communicate only with the selected system. Nominating a PC can help to prevent the potential problem of more than one copy of Traka32 trying to communicate with the same system at the same time in which case one of them could fail with an error. If Nominate a PC is left not ticked, then all copies of Traka32 will auto communicate with the system.
- Page 264 Standard Search option only allows you to search on only one criterion and highlights the matches. Show Visitor Bookings To enable the Visitor Booking wizard in Traka32, select Show Visitor Bookings. Auto Allocate Tag Numbers This feature when enabled automatically adds a tag number to iFobs that are newly synchronised to the system.
- Page 265 Window Open on Application Start Select the Window you require to open when the Traka32 software is loaded. This will depend on the roll of the workstation the software is installed upon or the application of the Traka32 software. For example motor dealers often use the Key List for day to day administrations or a Fork Truck engineer may use the Fault List to administer day to day truck faults.
- Page 266 For most systems this should not be changed. Synonym for 'Permit Date' The text entered here will be used wherever the original 'Permit Dates' was used in Traka32. Perform LUHN-10 validation on Checking this option will force a check on the Primary ID field of the User Details each time a user record is saved.
- Page 267 User Settings Force all users to use common security settings Checking this option will force the Apply to all systems check box on the User Details window to always be checked. If this option has not previously been selected, the Apply settings from this system drop down menu will become active, allowing the selection of the system that the security settings will be copied from for each user.
- Page 268 When a user goes to login to Traka32 and their password has expired, the user will be prompted to enter a new password and their password expiry date will be reset as per the password expiry period. User Details Field This allows change to the field descriptions of the non essential information on the user details screen.
- Page 269 In applications where there is a large turnover of key records such as the motor trade, it may be important to check if there is already a record for that key. Traka32 can automatically check the individual fields of all the key records against the one you are adding or editing to check for duplications.
- Page 270 Service This section allows you to customise what field descriptions you have in the Service section within the Key Details screen. Desktop iFob Programmer Adaptor Type Select the Adaptor Type accordingly. There are 3 adaptor types, two serial and one USB. The adaptor type is printed on the serial port connector of the Desktop iFob Programmer, if you require USB type the port number is Unnecessary.
- Page 271 Select one of the following options: User reports on local computer - this will use the Crystal Report (*.rpt) files that are installed on the local computer in the Reports directory of Traka32. C:\Program files\Traka Limited\Traka32\Reports Use reports from a shared remote location - this will use the Crystal Report (*.rpt) files that are installed in a remote location.
- Page 272 Enter the Name or IP Address of the SMTP Sever that Traka32 will use to send e-mails. SMTP Port Enter the Port Number of the SMTP Sever that Traka32 will use to send e-mails. The standard default port number used by most SMTP Servers is 25.
- Page 273 'All Regions'. Allow Key Record Deletion With the release of Traka32 version 02.40.0000, a tickbox has been added to the properties form. Once enabled, the Key Wizard will ask if the logged-in user wants to delete unmatched key records when importing data from Kerridge.
- Page 274 Enable linked Server To allow the importing of data from a linked server, select Enable linked server. Table/View 1-4 Enter the Table names for Traka32 to search within Kerridge. Up to 4 tables can be searched. For example: MK_01_VehcleRecords Search Field 1 Enter the Chassis Search Field name that Traka32 will search within the selected tables for the vehicle Chassis Number.
- Page 275 Linked Server Key Details Enter the linked server keys detail Field names for Traka32 to import the data from. If a field is not required for importing, leave the field blank. For example: ChassisNumber RegistrationNumber BriefDescription Description_ ColourWheelbase UserDefinedText BMW Key Reader V3.5 14/08/19...
- Page 276 File Name 2 Set the File Name 2 to KEYREADER.TXT Related Key Field Select the Related Key Field that Traka32 will use to compare the chassis number against. Serial Port Various Settings When experiencing difficulties communicating to Traka Systems using the Serial Port it is possible to adjust some of the more advanced settings of the Serial Port from here.
- Page 277 Logging The Logging tab can only be accessed if the current user of the software is logged in as an engineer. Write the log files locally Select this option to record any internal software errors to log files on the local computer. Write to a shared remote location Select this option to record any internal software errors to log files located at the selected path.
- Page 278 Traka32. Support Contact Info. The information entered into this section of the Traka32 Properties will be visible to all users of Traka32 when they click on Help, Technical Support. Customers and Distributors can amend these details as required. Company Enter the company name of the technical support contact.
- Page 279 Loadable Device Drivers Choose one of These Installed Tablet Types Use this drop down box to select the appropriate Tablet type driver you require to use your Tablet. Choose one of These Installed Fingerprint Readers Use this drop down box to select the appropriate Fingerprint reader driver you require to use your Fingerprint hardware.
-
Page 280: Options
It is possible to set up various user login types, each with their own restrictions so that when users log into the Traka32 software they can only access the parts of the software defined in the login type. The default user type is Administrator. Administrators must of course have all of these permissions and it is therefore not possible to change the Administrator options. - Page 281 3.9.2.1.2 SOFTWARE LOGIN DETAILS The Software Login Details window allows you to add and edit the login details. Please refer to the User Details Software Access section on how to assign the login types to the individual users. Description Enter a description for the login type. This description will appear in the User Details Software Access drop down list. System Allow user to add systems Check this box to allow the logged in user to be able to add system records.
- Page 282 PIN numbers in the User Details or Properties screen, the PIN numbers will only show until the user logs out of Traka32. If this new tick box is ticked and the logged in user is a member of the correct Software Login group then when they log back into Traka32 the user PIN numbers will still be shown.
- Page 283 Allow user to change Software Access Check this box to allow the logged in user to be able to edit user's software access. Allow user to remove users Check this box to allow the logged in user to be able to delete user records. iFob Allow user to add iFobs Check this box to allow the logged in user to be able to add iFob records.
- Page 284 Allow user to use emergency iFob release Check this box to allow the logged in user to be able remotely release an iFob in an emergency. This option is useful for supervisors in case of problems or emergency situations. Allow user to release iFobs remotely Check this box to allow the logged in user to be able to give another user remote access to a selected iFob.
- Page 285 Allow user to add bookings Check this box to allow the logged in user to be able to add key booking records. Checking this box will automatically check the edit key booking box. Allow user to edit booking details Check this box to allow the logged in user to be able to edit key booking records. Allow user to delete bookings Check this box to allow the logged in user to be able to delete key booking records.
- Page 286 Check this box to allow the logged in user to be able to upgrade the firmware of the Traka Systems. This option should only be available to administrators. Allow user to upgrade software Check this box to allow the logged in user to be able to upgrade the Traka32 software. This option should only be available to administrators. V3.5 14/08/19...
- Page 287 Check this box to allow the logged in user to be able to delete security group records. Allow user to edit properties Check this box to allow the logged in user to be able to edit the Traka32 properties. This option should only be available to administrators.
- Page 288 Access Levels Available / Current Access Levels Select the Access Levels that the logged in user will be able to administer. This will allow the logged in user to administer iFobs that have one of the Current Access Levels. This will also only allow the logged in user to administer Keys attached to iFobs that have one of the Current Access Levels.
- Page 289 Visitor Booking Allow user to add bookings Check this box to allow the logged in user to be able to add visitor booking records. Checking this box will automatically check the edit visitor booking box. Allow user to edit booking details Check this box to allow the logged in user to be able to edit visitor booking records.
- Page 290 Sasol Allow user to assign Sasol Administrator role Check this box to allow the logged in user to be able to assign Sasol Administrator roles. Allow user to assign plant states rights Check this box to allow the logged in user to be able to assign plant states rights. Allow user to assign Sasol restricted access Check this box to allow the logged in user to be able to assign Sasol restricted access.
- Page 291 Notifications Allow user to add new Rules Check this box to allow the logged in user to add new Rules for the Message Notification system. Allow user to edit Rules Check this box to allow the logged in user to edit Rules for the Message Notification system. Allow user to Remove Rules Check this box to allow the logged in user to edit Rules for the Message Notification System.
- Page 292 Dock Door Reports. Allow user to Clear Alarms Check this box to allow the logged in user to the ability to Clear the Alarms notifications in Traka32. Please click the hyperlink to learn more about the Alarm Notifications. V3.5 14/08/19 UD0089 Page 292 This Document is uncontrolled unless over stamped "CONTROLLED DOCUMENT"...
- Page 293 Check this box to allow the logged in user to the ability to remove Key Categories. Allow user to View Bookings Created by all Users Check this box to allow the logged in user view Key Bookings that have been created by all users in Traka32. V3.5 14/08/19...
- Page 294 Access Levels Names Allow user to Add Access Level Names Check this box to allow the logged in user to Add Access Level Names. Allow user to Edit Access Level Names Check this box to allow the logged in user to Edit Access Level Names. Allow user to Remove Access Level Names Check this box to allow the logged in user to Remove Access Level Names.
- Page 295 3.9.2.2 SECURITY GROUPS 3.9.2.2.1 SECURITY GROUP OVERVIEW A Security Group defines a set of common system and iFob access credentials that can be applied to multiple users. For example all Line Managers within an organisation may each require access to the same group of keys. A Security Group called Line Managers could be created with only the iFob access levels (the keys) the Line Managers are allowed to take.
- Page 296 3.9.2.2.2 SECURITY GROUP DETAILS The security group details window allows you to add and edit security group details. Please refer to the User Details Security Group section on how to assign the security groups to the individual users. Description Enter a description for the security group. This description will appear in the User Details Security Group drop down list.
- Page 297 Deny Group Tick to make the selected Security Group a Deny Group. Upon selecting Deny Group the form will turn red. A Deny Group denies access to all system and iFob credentials defined by the group. For example if access levels 1 to 20 belong to the group and you make it a deny group, then any member of the group will be denied access to access levels 1 to 20 regardless of the other security groups to which they belong or their individual access settings.
- Page 298 Here the group is allowed access from Monday 18:00 to Tuesday 05:00. Here the group is allowed access from Monday 09:00 to Monday 17:30. iFob Access iFob Allowance The iFob Allowance can restrict how many iFobs a user within the security group can take out at any one time.
- Page 299 Each security group can belong to one or more Regions or No Regions. Note that only the Regions matching that of the logged in Traka32 Administrator will be displayed. To Add All available regions to the Current List, click on...
- Page 300 Tips: To select a group of regions, click on the first region, hold down the Shift key and click on the last access level in the group. To select several individual regions hold down the Ctrl key and click on the access levels in the group.
- Page 301 3.9.2.3 ACCESS LEVEL NAMES 3.9.2.3.1 ACCESS LEVEL NAME OVERVIEW To make it easier to identify how the iFob Access Levels are assigned, it is possible to add a meaningful description against each access level. These names are then used throughout the software wherever an Access Level needs to be selected or displayed, such as in the User Details and iFob Details.
- Page 302 3.9.2.3.2 ASSIGNING AN ACCESS LEVEL NAME To assign an Access Level with a name go to File>Options>Access Level Names. Select Options>Add New. Select the access level number that you wish to assign the name to. Enter the name or description of the access level. Click Save &...
- Page 303 3.9.2.4.1 REGION OVERVIEW Regions allows for Traka32 Administrators to see and access only the information from Systems, iFobs, Keys and Users within their specified region(s). In addition it allows Traka system cabinet users to only access the cabinets within their specified region(s).
- Page 304 When a user logs into the Traka32 software, if they have been placed into one or more regions, the software will only show details of System, iFob, Keys, User and Reports for regions to which they belong.
- Page 305 3.9.2.4.2 REGION DETAILS The Region Details window allows you to add, edit and delete the Regions. To create a new region click File>Options. Select the Regions tab. Click Options>Add New and the Region Details window will appear. Description Enter the name or description of the region. Click Save &...
- Page 306 3.9.2.4.3 SINGLE REGIONS (TRAKA32 VERSION 02 .07.0000 AND PRIOR) For customers using version 02.07.0000, the graphic below indicates how systems and users could only belong to a single Region. V3.5 14/08/19 UD0089 Page 306 This Document is uncontrolled unless over stamped "CONTROLLED DOCUMENT"...
- Page 307 3.9.2.5 USER GROUPS 3.9.2.5.1 USER GROUPS OVERVIEW User Groups by their definition allow users to be separated into different groups. At present, a single user cannot belong to multiple groups. User Groups can simply be used for administration purposes to report on users in a specific groups.
-
Page 308: Edit
3.10 EDIT 3.10.1 Cut is used to Copy and 'remove' information from Traka32 and put it in the clipboard. This information can then be retrieved using the Paste option. Cut works very similarly to delete with the exception that cut object(s) are placed in the clipboard and can be pasted elsewhere into Traka32 as normal OR into other Windows based applications like Word and Excel etc. -
Page 309: Copy
3.10.2 COPY Copy is used to 'copy' information from Traka32 and put it in the clipboard. This information can then be retrieved using the Paste option. V3.5 14/08/19 UD0089 Page 309 This Document is uncontrolled unless over stamped "CONTROLLED DOCUMENT"... -
Page 310: Paste
3.10.3 PASTE Paste is used to 'paste' information which has been previously saved to the clipboard using the Cut or Copy options, or Text which has been saved to the clipboard from another application. V3.5 14/08/19 UD0089 Page 310 This Document is uncontrolled unless over stamped "CONTROLLED DOCUMENT"... -
Page 311: View
3.11 VIEW 3.11.1 LOCKER ALLOCATION WI ZARD A Locker Allocation Wizard has been written to help customers (primarily schools and academies) migrate all the students from one year to another. When the Migrate button is pressed all the selected users will have their access revoked in all lockers in their current year and then assigned to new lockers in the next year. -
Page 312: Reports
3.12 REPORTS 3.12.1 REPORTS OVERVIEW A range of reports are available from the main Reports menu. NOTE: To ensure the reports are up-to-date for a system, select a system from the drop down menu and then click on the 'Read Selected Systems Data' button. Crystal Reports If you are running your Traka System with a firmware version of 6.07.31 or above, the iFob and Key History will be recorded as events. - Page 313 Software Audit This report lists all the changes that have been made in the Traka32 software. Advanced Software Audit This report allows you to select various filters and parameters before listing all the changes that have been made in the Traka32 software.
-
Page 314: Software Audit
3.12.2 SOFTWARE AUDIT This report lists all the changes that have been made in the Traka32 software. V3.5 14/08/19 UD0089 Page 314 This Document is uncontrolled unless over stamped "CONTROLLED DOCUMENT"... -
Page 315: Advanced Software Audit
ADVANCED SOFTWARE AU DIT This report, like the regular Software Audit, lists all the changes that have been made in the Traka32 software, however, the Advanced Audit allows you to select various filters and parameters to better define the results. -
Page 316: Key Access Report
KEY ACCESS REPORT Using Traka32 you can now generate a report that shows all the keys in the system/s and which user/s have access to them, or alliteratively you can view all the users and which keys they are authorised to take. When you run the report you can choose to run it on all systems or you can select an individual system. -
Page 317: Crystal Reports
CRYSTAL REPORTS 3.12.5.1 CRYSTAL REPORTS The new event reports in Traka32 designed and implemented using a package called Crystal Reports. Crystal Reports allows Traka and Customers to design new reports for Traka32 quickly and efficiently. If you would like to design your own reports for Traka32, please... - Page 318 Alarm History Report This report will display the alarms that have been cleared at Traka32 along with any notes that have been logged against them. If no notes are logged against an alarm the heading 'Notes not Entered' will be above the current alarms.
- Page 319 3.12.5.3 CRYSTAL REPORTS - IFOBS Standard iFob Event Report This report lists all the events for every iFob. Standard Current iFob Holder Report This report lists all the current holders of any iFobs that are currently out of a system. This report also shows any iFobs that are out under a curfew, what time they are due back and if they are overdue.
- Page 320 iFob Undetectable report This Crystal Report has been written to summarise the iFob Undetectable events. A date range can be selected and the report can be run for all cabinets or a selected cabinet. iFobs Currently Undetectable The iFob Currently Undetectable Report can show what iFobs are undetectable at the time the report is run. Item Access Report This report displays all the iFob or locker positions in the system and who can access them.
- Page 321 3.12.5.4 CRYSTAL REPORTS - KEYS Standard Current Key Holder Report This report lists all the current holders of any Keys that are currently out of a system. This report also shows any Keys that are out under a curfew, what time they are due back and if they are overdue. NOTE: The curfew status has been added to the Current Key Holder Report so you can filter the reports to only show keys that are currently under or past their curfew.
- Page 322 Standard Key List Report This report generates a list of the current Keys in the system and their information such as Make, Model etc Standard Key Usage Count This report will list the number of times that a key has been removed and returned to a system. Standard Key Usage Report Per Access Level This report and chart details the number of days, hours or minutes the keys with a specific iFob access level have been out of the system.
- Page 323 3.12.5.5 CRYSTAL REPORTS - KEY BOOKINGS Two new reports have been added to Traka32, one is for normal fixed return Key Booking and the other if for Key Booking By Reference. NOTE: In software version 02.10.0006 these reports are only visible for SQL Server and Access databases.
- Page 324 3.12.5.6 CRYSTAL REPORTS - USERS Standard User List This report lists all of the users in the Traka database along with their User details i.e Staff Number, Position, Tel, Email etc. Software Access List This report lists all of the users that have access to the Traka 32 software along with their User details i.e Staff Number, Position, Tel, Email etc.
- Page 325 3.12.5.7 CRYSTAL REPORTS - FAULTS iFob Per Truck Fault History Report This report lists all the recorded faults, when they occurred, who logged the fault, when the fault was cleared and who cleared the fault. iFob Per Truck Outstanding Faults This report lists all the current faults that are outstanding on any of the iFobs.
- Page 326 3.12.5.8 CRYSTAL REPORTS - NOTIFICATIONS Notification Log This report shows which Email Notifications were sent when the events were downloaded. The report shows details of the Notification Template, the Notification Rule and a status showing whether or not the email was sent successfully. V3.5 14/08/19 UD0089 Page 326...
- Page 327 3.12.5.9 CRYSTAL REPORTS - IMMOBILISOR Immobilisor Events A Crystal Report is now available which shows all events generated by the Immobilisor, e.g. Device Activated, Device Accepted etc. You can filter this report by Region, System, or User. Immobilisor Base Hours Meter Reader This report shows the Immobilisor Base hour’s usage for trucks.
- Page 328 This report lists all of the systems in the Traka database along with their System Details i.e System Title, Serial No., Firmware Version, Region etc. System Log This report lists the details of which users have logged into Traka32. V3.5 14/08/19 UD0089 Page 328 This Document is uncontrolled unless over stamped "CONTROLLED DOCUMENT"...
- Page 329 3.12.5.11 EVENT REPORT VIEWER Toolbar Reports Menu V3.5 14/08/19 UD0089 Page 329 This Document is uncontrolled unless over stamped "CONTROLLED DOCUMENT"...
- Page 330 Save Report When a report has been filtered and sorted it can be saved as a custom report. Simple give the report a name and it will appear in the main Reports menu. All the filter parameters will be saved with the report along with the name.
- Page 331 Print Any report any be printed. The main Preview is shown at all times. Close Close the report viewer. Page Navigator Click the relevant arrow to move from page to page on the report. Zoom Click to zoom in or out of a page. Show / Hide Filter The filter at the top of the screen can be hidden so that he Preview is easier to see.
- Page 332 Sorted A report can be sorted on one or more fields. Select a field to sort on and set the Sorted order. Repeat this for each field to sort on. Sort Direction For each field that has been selected to sort on, select the direction of the sort. Filter Each field can be filtered.
-
Page 333: Dock Door Reports
3.12.6 DOCK DOOR REPORTS 3.12.6.1 DOCK DOOR KPI REPORTS The Dock Door report can show normal events where the door has been raised using an iFob as well as events when the 'Override' mode has been used, this will show how long the doors have been up for in minutes. You can also see how many times and for how long the dock door has been opened while on override. - Page 334 3.12.6.2 DOCK DOOR TRAINING REPORTS This report allows you to view different users and their level of use/access regarding the Dock Door. Please see below for descriptions of each report. V3.5 14/08/19 UD0089 Page 334 This Document is uncontrolled unless over stamped "CONTROLLED DOCUMENT"...
-
Page 335: Transaction Reports
3.12.7 TRANSACTION REPORTS 3.12.7.1 TRANSACTION REPORTS - IFOBS iFob Transactions This report lists all the transactions of every iFob. iFob Transaction for Specific User This report is the same as the iFob transactions report but can be filtered down to a specific user. To highlight this option, open the User List by clicking on , select the user in question from the list and click on Reports, iFobs, iFob Transactions For 'xxxx'. - Page 336 iFob Usage Chart This report and chart details the number of days, hours or minutes the iFobs have been out of the system. iFob Usage Chart per Access Level This report and chart details the number of days, hours or minutes the iFobs with a specific access level have been out of the system.
- Page 337 3.12.7.2 TRANSACTION REPORTS - KEYS Key Transactions This report lists all the transactions of every key. Key Transaction for Specific User This report is the same as the key transactions report but can be filtered down to a specific user. To highlight this option, open the User List by clicking on , select the user in question from the list and click on Reports, Keys, and Key Transactions For 'xxxx'.
- Page 338 Key Allocations This report lists all the allocations of a key such as when the key was added to the system, when it was edited or moved from iFob to iFob and when it was removed from an iFob and who by. Key Allocations for Specific Key This report is the same as the key allocations report but can be filtered down to a specific key.
- Page 339 3.12.7.3 TRANSACTION REPORTS - FAULTS Fault History This report lists all the recorded faults, when they occurred, who logged the fault, when the fault was cleared and who cleared the fault. Fault History for Specific iFob This report is the same as the fault history report but can be filtered down to a specific iFob. To highlight this option, open the iFob List by clicking on View, iFob List, select the iFob in question from the list and click on Reports, iFobs, Fault History For 'xxxx'.
- Page 340 3.12.7.4 TRANSACTION REPORTS - IMMOBILISOR Immobilisor Events This report lists all the events for each Immobilisor. Immobilisor Events for Specific User This report is the same as Immobilisor Events report but can be filtered down to a specific user. To highlight this option, open the User List by clicking on , select the user in question from the list and click on Reports, Immobilisor, and Immobilisor Events for 'xxxx'.
- Page 341 3.12.7.5 MICRO TRAKA User History This report lists all the activities performed at each Micro Traka system. V3.5 14/08/19 UD0089 Page 341 This Document is uncontrolled unless over stamped "CONTROLLED DOCUMENT"...
- Page 342 3.12.7.6 TRANSACTION REPORTS - ALARMS This report lists all of the alarms that have occurred. An alarm is recorded if the system is used incorrectly or if something untoward has happened. The alarm report may be filtered by alarm type by selecting the appropriate alarm from the filter list.
-
Page 343: Tools
3.13 TOOLS 3.13.1 FIRMWARE UPGRADE The firmware of the Traka Systems can be updated very easily using the Firmware Upgrade Wizard in conjunction with an upgrade file supplied by Traka. Upgrading the firmware will allow users to benefit from all the latest features available without changing any hardware. -
Page 344: Software Upgrade
NOTE: This utility is still under development. To obtain an upgrade of the Traka32 software, please contact your supplier or visit our web site www.traka.com and click on the support link. To upgrade the software follow the instructions below. Insert the Traka32 CD into the CD-ROM drive. -
Page 345: Configure Systems
3.13.3 CONFIGURE SYSTEMS Please refer to the System Settings section. V3.5 14/08/19 UD0089 Page 345 This Document is uncontrolled unless over stamped "CONTROLLED DOCUMENT"... -
Page 346: Auto Synchronisation All Systems
Clearing this option only lasts for the time the user is logged in to Traka32, once a user logs out and back in again the option will by default be enabled. There is an option 'Preserve the State of Auto-Comms Online Mode' that whilst enabled, will keep auto synchronisation disabled. -
Page 347: Synchronise All Users To All Systems
3.13.5 SYNCHRONISE ALL USER S TO ALL SYSTEMS This synchronises all the user records in the database with the all the systems. If you want to synchronise all the user records in the database with a specific system, this can be done from the System Viewer's, System menu. -
Page 348: Import 16Bit Database
3.13.6 IMPORT 16BIT DATABASE To enable this option, close any open windows within the software so you have a grey screen. Click on Tools followed by Import 16bit Database from the main menu. Click on Next Select the path to the 16bit database that you wish to import. To search for the database file simply click on the Browse button. - Page 349 Select the information that you wish to import from the database. Import System and iFob Details Import User Details Import Key Details Import iFob Transactions Import Alarms NOTE: Importing the iFob Transactions and/or Alarms will take a long time depending on how many transactions and alarms there are to import.
- Page 350 What if the upgrade goes wrong? It is possible that the database is corrupt. Open the database using the old Traka16 software, Enable the Admin menu from the File menu, and click on the Admin menu followed by Tools, Database Tools, and Repair Database.
-
Page 351: Import 32Bit Database
Before You Start The version of the Traka32 software that is used with the database you wish to import MUST be the exact same version as that being used with the current database. If the versions are different, upgrade the Traka32 software that is used with the database you wish to import to the same version as going to be used with the current database. - Page 352 Click on Next Select the data that you wish to import. If you want to assign all the Systems, iFobs, Keys and Users within the import database into a specific region, uncheck the Import Region details check box and select the desired region. You can also specify None as the region in which case no regions will be assigned.
- Page 353 10. Select the appropriate mapping for the security groups. If you do not want to map security groups from the import database to those in the live database but simply import, check the Import all security groups without mapping to existing security groups' checkbox. 11.
- Page 354 14. Provided the import completed successfully, click on Close. V3.5 14/08/19 UD0089 Page 354 This Document is uncontrolled unless over stamped "CONTROLLED DOCUMENT"...
-
Page 355: Extract User Details
EXTRACT USER DETAILS The Extract User Details facility has been introduced to the Traka32 software to enable users that have lost their database or the database has become corrupted to be able to extract the user records currently stored in the Traka System into a new database. -
Page 356: Extract Ifob Details
This utility is still under development. The Extract iFob Details facility will be introduced to the Traka32 software to enable users that have lost their database or the database has become corrupted to be able to extract the iFob records currently stored in the Traka System into a new database. -
Page 357: Import Users From A Spreadsheet
When you are happy with your selections, simply click on Import Users. Importing Users into Regions It is possible to import users from a spreadsheet into specific regions in Traka32. Doing this is beneficial as it will save time manually inputting users into regions. - Page 358 The Excel Spreadsheet must be in a pre-defined format. Blank spreadsheets are available from the root of the Traka32 installation, for example 'C:\Program Files\Traka Limited\Traka32\Import\Traka32 User Import.xls'. Close any open windows within Traka32 so you have a grey screen. Click on Tools followed by Import Users from Spreadsheet from the main menu.
- Page 359 10. A message will appear informing you the import was a success. 11. Navigate to any user you imported via the spreadsheet. Click the regions tab, you will notice the user now belongs to the region you have specified in the spreadsheet. NOTE: You can only import users into regions that the logged in user can administer.
-
Page 360: Import Keys From A Spreadsheet
Fill out the spreadsheet accordingly and click the 'Process Sheet For Import' Button. To import a spreadsheet ensure all windows currently open in Traka32 are closed so you have a grey screen. Click on Tools followed by Import Keys from Spreadsheet from the main menu. -
Page 361: Extract Users And Items For Traka Touch
EXTRACT USERS AND ITEMS FOR TRAKA TOUCH This utility allows User and Item details to be exported from the Traka32 database directly into a Traka Touch import spreadsheet format. This allows a simple process for transferring the users from a 16bit system to a Traka Touch system. -
Page 362: Repair & Compact Database
3.13.13 REPAIR & COMPACT DAT ABASE NOTE: This option is only available to Microsoft Access Database users. The Repair & Compact utility has been provided to allow users to compact the size of the database to its absolute minimum. This utility also checks the database for any errors and will correct them automatically. To enable this option, close any open windows within the software so you have a grey screen NOTE: Every time a backup of the database is made of the database the database will be compacted... -
Page 363: Check Database Integrity
This option is only available to Microsoft Access Database users. As the Traka32 software is developed with new features, extra tables and fields are required within the database. The Check Database Integrity utility will check the current version of the Traka32 software and ensure that all the appropriate tables and fields are present and correct within the database. -
Page 364: Backup Database
NOTE: This option is only available to Microsoft Access Database users. Backing up the database is an important part of day to day administration of the Traka32 software as with any database application. To manually backup the database... To enable this option, close any open windows within the software so you have a grey screen. -
Page 365: Duplicate Biometric Templates
Select the Backup templates from reader before update. This forces the utility to backup the templates from the selected system to the Traka32 Database. Select the Restore templates to all readers after update. This forces the utility to replicate the templates out to all the Traka System fitted with a Traka Biometrics Reader. -
Page 366: Engineers
ENGINEERS MENU OVERV IEW The engineers menu has been added to Traka32 so that problems that may occur on site can be diagnosed quickly without the loss of any data. The engineers menu should only be used by trained engineers or with guidance from an engineer over the phone. -
Page 367: Diagnostics
3.14.2 DIAGNOSTICS To load the diagnostics window, click on the Engineers menu from the system viewer, followed by Diagnostics. To enter a systems diagnostic mode... Select the system you wish to diagnose from System Selection menu. Click on the Connect button, this will open the serial or network port. (Note that if successful the Connect button changes to Disconnect) Click on the Comms On button, this will wake and enter the system into diagnostic mode. - Page 368 Once in diagnostic mode you can use the keyboard to navigate through the various menus presented to you by the Traka System. Using the Traka Diagnostics Menus... The Traka Diagnostic Menus are driven by the keyboard of your PC. To use the menus, please ensure your cursor is in the diagnostics window.
-
Page 369: Event Pointer Editor
EVENT POINTER EDITOR The event pointer editor has been added to Traka32 so that problems that may occur on site can be diagnosed quickly without the loss of any data. The event pointer editor should only be used by trained engineers or with guidance from an engineer over the phone. -
Page 370: Desktop Ifob Programmer
DESKTOP IFOB PROGRAMMER The Traka Desktop iFob Programmer is single iFob receptor incorporated into a desktop programmer device. The desktop programmer connects to a computer running Traka32 via a spare serial or USB port. NOTE: This menu can only be accessed if the current user of the software is logged in as an engineer. -
Page 371: Edit T32Settings.ini
3.14.5 EDIT T32SETTINGS.INI When selected this opens the active T32Settings.ini file in notepad. This is useful for when the T32Settings.ini file is not stored in the default location. V3.5 14/08/19 UD0089 Page 371 This Document is uncontrolled unless over stamped "CONTROLLED DOCUMENT"... -
Page 372: Delete All Temporary Files
3.14.6 DELETE ALL TEMPORARY FILES This feature allows you to delete all the temporarily download files (*.trn) created by Traka32 when communicating with Traka Systems. V3.5 14/08/19 UD0089 Page 372 This Document is uncontrolled unless over stamped "CONTROLLED DOCUMENT"... -
Page 373: Clean Database
3.14.7 CLEAN DATABASE This feature allows you to permanently destroy all previously deleted System, iFob, Key and User details and any associated transaction and alarms from the database. V3.5 14/08/19 UD0089 Page 373 This Document is uncontrolled unless over stamped "CONTROLLED DOCUMENT"... -
Page 374: Traka Diagnostics Menu
3.14.8 TRAKA DIAGNOSTICS ME NU 3.14.8.1 POINTERS The Traka Pointers are used to index the various transaction and alarms that are currently stored in the memory of Traka. This only applies to firmware versions 6.07.23 and below. For firmware versions 6.07.24 and above, please refer to the Event pointer Editor section. - Page 375 3.14.8.2 RESETTING ALARMS Various sections of the memory within a Traka System can be reset if there is a problem. NOTE: By resetting the alarms, any alarm data will be lost permanently. This procedure should only be followed in the event of a problem and should only be carried out on the instruction of a Traka Engineer. First enter the system into diagnostics mode.
-
Page 376: Window
3.15 WINDOW 3.15.1 CASCADE Overlays open windows diagonally across the screen. V3.5 14/08/19 UD0089 Page 376 This Document is uncontrolled unless over stamped "CONTROLLED DOCUMENT"... -
Page 377: Tile Horizontal
3.15.2 TILE HORIZONTAL Tiles open windows in a vertical column. Horizontal breaks. V3.5 14/08/19 UD0089 Page 377 This Document is uncontrolled unless over stamped "CONTROLLED DOCUMENT"... -
Page 378: Tile Vertical
3.15.3 TILE VERTICAL Tiles open windows in horizontal row. Vertical breaks. V3.5 14/08/19 UD0089 Page 378 This Document is uncontrolled unless over stamped "CONTROLLED DOCUMENT"... -
Page 379: Arrange Icons
3.15.4 ARRANGE ICONS Arranges the icons of open, but minimised windows. V3.5 14/08/19 UD0089 Page 379 This Document is uncontrolled unless over stamped "CONTROLLED DOCUMENT"... -
Page 380: Refresh
3.15.5 REFRESH Refresh, refreshed the content of all open windows. This is useful in a multi-user environment where changes are made at multiple workstations. V3.5 14/08/19 UD0089 Page 380 This Document is uncontrolled unless over stamped "CONTROLLED DOCUMENT"... -
Page 381: Show Status Bar
3.15.6 SHOW STATUS BAR Show or hide the Status bar. V3.5 14/08/19 UD0089 Page 381 This Document is uncontrolled unless over stamped "CONTROLLED DOCUMENT"... -
Page 382: Help
3.16 HELP 3.16.1 CONTENTS For help with the Traka32 software simply click on Help followed by Contents from the main menu or simply press F1 to view the online user guide. V3.5 14/08/19 UD0089 Page 382 This Document is uncontrolled unless over stamped "CONTROLLED DOCUMENT"... -
Page 383: What's This
3.16.2 WHAT'S THIS? Traka32 also incorporates a 'What's this help?' facility. Each details window has a button in the top right hand corner. Click on the and the cursor will change to , click on the control you want to know more about and a pop up window will appear with details on that control. -
Page 384: Technical Support
3.16.3 TECHNICAL SUPPORT The technical support window shows the contact information for technical support: V3.5 14/08/19 UD0089 Page 384 This Document is uncontrolled unless over stamped "CONTROLLED DOCUMENT"... -
Page 385: Explore Data Files Folder
3.16.4 EXPLORE DATA FILES F OLDER When selected this opens up Explorer in the folder which contains download and support folders. This is useful for when the data files are not stored in the default location. V3.5 14/08/19 UD0089 Page 385 This Document is uncontrolled unless over stamped "CONTROLLED DOCUMENT"... -
Page 386: Update License
Traka32 Registration section for more details. When you have registered the Traka32 software you can update your license at any time to either increase the number of concurrent users or to extend the period of the license. To update the license please contact Traka by telephoning +44 (0)1234 712345 between the hours of 08:30 and 17:30 GMT/BST or by email to support@traka.com... -
Page 387: Easy Help
EASY HELP Traka easy HELP is a quick way to access the most commonly used sections of the Traka32 User Guide. If you would like the easy HELP menu to be customized to suit your business needs, please contact you supplier with details and we will help you create a new menu. -
Page 388: Software Access
3.17.1 SOFTWARE ACCESS Software Access is a fundamental part of the Traka32 software which allows restrictions to be applied against user logins preventing users from accessing certain areas of the software. The Software Access also forms part of the Software Audit report where every user action is logged. -
Page 389: Software Access Using A Microsoft Access Database
Allow Software Access option enabled then there is no Software Access in place at all and so when the Traka32 software is open, no user login will be prompted for and all areas of the software will be accessible. - Page 390 Tick the relevant boxes to allow members of the Software Access Group access to the relevant areas of the software. The options are categorised, simply click on the tabs to view each category: System User iFob ...
- Page 391 11. Enter a Password Expiry date or select the Password Never Expires option. 12. Click on Save and Close. Logging into Traka32 When one or more user records have been setup with Software Access, the Traka32 software will prompt for a user login when open: Password Expiry When a user logs into Traka32 and if their password has expired, Traka32 will prompt for a new password.
-
Page 392: Software Access Using A Microsoft Sql Server Database
Login Name to that of a user record in the Traka32 Database itself. When logging into Traka32 for the first time with a new database you will need to use the SQL Server's own SA account Login Name and Password. - Page 393 Click on the User Management tab. For each user that needs to login to Traka32 a new login must be created. Enter a Login Name. Enter a Password. Click on Create New Login. Repeat this for each user that requires a login.
- Page 394 Enterprise Manager then you cannot configure Integrated Security. Load Enterprise Manager. Expand the SQL Server that is hosting the Traka32 Database. Expand the Security folder and click on Logins. V3.5 14/08/19...
- Page 395 Enter a user account Name or click on the ... button to browse for the user account name. Select the Windows Authentication option. Select the appropriate Domain name. Select the Grant Access option. Select the appropriate Traka32 Database as the Default Database. 10. Click on the Database Access tab. V3.5 14/08/19 UD0089 Page 395 This Document is uncontrolled unless over stamped "CONTROLLED DOCUMENT"...
- Page 396 The Options screen will open and you will see the Software Access tab is already selected. You will also notice that there is a predefined Login called Administrator. This login record cannot be edited or deleted and allows access to all areas of the Traka32 software except for the Engineer sections.
- Page 397 Associate User Records to the SQL Server Login Account and Software Access Groups Once the Software Access Groups have been the next step is to associate the users to the software access group. Load the Traka32 software by double clicking on the icon.
-
Page 398: Message Notification System
The Message Notification System can be accessed by clicking View > Notifications from the Traka 32 menu. NOTE: Messages are sent from the Traka32 software and not the Traka system cabinets. A message is generated (provided the rule conditions are met) after a Read All System Data has been completed. -
Page 399: Message Rules And Triggers
Faults entered/cleared on system from the cabinet Faults entered/cleared in Traka32 Immobilisor iFob Events (e.g. Device Activated, Shock Occurrence etc.) All of the above can be referred to as Triggers. Each Trigger has an associated Trigger Code and a descriptive Trigger Name. - Page 400 iFob Critical Faults: Where one or more selected Critical Faults (e.g. Brakes, Steering) are created on the selected iFob(s) via Traka32 or the System. iFob Faults Repaired: Where one or more selected Faults (e.g. Battery, Heater) are marked as Repaired on the selected iFob(s) via Traka32.
- Page 401 Immobilisor iFob Events: Where one or more selected Immobilisor Events (e.g. Device Activated, Shock Occurrence) occur on the selected iFob(s). Immobilisor User Events: Where one or more selected Immobilisor Events (e.g. Device Activated, Shock Occurrence) occur for the selected User(s). ...
-
Page 402: Creating Message Templates
3.18.3 CREATING MESSAGE TEMPLATES Traka uses a Message Template system so as a Message can be customized to include only references to data as required by the message recipient(s). Once created, a Template is saved allowing it to be shared by the Notification Rules. - Page 403 Click on Template > Add New: A New Template window will open: Template Name Provide a Message Template name. Send Using Select if the message is to be sent using Email, Network (Windows Network Messaging System) or SMS Message. Email If email is selected V3.5 14/08/19 UD0089...
- Page 404 Properties. On certain SMTP servers such as Microsoft Exchange, relaying may have to be enabled in order allow Traka32 to send e-mails to the outside world. For a guide on how to safely configure Microsoft Exchange for relaying, please refer to the Relaying on Microsoft Exchange section.
- Page 405 Message Box: Enter the body of the message here and include the data variables (Traka system information) that are required to be included in this message template. To insert a variable: Click inside the Message Box Click Insert Variable and select from the many available variables listed. e.g Key >...
- Page 406 Configuring the GSM Module section. Secondly you will need to enable certain option within Traka32 by navigating to the Properties page, click File > Properties. You will be confronted by the Properties window, scroll down to the Message Settings tab and select 'SMS Module Settings'.
- Page 407 Click Insert Variable and select from the many available variables listed e.g. Key > Detail > Make to insert the Make variable into the message (see below) The example above shows a Message Template called "Managers". The phone number could be the managers of a company who is required to be sent this message when a message rule is triggered, e.g.
-
Page 408: Creating Notification Messages
3.18.4 CREATING NOTIFICATIO N MESSAGES NOTE: Before creating a Message, at least one Message Template needs to exist in the Traka database so as it can be assigned to the Message Rule. Please view Creating Message Templates for a guide on how to create a Message Template. - Page 409 Click on Notifications > Add New: The Notification Rule Wizard is displayed: V3.5 14/08/19 UD0089 Page 409 This Document is uncontrolled unless over stamped "CONTROLLED DOCUMENT"...
- Page 410 Click Next to display the Trigger Type window: Notification Rule Tick the box to enable the Notification Rule. Trigger Type Select the Trigger Type that will cause a message to be sent. Click Next to display the Trigger Name window. Select one or more Triggers that will trigger the message to be sent: V3.5 14/08/19 UD0089...
- Page 411 Click Next to display the Filter window: Any iFob Tick the box to apply the rule to any iFob. If not ticked, the rule will only apply to the iFobs in the selected iFobs window. Available iFobs Window Lists all available iFobs for each system in the Traka database. If Any iFob is not ticked, this list will be greyed out.
- Page 412 Click Next to display the Message Template select window: Generate Message using Template The available Message Templates are listed and are available for selection. Additional Recipients for this rule only Enter the email addresses or User name (if using NetSend) of any message recipients in addition to the recipients already included the selected Message Template.
- Page 413 Notification Rule Name Provide a meaningful name for the Notification Rule. 11. Click on Apply followed by Finish to save it to the database. 12. The Notification Message Rule will now be viewable in the Notification Messages list. Tip 1. Click on next to the Rule name to expand the Rule and display the details.
-
Page 414: Email Response Codes
When using Email Notification there are various response codes sent and received between Traka32 and the customer email server. For example, before an email is sent Traka32 will send a code to the customer email server to ensure that there is a reliable connection. Once received the email server will send a code back to Traka32 confirming that the connection is made and communications are clear. - Page 415 For example, if you know that the response code you should receive for a particular message is 220 but you are receiving 250, then in the settings.ini file under email you will have the following. [Email] Response1=250 This allows Traka32 to accept the code 250 in place of 220 and receive the correct response code. V3.5 14/08/19 UD0089 Page 415...
-
Page 416: Optional Features
3.19 OPTIONAL FEATURES 3.19.1 ACCESS CONTROL INTEGRATION 3.19.1.1 ANTI PASS-BACK Many Companies require a way in which they can prevent users from leaving the premises if they still have keys in their possession. One method now available for Wiegand Readers is to link the Traka Key Control system directly to an existing Access Control system. - Page 417 When using Doors rather than Turn-Stiles, it is possible for one person to authorise the opening of the door and for several people to walk through that door. This will make it difficult (if not impossible) to implement this type of solution.
-
Page 418: Authorised Access
3.19.2 AUTHORISED ACCESS 3.19.2.1 X SYSTEM AUTHORISERS Overview X System Authorisers is an optional feature that can be configured to require either 1 or 2 persons to authorise a user to access the system. Each User can be configured individually with no authorisation, 1 authorisation or 2 authorisations to be required to enable them to open the system door. - Page 419 8bit - On 8bit systems you cant use X System Authorisers and X iFob Authorisers together, they must be used separately. 16bit - When using the latest 16bit firmware and Traka32 software you can combine X System Authorisers and X iFob Authorisers.
- Page 420 Alternatively, you can select the option to make the user an 'Authoriser Only' as shown below. This will restrict the user from accessing the system themselves but will allow them to authorise other users. NOTE: The 'Authoriser Only' feature is only available for 16bit systems with firmware version v3.13.05 onwards.
- Page 421 3.19.2.2 X IFOB AUTHORISERS Overview X iFob Authorisers is an optional feature that can be configured to require either 1 or 2 persons to authorise a user to access an iFob. Each iFob can be configured individually with no authorisation, 1 authorisation or 2 authorisations to be required to enable a user to take it.
- Page 422 8bit - On 8bit systems you cannot use X System Authorisers and X iFob Authorisers together, they must be used separately. 16bit - When using the latest 16bit firmware and Traka32 software you can combine X System Authorisers and X iFob Authorisers.
- Page 423 If you selected 'Force Access Level 199 To Authorise' then you will need grant the user with access level 199. If you selected 'Force Authoriser from Different Group' you will need assign the user a User Group that is different to that of the user whom they will authorise. If you selected 'X iFob Authorisers - Check Authoriser has iFob Access Level' then you will need to ensure that you give the user the access level of the iFob they are authorising.
- Page 424 Multiple Authorisation on Return An iFob can be configured so it requires none, 1 or 2 authorisers when it is returned to the correct position in the system. You will need X iFob Authorisers enabled in the firmware for this option to work. Right click the iFob you wish to have the Multiple Authorisation on Return.
-
Page 425: Biometrics
3.19.3 BIOMETRICS 3.19.3.1 CONFIGURE BIOMETRICS The System Configuration window allows you to view and edit the current configuration of the selected Traka System. Read Configuration Click on Read Configuration to read the current configuration of the biometrics reader's firmware in to the Biometrics Configuration window. -
Page 426: Daily / Weekly Vehicle Checks
3.19.4 DAILY / WEEKLY VEHIC LE CHECKS 3.19.4.1 DAILY / WEEKLY VEHICLE CHECK OVERVIEW When managing a fleet of vehicles it is important that checks are made on the condition of the vehicles. The daily \ weekly vehicle check option is designed to prompt a user to make their checks on a daily and/or weekly basis. The Traka System will prompt the user when they return their iFob and Keys and ask if they have completed their check. -
Page 427: Fault Logging
Fault Logging: Firmware has Fault Logging Enabled – a single fault can be logged per position and from Traka32 only. Firmware Allows Faults to be Logged at Cabinet – as above but users can also log faults at the Traka System as well as Traka32. - Page 428 The first stage is to decide on a list of common faults and whether those faults are ‘critical’ on ‘non-critical’. The next step is to enter the fault details into the Traka32 software. Please refer to the Adding Fault Details section for more details.
- Page 429 3.19.5.3 ADDING FAULT DETAILS A Fault Detail is a type of fault applicable to the items your iFobs are managing. For example, if your iFobs are used to hold vehicle keys, one applicable fault detail could be ‘Faulty Brakes’. From the main toolbar click View, Fault List. Select the Fault Details tab.
- Page 430 3.19.5.4 EDITING FAULT DETAILS From the main menu click on View, Fault List. Select the Fault Details tab. From the fault list simply double click on the fault record you wish to edit or select the record and click on the Faults menu followed by Edit Fault.
- Page 431 3.19.5.5 DELETING FAULT DETAILS From the main menu click on View, Fault List. Select the Fault Details tab. From the fault list simply click on the fault record you wish to delete, click on the Faults menu followed by Delete. Click Yes to confirm you want to delete the fault detail.
- Page 432 3.19.5.6 LOGGING FAULTS Faults can be logged against an iFob directly from the Traka32 software and also at the Traka System when an iFob is returned. Once a Fault has been logged, it will appear in the Outstanding Faults list. Critical Faults will be coloured Red, and Non-critical Faults will be coloured Yellow in the Outstanding Faults list.
- Page 433 . To Cancel your changes, simply close the window and click ‘No’ when asked to save the changes. Once a new fault record has been saved, Traka32 will communicate with the system and the fault will appear in the Outstanding Faults list.
- Page 434 Select ‘No’ once you have finished adding faults. Once any faults have been logged you can Read All System Data from Traka32 to update the Outstanding Faults list and System Viewer with the new faults. If your system has Auto-Comms enabled it will send the fault details to Trak32 upon the next communication.
- Page 435 3.19.5.7 CLEARING AND REPAIRING FAULTS Faults can be cleared at the Traka system when returning the iFob, and can also be cleared or repaired from Traka32. Once a fault has been cleared it will disappear from the Outstanding Faults list. When a fault is marked as repaired, it will remain in the list but will be highlighted as repaired and shown in the system viewer with a pink spanner icon.
- Page 436 Select either ‘Fault Cleared’ or ‘Fault Repaired’ and click Save & Close. If you selected ‘Fault Cleared’, Traka32 will communicate with the Traka System removing the fault from the iFob. The fault will also have disappeared from the Outstanding Faults list.
- Page 437 This enables you to both clear faults and add any new faults that may have been found within the same transaction. Read All System Data Once any faults have been cleared you can from Traka32 to update the Outstanding Auto-Comms Faults list and System Viewer with the new status. If your system has enabled it will send the cleared fault details to Trak32 upon the next communication.
- Page 438 3.19.5.8 FAULT LOGGING ON IFOB REMOVAL NOTE: This option is only available on 8bit RFID Lockers with version 6.08.033 firmware. NOTE: This section assumes the user has prior knowledge of the operation of the Fault Logging feature. Please read from the start of the Fault Logging section of this guide and then refer to this section on how to log a fault on iFob removal.
- Page 439 Whilst you have a fault logged against an iFob, that particular iFob will not work in the Immobilisor again until the fault has been read from the iFob via Traka32 and the Immobilisor has been reset using a service iFob.
- Page 440 Viewing the Fault List After returning your iFob to the cabinet go to the Traka32 software and Read All System Data, then at the top left of the screen click View > Fault List. You will notice there is now an outstanding fault stored in the iFPP tab waiting to be repaired or cleared (see below).
- Page 441 Fault Reports Each Immobilisor fault that is logged to Traka32 is saved in a report. You are able to view reports for Outstanding Faults and Fault History. To view the reports of the Immobilisors that have had faults logged against them and then been cleared and/or repaired click in the top left corner Reports >...
- Page 442 Resetting the Immobilisor After you have cleared the fault from the Traka32 software the Immobilisor itself needs to be reset using a Service iFob. Service iFobs are usually Grey however with iFob Per Person systems we use Green Service iFobs. If you haven't done so already, you need to make sure your Service iFob has 'Permit Clear Fault at Vehicle' option enabled in order to reset and clear all the faults recorded at the Immobilisor.
- Page 443 Insert the Service iFob into the receptor barrel of the Immobilisor and hold the acceptance button straight away before the ignition starts to receive the following sequence of flashes. After holding the button for 10 seconds the sequence will change and the Red LED will be removed from the sequence. This symbolizes that the fault has been cleared from the Immobilisor and that you can now reuse a vehicle iFob.
-
Page 444: Fifo For Key Cabinets
3.19.6 FIFO FOR KEY CABINET S 3.19.6.1 FIFO FOR KEY CABINETS OVERVIEW First In, First Out (FIFO) is an option that automatically gives access to the iFob that has been in the cabinet for the longest time for each access level. For example, if a user has access level 1, they have authorisation to remove any iFob with access level 1. - Page 445 3.19.6.2 ENABLING THE FIFO OPTION In order for the FIFO option to be used it must first be enabled in the 16-bit configuration file. Once enabled, it can be switched off if required from the 16-bit configuration wizard. V3.5 14/08/19 UD0089 Page 445 This Document is uncontrolled unless over stamped "CONTROLLED DOCUMENT"...
- Page 446 3.19.6.3 USING FIFO Removing an iFob When a user logs into the system, any iFobs the user can remove will be highlighted with a green LED. These will be the iFobs that have been in the cabinet for the longest time – one for each access level the user has access to. If the Key Booking option is also being used on a system with FIFO, when a user logs into the system any iFobs with a key booking logged against them will be bypassed unless the booking has been made for that particular user.
-
Page 447: Fire Alarm Access Override
3.19.7 FIRE ALARM ACCESS O VERRIDE 3.19.7.1 FIRE ALARM ACCESS OVERRIDE OVERVIEW The Fire Alarm Access Override option allows the ability to connect a fire alarm or break glass switch to override system access and emergency release all of the iFobs. This means that all the iFobs can be removed from the system in the event of an emergency such as a fire. - Page 448 3.19.7.2 FIRE ALARM ACCESS OVERRIDE OPERATION NOTE: Fire Alarm Access Override is a firmware cost option; please ensure the correct firmware is loaded prior to using the system. If the system detects an input from the fire alarm or break glass switch, the system LCD will display: The door will open and the solenoids will fire in-turn starting from position 1.
- Page 449 3.19.7.3 FIRE ALARM ACCESS OVERRIDE CONNECTIONS NOTE: Fire Alarm Access Override is a firmware cost option; please ensure the correct firmware is loaded prior to using the system. 16bit Systems The fire alarm or break glass switch is required to be connected to the I/O Port on the 16bit I/O PCB, located just behind the On/Off switch as shown below.
- Page 450 For more information please view the following sections: Fire Alarm Access Override Overview Fire Alarm Access Overide Operation V3.5 14/08/19 UD0089 Page 450 This Document is uncontrolled unless over stamped "CONTROLLED DOCUMENT"...
-
Page 451: Fuel Level Logging
4 = Full Once the value has been entered the user simply presses # to confirm the value or * to edit the value. Each fuel level will appear in the Traka32 software against each iFob and Key transaction. NOTE: Fuel Level Logging will only be available if the firmware of the selected system has Fuel Level Logging enabled. -
Page 452: Hide Red Led's For Unauthorised Access
(coloured green) and the wrong slot, this prompts the user to return the iFob to the correct position. Hide Red LED's For Unauthorised Access is a cost option and must be enabled in the Traka32 Firmware Wizard. To enable/disable this option from your system right click your cabinet from the system viewer in Traka32, and select 'Configure Firmware'. -
Page 453: Ifob Release Timer
3.19.10 IFOB RELEASE TIMER 3.19.10.1 IFOB RELEASE TIMER OVERVIEW The iFob Release Timer prevents iFobs from being re-used if they are returned to the cabinet early. When the iFob is taken, the cabinet will add the Release Timer value to the current data and time. If the iFob is returned before the calculated time, the cabinet will not allow it to be taken again until the timer has elapsed. -
Page 454: Ifob Return Prompt
3.19.11 IFOB RETURN PROMPT 3.19.11.1 IFOB RETURN PROMPT OVERVIEW With the Traka Systems collecting more data when iFobs are returned to the system, one of the issues faced is ensuring users input the data rather and closing the door and walking away. With the current system this is physically impossible to prevent but iFob Return Prompt option goes along way to reducing the problem as it will not open the door on a system to allow a user to return an iFob unless they enter the data first. - Page 455 3.19.11.2 IFOB RETURN PROMPT OPERATION First access the Traka System. Please refer to the ’How to access the system?’ section. Press * to take an iFob or press # to return an iFob. To take an iFob press * and iFobs can be taken as normal. If a user tries to return an iFob whilst in this mode the iFob will be rejected and the following message will show:- Also an' iFob Returned without Data Entry’...
- Page 456 Repeat steps 5 and 6 for every iFob that is to be returned. When all the data is entered press # and the door will open ready to accept the iFobs that have had their data entered. If data has already been entered for the selected iFob, the following error message will show:- If an iFob is returned to the system without the data being entered in the above method, the iFob will be accepted into the system, however an 'iFob Returned without Data Entry’...
-
Page 457: Ifob In Wrong Slot System Lockdown
3.19.12 IFOB IN WRONG SLOT SYSTEM LOCKDOWN 3.19.12.1 IFOB IN WRONG SLOT SYSTEM LOCKDOWN OVERVIEW The iFob in Wrong Slot System Lockdown option will prevent ALL users from accessing the Traka system if a user has previously returned an iFob to the wrong slot, ignored the alarm condition and walked away. In this instance, a supervisor with access level 195 is the only user who can access the system and clear the condition by removing the iFob and returning it to the correct slot. - Page 458 3.19.12.2 IFOB IN WRONG SLOT SYSTEM LOCKDOWN OPERATION If a User has returned an iFob to the wrong slot, the LCD will show: If the user chooses to ignore the "iFob in wrong slot" message and closes the door the system will enter a "lockdown"...
-
Page 459: Incorrect Identification Lockdown
3.19.13 INCORRECT IDENTIFICATION LOCKDOWN This cost option allows the system to 'lockdown' when a user fails to correctly enter their access credentials within a pre-defined number of attempts. Setting up the System To use this feature it will need to be enabled with the system configuration file. If you are using a brand new system that was ordered with this feature, then this will already be configured for you. - Page 460 200 in their permissions. Having access level 200 will allow them to still gain access to the system even when the system is in Lockdown. An ‘Incorrect Identification Lockdown’ event will be generated in Traka32. This can be viewed by selecting the system events tab from the System Viewer.
-
Page 461: Immobilisor
3.19.14 IMMOBILISOR 3.19.14.1 IMMOBILISOR OVERVIEW The Traka Immobilisor allows a standard Traka iFob to be used as an alternative to a conventional key for a vehicle. The Immobilisor comprises a black control box, which is mounted discreetly on the vehicle and a special electronic socket (receptor), which replaces the usual key barrel. - Page 462 NOTE: Traka32 versions 01.05.0005 or before does not include the iFob Programmer. Read iFob Configuration To read the configuration of an iFob, select the System and Position of where the iFob is located and click on Read iFob Configuration.
- Page 463 System and Position The system and position fields are used to select where the iFob is located that you wish to program. Desktop iFob Programmer To program an iFob using the Traka Desktop iFob Programmer, select Desktop iFob Programmer from the Posion dropdown menu.
- Page 464 Manufacturer A Traka Immobilisor can be programmed with a specific Manufacturers Code using a Program iFob. Once the Immobilisor has been programmed with a Manufactures Code, only Service iFobs that have been programmed with the same Manufacturers Code will work with that Immobilisor. All new Immobilisors are programmed with a Manufactures Code of 'Traka'.
- Page 465 Permit Clear Fault at Vehicle Setting this option will allow the Service iFob to clear faults logged at the vehicle. Service iFob Life Enter a value for the number of times the Service iFob can be used before it expires. Program iFob When configuring a Program iFob you can configure the settings that you wish to program one or more Traka Immobilisors with.
- Page 466 Acceptance Acceptance Button Fitted Select this option if the Immobilisor is fitted with an Acceptance Button. You can configure a period of time (in minutes) in which the truck operator has to perform their pre-operational checks, this is located at the bottom of the window. NOTE: Clear this option if the Immobilisor is NOT fitted with an Acceptance Button otherwise the Immobilisor will cut out after the delay.
- Page 467 Shock Sensor Shock Sensor Threshold Select this option if the Immobilisor is fitted with a Shock Sensor module. You can configure the shock sensor's g-force threshold level at which the Immobilisor will record a shock and act upon it. NOTE: Clear this option if the Immobilisor is NOT fitted with a Shock Sensor module otherwise the Immobilisor will not program correctly.
- Page 468 105. Truck Address Select the truck address between 1 and 255. Each truck should have its own unique address. The address is used by Traka32 to report on the events that have occurred for that truck. V3.5 14/08/19 UD0089 Page 468 This Document is uncontrolled unless over stamped "CONTROLLED DOCUMENT"...
- Page 469 Enabled Access Control Select this option if the Immobilisor is used for Access Control. Select this option if the iFob does not remain in the receptor socket for operation of the device e.g. where an iFob is "touched" to open a door. If enabled an event is recorded in the iFob before activating the device, this prevents the user from removing the iFob too quickly and losing the event.
- Page 470 Tool Cabinets Limit Activation Period Select this option if the Immobilisor is fitted to a Tool Cabinet. Set Activation Period Set the Activation Period to the amount of time the Tool Cabinet will be unlocked whilst the iFob is inserted in the Immobilisor. If a timeout occurs the Immobilisor will automatically log an event and lock the Tool Cabinet.
- Page 471 Create Test Fob Select this option to create a Test iFob. This is used to test the functionality of the Immobilisor LED's and Relays and also program the iFob with the parameters set below. Comms Type Select if the communications between the Data Logger and Shock Sensor use Clock & Data or CANBUS.
- Page 472 Debug RAM / ROM iFob When configuring a Debug RAM/ROM iFob you can configure the settings that you wish to debug with. Start RAM/ROM Address Enter the start address from where the debug iFob will read the RAM/ROM of the Immobilisor from. The debug will read 32 bytes from the start address.
- Page 473 Diagnostics Please refer to the Engineers Overview section before using the diagnostics utility of the iFob programmer. System and Position The system and position fields are used to select where the iFob is located. Start Address Select the address of the iFobs memory map that you wish to start reading from. Length Select the length of the data that you wish to read from the iFob, starting at the starting address above.
- Page 474 Data Table If required, the data in the table can be altered by double clicking over the relevant data. The data can then be written back to the iFob by clicking on the Write iFob Configuration button. Clear Memory to Zero Click this button to set all the data in the data table to 0.
- Page 475 3.19.14.3 IFOB PER TRUCK 3.19.14.3.1 IFOB PER TRUCK OVERVIEW In operation, simply inserting the correct iFob activates the vehicle and allows it to be driven. If an iFob is lost or broken it is an easy task to activate an alternative iFob using the special Service iFob, which is provided to the manager or supervisor and also to the vehicle service engineers.
- Page 476 3.19.14.3.2 IMMOBILISOR ACCEPTANCE BUTTON This optional feature requests that a driver "Accepts" the truck within a defined period of time during which he can complete his Pre-op checks. Failure to press the button will cause the unit to time out, stopping the truck and necessitating the withdrawal and re-insertion of the iFob.
- Page 477 If the g-force level is breached a token will be automatically written to the iFob that will appear on the reports within Traka32. Optionally a relay can be activated on the Immobilisor to activate a siren or flashing light, the vehicle can be deactivated after a pre-set period of time and also the vehicle can be temporarily deactivated until reset by a supervisor using their Service iFob.
- Page 478 3.19.14.3.4 HOURS USAGE VIA CAN This optional feature allows the Seat Hours, Traction Hours and Lift Hours of a vehicle to be recorded in a Vehicle or User iFob. The Traka Immobilisor continuously collects the Hours Usage information from the Vehicle CAN (Controller Area Network).
- Page 479 3.19.14.4 IFOB PER PERSON 3.19.14.4.1 IFOB PER PERSON OVERVIEW As with the iFob per Truck option, the operator will access Traka cabinet in conventional way. The operator will select an iFob and as the iFob is selected, the immobilisor access rights and time profile will be written to the iFob. Writing the time profile will ensure that the operative will have to return the iFob at the end of the day, as the iFob will effectively expire and therefore need to be "recharged".
- Page 480 3.19.14.4.2 ADDING IMMOBILISORS From the main screen click on View followed by Immobilisor List and a list of the current immobilisors will be shown. From the immobilisor list click on the Configurations menu followed by Add New. A new blank immobilisor record will be created. Edit the appropriate details, for more details refer to the Immobilisor Details section.
- Page 481 3.19.14.4.3 EDITING IMMOBILISORS From the main screen click on View followed by Immobilisor List and a list of the current immobilisors will be shown. From the immobilisor list simply double click on the immobilisor record you wish to edit or select the record and click on the Configurations menu followed by Edit Configuration.
- Page 482 V3.5 14/08/19 UD0089 Page 482 This Document is uncontrolled unless over stamped "CONTROLLED DOCUMENT"...
- Page 483 3.19.14.4.4 DELETING IMMOBILISORS From the main screen click on View followed by Immobilisor List and a list of the current immobilisors will be shown. From the immobilisor list simply click on the immobilisor record you wish to delete, click on the Configurations menu followed by Delete.
- Page 484 3.19.14.4.5 IMMOBILISOR DETAILS The Immobilisor Details window allows you to add and edit the Immobilisor details. Details Tab System and Position The system and position fields are used to select where the iFob is located. Region From this drop down box you can select which region you wish the truck to belong too. For information on how to create Immobilisor please review the Immobilisor Regions topic.
- Page 485 (e.g. Traka) in the Traka32 properties. This is beneficial as you will not need to change the manufactures code for each individual Immobilisor that needs programming. Please review the Immobilisor section of the...
- Page 486 General Relay Assignment Select the operation of the relay when the Immobilisor is active. Normally Closed [red is Ignition] Normally Open [Yellow is Ignitions] Acceptance Acceptance Button Fitted Select this option if the Immobilisor is fitted with an Acceptance Button. NOTE: this option if the Immobilisor is NOT fitted with an Acceptance Button otherwise the Immobilisor will cut out after the time-out delay.
- Page 487 Acceptance Warning The Acceptance Warning option when enabled activates a beacon (to be wired into the Immobilisor on site) 30 seconds before the acceptance period expires. iFob Per Person Single Acceptance When this option is selected the driver of the Truck will only be asked to press the Acceptance button once, even if they leave the truck and come back later.
- Page 488 Truck Address Select the truck address between 1 and 1023. Each truck should have its own unique address. The address is used by Traka32 to report on the events that have occurred for that truck. Enabled Access Control Select this option if the Immobilisor is used for Access Control.
- Page 489 1 x System Authoriser Select this option two Valid User iFobs are required to be inserted into the receptor socket to activate the ignition. A "request activation" event is logged in the first valid User iFob inserted. This must then be removed within 5 seconds.
- Page 490 Traka. Next you will need to add the expiry dates to the user details. From the top of Traka32 select the User List. Highlight the desired user and double click, or select the Users button from the banner above and click the Edit User button.
- Page 491 The Refresher Start Date selection box allows you to select a date when the user needs to have refresher training. Using the drop down selection box set a Refresher Start Date. Click save and close. 10. The user is now set up and complete. Follow steps 7-9 for each user you wish to use the License Expiry option.
- Page 492 3.19.14.4.7 IMMOBILISOR REGIONS From the Immobilisor list it is now possible to assign an Immobilisor to a region. To assign one or more Immobilisors to a region simply highlight the desired iFobs, right click and select Regions>Add to Region(s). To create regions please refer to the Regions section.
- Page 493 3.19.14.4.8 IFOB PER PERSON DOWNLOAD STATION The iFob per person download station is a fast effective way to download information from the iFob without having people queue up at a cabinet for long periods of time. The Download station is particularly beneficial to large customers who have a vast work force that have continuous shift changes, who wish to cut down the amount of time workers spend at the cabinet returning/removing iFobs.
- Page 494 Swiping the Incorrect Card If a user inserts their iFob and swipes the incorrect card you will receive the following messages on the LCD... After a few seconds the display will change. The next message shows whose iFob has been inserted and also whose card has been swiped against it...
- Page 495 USB port, you can insert the desired iFob into the barrel of the Desktop Programmer ready for resetting. Next on the tool bar at the top of the screen in Traka32 click Engineers > Desktop iFob Programmer > Reset iFob.
- Page 496 iFob Memory Map tab The iFob Memory Map allows you to view the data that is currently stored in the iFob. Desktop iFob Programmer tab The Desktop iFob Programmer tab opens up the iFob Programmer that allows you to create iFobs such as Program iFobs, Test iFobs, Calibration iFobs etc.
- Page 497 Traka32 A new System event has been added called “iFob Recharge” which is created when a user recharges their iFob in a download station. This is available with the 16 bit firmware version 3.00.48. You can view the event details on the System Viewer screen, on the System Events tab V3.5 14/08/19...
-
Page 498: Job Reference Logging
3.19.15 JOB REFERENCE LOGGING Job Reference Logging was developed for companies that give their employees reference numbers for each job they perform. This option allows a user to enter an alphanumeric reference number (up to 15 characters in length) into the cabinet when removing or returning an iFob. - Page 499 Configuring the iFobs Job Reference Logging works on a per iFob basis. To enable this option right click the iFob you wish to setup and select 'Edit iFob Details'. Select the 'iFob Details' page. There will be two tick options at the bottom of the window, Job Reference Logging on Removal and Job Reference Logging on Return.
- Page 500 Job Reference Logging on Removal and Return With option enabled the user will be prompted to enter a reference code when removing and returning the iFob. Click the read all system data button and navigate to the 'iFob Events' section. Here you will see the user who removed the iFob and the reference number they have entered.
-
Page 501: Keep User Logged In
3.19.16 KEEP USER LOGGED IN This feature is a 16bit firmware only option that when enabled, allows a user to log into a 'No Door' system and stay logged in until the user presses the * key. If the user walks away from the system without logging off it will automatically log them off after the defined User Action Delay period. -
Page 502: Key Booking
The booking will remain active until the current time has passed the booking end time. If the user has finished with the iFob / key early, the booking can be cleared from the Booking List in Traka32 by deleting the booking. - Page 503 Traka System will automatically delete the booking from its memory freeing up the space for a new booking. The booking history is permanently kept by the Traka32 Software. The Key Booking System will not allow a user to pre- book the same key twice within a given period.
- Page 504 3.19.17.2 KEY BOOKING FORM This topic will detail the main tools of Key Booking and how they work. The main page of key booking is the Booking List, to access the booking list click from the main menu. Edit Booking Selecting this while highlighting an existing booking will allow you to make changed to that booking.
- Page 505 Reports Print Preview will show a preview of the report for whichever page you are currently viewing, e.g. Booking List. This preview will also depend on the layout you are currently viewing. Export Report gives you the option to export the report to an Excel spreadsheet. The Layout options allow you to save a custom layout.
- Page 506 3.19.17.3 KEY BOOKING LIST The Key Booking List allows you to view the current key bookings that have been made. From this list you can add and edit the bookings via the easy to use wizard or simply delete bookings. To view the key booking list, click on from the main menu.
- Page 507 3.19.17.4 KEY BOOKING CHART The Key Bookings Chart provides a graphical representation of all current bookings on the system. Booking details can be viewed by holding the mouse pointer over a booking record on the chart. A pop up is displayed with the booking details.
- Page 508 To view the bookings for a specific day, right click on the day of interest and the chart will zoom in to display this 24hr period. This also allows the user to easily see when an iFob is available (not booked) during the 24hr period. To edit an existing booking, double click on the booking directly from the chart and use the booking wizard at the bottom of the screen to edit the details as required.
- Page 509 3.19.17.5 KEY BOOKING WIZARD To add a booking simply click on the button. To edit a booking simply double click on the booking record you wish to edit or select the booking and click on the button. Step 1 – Select a System Select a System from the drop down list and click on Next.
- Page 510 For 8-bit systems, only the iFob or key the user is authorised to take will be displayed... For 16-bit systems, there is an additional tick box 'Only show iFobs and keys that all selected users can take'. This is useful as it allows a Traka32 administrator (with necessary privileges - see Login Details > Key...
- Page 511 Confirm the booking details, if you are happy and want to save the booking click on Confirm or if you want to change the details click on Back or to discard the booking click on Cancel. If the booking is confirmed the Traka32 software will write the booking to the Traka System. V3.5 14/08/19...
- Page 512 When a user returns an iFob that currently out of the system within the booking period, they have the option to complete the booking by pressing the # key, if they do this the booking will be removed or 'deleted' in Traka32, if they press the * key then the key booking will remain active until its expiry date.
- Page 513 3.19.17.7 KEY BOOKING LAYOUTS From software version v02.11.0001 onwards, it is possible to toggle the information columns that appear in the Bookings List & Booking Chart to create custom layouts. To create a new layout, right click the header of any column. The columns list will now appear allowing you to select and deselect the desired headings.
- Page 514 Once you have saved your layout Traka32 will automatically revert back to the default layout. To select your new layout click Reports, then select Layouts and choose your layout from the drop down list.
- Page 515 3.19.17.8 IFOB ACCESS VIA KEY BOOKING ONLY When this option is enabled users are denied access to an iFob unless there is a valid key booking record associated with the iFob. If this option is not enabled, users can remove the iFob outside the key booking time period. If a user tries to remove an iFob that does not have a key booking record associated or it is outside the key booking time period, the LCD will display: V3.5 14/08/19...
- Page 516 3.19.17.9 OVERRIDE A KEY BOOKING A User with Access Level 195 can override a key booking and remove an iFob during the booking period even though the iFob has not been booked for them. See also How do access levels work.
- Page 517 3.19.17.10 KEY BOOKING BY REFERENCE 3.19.17.10.1 KEY BOOKING BY REFERENCE OVERVIEW Key Booking by Reference will allow temporary users, who would not normally have access to the Traka System, to have a key made available to them via a booking reference number. This can be used for Hire Vehicles etc. Once booked the user can go up to the Traka System, press 1 on the Keypad and the system will prompt for the Booking Reference number.
- Page 518 3.19.17.10.2 KEY BOOKING BY REFERENCE Key Booking by Reference allows the selection of multiple keys when submitting the booking. Also, bookings can be made without specifying a user, by clicking the “Traka User” check box. This means that whoever registers for the booking at the cabinet (with the reference number) must also authenticate (e.g.
- Page 519 Step 3 – Select an iFob/s or Key/s With Key Booking by Reference Enhanced, you can select up to five iFobs or Keys to be booked in one booking. Select the desired amount of iFob/s or key/s from the list and click Step 4 –...
- Page 520 Step 7 – Viewing the Booking If the booking is confirmed the Traka32 software will write the booking to the Traka System. You can view the details of the booking by selecting the 'Bookings List' tab.
- Page 521 Release Types, and select release by Description. After selecting release by Description, continue to click the 'Next' button until you come to the end of the Configuration Wizard then click the 'Finish' button. Traka32 will then communicate with the cabinet and update the Configuration File.
- Page 522 Key Details There are certain aspects of the Key Booking feature which are user definable from Traka32, such as the Key Description fields. These fields can be changed to any description you desire, for example if the keys in your cabinet are specifically vehicle keys, your description fields may be as follows:- To change the description fields simply open Traka32 and select File>Properties>Key Details.
- Page 523 3.19.17.11.2 KEY BOOKING WEB PORTAL INSTALLATION 3.19.17.11.2.1 INSTALLING INTERNET INFORMATION SERVICES (IIS) AND .NET 4.0 FRAMEWORK NOTE: It is important that you have installed IIS before proceeding to install the Key Booking Web Portal. Installing Internet Information Services (IIS) To Install IIS go to Start>Control Panel>Programs>Programs and Features and the select Turn Windows features on or off from the left hand sidebar.
- Page 524 NOTE: IIS version 7 and later already supports ASP.NET, so you can skip this section and move on to Manually Installing the Key Booking Web Portal on Windows 7 Server. Open IIS and expand the Web Sites folder to the left. You can check if ASP.NET has already been setup on IIS 5.1 or IIS 6 by right clicking Default Web Site and selecting Properties (see below).
- Page 525 Once this has finished, the ASP.NET tab as described above should be visible with the ASP.NET version listed as 4.0.30319. 3.19.17.11.2.2 INSTALLING THE KEY BOOKING WEB PORTAL NOTE: It is important that you have installed IIS prior to installing the Key Booking Web Portal. Please refer to the Installing IIS and .NET 4.0 Framework section.
- Page 526 From the popup menu select the Convert to Application option, and then from the Add Application screen, make sure the Application pool is set to ASP.NET v4.0 Installing on IIS 6 with Windows 2003 Server It is recommended that Windows 2003 Service Pack 2 is installed before proceeding at this point. At the time of writing this is available at: https://technet.microsoft.com/en-us/windowsserver/bb463273.aspx Install the Files...
- Page 527 You will then see the Virtual Directory Creation Wizard. Click the Next button, and then enter KeyBooking with no spaces (or a name of your choice), into the Alias field. For the Directory field, select the folder the software was installed to (e.g. c:\Inetpub\Traka\KeyBooking), then click Next. You will then be taken to the Permissions screen, for Access Permissions check Read and Run scripts ONLY.
- Page 528 The Application Configuration window will now appear. On the Mappings tab, click the Insert button next to ‘Wildcard application maps (order of implementation)’. Then enter the following:- Executable Field: c:\windows\Microsoft.NET\Framework\v4.0.30319\aspnet_isapi.dll Verify that file exists Field: Unchecked (Important!) Finally, on the ASP.NET tab, ensure that the ASP.NET version is set to 4.0.30319. To test, navigate to http://localhost/keybooking (replacing ‘keyBooking’...
- Page 529 On the Virtual Directory tab, click the Configuration button (see below). You will be confronted by the Application Configuration window. Click the Add button and specify the following: Executable Field: c:\windows\Microsoft.NET\Framework\v4.0.30319\aspnet_isapi.dll (Note: same executable file as for .aspx file extension) Extension Field: .* (Note: The “dot”...
- Page 530 IIS, and select Properties. On the ASP.NET tab, click the Edit Configuration button. On the General tab, edit the KeyBookingASPNETConnectionString entry, and replace 'Data Source' with your SQL Server database instance, e.g. Data Source=MYSERVER\SQL2008, and the 'Initial Catalog' with the Traka32 database, e.g. Initial Catalog=MyTraka32Database.
- Page 531 Adding a Key Category To add or edit a Key Category, simply open Traka32 and then select File>Options. From the options menu select the Key Categories tab. Next click the Options button and select Add New. Enter the desired category in the provided field and click Save &...
- Page 532 3.19.17.11.3.2 CREATING A USER LOGIN - KEY BOOKING WEB PORTAL To allow a Traka32 User to have access to the Key Booking Web Portal, a login must be created. To create the login you must have access to User Details.
- Page 533 To allow a user to see all iFobs/keys for a system when creating a booking, the user must be in a software access group in traka32. The software access group must have the option Allow user to create bookings for keys that users do not have access to on the Key tab.
- Page 534 If an iFob/key is booked for more than one user, then any one of those users will be able to take the iFob/key from the System at the Booking Start time. To setup a user as Key Booking Admin, in Traka32, go to the user details, Web Portal tab and select the option Key Booking Admin.
- Page 535 They will then see all users in the System, and be able to make a booking for up to 3 users. They will also see the All iFobs link and see all iFobs/keys in that System. The bookings table will show the number of users for that booking. V3.5 14/08/19 UD0089 Page 535...
- Page 536 For Fixed Return systems, when booking an iFob/key for a user, by default, the iFobs/keys that are listed are those that the user has access to from the cabinet (Traka32 user record). There are also access levels that can be set against a software access group, which can give more control over a group of users. In order for the Web Portal to use these access levels from the software access group, the following config setting needs to be set to 1, either in the web.config file or from IIS...
- Page 537 key="BookRRLevelsBySoftwareAccess" value="1" V3.5 14/08/19 UD0089 Page 537 This Document is uncontrolled unless over stamped "CONTROLLED DOCUMENT"...
- Page 538 5. Restrict Booking Advance Period The Booking Advance Period option prevents the user from making a booking too far ahead in the future. This can be set to any number of days or months, e.g. setting to '30D' will restrict the user to only be able to make a booking for 30 days from the booking start date.
- Page 539 6. Booking Duration Period The Booking Duration Period option prevents the user from making a booking for longer than is necessary. E.g. setting to 7 will limit the calendar end date to 7 days after the selected start date e.g. key="BookingDurationPeriod"...
- Page 540 7. Booking Start and End Buffer Periods The BookingStartBufferPeriod and BookingEndBufferPeriod options add/remove minutes to the booking start and end times once the user presses next on the 'select booking times' page. This will make the booking start time and/or booking end time earlier or later. This allows for users who arrive early or late for a booking. e.g.
- Page 541 The booking confirmation screen shows the buffer minutes added to the booking start and end times. 8. Validate User Expiry Date Against Booking The Validate User Expiry Date Against Booking option prevents a user from making a booking if they expire within the booking period.
- Page 542 The validation stops a booking from being made for an expired user. 9. Start and End date Defaults By default, the booking start date is set to the current day plus one, and the booking end date set to the current day plus 2.
- Page 543 10. Allow users to view other users' bookings Also by default, users can only view their own bookings unless they are a key booking admin. But if you would like users to view other users’ bookings, set the following config setting to 1. key="AllowNonAdminToViewBookings"...
- Page 544 3.19.17.11.4 USING THE KEY BOOKING WEB PORTAL After Installing the Key Booking Web Portal, navigate to http://localhost/KeyBookingWebPortal (replacing 'KeyBookingWebPortal' with whatever Alias you used in the installation process). You will then be confronted with the Key Booking Welcome page. From here you have the choice to add a new booking, view the bookings list or viewing booking...
- Page 545 Next you will be prompted to select a user to book the key for. To find the desired user, browse the User List and click the Select button next to their name, or alternatively type the users name into the search bar and click the Search button.
- Page 546 After selecting a beginning and end time for your booking you will need to select which key you would like to book. There are several ways to find the desired key: You can browse by scrolling down to find the desired key. ...
- Page 547 Once you have selected the key you wish to book, click Next. On the following screen you can enter any notes you wish to relate to the booking, then click Next. The next screen shows the all of the booking details. If you are happy with the details and want to save the booking, click Next.
- Page 548 Once you've confirmed the booking the final screen will show you that the booking has been submitted successfully. From here you have the option to add another booking or click 'View Bookings' to see all current key bookings. V3.5 14/08/19 UD0089 Page 548 This Document is uncontrolled unless over stamped "CONTROLLED DOCUMENT"...
- Page 549 Bookings List button on the 'Welcome' screen and also from the 'Finish' page when you have completed a booking. NOTE: You can only see bookings made by the Web Portal in the bookings list. In Traka32, you can see bookings made by both Traka32 and the Web Portal. V3.5 14/08/19...
- Page 550 3.19.17.11.6 BOOKING CHART - KEY BOOKING WEB PORTAL The Key Bookings Chart provides a graphical representation of all current bookings. It can be viewed by selecting Chart from the 'Welcome' screen or from the Booking List. V3.5 14/08/19 UD0089 Page 550 This Document is uncontrolled unless over stamped "CONTROLLED DOCUMENT"...
-
Page 551: Key Handover Logging
Setting up Key Handover Logging Firstly an option is required in the 'Configure Firmware' to enable the use of the Key Handover Logging option. Right click your cabinet within Traka32 and click 'Configure Firmware'. NOTE: To be able to see this option within the Configuration Wizard you must have software version 02.09.0001 and above. - Page 552 Key Handover Logging Hardware and Software Requirements As mentioned above the software version needed to operate Key Handover Logging is v02.09.0001 and above. To be able to interface a QWERTY keyboard with your Traka cabinet you must have the following hardware... ...
- Page 553 The iFob Details window will now appear, select the iFob Details Tab. At the bottom of the screen you will see the option 'Key Handover Logging', tick this box then save and close. NOTE: If this option is not enabled on the iFob before the user attempts to remove it, then they will NOT be prompted to enter the Handover details.
- Page 554 From the System viewer, click Reports > Crystal Reports > iFobs > Standard iFob Event Report. This report will generate a list of all the people who have had an iFob 'handed' over to them and the location they used that iFob (see below) V3.5 14/08/19 UD0089...
-
Page 555: Key Vending Wizard
Both Key Requestors and Key Vendors have a user record inside the Traka32 database, however only Key Vendors are given access to the Traka systems. Tenant Key Requestors can also be added to the Traka32 database via the Key Issue a Key Vending Wizard. - Page 556 KEY VENDING WIZARD SETUP 3.19.19.2.1 KEY VENDING TRAKA32 SOFTWARE INSTALLATION NOTE: The Key Vending feature uses Traka32 as a Service to process the automatic emails. For more information on installing Traka as a Service refer to the section Traka32 as a Windows Service.
- Page 557 Topaz Signature Pad Configuration NOTE: Ensure the Signature Pad is not connected to the PC before beginning. Navigate to c:\Program Files (x86)\Traka Limited\Traka32\Drivers\Signature Run the sigplusbasic.exe application. Click ‘Next’ and then click ‘Agree’ to the license agreement. Select the correct operating system.
- Page 558 Select the option ‘I have a tablet, and want to sign eDocuments’ and click ‘OK’. Select the tablet ‘SignatureGem LCD 1X5 (T-L462)’ and click ‘OK’. V3.5 14/08/19 UD0089 Page 558 This Document is uncontrolled unless over stamped "CONTROLLED DOCUMENT"...
- Page 559 USB Desktop Programmer Configuration NOTE: Ensure the Desktop Programmer is not connected to the PC before beginning. Navigate to c:\Program Files (x86)\Traka Limited\Traka32\Drivers\USB Desktop Programmer Install the correct one of the following depending on your system type: Install_1_wire_drivers_x64_v402.msi (use this on 64-bit systems) ...
- Page 560 Format option is unticked. If this PC is to be used by a Key Vendor user and the user will not be administering the Traka32 software (such as adding/editing users) it is possible to set the default screen to be the Key Vending Wizard. This means whenever Traka32 is opened on this PC by any user it will only show the Key Vending Wizard, and no other functions of Traka32 will be accessible.
- Page 561 ‘Forename’ and ‘Surname’. Changing the descriptions here will update the headings wherever they are displayed across Traka32 and the Key Vending Wizard. Select User Details. Specify the correct user definable labels. Changing these fields will update the field headings in the User Details page.
- Page 562 Select the Key Details page. Specify the correct user definable labels. Changing these fields will update the headings in the Key Details pages. An example is shown below: Field 01 = Unit Number Field 02 = Key Description Field 03 = Unit Type To make things clearer it is advised to specify a’.’...
- Page 563 In the example below, ‘Unit Number’ is used as the iFob Description. Anywhere the iFob description is displayed in Traka32 (for example in the iFob list) will now be populated with the Unit Number. Click Save before moving on.
- Page 564 10. Select Message Settings>Email. Enter the correct details for your email server and click Save. 11. Select the Key Vending Wizard page. Ensure the ‘Show the Key Vending Wizard’ tick box is ticked. From this page you can also specify various details specifically for the Key Vending Wizard as detailed below: NOTE: To open the Key Vending Wizard select View>Key Vending Wizard.
- Page 565 User ID Field: Specify the data that will be used for the User ID field in the Key Vending Wizard. The options available in this list will be those that were specified in the User Details earlier in this section. NOTE: The user ID Field requires the data entered to be numerical and between 6-8 digits in length.
- Page 566 15. Select Shift Patterns. This maintenance form will enable you define multiple shift patterns. Shifts can be added by entering a Start Time, End Time and a Due Back Time followed by clicking on the Add Shift button. This can be repeated to add multiple shifts. When an iFob is issued, the table will be referred to in order to determine the Due Back Time.
- Page 567 17. Select the Loadable Device Drivers page and select Topaz Systems LBK 462-HSB from the ‘Tablet types’ dropdown. 18. Click Save & Close. 3.19.19.2.3.2 KEY VENDING ACCESS LEVELS The Key Vending feature divides keys into 2 types; ‘Tenant Key’ and ‘Service Key’. These 2 types must each be given an Access Level.
- Page 568 Key Requestors – able to request keys from the Key Vendors but have no access to the Traka systems. Key Vendors – process the key requests and must be given access the Traka systems and Traka32 software. Users can be added either via the User Import Spreadsheet or manually through the Traka32 software.
- Page 569 When adding a new Key Vendor user, in addition to adding the required details on the User Details tab the user will also need to be given access to the Traka System(s) and the Traka32 software. Enter the user’s Pin or Card ID on the System Access tab and set the Status to ‘Active’.
- Page 570 KEY VENDING - ADDING KEYS Keys can be added either via the Key Import Spreadsheet or manually through the Traka32 software. A brief guide on manually adding keys is outlined below. For more specific details on adding keys please refer to the section Adding Keys for more details.
- Page 571 Under the [General] section type KeyVendEscalationDelay=(number of minutes). For example, to change the time delay to 10 minutes, type KeyVendEscalationDelay=10 as shown in the example below. Save and close the file. The time delay will now be set to the specified time. To edit the time again, simply open this file, change the number of minutes and then save and close the file.
- Page 572 3.19.19.2.3.5 CUSTOMISE KEY RECEIPTS During the key issuing and returning processes a Key Receipt can be printed to be signed to accept receipt of the keys. As well as displaying a list of the keys being issued or returned, it also has a default section of text that can be edited to suit the customers' specific requirements.
- Page 573 From the ‘Request Type’ section select whether the Key Requestor is a Tenant or Service Person. Enter the ID number of the Key Requestor and select Lookup User. If the ID number is in the Traka32 User Database, the system will populate the fields with any details already entered in the User Record in Traka32.
- Page 574 Properties. Once you have entered the necessary information click Next. If the user is not currently in the Traka32 database a message will pop up asking if you wish to create a new user record. Click Yes and the user will be added to the Traka32 database.
- Page 575 From the next page you can enter search criteria to find the requested key. The searchable fields available will be those specified during the setup in the Key Details of the Properties. In the example below the available fields are ‘Unit Number’ and ‘Key Description’. The Unit Number has already been populated as this detail is already specified in the User Record in the example.
- Page 576 If you want to search for more keys using different search criteria, click the ‘Search Again’ button and you will be taken back to the search criteria page. The currently selected keys will remain selected allowing you to add to the list from your new search results. If you select a key, or an iFob that contains a key that is a duplicate (or accesses the same apartment) of one that has already been issued, a message will pop up to warn the user that the Unit/House could be occupied.
- Page 577 Note that the current status of the selected key is ‘Not Issued’. The key will only become ‘Issued’ when it is removed from the Traka System and inserted into the USB Desktop Programmer as outlined in the next steps. The Key Vendor must now remove the iFob/Key from the Traka System. The grid showing the selected keys indicates the system and position number of which they are located.
- Page 578 11. You can print a receipt for the issue of the key(s) by clicking Print Receipt. The receipt shows details of the Key(s) and Key Requestor and can be signed by the user to accept receipt of the key(s). NOTE: It is possible to change the text in the paragraph beneath the key list.
- Page 579 3.19.19.3.2 KEY VENDING - RECEIVE A KEY From the Key Vending Wizard home screen click Receive a Key. This will activate the Signature Pad to allow the user to sign to confirm the return of the key(s). The signature will be displayed in the Signature Control window. Once the signature is complete the Key Requestor can select ‘OK’...
- Page 580 Enter the ID number of the user into the provided field and press Lookup Keys. This will display a list of the keys currently issued to that user. If no keys are displayed it’s likely that the ID number was not entered when the key was issued. In this case, click Update ID (Update Traka ID in the example).
- Page 581 Enter the user’s name and click Search. Select the correct user from the list, enter the ID number in the field at the bottom of the window and then click Update User. A message will appear asking you to confirm the update. Click Yes and OK to the confirmation, and then click Back to return to the Key selection screen to enter the ID number as shown at the beginning of this step.
- Page 582 You can print a receipt for the return of the key(s) by clicking Print Receipt. Click Finish to save the details. Return the key(s) to the Traka System. 3.19.19.3.3 KEY VENDING REPORTS The following reports can be generated for the Key Vending Wizard feature: ...
- Page 583 To generate one of these reports go to Reports>Crystal Reports>Key Vending Wizard>… NOTE: For details on how to filter and save reports refer to the section Event Report Viewer. Key Handover Audit Report The Key Handover Audit Report shows all of the transactions for keys that have been issued and returned. It shows the date and time of the key issue/return and various details of the keys and user including the user’s signature that was signed during the transaction.
- Page 584 Key Issue Exception Report The Key Issue Exception Report lists all of the keys that have been removed from the Traka System but have not been issued using the Key Vending Wizard. Keys will appear in this report 15 minutes after being removed from the system if they have not been issued via the Wizard.
- Page 585 An email is generated for any keys that are overdue, or if they have been removed from or returned to the Traka System without using the Key Vending Wizard (Key Issue Exception and Key Return Exception). The recipients of the emails can be specified in File>Properties>Key Vending Wizard in Traka32. Refer to the Properties section in this guide for more information.
-
Page 586: Key Weighing
If the key bunch is over or below the tolerance, then an event will be generated in Traka32 to display this. - Page 587 V3.5 14/08/19 UD0089 Page 587 This Document is uncontrolled unless over stamped "CONTROLLED DOCUMENT"...
-
Page 588: Key Wizard
3.19.21.1 KEY WIZARD OVERVIEW The new Traka32 Key Wizard allows quick and easy access to adding, maintaining and searching key records within Traka32. It incorporates a quick lookup facility using the Traka Desktop iFob Programmer allowing users to identify the keys in an instant and also allow quick allocation and de-allocation of keys. - Page 589 Traka32 software, simply hold down the F9 key and click on Close. Update from Kerridge The update from Kerridge utility will check each key record in the Traka32 database can compare it with Kerridge. If there are any differences the Traka32 database will be updated accordingly.
- Page 590 Click on Import Chassis to import a key record from Kerridge based upon a Chassis Number. Simply confirm the chassis number and click on OK. Traka32 will attempt to find a match in Kerridge. If a match was found then click on Save to save the new record or Cancel to discard the new key record.
- Page 591 When editing a Key Record it is also possible to update the details from Kerridge by clicking on the Update from Kerridge button. This will cross reference the Kerridge database via the Chassis or Registration and update all the mapped Key Record fields. To clear the search criteria simply click on Clear.
- Page 592 3.19.21.4 QUERY AN IFOB It is possible to search for a Key in the Traka Database using the Traka iFob. Click on Query an iFob Insert an iFob into the Traka Desktop iFob Programmer. If there is no Traka Desktop iFob Programmer or you do not have the iFob to hand, either... Enter a Search detail such as System, Position or iFob No.
- Page 593 Chassis Number. Simply confirm the chassis number and click on OK. Traka32 will attempt to find a match in Kerridge. If a match was found then click on Save to save the new record or Cancel to discard the new key record.
- Page 594 3.19.21.6 ALLOCATE KEY TO IFOB First of all search for an iFob record by clicking on Search for a Key or Query a BMW Key. Please refer to the relevant sections of this guide. Once the key record has been found, insert an iFob into the Traka Desktop iFob Programmer and click on Allocate Key to iFob to allocate the key to an iFob.
- Page 595 3.19.21.7 REMOVE KEY FROM IFOB First of all click on Query an iFob Insert an iFob into the Traka Desktop iFob Programmer (if available). NOTE: Inserting the iFob in the Traka Desktop iFob Programmer will ensure the description will be removed from the iFobs memory.
-
Page 596: Location Storing
3.19.22 LOCATION STORING Location Storing or Bay Logging as it's also referred to, allows users to record the current location of a vehicle or item. Every time a user returns an iFob they will be prompted for a location. The user can use the keypad to enter letters and numbers to make up a location description. - Page 597 If a user fails to enter a location, a 'Location not entered' event is generated in Traka32. These events can also be seen in reports. The location entered is also displayed in the information panel in the system viewer window.
-
Page 598: Lockout Facility
3.19.23 LOCKOUT FACILITY 3.19.23.1 RECEPTOR STRIP LOCKOUT FACILITY OVERVIEW The Receptor Strip Lockout Facility enables the control of the three relays fitted to the Control PCB. The relays can be programmed to activate / de-activate depending on the status of the iFobs within certain receptor strips. This can be used as a safety lockout facility. - Page 599 3.19.23.2 SYSTEM LOCKOUT FACILITY OVERVIEW The System Lockout Facility enables the control of the three relays fitted to the Control PCB. The relays can be programmed to activate / de-activate depending on the status of all the iFobs within the system. This can be used as a safety lockout facility.
-
Page 600: Micro Traka
When the user returns the key, history information is written in to the user's iFob that is downloaded to Traka32 when the user eventually returns the iFob to the cabinet. - Page 601 3.19.24.2 MICRO TRAKA IFOB CONFIGURATIONS From the main screen click View, Micro Traka iFob Configurations and a list of the currently defined configurations will be displayed. To create a new configuration click Configurations, Add New and the Program Micro Traka iFob dialog will be opened with blank settings.
- Page 602 3.19.24.3 PROGRAM MICRO TRAKA IFOB System Select the system in which the iFob to be programmed resides. Position Select the position in which the iFob to be programmed resides. Configuration Select the type of configuration to be written to the iFob: ...
- Page 603 Address Select the address of the configuration. Note: An address can only be associated with one configuration. Type Select the type of the Micro Traka unit. Opening Detection Action Select the action that will be taken when the door of the unit is opened. Location, Building, Floor and Local Labels associated with the configuration to describe the location of the Micro Traka unit.
- Page 604 3.19.24.4 SPECIAL IFOBS There are five special types of iFobs available for management of the Micro Traka system. These are programmed via iFob menu on the System Viewer window: Priority; allows an administrator access to any Micro Traka unit, ignoring the address, type and validity dates.
-
Page 605: Mileage Logging
Traka will know what the value of the previous mileage entered and will not allow a user to enter a value lower than the current mileage. However mistakes can be made and this value can be edited through the Traka32 software within iFob Details window. - Page 606 The Trip Mileage is shown on all the usual transaction and event reports. If you have upgraded from previous version of Traka32 (version 02.04.0001 or earlier) the Trip mileage values will not have been previously calculated. To calculate the previous Trip Mileage vales simply follow these steps...
- Page 607 3.19.25.3 LOWEST MILEAGE LOGGING PRIORITY Lowest Mileage Logging is an 'add on' feature to the original Mileage Logging. When a user authenticates themselves at the system, the appropriate LED will illuminate and release the vehicle key that has the lowest mileage out of other vehicles within same access level.
-
Page 608: Reason Code Logging
0 and 15... Once the value has been entered the user simply presses # to confirm the value or * to edit the value. Each reason code will appear in the Traka32 software against each iFob and Key transaction. NOTE: Reason Code Logging will only be available if the firmware of the selected system has Reason Code Logging enabled. -
Page 609: Random Return
Fixed & Random return within the same Database Traka32 is now able to have a combination of Fixed & Random return cabinets within the same database from software version v02.09.0000 and above. For this to work you will require this option to be enabled within the firmware on the fixed return cabinet/s within the database. - Page 610 The iFobs will not be recognised if placed into another system as with fixed return systems. Random Return to Single Systems Setup The iFobs are referenced in Traka32 with the Index Number. The iFobs are configured in the same manner as fixed return. When the iFobs are configured they are allocated an 'iFob Index Number' which is a number of equal value to the slot the iFob was in when configured.
- Page 611 * key on the keypad and type in all or part of an iFobs description to search for its location within that system. If the iFob is not in the system the iFob cannot be located with this method and the Traka32 software should be used.
- Page 612 If the iFob does not have memory (Standard iFob) then the system will reject the iFob. To make the iFob records appear in the Traka32 software all you have to do is Read All System Data. The Traka32 software will automatically check if the database has a record for that iFob, if not it will create one.
- Page 613 It is very important that you read the system data in the order in which the iFob Tags are allocated. 10. From the Traka32 software’s System Viewer, right click over the picture of the system and click on Engineers>Synchronise iFobs. This will write the assigned iFob Indexes into the Data iFobs memory which can then be used for iFob Searching.
- Page 614 If you would prefer to tag you iFobs manually then you can do this via the 'Tag Numbering Wizard'. If you navigate to the iFob list by clicking View>iFob List, you will be confronted by a list of all the iFobs in the database whether the iFob is in or out of the system/s.
- Page 615 3.19.27.3.3 REPLACING IFOBS IN RANDOM RETURN TO MULTIPLE SYSTEMS This procedure should be followed when replacing an iFob in a Random Return to Multiple Systems system and transferring the iFob tag across to the new iFob. Insert the new iFob into a vacant position. Select the correct system from the drop down menu in the main toolbar.
- Page 616 10 in system two if desired. Setting up Fixed Return to Multiple Systems NOTE: This guide does not cover how to set up and configure a cabinet(s) on Traka32. See the Configuring Systems section for more details.
- Page 617 Traka32 After selecting the appropriate settings in the Details window click the 'Save & Close' button.
- Page 618 Now that the iFob record has been duplicated and Traka32 knows the iFob can be used at both cabinets, view the second system within Traka32 and you will notice that there will be a greyed out iFob in the position that you selected to host your duplicate iFob.
-
Page 619: Reduced User Security
3.19.28 REDUCED USER SECURIT Y 3.19.28.1 REDUCED USER SECURITY OVERVIEW Full Reduced User Security Overview Full Reduced User Security has been developed for customers that do not take advantage of the advanced security settings available within Traka but require the System to work with more users. This only applies to 8bit systems. When the option is switched on the only visible difference that can be seen is in the User Details and Security Group windows where the following features will not be visible... -
Page 620: Reduced Ifob Security
3.19.29 REDUCED IFOB SECURITY 3.19.29.1 FULL REDUCED IFOB SECURITY OVERVIEW Full Reduced iFob Security has been developed for customers that do not take advantage of the advanced security settings available within Traka but require the System to work with more iFobs (up to 2,560 iFobs per system). When the option is switched on the only visible difference that can be seen is in the iFob Details window where the following features will not be visible... - Page 621 3.19.29.2 HALF REDUCED IFOB SECURITY OVERVIEW Half Reduced iFob Security has been developed for customers that do not take advantage of the extra features available within Traka but require the System to work with more iFobs (up to 1,280 iFobs per system). When the option is switched on the following options will not be available...
-
Page 622: Remote System Lockdown
3.19.30 REMOTE SYSTEM LOCKDO WN 3.19.30.1 REMOTE SYSTEM LOCKDOWN Remote System Lockdown has been developed to keep all users locally locked out of the system whilst the option is enabled and third party hardware is connected. When switched on, Remote System Lockdown will not allow any user to login to the system or access iFobs, keys or items by any means. - Page 623 When the 16bit Configuration Wizard appears navigate to the forth options page and select the Remote System Lockdown tick option. Continue to click Next and then finally Finish to communicate and apply the changes to the system. The system now has Remote System Lockdown activated. When a user tries to access the system by pressing a key or swiping a card the LCD will display the message ‘System Lockdown’...
-
Page 624: Secondary Access Levels
3.19.31 SECONDARY ACCESS LEV ELS 3.19.31.1 SECONDARY ACCESS LEVEL OVERVIEW Enabling Secondary Access Levels allows a user to take an iFob which primarily has an access level they do not have. Enabling an iFob with a Secondary Access level means a user will be able to remove that iFob once all other iFobs with the user’s primary access level have been removed from the cabinet. - Page 625 Next, open the Details window for the desired User and select the iFob Access tab then Set the iFob allowance to 1. This restricts the number of iFobs a user can take. Without limiting their iFob allowance to 1 a user could take the last iFob with their assigned access level and then at the same time remove iFobs that have secondary access levels, allowing the user to choose another iFob as opposed to being assigned one.
- Page 626 If a user accesses the cabinet to take an iFob and finds iFobs 1-5 have been removed by other users, the Secondary Access Levels on the iFobs will activate and the user can now access iFobs 6-10, the LED's will now turn green (see Below).
-
Page 627: Security Seal Confirmation
3.19.32 SECURITY SEAL CONFIRMATION 3.19.32.1 SECURITY SEAL CONFIRMATION OVERVIEW The Security Seal Confirmation option prompts a user when removing an iFob from the cabinet to check and verify the security seal no. attached to the iFob. If the security seal no. is different to that of which is stored in Traka, then the iFob and related key may have been tampered with. - Page 628 3.19.32.2 SECURITY SEAL CONFIRMATION OPERATION To setup an iFob to Prompt for Security Seal Confirmation: From the Traka 32 system viewer right click over an iFob and click Edit iFob Details Click the iFob Details tab. Ensure the System and iFob selected is correct. Enter the Security Seal No.
-
Page 629: User Identification Number
The User Identification Number was developed to allow users to securely assign themselves a PIN on the keypad at the system. This eliminates the administrator who is adding the user profiles to Traka32 knowing the PIN codes and ID card numbers of the users. How the feature works is each user is given a unique 'Identification Number' (commonly referred to as a NIP code) that they then enter at the system, which will allow them to swipe their ID card and assign themselves a PIN via the keypad. - Page 630 At this point the card number is stored in the system against the user profile as the primary PIN. This information will be read back to Traka32 once the data has been read from the system. Once the card number has been read and stored, the user can enter their own PIN followed by the # key.
-
Page 631: Vehicle Cost Logging
3.19.34 VEHICLE COST LOGGING 3.19.34.1 VEHICLE COST LOGGING OVERVIEW The Vehicle Cost logging option enables a user of a vehicle to enter certain data about the vehicle when returning the iFob / keys. The information that can currently be recorded is... ... -
Page 632: Visitor Booking
The visitor booking wizard is used to create and edit visitor booking records. When a visitor has pre-booked a visit and the visitor arrives on site and requests a key, the operative of Traka32 can open the visitor booking list and search for the relevant visit. Once the visit booking record has been found the booking can be confirmed and the related key released from the Traka System. - Page 633 3.19.35.2 VISITOR BOOKING LIST The Visitor Booking List allows you to view the current visitor bookings that have been made. From this list you can add and edit the bookings via the easy to use wizard or simply delete bookings. To view the visitor booking list, click on View, Visitor Booking from the main menu.
- Page 634 3.19.35.3 VISITOR BOOKING WIZARD The visitor booking wizard is used to create and edit visitor booking records. To view the visitor booking list, click on View, Visitor Booking from the main menu. To add a booking simply click on the button. To edit a booking simply double click on the booking record you wish to edit or select the booking and click on the button.
- Page 635 Enter and notes that you want relating to the booking and click on Next. Step 5 – Confirm the booking: Confirm the booking details, if you are happy and want to save the booking click on Confirm or if you want to change the details click on Back or to discard the booking click on Cancel.
- Page 636 CONFIRM AND RELEASE When a visitor has pre-booked a visit and the visitor arrives on site and requests a key, the operative of Traka32 can open the visitor booking list and search for the relevant visit. Once the visit booking record has been found the booking can be confirmed and the related key released from the Traka System.
- Page 637 To enable this option you must contact Traka as a Project Manager or Engineer is required to facilitate the upgrade. Immediate Release Booking Process From the top of Traka32, click on View, Visitor Booking. You will be presented with the Visitor Booking List. Here you can Add, Edit or Delete a Visitor Booking. Click Add New.
- Page 638 Enter any notes you want to make against the booking and click next. This page will display the details of the booking you are creating, if you are happy everything is correct click the Confirm button to complete the booking. Once you click the Confirm button, the system door will then automatically open and release the iFob for you to take.
- Page 639 10. You can run a crystal report to show the completed bookings. From the top of Traka32 select Reports, Crystal Reports, Visitor Booing Reports, Immediate Release Visitor Booking Report. V3.5 14/08/19 UD0089 Page 639 This Document is uncontrolled unless over stamped "CONTROLLED DOCUMENT"...
-
Page 640: General
3.20 GENERAL 3.20.1 AUTO DATABASE BACKUP If you are using a Microsoft Access Database, the Auto Database Backup automatically prompts the backup of the database to a chosen location set in the Properties window. NOTE: It is strongly recommended that you back up your database as regularly as possible. To enable the Automatic Database Backup reminder click on File, Properties... - Page 641 When you have used the software x times (x = Frequency), when you close the software the following prompt will appear... Click on Not This Time to skip the backup and exit the software. Click on Yes, Backup Now to back up the database to your chosen location. Ensure the backup path is correct (and if required the PC is connected to the network or a floppy disk is inserted etc.).
-
Page 642: Setting Up Auto Comms
PC. NOTE: Auto Comms in Traka32 will not work if Traka as a Service is installed on the same PC, even if the service is not running. Auto Comms will only work again once the service is uninstalled. - Page 643 Specific Time of Day By selecting specific time of the day you may specify exact times of each day that Traka32 should communicate with the systems. To add a time, enter the required time and click on Add. The time will appear in the list opposite.
- Page 644 Set the Auto Communication to Include In Auto Comms. Nominate a PC This option allows a PC or a Server of your choice to communicate with your Traka system. Tick this option and nominate a PC or Server to Auto Communicate with the desired system, then enter the PC Name, IP or IP Name.
-
Page 645: Relaying On Microsoft Exchange Server
SMTP Server cannot authenticate who the sender of the e-mail is. The SMTP server will block the e-mail from being sent and an error will occur in Traka32. To overcome this problem you simply need to configure the SMTP to allow relaying from either your internal network or from the specific IP address of the PC running Traka32. - Page 646 In the Relay Restrictions section, click on Relay... From the Relay Restrictions window, select the Only the list below option and Add in an entry for either the domain or for the specific PC that is running Traka32. V3.5 14/08/19...
-
Page 647: Messenger On Microsoft Windows
3.20.4 MESSENGER ON MICROSO FT WINDOWS This is a guide to enabling the Microsoft Messenger Service to allow Traka32 to send NetSend messages across a domain. NetSend is only available on NT based operating system such as Windows ME, 2000, NT and XP. NetSend will not work on Windows 95 or 98. -
Page 648: Alarm & Event Types
3.20.5 ALARM & EVENT TYPES Alarm Types Triple Primary PIN: Occurs when a user enters their PIN incorrectly three times or when an unrecognised card is swiped three times. Door Left Open: Occurs when a user accesses the system and does no close the door when finished. Power Fail: Occurs when the Traka System’s mains power fails and Traka runs on its battery backup. - Page 649 37. Door Closed Manually: Reserved for special projects. 38. Remote Item Release: Occurs when an Item is released from the Traka32 software using the Remote Item Release utility. 39. User Has Returned All Item: Occurs when a user has returned all Item that were previously booked out to Alarm Output them.
- Page 650 46. Lockout Status Cleared: Occurs when a lockout status has been cleared. This event is only recorded with the Maintenance Lockout Facility option. 47. Daily vehicle checks not entered: Occurs when the daily vehicle checks have not been entered at the Daily/ Weekly Vehicle cabinet.
- Page 651 69. Toolset Check Incomplete: Occurs when a user fails to check their toolset 70. Toolset Checked Incomplete: Occurs when a user doesn't fully complete a toolset check 71. Toolset Not Checked: Occurs when a user doesn't check their toolset 72. Allowance Reached: Occurs when a user has taken their predefined allowance of items. 73.
- Page 652 138. Toolset Check Initiated: Occurs when a tool set check is underway. 139. Toolset Check Completed: Occurs when a toolset check is completed. 140. Toolset Allocated For Checking: Occurs when a toolset is automatically allocated to a user ready for checking. 141.
-
Page 653: Access Levels
3.20.6 ACCESS LEVELS Each iFob must be assigned with an access level. The access level is a number between 1 - 200 for 8bit systems and 1 - 2560 for 16bit systems and does not relate to the position of the iFob. For a user to be able to take an iFob with a specific access level, you simply need to allocate that access level to the users Current Access Levels list. - Page 654 User Definable Number of Access Levels Per Cabinet Each system can have the number of usable access levels defined. The default number of access levels is show below: System Type Number of Access Levels 16bit systems - Key Cabinets 2560 16bit systems - Locker Systems 8bit Key Cabinets and Locker Systems 8bit with Half Reduced User Security...
-
Page 655: Alarm Notification
3.20.7 ALARM NOTIFICATION When Traka32 downloads one or more alarm type events, the following symbol will appear in the status bar Optionally Traka32 will play a notification sound if the Allow Traka32 to play sounds property is enabled. For further details on enabling sounds, please refer to the Properties section. - Page 656 Reports When alarms are cleared an audit is kept of when the alarms were cleared and who by. You can view this information the single or by running the Reports > Crystal Report > Events > Alarm History report. Notes are logged against multiple alarms (depending on what was selected) and a list of the associated alarms underneath.
-
Page 657: Lists & Reports
3.20.8 LISTS & REPORTS 3.20.8.1 FILTERING REPORTS The reports filter can be used to filer the any of the reports between certain date and times and between systems. Filtering Dates To view all the transactions that have ever occurred, clear the 'Filter report by specific dates' checkbox. To view transactions between certain dates, check the 'Filter report by specific dates' checkbox and specify the From and To date and time. - Page 658 3.20.8.2 SORTING LISTS AND REPORTS All the lists and reports within the Traka32 software can be sorted in the same way. Simply highlight the top of the column that you wish to sort by. For example I want to sort by the Position column...
- Page 659 3.20.8.3 CUSTOMISING LISTS AND REPORTS All the lists and reports within the Traka32 software can be customised in the same way. General Each column may be moved by clicking over the column and dragging it to the required location.
- Page 660 Specify a new name for the layout Enter the name of the new layout and click OK. Note: You cannot have more than one layout with the same name. Overwrite an existing layout If you wish to overwrite an existing layout, select the overwrite option, select the layout from the list and click OK. Rename Layout To rename a saved layout simply select the layout that you want to rename from the Layout List and click on Rename Layout.
- Page 661 3.20.8.4.1 STANDARD SEARCHING All the lists and reports within the Traka32 software can be searched upon all in the same way. At the top of each list or report there is a search menu... If you wish to search on a specific column simply select the column title from the drop down list. To search all the visible columns select All Columns.
- Page 662 All of the data that is visible in the list or report will be searched. If one or more matches are found the records will be highlighted in the list or report. To move to the next record found in the search simply click on Next. ...
- Page 663 Use Advanced Searching option in the Properties window. All the lists and reports within the Traka32 software can be searched upon all in the same way. At the top of each list or report there is a search menu... If you wish to search on a specific column simply select the column title from the drop down list. To search all the visible columns select All Columns.
-
Page 664: Firmware Upgrades
FIRMWARE UPGRADES 3.20.9.1 8BIT FIRMWARE UPGRADE If you are upgrading the Traka32 software and firmware, please ensure you upgrade the Traka32 software before upgrading the firmware. Upgrading the firmware will take approximately 5 minutes per Traka system to complete. Please ensure that any important keys are removed from the systems prior to the upgrade, as it may be difficult to obtain the keys during the upgrade. - Page 665 If you see ’System Serial Number Not Set’, click on the either: Enter Serial For older systems (firmware version 6.06.01 and above), enter the serial number of the system. This can be located on the inside of the Pod. ...
- Page 666 Engineers only. When you are happy click on Upgrade. The Traka32 software will back up all the data from the selected Traka System, upgrade the firmware and restore all the backed up data. Provided the upgrade completed successfully, click on Finish V3.5 14/08/19...
- Page 667 What if the upgrade goes wrong? If the upgrade did not complete successfully, click on Back and then click on Upgrade again to retry. If you see the following message during the upgrade, the upgrade wizard was not able to back up the data from the system.
- Page 668 3.20.9.2 16BIT FIRMWARE UPGRADE If you are upgrading the Traka32 software and firmware, please ensure you upgrade the Traka32 software before upgrading the firmware. Upgrading the firmware will take approximately 5 minutes per Traka system to complete. Please ensure that any important keys are removed from the systems prior to the upgrade, as it may be difficult to obtain the keys during the upgrade.
- Page 669 When you have selected the system and confirmed the serial number is correct, click on Next. Select the path to the upgrade file. To search for the upgrade file simply click on the Browse button. The firmware upgrade file name will be formatted as follows TKCvNNNNN-DDDDDD.MOT where the NNNNN part is the version and the DDDDDD part is the release date.
- Page 670 When you are happy click on Upgrade The Traka32 software will back up all the data from the selected Traka System, upgrade the firmware and restore all the backed up data. Provided the upgrade completed successfully, click on Finish. What if the upgrade goes wrong? V3.5 14/08/19...
- Page 671 If the upgrade did not complete successfully, click on Back and then click on Upgrade again to retry. If you see the following message during the upgrade, the upgrade wizard was not able to back up the data from the system. If you are not worried about losing some of the transaction or alarm data then click on Yes. If you do not want to lose any data then click on No and contact you supplier for further details.
-
Page 672: Configure Firmware
The System Configuration window allows you to view and edit the current configuration of the selected Traka System. On a 16bit Traka System, the Configure Firmware wizard is also used to register the hardware to the database. This is required before Traka32 will fully communicate with the hardware. Please refer to the relevant... - Page 673 3.20.10.1 8BIT CONFIGURE FIRMWARE The 8bit System Configuration window allows you to view the various options that are enabled on the selected Traka System. It is also possible to make minor adjustments to specific parts of the configuration such as the number of receptor strips and reader settings.
- Page 674 3.20.10.2 FIRMWARE OPTIONS & SETTINGS Below is a list of firmware options and settings for the 8bit and 16bit Traka Systems: Reader NOTE: The card reader section should not be altered from the factory settings. If you are experiencing problems with the setup of your ID Card, please contact Traka as they will be able to discuss the problems with you and suggest alternate settings which can be altered below.
- Page 675 To alter the choice of reader, please contact Traka with details as a firmware upgrade will be required. Human Interface Type Select the Human Interface Device (HID) Type used for access. For example an RFID card or tag would be placed within "proximity" of the reader and a magstripe card would be "swiped" through the reader.
- Page 676 * = Ignore this bit 1 to 4 = Decode this as the entered section number For example, for a Wiegand 26bit card the string would read *222222221111111111111111* The Encode button can be used to convert the Card Reader Code into the relevant Card Section Numbers above and likewise the Decode button can convert the Card Section Numbers into a Card Reader Code.
- Page 677 If you alter this setting you will need to alter the System ID Number within the System Details window otherwise the Traka32 software will not be able to communicate with the Traka System if the ID’s do not match. Comms Delay Slide the Comms Delay control to alter the comms delay between 0 and 255.
- Page 678 LCD Scroll Speed Slide the LCD Scroll Speed between 1 and 45 to alter the speed at which the LCD text scrolls. 1 is the slowest and 45 is the fastest. The default is 35. Language This field shows the current language setting of the firmware. Please view the Languages topic to see what languages are currently available.
- Page 679 System 2 Firmware Version This field shows the current version of the firmware. Serial Number This field shows the serial number of the system. I’Switch Fitted This box will be checked if the firmware has the I’Switch Delay utility included. The Traka I’Switch is a device that allows two set of keypads, LCD’s and readers to be connected to a Traka Control PCB.
- Page 680 NOTE: The firmware memory setting must be used with the correct memory fitted to the Control PCB otherwise errors will occur. Firmware has relay lock-out facility enabled This box will be checked if the firmware has the relay Lockout Facility enabled.
- Page 681 Locking Strip Height Select the height of the first locking receptor strip within the selected system starting at 1 for the top strip. Firmware has full reduced iFob security enabled This box will be checked if the firmware has full reduced iFob security enabled.
- Page 682 Firmware has fault logging enabled This box will be checked if the firmware has fault logging enabled. Firmware allows faults to be logged at cabinet This box will be checked if the firmware has the ability to log faults from the keypad. Default fault code The drop down list allows a default fault code to be selected.
- Page 683 Firmware has iFob description search enabled This box will be checked if the firmware has the iFob description search facility enabled. Firmware supports Immobilisor (iFob per Truck) Acceptance Button This box will be checked if the firmware has immobilisor acceptance button logging enabled.
- Page 684 iFob Release This field shows the current iFob release method the firmware has been complied for. Receptor Strip – The user presses the button adjacent to the iFob to request an iFob. Guard – The user enters the position number of the iFob they require. If authorised the door will open releasing the iFob to a guard who will then issue the iFob to the user.
- Page 685 X iFob Authorisers This option will be selected if the firmware has the X iFob Authorisers option enabled. X iFob/System Authorisers – Force Access Level 199 To Authorise This option will be selected if the firmware has either X System Authorisers or X iFob Authorisers options enabled and the authoriser is required to have access level 199.
- Page 686 Multiple Cabinets This box will be checked if the firmware has random iFob replacement to multiple cabinets enabled. Firmware has vehicle cost logging enabled This box will be checked if the firmware has vehicle cost logging enabled. Currency Setting This field shows the selected currency setting of the firmware. The following currencies are currently available.
- Page 687 Firmware has advanced search enabled This box will be checked if the firmware has the advanced iFob search option enabled. This only applies to firmware version 6.07.23 and above. Firmware has iFob release timer enabled This box will be checked if the firmware has the iFob release timer option enabled.
- Page 688 Firmware has Daily / Weekly Vehicle Check option enabled This box will be checked if the firmware has the daily / weekly vehicle check option enabled. Daily Vehicle Check Shift Start Hours This field shows the selected shift start time for the daily vehicle check option. Options 4 NOTE: The following options are available within the firmware upon request from Traka.
- Page 689 The 16bit Configuration Wizard can also be launched automatically if you are adding a new system to the database or if Traka32 detects a change in the hardware such as the 16bit Control PCB. If Traka32 has detected a change in the hardware then a new configuration file will need to be obtained from Traka in order for the communications to continue permanently.
- Page 690 Control PCB. The communications between Traka32 and the Traka System will also be possible for up to 30 days, but every time communications is initiated, Traka32 will prompt for a configuration file first.
- Page 691 You will need to contact your distributor quoting the CPSN Read from Hardware. The distributor will them be able to e-mail you with a configuration file for your hardware. TIP: Click the button to copy the CPSN to the clipboard for pasting into a file or email. Once you have obtained the configuration file from Traka or your distributor, save it to the machine from...
- Page 692 NOTE: This indicates it has been loaded into the Traka32 database only at this stage and not yet applied to the cabinet. If the configuration file was incorrect, check that you have the correct file via the file name and try again. An incorrect file may be may be because…...
- Page 693 3.20.10.3.3 CHANGING 16BIT FIRMWARE SETTINGS The 16bit Configuration Wizard can also be used to make changes to the current system settings and also to unlock new cost options via a configuration file. To open the System Configuration window, from the main screen select the system and from the system viewer right click over the picture of the relevant position and click on Configure Firmware.
- Page 694 The CPSN window is displayed confirming the Serial Number, CPSN Read from Hardware, the Hardware and Code versions and in addition the Traka32 version the firmware was tested with. You will need to contact your distributor quoting the CPSN Read from Hardware. The distributor will then be able to e-mail you with a configuration file for your hardware.
- Page 695 NOTE: This indicates it has been loaded into the Traka32 database only at this stage and not yet applied to the cabinet. If the configuration file was incorrect, check that you have the correct file via the file name and try again. An...
- Page 696 Finally click on Apply to load the configuration into the cabinet. If you wish you may also save the current configuration (with any changes) to a File. Click on to do so and provide a suitable name for the file perhaps indicating any specific options that it contains.
-
Page 697: Traka32 As A Windows Service
TRAKA32 AS A WINDOWS SERVICE (TAAS) OVERVIEW Traka 32 as a Service (TAAS) provides a means of running Traka32 in the background as a Windows Service on a PC or Server. TAAS requires no User interface and keeps running even if no-one logs on to the PC / Server. This has... -
Page 698: Traka As A Service Installation Prerequisites
The PC or Server that Traka as a Service is to operate on, must be running Windows NT 4.0 SP6 or later (i.e NT, 2000,2003, XP or Vista). Please note that Windows 95 and Windows 98 are not supported. Other requirements are as per Traka32 Minimum PC Requirements. -
Page 699: Traka As A Service Installation
Traka32 software. Installing Traka32 as a Service Once Traka32 is installed, register Traka32 as a Service with Windows using any of the following methods:- Double click the shortcut on the Desktop. From the Windows Run dialog box. -
Page 700: Setting Up Traka32 As A Windows Service
Set the Nominated PC Name under the Comms tab in the System Details window. Note that if Nominate a PC is left not ticked, then all Traka32 clients will attempt to communicate with the selected system. V3.5 14/08/19 UD0089 Page 700... - Page 701 Switch on Service Logging in File->Properties under the Logging tab. It is recommended that Comms Logging should also be switched on during testing of the application. Communications messages between the Traka systems and Traka32 will then be shown in the Service Manager Details panel.
-
Page 702: Starting And Stopping The Service
3.21.5 STARTING AND STOPPING THE SERVICE To Start, Pause, Continue, Restart or Stop the service under XP, you should use the Windows’ Computer Management tool. This is available by: Right-clicking the My Computer icon. or right-clicking any link to My Computer. Choose Manage from the context menu. - Page 703 Expand Services and Applications, then single-click Services, you should see a complete list of Windows Services. Scroll down until you see Traka32 Cabinet Communications Service, then single-click the line to select it. If it’s not there, the service is not installed.
- Page 704 To start or stop the service, use the Play, Stop, Pause and Restart icon buttons in the top toolbar. NOTE: Under Windows NT 4.0, use the 'Service applet' in Control Panel. Refer to Service on Windows NT 4.0 Consideration for important information on running the Service on this operating system.
-
Page 705: Firmware And Software Upgrades (Taas)
Windows Computer Management tool to start, pause and stop the service. After a Traka32 software upgrade, use the Traka32 Client to perform any database integrity checks before restarting the service. Unless the location of Traka32.EXE changes, there is no need to reinstall the Service. -
Page 706: Traka Service Manager
The Traka Service Manager program has been designed to continuously monitor a Traka32 Service running on a remote PC. The Service Manager operates by periodically sending status requests over the network to a copy of Traka32 running as a service and displaying the returned information in an easy to see, colour-coded fashion. - Page 707 Service Manager Options Click Options to adjust the Service Manager parameters: Machine Name or IP Address/Name Enter the Machine Name or IP Address of the target PC / Server running the Service to be monitored. Port No. Enter the TCP/IP Port No. used to communicate with the Service. 10002 is the default however when using Remote Host communications where each Traka system must use a unique Port No, ensure the Service Port No.
-
Page 708: Other Service Info
OTHER SERVICE INFO 3.21.8.1 WHAT TO DO IF SERVICE IS UNRESPONSIVE In the unlikely event that the Traka32 Service becomes unresponsive, try the following in this order: Try stopping the Service with Windows Computer Management tool. Refer to Starting the Service. - Page 709 3.21.8.2 WHICH MACHINE IS THE SERVICE RUNNING ON? If you only have access to a Traka32 workstation PC and need to find out which machine the TAAS is running on, there are two methods depending on which database type is used: Access: Open the T32Database.LCK file with notepad and you should be able to see the Computer names of...
- Page 710 This restriction is lifted once Traka32 is installed as a Windows Service in order to be able to run both the Traka32 Service and Traka32 Client at the same time on the same machine. This means that you can (unintentionally) run two or more copies of the Traka32 Client simultaneously.
- Page 711 Audit trails for the Service (install, start, stop events etc) are written to both Support\T32Service.txt (assuming that Service Logging is switched on in Traka32) and the Windows Application and System Event logs. Note also that as T32Service.txt grows larger than 3Mb, it is automatically archived into T32ServiceArchive.txt. V3.5 14/08/19...
- Page 712 Connect to another computer. Tip 2. The service can be started and stopped from a Command Prompt or batch file by typing: NET START "Traka32 Cabinet Communications Service" NET STOP "Traka32 Cabinet Communications Service" Advanced: By default, the Service is installed as Startup:Automatic and ’Log on as Local System Account’. This means that the Service will start when Windows starts and run it as ’SYSTEM’.
- Page 713 3.21.8.6 SERVICE ON UNSUPPORTED WINDOWS VERSION Attempting to install Traka32 as a windows service on an unsupported version of Windows (such as Win98SE) will result in any command line (/serviceinstall) being ignored. Service Prerequisites for information on supported Operating Systems.
- Page 714 3.21.8.7 SERVICE ON WINDOWS NT 4.0 CONSIDERATION When manually starting the service on NT 4.0 using an Access Database, the Service can take over 40 seconds to start. This will cause Windows Service Control Manager to show an error message after 30 seconds: 'The Service failed to start or respond to a control message in a timely manner'.
- Page 715 3.21.8.8 SERVICE MESSAGE BOX DIALOG HANDLING Message box dialogs that are presented during the course of operation of Traka32 As A Service (including questions, confirmations and operational errors) will be suppressed, written to the T32Service.txt log file and 'OK' will be automatically supplied to the dialog to allow the service to continue without waiting for a user response.
- Page 716 3.21.8.9 SYSTEM BLOCK DIAGRAM The block diagram shows the relationship between the Server PC that Traka as a Service runs on, the Traka Systems and the PC that the Service Manager runs on. V3.5 14/08/19 UD0089 Page 716 This Document is uncontrolled unless over stamped "CONTROLLED DOCUMENT"...
-
Page 717: Traka Sql Server Manager
Traka SQL Server Manager requires the SQL DMO Object Library to work. To install Traka32 with the SQL Server options on any PC you need either of the following two things: Full Microsoft SQL Server installed on the PC... -
Page 718: Sql Database Backup
3.22.2 SQL DATABASE BACKUP It is extremely important to take regular backups of the Traka database in case of disk or file corruption or hardware failure. Unlike with an Access database, the SQL Server backup process currently cannot be automated and so a regular manual backup must be taken. -
Page 719: Sql Updates
3.22.3 SQL UPDATES This section provides a guide for upgrading an existing installation of Traka32 for use with SQL Server. It assumes the reader is already familiar with the Traka32 software, SQL Server Enterprise Manager and SQL Server security. NOTES: ... - Page 720 Complete the set-up as usual. When the installation finished, uncheck the Launch application now checkbox and click on Finish. Update the Database using the SQL Server Manager... Click SQL Server Manager from the Traka program group in the Start menu to open the Traka SQL Server Manager: Click Query Database to check the current state of the database.
- Page 721 Close this dialog and the main window should appear as follows: The initialisation is now completed and the database is ready for use with Traka. Upgrade all the remaining copies of Traka32 to the latest version. V3.5 14/08/19 UD0089 Page 721...
-
Page 722: Traka Systems
TRAKA SYSTEMS SERIAL NUMBER / RATI NG PLATE All Traka Systems are fitted with a Serial Number / Rating Plate. This can be found in the following location... For the Traka M-Series the Rating Plate is located on the inside, you will need to remove the control panel in order to view the Rating Plate. - Page 723 V3.5 14/08/19 UD0089 Page 723 This Document is uncontrolled unless over stamped "CONTROLLED DOCUMENT"...
-
Page 724: Battery Connection Details
BATTERY CONNECTION D ETAILS WARNING: All Traka Systems have two power sources, mains and battery. Before installing or servicing a Traka System, please ensure both mains and battery power sources are disconnected from the system. This section will explain how to disconnect the battery from 8bit and 16bit systems. Battery Disconnection Open the control pod/panel of the system using the master key. -
Page 725: How To Access The System
HOW TO ACCESS THE SYSTEM First access the Traka System. For a Keypad entry Traka System, press # and enter the Primary Personal Identification Number (PIN) followed by #. For a Card entry Traka System, swipe your card. ... -
Page 726: How To Return An Ifob
If you have any of the optional features such as fault, bay, mileage and / or fuel logging, you will be prompted to enter the relevant information. Traka32 In Traka32 the previous user of an iFob is the user who returned the iFob to the system, not the user who removed it. V3.5 14/08/19 UD0089 Page 726 This Document is uncontrolled unless over stamped "CONTROLLED DOCUMENT"... -
Page 727: Bit Configuration Menu
This option should be used with great caution! It deletes the information held with the system and resets the Traka system memory. To ensure no loss of data, load the Traka32 software, select a system from the drop down menu and click on the button to backup all the data from the system. - Page 728 To ensure no loss of data, load the Traka32 software, select a system from the drop down menu and click on the button to backup all the data from the system. After swapping the vector a firmware upgrade can then be performed,...
- Page 729 16BIT CONFIGURATION MENU The Configuration Menu of the 16bit Traka System allows you to configure certain settings, such as reset the system, change the CPSN number and restore the Default Configuration. Using the Master Key, unlock the CAM Lock. The Control Panel is hooked in at the bottom and locked at the top.
- Page 730 Comms Press 3 at the System menu to enter the Comms section. The Comms section consists of the following sub options... Press 1 at the Comms menu to enter the System ID section. To change the System ID Number press the key to delete the current number and enter the appropriate number via the Traka keypad and press #.
- Page 731 This option should be used with great caution! It deletes the information held with the system and resets the Traka system memory. To ensure no loss of data, load the Traka32 software, select the desired system from the drop down menu and click on the button to backup all the data from the system.
-
Page 732: Bit System File Types
Number> - etc. In addition it allows cost options This is because It needs to be registered to the <CPSN Number> to be unlocked; cost options include new Traka32 Database even if the system was - <Firmware Fault Logging, Booking, X-iFob shipped with a configuration file in. -
Page 733: Ifob Search Facility
IFOB SEARCH FACILITY 4.8.1 SIMPLE IFOB SEARCH NOTE: The simple iFob search facility is standard in firmware versions 6.07.16 and below. For firmware versions 6.07.17 and 6.07.22 only the Advanced iFob Search option is available. For firmware versions 6.07.23 and above the simple iFob search is standard and the advanced iFob search is optional. If an iFob / key is currently out of the system and a user wants to know who's got the iFob / key or if an iFob / key is in the system and a user wants to know who the last user of the key was, they can do this using the lookup facility. -
Page 734: Advanced Ifob Search
4.8.2 ADVANCED IFOB SEARCH 4.8.2.1 ADVANCED IFOB SEARCH OVERVIEW NOTE: Simple iFob Search facility is standard in firmware versions 6.07.16 and below. For firmware versions 6.07.17 and 6.07.22 only the advanced iFob search option is available. For firmware versions 6.07.23 and above the simple iFob search is standard and the advanced iFob search is optional. If a user wants to know who's currently in possession of an iFob / key or if an iFob / key is in the system and a user wants to know who the last user of the key was, they can do this using the advanced search facility. - Page 735 4.8.2.2 IFOB POSITION SEARCH The iFob position search enables a user to search by a physical position within the system. This search is useful if there is an unlabelled iFob / key in a position and you need to find out more information. Using the position search facility From the Traka System, press the * key on the keypad.
- Page 736 4.8.2.3 IFOB TAG SEARCH NOTE: The iFob tag search will only be available if the firmware has Random Return enabled. The iFob tag search enables a user to search by an iFob tag number. This search is useful if there is an unlabeled iFob / key in a position and you need to find out more information or if you are searching for an iFob / key.
- Page 737 Traka system. For example, details such as vehicle registrations or chassis numbers could be searched upon to locate the keys within the cabinet. Configuration Using the Traka32 software, click on File, Properties. Click on the Key Details, Use as iFob Description tab. Select one of the Key Description fields to be used.
- Page 738 The system will display if no further matches are found. The system will display if no matches are found at all. NOTE: This search facility will not search across systems however this is planned for the future. Please contact your supplier for more details. V3.5 14/08/19 UD0089 Page 738...
-
Page 739: Emergency Ifob Release
EMERGENCY IFOB RELEASE 4.9.1 EMERGENCY IFOB RELEASE The Emergency iFob Release utility is available to release all the iFobs from a system one at a time. Using the Master Key, unlock the Pod Lock. The Control Panel is hooked in at the bottom and locked at the top. -
Page 740: Total System Failure
4.9.2 TOTAL SYSTEM FAILURE In the event of total system failure you have two choices... If you need to gain access to the keys quickly or you have a Mini Traka System the best way is to cut the security seals that hold the keys to the iFobs. -
Page 741: Manual Ifob Release
4.9.3 MANUAL IFOB RELEASE 4.9.3.1 M-SERIES MANUAL IFOB RELEASE In the event of total system failure you will need to remove various parts of the M-Series Traka System to gain access to the iFobs / Keys. Tools required... Large flat blade screwdriver ... - Page 742 Using a 4mm Allen Key, remove the cover panel screws one at a time and remove the cover panels. Using a large flat bladed screwdriver, remove the screws from the receptor strip you wish to release the iFobs from. Remove the strip, carefully disconnecting the receptor ribbon cable. Using a small flat blade screwdriver, you will be able to pull back the small solenoid blade that holds the iFob in place and remove the iFob.
- Page 743 4.9.3.2 S-SERIES MANUAL IFOB RELEASE In the event of total system failure you will need to remove various parts of the S-Series Traka System to gain access to the iFobs / Keys. Tools required... Large flat blade screwdriver. Small flat blade screwdriver ...
- Page 744 Tilt the Control Panel forward and reach inside and open the door manually by moving the door lock catch Undo the plastic Wing Bolt then close and lock the Control Panel. You will now be able to swing open the Control Panel Door.
- Page 745 Fit two plastic Wing Bolts attaching the Receptor Frame Hinge to the Receptor Frame. 10. Slowly open the Receptor Frame. 11. Using a small flat blade screwdriver, you will be able to pull back the small solenoid blade that holds the iFob in place and remove the iFob.
- Page 746 4.9.3.3 L-SERIES MANUAL IFOB RELEASE In the event of total system failure you will need to remove various parts of the L-Series Traka System to gain access to the iFobs / Keys. Tools required... 10mm Socket/Nut Spinner Small flat blade screwdriver ...
- Page 747 Using the Master Key open the door (if fitted) using the Door Release CAM Lock. Using a 4mm Allen Key, remove the Cover Panel Screws one at a time and remove the cover panels. Using a 10mm nut spinner, remove the nuts from the receptor strip you wish to release the iFobs from. Remove the strip, carefully disconnecting the receptor ribbon cable.
- Page 748 V3.5 14/08/19 UD0089 Page 748 This Document is uncontrolled unless over stamped "CONTROLLED DOCUMENT"...
- Page 749 4.9.3.4 MINI 16 MANUAL IFOB RELEASE In the event of total system failure you will need to remove various parts of the Mini 16 Traka System to gain access to the iFobs / Keys. NOTE: On a Mini 16 system it is not possible to manually remove an iFob without removing PCBs and various other components.
- Page 750 4.9.3.5 STANDARD TRAKA MANUAL IFOB RELEASE In the event of total system failure you will need to remove various parts of the Standard Traka System to gain access to the iFobs / Keys. Tools required... Large flat blade screwdriver. ...
- Page 751 11. Repeat steps 9 to 11 for each receptor strip you wish to remove the iFobs from. NOTE: It is essential that the receptor strips are replaced in the same location from which they were removed otherwise the system will not function correctly. 12.
- Page 752 4.9.3.6 LARGE TRAKA MANUAL IFOB RELEASE In the event of total system failure you will need to remove various parts of the Large Traka System to gain access to the iFobs / Keys. Tools required... Large flat blade screwdriver. ...
- Page 753 Using the Master Key release the door (if fitted) using the Door Release Lock. Using a 4mm Allen Key, remove the cover panel screws one at a time and remove the cover panels. Using a large flat bladed screwdriver, carefully remove the screws from the blank receptor strip above the receptor strip you wish to release the iFobs from.
-
Page 754: Ifob Undetectable
4.10 IFOB UNDETECTABLE 4.10.1 IFOB UNDETECTABLE OVERVIEW The Traka cabinet continuously scans the iFobs to ensure they remain present and correct. If the system fails to detect the iFob whilst no authorised user is logged in then it is flagged as undetectable and an 'iFob Undetectable' event is recorded. -
Page 755: Causes Of Ifob Undetectable
4.10.2 CAUSES OF IFOB UNDETECTABLE The main reason for an iFob becoming undetectable is a loss of contact between the iFob and the receptor slot contacts. This can be happen due to a number of reason... In order for the Traka Cabinet to communicate to an iFob there must be a good contact between the iFob and the Receptor Socket Contacts. -
Page 756: Solenoid Vibration
Traka system. However Traka would recommend you check the event reports in Traka32 as it could an indication of a faulty iFob. View also... -
Page 757: What Happened To Ifob Forced From System
4.10.4 WHAT HAPPENED TO IFO B FORCED FROM SYSTEM? In older firmware versions, instead of recording an 'iFob Undetectable' event the system would have recorded an 'iFob Forced from System' event in addition to an 'iFob Removed' event (recorded against the last User who accessed the system). -
Page 758: Troubleshooting
4.11 TROUBLESHOOTING 4.11.1 BROKEN IFOB IN CABIN ET If a Traka System starts displaying the 'Broken iFob In Cabinet' message, there is a broken iFob somewhere within the system. To find the broken iFob... First access the Traka System. Please refer to the 'How to access the system? ' section Check the LCD... -
Page 759: Id Not Recognised
4.11.2 ID NOT RECOGNISED If a user cannot gain access to the Traka System check their user details have been set up correctly from the Traka32 software. Please refer to the User Details section. V3.5 14/08/19 UD0089 Page 759 This Document is uncontrolled unless over stamped "CONTROLLED DOCUMENT"... -
Page 760: Ifob Not Authorised
4.11.3 IFOB NOT AUTHORISED If a user can gain entry to the Traka System but cannot remove an iFob that they should have access too, check the user details have been set up with the appropriate access levels for the iFob in question. Please refer to the User Details section. -
Page 761: Memory Almost Full
If a Traka System starts displaying the 'Memory Almost Full' message, the alarm and/or transaction memory within the Traka System is nearing maximum capacity. To clear this message... Load the Traka32 software by double clicking on the icon. Select the appropriate system from the drop down menu. -
Page 762: Warning: Memory Full
If a Traka System starts displaying the 'WARNING: MEMORY FULL !!' message, the alarm and/or transaction memory within the Traka System has reached maximum capacity. To clear this message... Load the Traka32 software by double clicking on the icon. Select the appropriate system from the drop down menu. -
Page 763: Check Alarms
4.11.6 CHECK ALARMS The Check Alarms message will show on the LCD if there are some alarms to download. Simply open a copy of Traka32 and click on V3.5 14/08/19 UD0089 Page 763 This Document is uncontrolled unless over stamped "CONTROLLED DOCUMENT"... -
Page 764: How To Take An Ifob
4.11.7 HOW TO TAKE AN IFOB Button Release System First access the Traka System. Please refer to the 'How to access the system? ' section. To take an iFob... If the position is a Locking position, press the black button against the iFob until you hear a beep. Release the button, the solenoid that holds the iFob in place will activate and you should be able to remove the iFob. - Page 765 The Traka Desktop iFob Programmer is a single iFob receptor incorporated into a desktop programmer device. The desktop programmer connects to a computer running Traka32 via a spare serial or USB port. The desktop programmer can be used to configure new iFobs for a cabinet or to program iFobs using the...
-
Page 766: Desktop Ifob Programmer Installation
To use the USB Desktop iFob Programmer you need to install the appropriate drivers. This can be done two ways, First there is a custom installation option when you are installing Traka32 for the first time, the second way is you can edit the drivers in the add/remove programs folder from the control panel, this option is for anyone who already has Traka32 installed. - Page 767 The Traka32 Administrator will now appear. At this point you will have the option to choose the location you wish to save Traka32 to by clicking the 'Change' button, if however if you leave this unchanged by clicking 'Next' it will save in a default location. The next screen will ask you what type of install you wish to proceed with, i.e 'Typical', 'Normal' or 'Custom'.
- Page 768 This option is applicable if you already have Traka32 installed and wish to activate the USB Desktop iFob Programmer Drivers. Select... Control Panel\ Add or Remove Programs and select ‘Traka32bit Administrator’. Select change, then next. Check the box for ‘Modify’ and select next.
-
Page 769: Traka Handheld Ifob Transfer Device
Biometrics reader. The purpose of this unit is to log the handover of an iFob from one user to another. Communications between the Traka Handheld Device and Traka32 Software is via a USB connection. Traka32 may be used to set up the device and read back configuration information in a similar way to communicating with a Traka Key Cabinet or Locker System. - Page 770 The iFob Transfer Unit application is used to record the handover of an iFob, with associated keys, from one user to another. This process is summarised below: V3.5 14/08/19 UD0089 Page 770 This Document is uncontrolled unless over stamped "CONTROLLED DOCUMENT"...
- Page 771 V3.5 14/08/19 UD0089 Page 771 This Document is uncontrolled unless over stamped "CONTROLLED DOCUMENT"...
-
Page 772: Handheld Device Driver Installation
Driver, and select ‘This Feature Will be installed on Local Hard drive’. Click 'Next' then 'Install'. The set-up wizard will guide you through the rest of the modification. After you have finished modifying or installing Traka32 plug in the Handheld Device via your provided USB A to B cable. - Page 773 Shortly after the device is detected by Windows the ‘Found New Hardware Wizard’ will appear. Select ‘No, not this time’ to reject connecting to Windows Update and click next. Windows will then prompt to help you find the driver automatically. For this driver installation we are going to browse directly to the drivers.
- Page 774 Traka32 was successful, you will need to browse to the following location an then click 'Next'. C:\Program Files\Traka Limited\Traka32\Drivers\Traka Handheld Device Windows will then attempt to install the drivers. The Traka Drivers are a modified version of driver source supplied by the USB interface IC vendor.
- Page 775 Browse to the following location. C:\Program Files\Traka Limited\Traka32\Drivers\Traka Handheld Device There are two folders within the Traka Handheld Device folder, the first is amd64 and the second is i386. If you PC processor is an amd64 open this folder and select the .sys file. If your PC has anything other than a amd64 processor then select the .sys file within the i386 folder.
- Page 776 Follow the same procedure for the second driver installation. After completing this procedure the Handheld Device is now installed and ready to use. It will behave as a serial port to the PC so that serial communication can take place between Traka32 and the Handheld Device. V3.5 14/08/19...
-
Page 777: Using The Handheld Device
4.13.3 USING THE HANDHELD D EVICE Powering The Handheld Device The iFob Transfer Unit application firmware that runs inside the Traka Handheld Device automatically puts the unit into a low power standby mode if there is no user interaction for a preset period of time. The factory default setting for this timeout is 20 seconds. - Page 778 At this point the unit must be recharged before further use is possible. Setting up Traka32 The Traka Handheld Device can be configured through Traka32. The device is set up as if it is any other type of Traka System and therefore has its own System Viewer page.
- Page 779 Handheld Device. The first step to setting up the Handheld Device in Traka32 is to add a new system. From the main menu bar, select ‘Tools’ then ‘Configure Systems’. From the Configure Systems window, select ‘Systems’ then ‘Add New’.
- Page 780 The ‘System Settings’ window will then appear. Enter the desired system title – i.e. Handheld Device. Select the date format required from the date format drop down box. Select THD (Traka Handheld Device) from the Control Version drop down box. Next select the ‘Cabinet Config’...
- Page 781 When the Traka Handheld Device is connected to a USB port the Serial Number will be displayed on the screen for two seconds. This is to aid identification of the unit for when determining which device is to be selected in Traka32. V3.5 14/08/19...
- Page 782 System Viewer The system viewer image for the Handheld Device iFob Transfer Unit is as follows. This can be viewed by clicking the button in the Traka32 toolbar, then select the Handheld Device from the drop-down system box: NOTE: Each Handheld Device will have its own system viewer page. Ensure you have selected the device that you have connected and wish to communicate with, using the serial number as a reference.
- Page 783 This is useful if you have a large number of changes to make or if you are setting up a new database without the Traka System. This option applies to All Systems and is selected by default whenever Traka32 is loaded. Configure Systems Selecting 'Configure System' will open the System Settings window which allows you to change certain settings of the device such as...
- Page 784 This tab breaks down into three options: Reset System - This command is not yet supported for the Handheld device. Check Version - This command allows Traka32 to communicate to the device and read back its current firmware version. Check Serial Number - This command allows Traka32 to communicate to the device and read back its Serial Number.
- Page 785 The reader will light up red to show that a request has been made to identify a finger print. User B then places their finger onto the reader. If the fingerprint exists in the database then the display will show... If User B is identified by the fingerprint reader then the unit will attempt to write his unique user ID and the date and time to the iFob.
- Page 786 Handheld Device Information Pages Each press of Function Button 2 from the idle screen of the iFob Transfer Unit application scrolls through the Device Information Pages. These are displayed in the following order... Firmware Version and Date: This page shows the version of firmware running in the Handheld Device and the date on which it was released. This information is useful for determining whether a firmware upgrade is available to support new features.
-
Page 787: Traka Handheld Device Troubleshooting
4.13.4 TRAKA HANDHELD DEVIC E TROUBLESHOOTING When using the Traka Handheld Device you could encounter some common errors or problems, the list below highlights these problems and references the cause. LCD Error Message Cause Of Error If the Handheld Device does not power up when pressing the 'F1' button then this means the battery is flat and needs to be charged immediately. - Page 788 When attempting a transfer, if the iFob is left in the unit then it will automatically retry to acquire a finger print from the user who is accepting the iFob transfer. After three attempts the display will show this message. To attempt the transfer again the iFob should be removed re-inserted into the unit.
-
Page 789: Tssi Biometrics Reader
4.14 TSSI BIOMETRICS READ ER 4.14.1 TSSI BIOMETRICS OVERVIEW The Biometrics Reader is used to verify a user identity based upon a 4 digit PIN. The fingerprint reader is an add-on system to Traka and holds information about the PIN and Fingerprint separately to Traka. -
Page 790: Tssi Biometrics Enrolment
4.14.2 TSSI BIOMETRICS ENROLMENT To enrol a user on the biometrics readers... Using Traka32, configure a user with a 4 digit Primary PIN. Please refer to the User Details section for more details. Using the keypad on the Traka system, press # and enter the Primary Personal Identification Number (PIN) followed by #. - Page 791 There are five security levels to choose from, the security levels get increasingly harder to enrol with as the numbers ascend (number 1 being the easiest and number 5 being the hardest), however if you enrol with a high security level you are heightening the sensitivity of the reader, this will ensure you get a good quality template. You have to be very accurate with your finger placement when enrolling with a higher security level.
- Page 792 Biometric Options section is always set to number 141 by default, this should NOT be changed unless advised otherwise. As of firmware versions v6.07.58 (8bit) and v2.00.40 (16bit) upwards, when you backup the reader templates via Traka32 the users security level will be saved along with their individual fingerprint template. V3.5 14/08/19 UD0089 Page 792 This Document is uncontrolled unless over stamped "CONTROLLED DOCUMENT"...
-
Page 793: Tssi Biometrics Verification
4.14.3 TSSI BIOMETRICS VERIFICATION To verify a user with the biometrics readers... Using Traka32, configure a user with a 4 digit Primary PIN. Please refer to the User Details section for more details. Using the keypad on the Traka system, press # and enter the Primary Personal Identification Number (PIN) followed by #. -
Page 794: Tssi Biometrics Reader Tip & Tricks
4.14.4 TSSI BIOMETRICS READ ER TIP & TRICKS If you having problems when enrolling users or with verification then please try the following... When enrolling do NOT rush Always place your finger in the same location Grab the reader with your hand and do not let go ... - Page 795 The Biometrics Configuration window will appear allowing you to change the Global Security Level as desired. NOTE: the Biometric Options section is always set to number 141 by default, this should NOT be changed unless advised otherwise. When enrolment is complete, reduce the sensitivity. This will make the biometrics reader less fussy about finger placement.
- Page 796 V3.5 14/08/19 UD0089 Page 796 This Document is uncontrolled unless over stamped "CONTROLLED DOCUMENT"...
-
Page 797: Tssi Biometrics - Reset Template
4.14.5 TSSI BIOMETRICS - RESET TEMPLATE If you have a user enrolled on the biometrics reader and you would like to re-enrol them, simply reset their template and let the user enrol again. NOTE: When deleting a user, the record is deleted from Traka but NOT from the biometrics reader automatically. -
Page 798: Tssi Biometrics - Backing Up The Templates
4.14.6 TSSI BIOMETRICS - BACKING UP THE TEMPLATES When you are have a number of users enrolled on the fingerprint reader it is strongly recommended that a backup of the templates is done as this is not done automatically. To back up the templates right click over the picture of the system and click on Biometrics Admin, Backup Templates. -
Page 799: Gsm Module
4.15 GSM MODULE 4.15.1 GSM MODULE OVERVIEW With the increasing need to administer Traka Cabinet remotely, Traka has decided to take a step forward and implement a simple text message service directly with the Traka Cabinets. Traka has sourced a low cost Sony Ericsson GSM Module to integrate directly with the Traka Cabinet to allow... ... -
Page 800: Configuring The Gsm Module
4.15.2 CONFIGURING THE GSM MODULE Before using the GM28 or GM29 module, the module will need configuring using Traka32 and a standard serial cable. NOTE: If the unit was supplied by Traka, this configuration will already have been done at the factory. -
Page 801: Installing The Gsm Module
4.15.3 INSTALLING THE GSM MODULE Connecting to Traka Connect the Sony Ericsson GM28 or GM29 module as follows: Connect the Power Cable to the Power Output connect of the Traka Control PCB. Connect the Communications Cable to the UARTB connector of the Traka Control PCB. NOTE: The communications will not work if the UARTB is connected and a Serial Cable is connected to the 9 Pin D-Sub of the Sony Ericsson GM28 or GM29 module at the same time. - Page 802 3:PIN If the SIM Card used in the Sony Ericsson GM28 or GM29 module requires a PIN, press the 3 key on the Keypad. Enter the 4 digit SIM PIN followed by the # key. If the PIN is accepted, OK will be displayed on the LCD. If the PIN is rejected, ERROR will be displayed on the LCD.
- Page 803 Operating State LED Status After switching on the GSM Module On after 4 seconds Switch off (Power down) or power removed Standby or talk Flashing No network, network search, no SIM card, no PIN entered V3.5 14/08/19 UD0089 Page 803 This Document is uncontrolled unless over stamped "CONTROLLED DOCUMENT"...
-
Page 804: Remote Ifob Release Via Sms
4.15.4 REMOTE IFOB RELEASE VIA SMS It is possible to remotely release an iFob by sending an SMS Text Message to the Traka Cabinet via the GSM Module as follows: Text the following message to the Traka Cabinet GET<Number of iFob e.g. 10> For example GET10 Traka should respond after a short delay and ask you to open the door. - Page 805 NOTE: The SMS messages will be sent to the phone number that was entered via the setup menu on the Traka Cabinet. V3.5 14/08/19 UD0089 Page 805 This Document is uncontrolled unless over stamped "CONTROLLED DOCUMENT"...
-
Page 806: Event Information Via Sms
4.15.5 EVENT INFORMATION VIA SMS It is possible to get Event Information from the Traka Cabinet when specific iFobs are taken or returned or certain alarms occur. The SMS messages will be sent to the phone number that was entered via the setup menu on the Traka Cabinet. - Page 807 Click on the GSM Module tab. Select the Send SMS when iFob is taken option to allow the Traka Cabinet to send a SMS each time the selected iFob is taken from the Cabinet. Select the Send SMS when iFob is returned option to allow the Traka Cabinet to send a SMS each time the selected iFob is returned to the Cabinet.
- Page 808 The Traka Cabinet will also send SMS Text Messages when certain alarm event occurs. Only the Alarm Code will be displayed. For details on the Event Codes please refer to the Alarm & Event Types section. NOTE: The following event / alarm codes are NOT sent by the GSM Module: 10.
-
Page 809: Alcolock Breath Test
A User who has not passed the breath test to be prevented from taking any further iFobs requiring a breath test until a supervisor has reset their user profile in the Traka32 software. Random breath testing where the percentage chance per user can be selected from 0 – 100%. -
Page 810: Alcolock System Configuration
4.16.2 ALCOLOCK SYSTEM CONF IGURATION The Alcolock device is supported by 8bit cabinet firmware version 6.07.47 and later. This is a cost option that is compiled upon request only. The minimum required Traka32 version is 02.006.005. Please inform Traka if you require a firmware or software upgrade. - Page 811 Select the iFob Details tab. Tick Prompt for Breath Test on Return to enable. NOTE: If you can't see Prompt for Breath Test on Return, it is because the selected Traka system does not have it enabled in the firmware. Please consult Traka for an upgrade.
- Page 812 Click on User List. Select and open a User who should be required to take a mandatory breath test. Click the button to scroll along the tabs and select the Advanced tab. Tick Alcolock mandatory breath test required to enable. Click For more information please view the following sections: Alcolock Operation...
-
Page 813: Alcolock Operation
4.16.3 ALCOLOCK OPERATION NOTE: Please refer to the section on Alcolock System Configuration prior to using the Alcolock on the Traka system. The following section describes how to use the Alcolock device and what happens if a User fails a breath test or does not provide an adequate sample. - Page 814 NOTE: It is important to note the user will still be able to remove another iFob that has the Prompt For Breath Test parameter set without having to give another breath test. The user must be "unlocked" from within the Traka 32 software. From the Traka 32 System Viewer for the selected system: Click Read All System Data to ensure the event data has been downloaded from the selected...
- Page 815 For details on the all Event Codes please refer to the Alarm & Event Types. For more information please view the following sections: Alcolock Calibration Requirements Breath Test on iFob Return Taking a Breath Test: Authorise yourself to the Traka system using your card, pin or fingerprint in the usual way. Return the iFob to the correct position, that has been configured to Prompt for a Breath Test.
- Page 816 NOTE: It is important to note the user will still be able to return another iFob that has the Prompt For Breath Test parameter set without having to give another breath test whilst the door is open. The user must be "unlocked" from within the Traka 32 software. From the Traka 32 System Viewer for the selected system: Click Read All System Data to ensure the event data has been downloaded from the selected...
- Page 817 For details on the all Event Codes please refer to the Alarm & Event Types. For more information please view the following sections: Alcolock Calibration Requirements V3.5 14/08/19 UD0089 Page 817 This Document is uncontrolled unless over stamped "CONTROLLED DOCUMENT"...
-
Page 818: Alcolock Calibration Requirements
4.16.4 ALCOLOCK CALIBRATION REQUIREMENTS All Alcolock devices are required to be calibrated every 6 months. Traka can provide the means for this service to be undertaken as part of a Service Contract. The calibration process itself is usually completed using dry gas and takes just a few minutes to complete, however the procedure will vary depending upon the type of Alcolock device being used. -
Page 819: Can Gateway
Controller Area Network (CAN). This "multi-master" protocol enables systems and access pods to communicate instantly with each other without using Traka32. An example of the need for CAN Gateway is where an Access Pod needs to know if a user is currently holding keys before making a decision as to whether they are allowed to leave a premise or area. -
Page 820: Can Gateway Configuration
4.17.2 CAN GATEWAY CONFIGUR ATION Firmware Configuration Options Each system (Key Cabinet and Access Pod) will need CAN Gateway to be enabled in the cabinet firmware. Please contact Traka or your distributor for a firmware upgrade configuration file (16-bit) files as necessary. You can check to see if your system has the correct firmware options by viewing the system configuration. - Page 821 Firmware Options Common to Key Cabinets, Lockers and Access Control Pods CAN Gateway - Key Cabinet count Set the number of key cabinets only (not including access pods) that are on the same CAN Gateway network as the currently selected key cabinet / access pod. For the access pods, this needs to be configured so as it knows how many responses (from each key cabinet) to expect after requesting number of keys held by a user.
-
Page 822: Bit Can Gateway Hardware And Connections
4.17.3 8BIT CAN GATEWAY HARDWARE AND CONNECTIONS Each Traka Key Management System, Locker or Access Pod requires a CAN Gateway adaptor that converts messages from the Traka Control PCB into Controller Area Network (CAN) messages for sending over CAN. Traka currently supports two different types of CAN Gateway adaptor. The type required depends on the card reader as well as the other peripheral devices the system needs to support. - Page 823 Connecting systems together on CAN All Traka systems and Access Pods on CAN are connected using only a single pair (2 wires) from a standard Category 5 twisted pair network cable. Ideally they should be daisy chained together on a single long bus. In some installations it may not be possible to daisy chain all systems together and some maybe "spurred"...
- Page 824 IMPORTANT - Bus Termination Rules CAN Gateway PCB The first and last systems in the chain should have the jumper settings configured to END (see diagram above). The systems in the middle of the chain should be set to STUB. See CAN Gateway PCB diagram above. RS232 CAN Converter The first and last systems in the chain should have a 120 ohm resistor connected across the 2 pin terminal block (CAN High and CAN Low pins).
- Page 825 4.17.4 16BIT CAN GATEWAY HARDWARE AND CONNECT IONS Each Traka Key Management System, Locker or Access Pod requires a CAN Gateway adaptor that converts messages from the Traka Control PCB into Controller Area Network (CAN) messages for sending over CAN. Traka currently supports two different types of CAN Gateway adaptor.
- Page 826 Simply select a colour pair and daisy chain together as follows:- IMPORTANT - Bus Termination Rules RS232 CAN Converter The first and last systems in the chain should have a 120 ohm resistor connected across the 2 pin terminal block (CAN High and CAN Low pins).
-
Page 827: Using Can Gateway
4.17.5 USING CAN GATEWAY The users of a CAN Gateway enabled system do not have to do anything differently to that of a normal system. However it is useful to be aware of the following LCD messages that will be displayed during operation. Access Pod When a user is identified and verified to the Access Pod, the LCD will momentarily display:- ... - Page 828 CAN Communication Issue When an access pod or key cabinet is checking for keys, if the LCD displays "CAN Error Please Retry" then retry taking the iFob or identifying yourself on the Access Pod (as applicable). If this continues to be a problem, then double check the Key Cabinet count for this system.
-
Page 829: Sagem Fingerprint Reader
The Sagem reader is similar to the TSSI Biometrics reader however, the Sagem reader is much smaller is provided with a separate module that allows users to enrol at the PC Traka32 is installed on rather than the system the Sagem reader is fixed to. -
Page 830: Sagem Fingerprint Reader Drivers
If you are installing Traka32 for the first time and wish to install the drives at this point follow Option 1, if you already have Traka32 installed and you wish to install the drivers themselves follow Option 2. - Page 831 Insert the Enrolment Module into a USB port on the required PC. Open the TRAKA32 software and select File/Properties, and select ‘Loadable Device Drivers’. Now use the drop down box labelled ‘Choose one of these installed Fingerprint Readers’. Select ‘Sagem MorphoSmart MS0- 300/1300’...
-
Page 832: Sagem Fingerprint Enrolment
4.18.3 SAGEM FINGERPRINT ENROLMENT NOTE: At this point all hardware (Sagem Fingerprint Reader, USB Enrolment Module and/or 8bit Interface Board and Traka reader cable) must be plugged into the UART-B. before attempting an upgrade or configuring the system. This also applies when communicating to the system, or if the system is to be changed to PIN only, i.e. - Page 833 When enrolling it is important you align the your finger to the centre of the Enrolment Module and lay you finger flat to receive accurate results (See Below) Do not move finger when enrolling Do not press to hard ...
- Page 834 Re-Enrolling If you wish to change the Fingerprint template that you have saved to the user, simply click the 'Enrol' button and go through the enrolment process again. Verify Button The 'Verify' button allows you to compare the current fingerprint template to the fingerprint of the user. When you click the 'Verify' button the acquisition window will appear and the user will have to place his/her finger on the USB enrolment module once to compare with the previously configured template.
- Page 835 Reader and/or PIN option The reader and/or PIN option is now available when using a Sagem fingerprint reader. If enabled, this will allow a user to enter the PIN number instead of using their fingerprint to authenticate at the cabinet. To enter your PIN instead of using the fingerprint reader press and hold the # button.
-
Page 836: Bit Sagem Fingerprint Reader Configuration
4.18.4 8BIT SAGEM FINGERPRINT READER CONFIGURAT ION The version of control board you have will determine the way the Sagem reader is wired up. 8-bit PCB V2.31.00 and Above V2.31.00 and above and the Sagem reader will be wired directly into the 8bit PCB and will look as pictured below. Each system will be provided with the USB enrolment module. - Page 837 Each system will be provided with the USB enrolment module. V3.5 14/08/19 UD0089 Page 837 This Document is uncontrolled unless over stamped "CONTROLLED DOCUMENT"...
- Page 838 4.18.5 16BIT SAGEM FINGERPRINT READER CONFIGURATION The 16bit PCB does not require any additional hardware modifications, however the wiring on the reader cable is different to the 8bit, please see below. Each system will be provided with the USB enrolment module. V3.5 14/08/19 UD0089 Page 838...
-
Page 839: Sagem Fingerprint Reader - False Acceptance Rate
4.18.6 SAGEM FINGERPRINT READER - FALSE ACCEPTANCE RATE The Sagem Morphosmart reader is currently hardcoded in the 8 and 16 bit firmware to use a matching threshold level of 5, when identifying a user. This corresponds to a False Acceptance Rate (FAR) of <0.01%. This can now be adjusted on a cabinet-by-cabinet basis in the ‘Configure Firmware’... -
Page 840: Sagem Troubleshooting
4.18.7 SAGEM TROUBLESHOOTIN G Below is a list of common error codes you might encounter when using the SAGEM Fingerprint Reader. NOTE: The description will not appear on the LCD only the code will appear. SAGEM Reader Errors The finger detection time out has expired. The specified database doesn’t exist. - Page 841 Lockers as for Key Cabinets. This 'Lockers' section of the guide assumes knowledge of the basic Traka32 features and focuses on specific details for customers using locker systems. It is intended to be used in conjunction with the rest of the Traka32 Help Guide.
- Page 842 Tablet Lockers Tablet Lockers are available in either 20 or 30 compartment systems. Much like the laptop lockers, they can be fitted with a custom design bracket to suit a particular tablet to enable reliable RFID reading, and can also be designed with or without charging capabilities.
-
Page 843: Synonym For 'Key
Traka's legacy products are key cabinets and key related products, therefore Traka32 by default is configured to work with 'key cabinets' and 'keys'. As a result there are many places within the software that refer to 'keys'. Traka32 allows you to assign a synonym that replaces the term 'key' in most places throughout the software. -
Page 844: Locker System Viewer
Item Events Tab By default this tab is called 'Key Events'. When using lockers in Traka32 it makes sense to change this term for a word of your choice (such as 'Item') to better suit your requirements. Refer to the... - Page 845 The tab shows all item event history for the past 1 month for the currently selected item. To view events older than 1 month, you can run a report from Reports>Crystal Reports>Keys>Standard Key Event Report and filter as required. See Crystal Reports - Keys for more details.
-
Page 846: Locker Firmware Options
4.19.4 LOCKER FIRMWARE OPTI ONS To allow the functionality of a Traka locker certain options must be enabled within the firmware... Receptor PCB Type Select 'Lockers - IRS' from the drop down menu for all 8bit and 16bit lockers. ... - Page 847 Use Tag Instead Of Position This option enables a user to open a locker compartment door by specifying the tag number instead of the position number. V3.5 14/08/19 UD0089 Page 847 This Document is uncontrolled unless over stamped "CONTROLLED DOCUMENT"...
- Page 848 Firmware has Auto Locker Allocation Enabled This option when ticked allows a user to 'Auto Allocate' a device within the locker compartments. Also Auto Allocation’ functions so that... If a user has Access Level 197 (or level 5 for RUS), they can open any locker door effectively overriding the auto allocation (for either FIFO or Rotation).
-
Page 849: Defining And Editing Items
4.19.5 DEFINING AND EDITING ITEMS Much the same as Keys can be added to iFobs in Traka32, with Lockers you can assign an Item (or whatever term you have specified in the Synonym for 'Key' section) to a locker compartment. A list of all Items and their specific details can be created in the Traka32 database. - Page 850 Editing an Item To edit an item:- Click on the Item List button. Select the Item you wish to edit from the list. Click on Items>Edit Item. V3.5 14/08/19 UD0089 Page 850 This Document is uncontrolled unless over stamped "CONTROLLED DOCUMENT"...
-
Page 851: Deleting/Removing Items
"unallocated item". Of course it can be re-allocated to a compartment at a later date if needed. When you have removed an item in Traka32 it must of course also be physically removed from the system. Should an item record need to be deleted permanently this can be achieved by doing the following:- Click on the Item List button. -
Page 852: Rfid Lockers
4.19.7 RFID LOCKERS 4.19.7.1 RFID OVERVIEW Traka RFID Lockers are used in situations where controlling who has access to the item is itself not enough. In such circumstances it is often necessary to know exactly when the item was taken, when it was returned, and to ensure that it was returned to the correct location. - Page 853 4.19.7.2 TAGGING A NEW ITEM If your locker system uses Traka RFID technology, you will need to secure a new tag to the item before allocating it to the compartment. Traka supply every customer who uses RFID with a 'Tagging Guide'. This will show how to correctly tag the items in your system.
- Page 854 Ignore this message and close the door. Ensure the no-one accesses the system during this time. If the computer running Traka32 is located far away from the locker, it is a good idea to get a second person to stand by the locker to ask users just to wait a minute until this process has been completed.
-
Page 855: Traka Control Pcb
TRAKA HARDWARE TRAKA CONTROL PCB 5.1.1 8BIT CONTROL PCB 5.1.1.1 8BIT CONTROL PCB LAYOUT V2.6 06-Oct-17 UD0089 This Document is uncontrolled unless over stamped "CONTROLLED DOCUMENT"... - Page 856 V3.5 14/08/19 UD0089 Page 856 This Document is uncontrolled unless over stamped "CONTROLLED DOCUMENT"...
- Page 857 V3.5 14/08/19 UD0089 Page 857 This Document is uncontrolled unless over stamped "CONTROLLED DOCUMENT"...
- Page 858 5.1.1.2 8BIT CONTROL PCB ALARM OUTPUTS NOTE: At no point should mains be wired into the Alarm Output Alarm Output Functions in firmware version 6.06.18 and below... Power Fail. iFob forced from cabinet or unauthorised iFob taken. Door left open or forced open. The Alarm Output Functions in firmware version 6.07.00 and above are configurable by the user.
- Page 859 5.1.1.3 8BIT CONTROL PCB COMMUNICATION JUMPER SETTINGS V3.5 14/08/19 UD0089 Page 859 This Document is uncontrolled unless over stamped "CONTROLLED DOCUMENT"...
- Page 860 5.1.1.4 8BIT CONTROL PCB READER JUMPER SETTINGS V3.5 14/08/19 UD0089 Page 860 This Document is uncontrolled unless over stamped "CONTROLLED DOCUMENT"...
- Page 861 Replacing the Control PCB may take up to half an hour to complete. Please ensure that any important keys are removed from the systems prior to the replacement, as it may be difficult to obtain the keys. Load the Traka32 software by double clicking on the icon. Select the appropriate system from the drop down menu that you wish to work on.
- Page 862 Control Panel and the Pod. Please ensure nobody uses the system until the work is complete. 24. From the system viewer of Traka32, right click over the picture of the pod again and click on Synchronise System. Click on No first.
-
Page 863: Bit Control Pcb
5.1.2 16BIT CONTROL PCB 5.1.2.1 16BIT CONTROL PCB OVERVIEW The 16bit Control Board now comes as 2 separate PCB's. There is the main Control PCB that contains the 16bit processor, LCD & Keypad interfaces, Flash (program memory), SD-RAM (data memory) and Ethernet communications. There is also an I/O Interface PCB that contains the RS-232 &... - Page 864 5.1.2.2 16BIT CONTROL PCB LAYOUT Also view 16bit_I/O_PCB_Layout.htm. Version 1.4.0 (Black) V3.5 14/08/19 UD0089 Page 864 This Document is uncontrolled unless over stamped "CONTROLLED DOCUMENT"...
- Page 865 Version 1.3.0 (blue) Battery Isolator The battery isolator jumper must be connected so as the database (users, iFobs, events etc) can be retained in RAM (random access memory) upon removal of operating system power. Memory The 16 bit Control PCB hardware includes: ...
- Page 866 Version 1.2.0 (green) V3.5 14/08/19 UD0089 Page 866 This Document is uncontrolled unless over stamped "CONTROLLED DOCUMENT"...
- Page 867 5.1.2.3 16BIT I/O PCB LAYOUT Version 1.5.0 (Black) V3.5 14/08/19 UD0089 Page 867 This Document is uncontrolled unless over stamped "CONTROLLED DOCUMENT"...
- Page 868 Version 1.3.0 (blue) NOTE: Version 1.3.0 UART-B pins 1 and 2 (RS-232 TX and 0v) have been switched (compared with Version 1.2.0) so as the same RS232 cable can now be used for UARTA and UARTB. V3.5 14/08/19 UD0089 Page 868 This Document is uncontrolled unless over stamped "CONTROLLED DOCUMENT"...
- Page 869 NOTE: Notice that no bottom view of Version 1.3.0 is provided here, this is because the communication selector pots that previously occupied the PCB underside have now been completely removed. The 16-bit system now auto-detects the communications protocol used so there are no controls to worry about setting! Version 1.2.0 (green) V3.5 14/08/19...
- Page 870 5.1.2.4 16BIT CONTROL PCB COMMUNICATION SETTINGS Version 1.3.0 (blue) & Version 1.4.0 (Black) A major improvement over Version 1.2.0 is the communication settings. The communication selector pots that previously occupied the PCB underside have now been completely removed. The 16bit system now auto- detects the communications protocol used so there are no controls to worry about setting! Version 1.2.0 (green) XPort Ethernet...
- Page 871 RS-485 V3.5 14/08/19 UD0089 Page 871 This Document is uncontrolled unless over stamped "CONTROLLED DOCUMENT"...
- Page 872 5.1.2.5 16BIT CONTROL PCB READER CONNECTIONS The 16bit Control PCB does not have any Jumper settings unlike the 8bit Control PCB for the various reader settings. Different connectors are used for the various readers as follows... Wiegand The Wiegand card reader connections are the same for Versions 1.2.0,1.3.0 and 1.4.0 Clock &...
- Page 873 RS-232 / TTL Version 1.3.0 (blue) V3.5 14/08/19 UD0089 Page 873 This Document is uncontrolled unless over stamped "CONTROLLED DOCUMENT"...
- Page 874 NOTE: Version 1.3.0 UART-B pins 1 and 2 (RS-232 TX and 0v) have been switched (compared with Version 1.2.0) so as the same RS232 cable can now be used for UARTA and UARTB. Version 1.2.0 (green) V3.5 14/08/19 UD0089 Page 874 This Document is uncontrolled unless over stamped "CONTROLLED DOCUMENT"...
- Page 875 Barcode The barcode decoder chip that was fitted to the 8bit Control PCB is no longer used. Traka will use Barcode reader with either an RS-232 or Wiegand output temporarily to overcome this problem and will look into the firmware required to accept TTL signals directly from barcode readers and decode them directly.
- Page 876 5.1.2.6 16BIT I/O PCB ALARM OUTPUTS Alarm Relay Connections NOTE: At no point should mains be wired into the Alarm Relay Output. Relay Contact Rating 1A at 30V DC Power Output +5V 1A (Regulated ) or When running on mains: +15V 1.7A When running on battery: +12V 1A V3.5 14/08/19 UD0089...
- Page 877 Replacing the 16bit Control PCB may take up to half an hour to complete. Please ensure that any important keys are removed from the systems prior to the replacement, as it may be difficult to obtain the keys. Load the Traka32 software by double clicking on the icon. Select the appropriate system from the drop down menu that you wish to work on.
- Page 878 21. The following 16bit Configuration Wizard will be displayed. 22. Click on Next. 23. The CPSN window is displayed confirming the Serial Number, CPSN Read from Hardware, the Hardware and Code versions and in addition the Traka32 version the firmware was tested with. V3.5 14/08/19 UD0089 Page 878 This Document is uncontrolled unless over stamped "CONTROLLED DOCUMENT"...
- Page 879 NOTE: This indicates it has been loaded into the Traka32 database only at this stage and not yet applied to the cabinet. If the configuration file was incorrect, check that you have the correct file via the file name and try again. An incorrect file may be may be because…...
- Page 880 31. Now that the new 16bit Control PCB’s CPSN has been registered, you will be able to communicate as normal. 32. From the system viewer of Traka32, right click over the picture of the pod and click on Synchronise System to restore the database. 33. Click on No first.
- Page 881 30 minutes. After this time the data will be lost for good. Therefore it is more important than ever to complete a 'Read All System Data' prior to servicing a 16bit Traka system. Load the Traka32 software by double clicking on the icon.
- Page 882 Traka32, right click over the picture of the pod and click on Synchronise System. 22. Click on No first. 23. Then click on Yes. Please refer to the Testing section for further details on fully testing the system. V3.5 14/08/19...
- Page 883 16bit Control PCB. This covers all systems in general but does not go into detail for types of systems. Backup Data Before upgrading it is important backup any data from the 8bit Control PCB. Open the Traka32 software. Select the appropriate system from the drop down menu. Click the Read All System Data from the selected system button.
- Page 884 Installing the 16bit Control PCB Panel The 16bit Control Panel is the same size as the 8bit Control PCB and uses the same mounting points. Place the 16bit Control Panel on the 4 mounting points with the Keypad Connector at the top and the Speaker at the bottom.
- Page 885 Place the new Power Supply on the 2 mounting points. Re-attach any Earth Leads that were previously attached. Any additional Earth Lead is also provided from the Power Supply that can be used to bond the Earth to the various cabinets. NOTE: Wiring Alterations.
- Page 886 When upgrading a system, you will be able to re-use some of the existing cables. The old Power Supply can be re-wired into the new green connector block The old Battery Cable can be re-wired into the new green connector block but will require a Ferrite Core as supplied in the upgrade kit for EMC purposes.
- Page 887 Clock & Data Readers The wiring for Clock & Data Readers does not change as the reader connector still has the same pin connections. Serial RS-232 / TTL Readers The reader connector will require re-wring as follows. In addition to supporting Serial RS-232 Readers, the 16bit Control PCB also has the ability to communicate at a TTL level.
- Page 888 are not needed. The Sagem module itself will need to be rewired. Depending on what type of 8bit wiring you have on your Sagem Reader (prototype or official), the wiring will be as follows: Prototype Wiring 8 way connector Pin 1 moves to Pin 2 ...
- Page 889 PCB that has the standard connections available. An RS-232 Link Cable is supplied to allow connection to D- Sub RS-232 Connector. NOTE: When communicating to a 16bit system via RS-232 the Baud Rate in the System Settings in Traka32 must be set to 38400. Refer to the RS232 Installation section for more details. RS-485 For RS-485, simply connect the provided cables into the RS485 Connection port on the 16bit PCB.
- Page 890 XPort Ethernet For Ethernet, simply connect the appropriate cable into the X-Port Connection port on the 16bit PCB. NOTE: Refer to the XPort Configuration section for details on how to configure communications via the XPort device. Powering up the 16bit Control PCB Once the 16bit Control Panel has been installed and all the wiring is in place there are a couple of checks that should be made.
- Page 891 Fit the Secondary Battery Backup Isolator jumper. Switch on the power to the mains power supply. Switch on the power to the 16bit I/O PCB. Check that Power LED comes on and after a short while that the Status LED starts to flash. V3.5 14/08/19 UD0089 Page 891...
- Page 892 NOTE: The status LED should flash when there is an application loaded and is running. If there is no application loaded, then the status LED will be on solid and the LCD will show: In this case a firmware upgrade will be required. Refer to the 16bit Firmware Upgrade section for more details.
-
Page 893: Traka Receptor Strips
TRAKA RECEPTOR STRIPS 5.2.1 RECEPTOR LAYOUT V3.5 14/08/19 UD0089 Page 893 This Document is uncontrolled unless over stamped "CONTROLLED DOCUMENT"... -
Page 894: Receptor Selector Settings
5.2.2 RECEPTOR SELECTOR SETTINGS On the back of each Traka Receptor Strip is selector switch. Each strip in the system will need an individual number assigned to it via the selector. The first strip in the cabinet is always set to 0, from then on the sequence should increase in increments of one number per strip. - Page 895 V3.5 14/08/19 UD0089 Page 895 This Document is uncontrolled unless over stamped "CONTROLLED DOCUMENT"...
-
Page 896: Adding Extra Receptor Strips
Upgrading the system may take up to an hour per Traka system to complete. Please ensure that any important keys are removed from the systems prior to the upgrade, as it may be difficult to obtain the keys. Load the Traka32 software by double clicking on the icon. Select the appropriate system from the drop down menu that you wish to upgrade. - Page 897 NOTE: Please ensure nobody uses the system until the upgrade is complete. 14. From the system viewer of Traka32, right click over the picture of the pod and click on Configure Firmware. Navigate to the Receptors tab. 15. Select the Number of Slots to match the new total number of receptor slots within the upgraded system.
- Page 898 24. Click on No first. This will ensure that no information is cleared before you synchronise the system. 25. Then click on Yes. 26. Finally, right click over the picture of the pod again and click on Synchronise iFobs. 27. When completed you should see all the iFob appear within the system viewer. If any iFobs are missing, check each iFob in turn.
-
Page 899: Locking Receptor Strip
5.2.4 LOCKING RECEPTOR STRIP 5.2.4.1 LOCKING RECEPTOR STRIP The Locking strip is the most common receptor strip used in Traka Cabinets. Recommended for customers who require a secure method of removing keys, the Locking strip locks the iFob & keys in position and will only release them once the adjacent button has been pushed. -
Page 900: Non-Locking Receptor Strip
Levels. NOTE: Traka32 will still record who took the iFob along with the date & time. If the user did not have access to the iFob but removed it once they accessed the system then an event will be generated informing you of the users actions. -
Page 901: Led Receptor Strips
5.2.6 LED RECEPTOR STRIPS 5.2.6.1 LED RECEPTOR STRIPS The LED Receptor strip provides clarity as to which iFob(s) a user can remove. The LED strip locks the iFob & keys in position and will only release them once the adjacent button has been pushed, once pushed the LED will illuminate red indicating that iFob can be removed. -
Page 902: Intelligent Receptor Strip
5.2.7 INTELLIGENT RECEPTOR STRIP 5.2.7.1 RECEPTOR LAYOUT Intelligent Receptor Strip (IRS) PCB Version 1.2 V3.5 14/08/19 UD0089 Page 902 This Document is uncontrolled unless over stamped "CONTROLLED DOCUMENT"... - Page 903 The Intelligent Receptor Strip (commonly referred to as the IRS) is the next generation of the existing receptor strip. The main cosmetic difference with the IRS compared to the standard receptor strip range is the Tri-Coloured LED's, which allow Traka32 to assign a status to the iFob. Intelligent Receptor Strip (IRS) Features ...
- Page 904 Independent Button Control Another significant improvement is independent button control. Receptor Strip v2.03.01 and prior versions used buttons wired through the iFob, meaning that when the button was pressed, it disconnected the iFob so as it could not be detected. The problem with this is if a large bunch of keys pushes on a button whilst no user is logged into the system (cabinet door is open), the iFob goes undetectable.
-
Page 905: Traka Locker Interface Pcb
TRAKA LOCKER INTERFACE PCB 5.3.1 LOCKER INTERFACE PCB LAYOUT Locker Interface PCB Version 1.4 Locker Interface PCB Version 1.2 V3.5 14/08/19 UD0089 Page 905 This Document is uncontrolled unless over stamped "CONTROLLED DOCUMENT"... - Page 906 V3.5 14/08/19 UD0089 Page 906 This Document is uncontrolled unless over stamped "CONTROLLED DOCUMENT"...
-
Page 907: Locker Interface Pcb Features
5.3.2 LOCKER INTERFACE PCB FEATURES The Locker Interface PCB has all the same functionality as the Intelligent Receptor PCB. Please view Intelligent Receptor Strip for more information. However the shape of the PCB lends itself to being used for Lockers as well as other bespoke applications. V3.5 14/08/19 UD0089 Page 907... -
Page 908: Traka Interface
TRAKA INTERFACE 5.4.1 INTERFACE LAYOUT V3.5 14/08/19 UD0089 Page 908 This Document is uncontrolled unless over stamped "CONTROLLED DOCUMENT"... -
Page 909: Interface Selector Settings
5.4.2 INTERFACE SELECTOR SETTINGS The settings are as follows... V3.5 14/08/19 UD0089 Page 909 This Document is uncontrolled unless over stamped "CONTROLLED DOCUMENT"... -
Page 910: Traka Ifob
TRAKA IFOB 5.5.1 IFOB LAYOUT V3.5 14/08/19 UD0089 Page 910 This Document is uncontrolled unless over stamped "CONTROLLED DOCUMENT"... -
Page 911: Traka Door Lock
TRAKA DOOR LOCK 5.6.1 DOOR LOCK LAYOUT V3.5 14/08/19 UD0089 Page 911 This Document is uncontrolled unless over stamped "CONTROLLED DOCUMENT"... -
Page 912: Traka Battery Backup
TRAKA BATTERY BACKUP 5.7.1 BATTERY CONNECTION D ETAILS WARNING: All Traka Systems have two power sources, mains and battery. Before installing or servicing a Traka System, please ensure both mains and battery power sources are disconnected from the system. This section will explain how to disconnect the battery from 8bit and 16bit systems. Battery Disconnection Open the control pod/panel of the system using the master key. -
Page 913: Traka Battery Specifications
5.7.2 TRAKA BATTERY SPECIFICATIONS All the Traka Systems can be fitted with a 12 volt battery backup to keep the system fully operational in the event of a power failure. The choice of battery is dependent on the type of Traka System and how long the battery backup must last in the event of power failure. -
Page 914: End User Licence Agreement – Embedded Software
Customer or dealing with the subject matter of this EULA, including under which payment is made for the Hardware by the Customer. "Company" means ASSA ABLOY Ltd trading as Traka and shall include the Company's successors and assigns. "Customer" means the person, firm or company with whom this EULA is made. - Page 915 The Embedded Software is licensed, not sold, to the Customer by the Company for use only under the terms of this EULA. The Company and its licensors retain all proprietary interests and rights in and over the Embedded Software and reserve all rights not expressly granted to the Customer under this EULA including all Intellectual Property Rights which shall remain the exclusive property of the Company or its licensors.
- Page 916 Communications and Notices 12.1 All communications or notices that the Customer is required to provide to the Company under this EULA shall be sent to the following address: Traka – ASSA ABLOY V3.5 14/08/19 UD0089 Page 916 This Document is uncontrolled unless over stamped "CONTROLLED DOCUMENT"...
- Page 917 30 Stilebrook Road, Olney, Milton Keynes, MK46 5EA, United Kingdom or such other address of which the Company makes the Customer aware from time to time. 12.2 Any notice given in accordance with Clause 12.1 will be deemed to have been served: 12.2.1 if delivered to or left at the Company’s address, at the time the notice is delivered to or left;...
- Page 918 17.5.3 obtain all necessary consents and/or provide all fair processing notices required under the Data Protection Laws to enable the Company to lawfully receive, store, disclose and/or use all Agreement Personal Data (whether by itself or Authorised Sub-Processors) for the purpose of performing its obligations and exercising its rights under this EULA and as otherwise agreed by the parties from time to time.
- Page 919 Clauses. Copyright © 1997 - 2019 ASSA ABLOY Ltd trading as Traka. All rights reserved. All brand or product names are trademarks of their respective holders.
Need help?
Do you have a question about the TRAKA32 and is the answer not in the manual?
Questions and answers