Table of Contents
Advertisement
Quick Links
NW0508 Rev N
Mizuho OSI ©2017
MIZUHO OSI
30031 AHERN AVENUE
UNION CITY, CA 94587-1234 USA
Inside USA: 1-800-777-4674
Outside USA: +1-510-429-1500
Fax: 1-510-429-8500
Hana
Surgery Table
This manual is available in the following versions:
•
English (EN)
•
Spanish (ES)
•
French (FR)
•
German (DE)
•
Italian (IT)
•
Portuguese (PTBR)
•
Japanese (JA)
•
Chinese (ZH)
•
Multilingual (ML)
WWW.MIZUHOSI.COM
WWW.NEWHIPNEWS.COM
Orthopedic
®
Owner's Manual
Emergo Europe
Molenstraat 15
2513 BH The Hague
The Netherlands
6875, 6875I, 6875J
Advertisement
Table of Contents

Subscribe to Our Youtube Channel
Related Manuals for Mizuho osi Hana 6875

Summary of Contents for Mizuho osi Hana 6875
- Page 1 Portuguese (PTBR) • Japanese (JA) • Chinese (ZH) • Multilingual (ML) NW0508 Rev N Mizuho OSI ©2017 MIZUHO OSI Emergo Europe 30031 AHERN AVENUE UNION CITY, CA 94587-1234 USA Molenstraat 15 Inside USA: 1-800-777-4674 2513 BH The Hague Outside USA: +1-510-429-1500...
-
Page 2: Table Of Contents
Table of Contents 1 Important Notices ..................... 1 Trademarks and Patents ......................7 Disposal of Electrical Components ..................7 2 Introduction....................... 8 General Description........................8 Intended Use ..........................9 User Profile..........................9 Training Requirements......................9 Conditions of Use ........................9 Product Lifetime ........................ - Page 3 Traction Hook Extender ......................40 Well Leg Support Assembly ....................41 ® Hana Arm Boards ........................44 Jack Mount Assembly ......................48 6.9.1 Installing the Jack Mount Assembly ................49 6.9.2 Removing the Jack Mount Assembly................. 50 6.10 Femur Lift Assembly ....................... 51 6.10.1 Connecting the Coiled Hook Motor Cable to the Expansion Junction Box ...
- Page 4 Foot-End Drape Rod Assembly ................134 Equipment Cart ........................135 10 Cleaning, Sterilization, and Maintenance............136 10.1 Cleaning and Disinfecting.....................136 10.1.1 Table Exterior ......................136 ® 10.1.2 Mizuho OSI Tempur-Pedic Medical Pads ..............136 10.1.3 Femoral Hook Support and Femoral Hook ..............137 ® ® 10.1.4 Hana Knee Flexion System ...................137...
-
Page 5: Important Notices
NOTE: This device is intended for use by trained personnel only. To schedule an in-service, please contact your local Mizuho OSI sales representative, or call 1-800-777-4674 inside the USA or +1-510-429-1500 outside the USA. NOTE: The application techniques outlined in these instructions are the manufacturer’s suggested techniques. - Page 6 See Section 3.2.2 and Section 11.6 for more information. This symbol identifies the Battery OK LED. When lit, the battery is charged and ready for use. See Section 3.2.2 for more information. This symbol indicates Battery Power. Mizuho OSI 2017 NW0508 Rev N...
- Page 7 Femur Lift Assembly. See Section 6.10.5 for more information. This symbol indicates the table weight limit. This symbol indicates Small Size. This symbol indicates Large Size (regular). This symbol indicates Extra Large Size. This symbol indicates the Left Traction Boot. Mizuho OSI 2017 NW0508 Rev N...
- Page 8 Table must be charged for three (3) hours before use. If running on DC power, the table must be fully charged and a protective earth ground attached to the table’s external ground plug must be used. Mizuho OSI 2017 NW0508 Rev N...
- Page 9 Carefully inspect all critical accessible areas, joints, and all moving parts for possible damage or non-function. Damaged or defective parts should not be used or processed. Contact Mizuho OSI Service for repair or replacement (see Section 14).
- Page 10 Table is to be used by personnel that receive training from either Mizuho OSI or from someone qualified by the medical facility to provide this training. Failure to comply with this requirement may result in damage to the device, possible injury to the patient, or harm to the healthcare professionals.
-
Page 11: Trademarks And Patents
Directive, all electrical components, batteries, and carbon composite components must be disposed of in accordance with local regulations or returned to Mizuho OSI for proper disposal. Please contact Mizuho OSI Service at 1-800-777-4674 inside the USA or +1-510-429-1500 outside the USA for further information regarding this requirement. -
Page 12: Introduction
Pressure is distributed evenly over the entire surface area. The pad is radiolucent ® and is not made with natural rubber latex. The benefits of using Mizuho OSI Tempur-Pedic pads are improved pressure management, reduced shear forces, and enhanced patient comfort. -
Page 13: Intended Use
Orthopedic Surgery Table is intended for and suitable for use in the hospital ® operating room, sub-acute surgical environments, and hospital trauma centers. The Mizuho OSI Hana Orthopedic Surgery Table is designed for adult and pediatric patients with body weight up to 450 lbs (204 kg), needing hip or knee orthopedic surgical procedure as prescribed by a trained physician. -
Page 14: Product Lifetime
However, despite proper use, routine inspection, prescribed service, maintenance, and repairs, the product is subject to aging and wear. Therefore, Mizuho OSI cannot guarantee the product’s safety for more than 10 years after date of manufacture and recommends your ®... -
Page 15: Shipping And Storage
Hand Pendant or Control Pad button labeled . Holding Table this button longer than approximately three seconds will also lower the tabletop to its lowest position after the tabletop is leveled. Mizuho OSI 2017 NW0508 Rev N... - Page 16 The side to the patient’s right in the supine position. This corresponds to the Right Side of the Table Hand Pendant or Control Pad button labeled Lowering the height of the Head-End of the tabletop. This corresponds to the Trendelenburg Hand Pendant or Control Pad button labeled Mizuho OSI 2017 NW0508 Rev N...
-
Page 17: Basic Operation
Orthopedic Surgery Table is described as having a Head-End and a Foot-End. The Control Panel, On/Off Power Switch, and the Power Cord Receptacle are located at the Head-End of the table. ® Figure 2: Right Side View of Hana Table with Patient in Supine Position Mizuho OSI 2017 NW0508 Rev N... -
Page 18: Motion Control Box
® Input power requirement for the Hana Table Models 6875, 6875I, and 6875J are indicated on the manufacturer’s label: • 6875J: 100V, 50/60Hz, 4A • 6875: 120V, 60Hz, 4A • 6875I: 220-230V, 50/60Hz, 2.5A Mizuho OSI 2017 NW0508 Rev N... -
Page 19: Breaker/Power Panel
The Control Panel is located on the top of the Motion Control Box. It contains the Femur Lift Controls, the Control Pad, and the Power Indicators. Femur Lift Controls Control Pad Power Indicators Figure 4: Control Panel Mizuho OSI 2017 NW0508 Rev N... - Page 20 When this LED is illuminated, the Foot Pedal is properly connected. Foot Pedal Connected LED 3.2.2.2 Control Pad ® The Control Pad and the Hana Hand Pendant control the table’s up/down movement, lateral tilt, and Trendelenburg/Reverse Trendelenburg. Mizuho OSI 2017 NW0508 Rev N...
- Page 21 When this LED is illuminated, the table is running on AC power (100V, 120V, or 220-230V) from the wall receptacle. AC Power LED When this LED is illuminated, the table is running on internal battery power. Battery Power LED Mizuho OSI 2017 NW0508 Rev N...
-
Page 22: Hana ® Hand Pendant/Control Pad Operation
AC Power Battery Power Indicator Light Indicator Light Height Down Height Up Reverse Trendelenburg Trendelenburg Right Lateral Tilt Left Lateral Tilt Battery Status Return to Level Indicator Light ® Figure 6: Hana Hand Pendant Mizuho OSI 2017 NW0508 Rev N... - Page 23 If the table must be adjusted to a ® position closer to 0°, press the appropriate button on the Hana Hand Pendant until the desired position is achieved. Mizuho OSI 2017 NW0508 Rev N...
-
Page 24: Emergency Stop Button
Table, press the Emergency Stop button. To reset the system, turn the Emergency Stop button in the direction of the arrows until it returns to its original position (Figure 7). Emergency Stop Button Figure 7: Emergency Stop Button Mizuho OSI 2017 NW0508 Rev N... -
Page 25: Casters
Figure 9: Caster in the Locked Position ® NOTE: The casters and locks installed on your Hana Table may look different than those depicted above but they will operate in the same manner as described. Mizuho OSI 2017 NW0508 Rev N... -
Page 26: Moving The Table
Function Check must be performed (see Section 6). If damage is discovered or the table does not pass the Function Check, contact Mizuho OSI Service (see Section 14). ®... -
Page 27: Inspection
® adversely affect the proper operation of the Hana Orthopedic Surgery Table. Damaged or defective products should not be used or processed. Contact Mizuho OSI Service for repair or replacement of parts (see Section 10). Pre-Procedure/Post-Procedure •... -
Page 28: Preventative Maintenance
Hana Orthopedic Surgery Table Owner’s Manual Preventative Maintenance ® Perform a Preventative Maintenance (PM) check on your Hana Orthopedic Surgery Table semi-annually. A PM checklist is available from Mizuho OSI Service (see Section 14). Mizuho OSI 2017 NW0508 Rev N... -
Page 29: Function Check
5. Perform a Hana Hand Pendant check: a. Press and hold the Height Up button. Verify that the tabletop moves up. b. Press and hold the Height Down button. Verify that the tabletop moves down. Mizuho OSI 2017 NW0508 Rev N... - Page 30 Selection Switch located on the Control Panel (Figure 4) to either the Left Femur Lift or Right Femur Lift. Test the Femur Lift Foot Pedal function for operation of the indicated Femur Lift. Repeat for the opposite side. Mizuho OSI 2017 NW0508 Rev N...
-
Page 31: Standard Component Installation And Adjustment
Hana Orthopedic Surgery Table Owner’s Manual 6 Standard Component Installation and Adjustment NOTE: Only Mizuho OSI supplied accessories have been tested and approved for use with the ® Hana Orthopedic Surgery Table. Other manufacturers’ products have not been tested for proper performance when used with the table, and therefore are not endorsed for use by Mizuho OSI. -
Page 32: Installing And Removing Leg Spars
Leg Spar post is inserted past the safety latch. 4. Lock in place by turning the Spar Locking Knob clockwise until tight. Move the Leg Spar up and down slightly while tightening the knob to ensure a tighter lock (Figure 11). Mizuho OSI 2017 NW0508 Rev N... - Page 33 6. Reposition the Leg Spar as needed and then return the Spar Lock Handle to the locked position. 7. Before transferring the patient to the table, install the approved Mizuho OSI Leg Spar Ball Joint Protectors (Figure 12). CAUTION: Failure to use the disposable Leg Spar Ball Joint Protectors may damage the ball joints on the Leg Spars and will void the warranty on the spars.
-
Page 34: Adjusting The Leg Spars
To adjust rotation of the Traction Assembly, turn the Foot Rotation Locking Knob counterclockwise to unlock, and then turn the Internal/External Rotation Dial to the desired position. When properly positioned, turn the Foot Rotation Locking Knob clockwise to lock in place (Figure 14). Mizuho OSI 2017 NW0508 Rev N... - Page 35 To make fine traction adjustments, turn the Fine Traction Crank Handle at the end of the Leg Spar to move the Traction Assembly to the desired position. Rotate the Crank Handle clockwise to add traction. Rotate the Crank Handle counterclockwise to remove traction (Figure 16). Mizuho OSI 2017 NW0508 Rev N...
- Page 36 NOTE: To allow the surgeon to pull adequate traction on the patient’s legs during surgery, the ® Hana Table is recommended for use on patients with a maximum inseam that does not exceed 43 inches (Figure 17). 43 inches ® Figure 17: Maximum Patient Inseam for Hana Table Mizuho OSI 2017 NW0508 Rev N...
- Page 37 WARNING: Leg Spars can be damaged if allowed to contact the floor during table operation. Clear the area of any obstructions or obstacles during table movement. Mizuho OSI 2017 NW0508 Rev N...
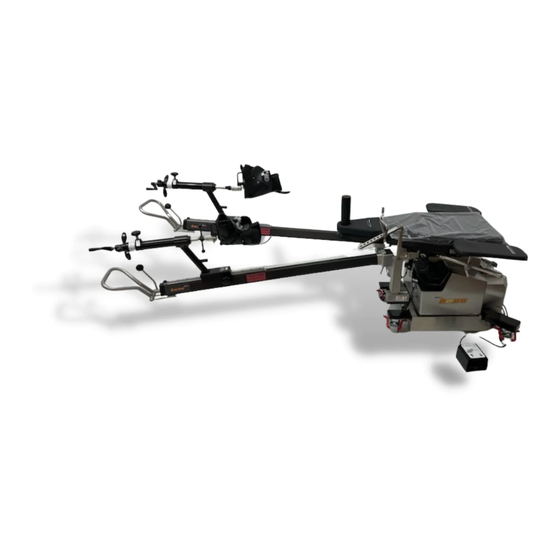
- Page 38 ® Hana Orthopedic Surgery Table Owner’s Manual ® Figure 19: Hana Orthopedic Surgery Table with Leg Spars Attached and Set Up for Anterior Approach Total Hip Replacement Mizuho OSI 2017 NW0508 Rev N...
-
Page 39: Patient Safety Strap
Figure 21: Patient Secured to Table with Patient Safety Strap CAUTION: The Patient Safety Strap is intended to secure the patient to the surgical table. It should not obstruct or constrict the patient's airway during use. Mizuho OSI 2017 NW0508 Rev N... -
Page 40: Pelvic Pad And Perineal Post
WARNING: When the patient is no longer secured to the table, assign at least one attendant to support the patient until safely transferred to the stretcher. 3. Once the patient has been safely removed from the table, the Pelvic Pad may be removed. Mizuho OSI 2017 NW0508 Rev N... -
Page 41: Lateral Perineal Post And Board Assembly
3. Place the Lateral Board plug into the Perineal Post attachment hole on the table (Figure 24). This secures the Lateral Board in place at the distal end. Figure 24: Lateral Board with Plug Inserted Mizuho OSI 2017 NW0508 Rev N... - Page 42 3. Once the patient has been safely removed from the table, the Lateral Board Assembly may be removed. Remove the lateral board plug from the Perineal Post attachment hole and slide the Assembly off the table top. Mizuho OSI 2017 NW0508 Rev N...
-
Page 43: Traction Boots
CAUTION: When using the Traction Boots, ensure that the proper size is selected for the patient’s foot. Using an improperly sized boot and/or excessive over-tightening of the buckle can cause the boot straps to fail. Mizuho OSI 2017 NW0508 Rev N... -
Page 44: Traction Hook Extender
Mount. The Traction Boot attaches to the hook at the end of the Traction Hook Extender, as shown in Figure 26. Traction Hook Extender Traction Brake Cover Red Zone Figure 26: Using a Traction Hook Extender for Patients Short in Stature Mizuho OSI 2017 NW0508 Rev N... -
Page 45: Well Leg Support Assembly
Drop Handle for Securing Articulating Bracket to Well Leg Support Adapter Drop Handle for Securing Articulating Bracket Position Drop Handle for Securing Well Leg Support to Articulating Bracket Articulating Bracket Figure 27: Well Leg Support Assembly Mizuho OSI 2017 NW0508 Rev N... - Page 46 Figure 29: Well Leg Support Adapter Locked in Place 4. Slide the Articulating Bracket onto the post at the distal end of the Well Leg Support Adapter (Figure 30) and secure by rotating the drop handle clockwise (Figure 27). Mizuho OSI 2017 NW0508 Rev N...
- Page 47 Adjust the lower collar position: Rotate the drop handle on the lower collar counter- clockwise to loosen, adjust the height of the collar, and then rotate the drop handle clockwise to lock in place. This acts as a secondary height positioner for the Well Leg Support Assembly. Mizuho OSI 2017 NW0508 Rev N...
-
Page 48: Hana ® Arm Boards
They can be used to support the patient’s arms when in the supine position. If the patient is in the lateral ® decubitus position, use one Hana Arm Board in conjunction with the optional Cross Arm Support. Swing Bar ® Figure 31: Close-up of Hana Arm Board Installed on Table Mizuho OSI 2017 NW0508 Rev N... - Page 49 2. Rotate the smaller of the two drop handles on the Holding Clamp counterclockwise to loosen the Holding Clamp. ® 3. Insert the post of the Hana Arm Board into the slot on the Holding Clamp (Figure 33). Mizuho OSI 2017 NW0508 Rev N...
- Page 50 6. Adjust the angle of the Hana Arm Board in relation to the table by moving the Swing Bar. Once properly positioned, rotate the drop handle at the distal end of the Swing Bar clockwise to lock in place. Mizuho OSI 2017 NW0508 Rev N...
- Page 51 ® Hana Orthopedic Surgery Table Owner’s Manual Figure 34: Range of Motion of Swing Bar Mizuho OSI 2017 NW0508 Rev N...
-
Page 52: Jack Mount Assembly
Visually inspect all accessible areas for possible damage that may adversely ® affect the proper operation of the Hana Orthopedic Surgery Table. Damaged or defective products should not be used or processed. Contact Mizuho OSI Service (see Section 14) for repair or replacement. Safety Latch in Locked Position... -
Page 53: Installing The Jack Mount Assembly
Before every use, visually inspect the safety latch lever and verify that it is fully engaged and hanging down (Figure 36). Make sure that the black knob is fully tightened and that the Jack Mount is secured to the table. Mizuho OSI 2017 NW0508 Rev N... -
Page 54: Removing The Jack Mount Assembly
Figure 37: Jack Mount Assembly (Safety Latch Unlocked) ® WARNING: Do not attempt to install or remove the Jack Mount Assembly from the Hana Table while the Femur Lifts are still attached to the Jack Mount. Mizuho OSI 2017 NW0508 Rev N... -
Page 55: Femur Lift Assembly
The table should be properly checked by a trained technician prior to reusing the Foot Switch and Femur Lifts. NOTE: For more information on manual operation of the Femur Lift using the Emergency Crank Handle, see Section 6.10.5. Circuit Breaker Figure 38: Expansion Junction Box Mizuho OSI 2017 NW0508 Rev N... -
Page 56: Connecting The Coiled Hook Motor Cable To The Expansion Junction Box
® Hana Orthopedic Surgery Table Owner’s Manual Figure 39: Expansion Junction Box (Location) 6.10.1 Connecting the Coiled Hook Motor Cable to the Expansion Junction Box Figure 40: Coiled Hook Motor Cables Mizuho OSI 2017 NW0508 Rev N... -
Page 57: Connecting The Coiled Hook Motor Cable To The Femur Lift
Carefully inspect all electrical quick disconnect receptacles and Circuit Breakers for possible damage or non-function. Damaged or defective products should not be used or processed. Contact Mizuho OSI Service for repair or replacement (Section 14). - Page 58 Mount Femur Lift on Jack Mount Assembly. Rotate Femur Lift Lock to tighten. Figure 43: Femur Lift Mounted on Jack Mount Assembly 5. Repeat this procedure for the Femur Lift on the other side. Mizuho OSI 2017 NW0508 Rev N...
-
Page 59: Disconnecting The Coiled Hook Motor Cable And Removing The Femur Lift
CAUTION: Do not attempt to remove the Femur Lift if the Coiled Hook Motor Cable is connected to it. This can cause damage to the Coiled Hook Motor Cable and the electrical quick- disconnect connectors. Always unplug the Femur Lift first. Mizuho OSI 2017 NW0508 Rev N... -
Page 60: Attaching The Femur Lift Foot Pedal
4. Press the Foot Pedal on the left side and observe the Femur Lift rise to its highest position. Then press the Foot Pedal on the right side and observe the Femur Lift lower to its lowest position. 5. Complete this process for both right and left Femur Lifts. Mizuho OSI 2017 NW0508 Rev N... -
Page 61: Manual Operation Of The Femur Lift
Femur Lift manually, insert the Emergency Crank Handle into the opening and rotate the handle to move the Femur Lift up and down (Figure 47). Figure 47: Emergency Crank Handle Inserted in the Femur Lift Mizuho OSI 2017 NW0508 Rev N... -
Page 62: Femoral Hook Support And Femoral Hook
6.11 Femoral Hook Support and Femoral Hook ® The Femoral Hook and Femoral Hook Support are designed for use with only the Mizuho OSI ProFx ® Orthopedic Surgery Table, the Mizuho OSI Hana Orthopedic Surgery Table, or the Mizuho OSI Hana ®... - Page 63 3. Use the Femur Lift Foot Pedal to raise or lower the height of the Femur Lift as needed. Press the left side of the Foot Pedal to raise the Femur Lift. Press the right side of the Foot Pedal to lower the Femur Lift. (See Section 6.10 for more information.) Mizuho OSI 2017 NW0508 Rev N...
-
Page 64: Hana ® Knee Flexion System ® For Total Knee Arthroplasty
See Section 10 for more information on proper cleaning and sterilization. Damaged or non-functioning instruments should not be used or processed. Contact your local Mizuho OSI sales representative or Mizuho OSI Service for repair or replacement. WARNING: Use of damaged instruments may increase the risk of tissue trauma, infection, and length of operative procedures. - Page 65 Attached to Traction Assembly 6. Place the Foot Plate on the Foot Plate Holder (Figure 52). The Foot Plate may be attached at Plate Position 1 or 2, depending on amount of knee flexion desired. Mizuho OSI 2017 NW0508 Rev N...
- Page 66 Orthopedic Surgery Table Owner’s Manual Plate Position 1 Plate Position 2 Figure 52: Foot Plate Placed on the Foot Plate Holder ® Figure 53: Hana Orthopedic Surgery Table Set Up for Right TKA, Leg Spar Draped Mizuho OSI 2017 NW0508 Rev N...
- Page 67 Foot Plate to Plate Position 1 and use the Gross Traction Knob to move the traction assembly of the Leg Spar. In this way, the operative leg can be fully extended (Figure 57). Mizuho OSI 2017 NW0508 Rev N...
- Page 68 Figure 55: Table Set Up for Total Knee Arthroplasty with Knee Flexion System Foot Plate in Position 2, Knee at 120°+ Flexion ® Figure 56: Table Setup for Total Knee Arthroplasty with Knee Flexion System Foot Plate in Position 2, Knee at 90° Flexion Mizuho OSI 2017 NW0508 Rev N...
- Page 69 ® Hana Orthopedic Surgery Table Owner’s Manual ® Figure 57: Table Setup for Total Knee Arthroplasty with Knee Flexion System Foot Plate in Position 1, Knee at Full Extension by Adjusting Gross Traction Mizuho OSI 2017 NW0508 Rev N...
-
Page 70: Hana Table Components
Hand Pendant (replacement part) ® ® The Hana Hand Pendant controls the Hana Table functions, including table top height, Trendelenburg/Reverse Trendelenburg angle, and lateral tilt angle. It also provides AC power and battery status information. Mizuho OSI 2017 NW0508 Rev N... - Page 71 The Adult Perineal Post is 9 inches long (22.8 cm) and has a 2.75-inch (7 cm) diameter with pad. Disposable blue foam perineal post covers are available (see Section 7.2). Mizuho OSI 2017 NW0508 Rev N...
- Page 72 Femur ® Lifts and the optional Hana Patient Transfer Board. It may be easily removed when not in use to improve C-arm access. 914-516 Drop Handle Mizuho OSI 2017 NW0508 Rev N...
- Page 73 6875-390 Left (Backwards compatible with 6875-360) 6875-370 Right (Backwards compatible with 6875-350) 6875-2370 Traction Unit Assembly 6875-378 Foot Rotation Locking Knob 6850-313 Fine Traction Crank Handle Mizuho OSI 2017 NW0508 Rev N...
- Page 74 The Articulating Bracket attaches to the Well Leg Support Adapter and provides the point of attachment for the Well Leg Support Assembly. The bracket is adjustable, enhancing positioning options for the Well Leg Support Assembly. Mizuho OSI 2017 NW0508 Rev N...
- Page 75 Total Knee Arthroplasty (TKA). It allows for full flexion/ extension of the leg and knee as well as internal/ external rotation of the foot. 6875-209 Knee Flexion Footplate Assembly 6875-208 Knee Flexion Base Assembly Mizuho OSI 2017 NW0508 Rev N...
- Page 76 Lift if there is a loss of power. ® 6875-5003 Hana Femur Lift Foot Pedal The Femur Lift Foot Pedal operates both left and right Femur Lifts. It plugs into the port at the Foot- End of the table base. Mizuho OSI 2017 NW0508 Rev N...
- Page 77 Hook is at the discretion of the surgeon and surgical team. 6850-144 Classic Right ® 6875-20 Hana Table Cover ® The Hana Table Cover serves as a dust cover when the table is in storage. Mizuho OSI 2017 NW0508 Rev N...
- Page 78 The Patient Care Kits are single-use padding and covers intended to prevent cross-contamination and protect the equipment. Three (3) Patient Care ® Kits are included with the Hana Table. See Section 7.3 for reordering information. Mizuho OSI 2017 NW0508 Rev N...
-
Page 79: Disposable Components
Orthopedic Surgery Table Owner’s Manual Disposable Components To place an order for disposable components, contact Mizuho OSI Sales Operations at 1-800-777-4674 within the USA or +1-510-429-1500 outside the USA. At the prompt, select Option 1. WARNING: Disposable components are single use only. Discard after use. Re-use of any disposable component may result in cross-contamination. -
Page 80: Hana ® Patient Care Kits
Orthopedic Surgery Table ships with three (3) individual Hana Patient Care Kits. A case of six (6) individual kits is provided when ordering 6855. NOTE: Remove the Patient Care Kit components from the packaging and visually inspect the components. Mizuho OSI 2017 NW0508 Rev N... -
Page 81: Surgical Procedure Setups
NOTE: The following setup instructions make use of many standard components and optional accessories. For more detailed information on installing and adjusting standard components, see Section 6. For more detailed information on installing and adjusting optional accessories, see Section 9. Mizuho OSI 2017 NW0508 Rev N... -
Page 82: Im Femoral Nailing: Unilateral Skeletal Traction
9. Transfer the patient to the table in the supine position and secure with the Patient Safety Strap. 10. Insert the padded Perineal Post into the table. Move the patient to establish firm contact with the Perineal Post and adjust the Patient Safety Strap as appropriate. Mizuho OSI 2017 NW0508 Rev N... - Page 83 Accessory Clamp and lock it into place. 17. Trial position the C-arm unit on the non-operative side. 18. If desired install the optional Head-End and Foot-End Drape Rod Assemblies, and suspend the Patient Isolation Drapes. Mizuho OSI 2017 NW0508 Rev N...
- Page 84 Components for Femur Nailing, Supine with Skeletal Traction ® Jack Mount Assembly Hana Radiolucent Leg Spar, Pelvic Pad Left and Right ® Hana Patient Transfer Board Patient Safety Strap Traction Boot (Left or Right), (Optional) Large or Small Mizuho OSI 2017 NW0508 Rev N...
- Page 85 90 Degree Pin and Wire Holder Kirschner Bow Holder (Optional) ProFx Traction Boot Adapter (Optional) Assembly (Optional) Lower Leg Support (Optional) Accessory Clamp (Optional) Head-End Drape Rod Assembly (Optional) Foot-End Drape Rod Assembly (Optional) Mizuho OSI 2017 NW0508 Rev N...
-
Page 86: Im Femoral Nailing: Unilateral Skeletal Traction (With Traction Foot Plate Assembly)
NOTE: If desired, the operative foot can be secured to the Traction Unit in a Traction Boot instead of using the Traction Foot Plate Assembly. In this instance, attach a Tibial Traction Boot Adapter to the Traction Unit. Mizuho OSI 2017 NW0508 Rev N... - Page 87 Accessory Clamp and lock it into place. 21. Trial position the C-arm unit on the non-operative side. 22. If desired install the optional Head-End and Foot-End Drape Rod Assemblies, and suspend the Patient Isolation Drapes. Mizuho OSI 2017 NW0508 Rev N...
- Page 88 Radiolucent Leg Spar, Pelvic Pad Left and Right Accessory Clamp (Optional) Tibial Traction Upright (Optional) Traction Unit (Optional) ® Hana Traction Foot Plate Assembly Tibial Traction Boot Adapter Patient Transfer Board (Optional) (Optional) (Optional) Mizuho OSI 2017 NW0508 Rev N...
- Page 89 Traction Device Hook (Optional) 90 Degree Pin and Wire Holder (Optional) ® Kirschner Bow Holder (Optional) ProFx Traction Boot Adapter Lower Leg Support (Optional) Assembly (Optional) Head-End Drape Rod Assembly Foot-End Drape Rod Assembly (Optional) (Optional) Mizuho OSI 2017 NW0508 Rev N...
-
Page 90: Im Femoral Nailing: Unilateral Skin Traction
10. Insert the padded Perineal Post into the table. Move the patient to establish firm contact with the Perineal Post and adjust the Patient Safety Strap as appropriate. 11. Attach the Traction Boot to the Traction Mount on the Leg Spar. Mizuho OSI 2017 NW0508 Rev N... - Page 91 17. Trial-position the C-arm unit on the non-operative side. 18. If desired, install the optional Head-End and Foot-End Drape Rod Assemblies and suspend the Patient Isolation Drapes. Figure 63: Patient Positioned for Right IM Femoral Nailing, Supine, with Unilateral Skin Traction Mizuho OSI 2017 NW0508 Rev N...
- Page 92 Well Leg Support Assembly Hana Arm Board with Pad (1 or 2) Cross Arm Support (Optional) Clark Socket (Optional) Lower Leg Support (Optional) Accessory Clamp (Optional) Head-End Drape Rod Assembly Foot-End Drape Rod Assembly (Optional) (Optional) Mizuho OSI 2017 NW0508 Rev N...
-
Page 93: Im Femoral Nailing: Lateral Decubitus Position With Bilateral Skin Traction
8. Put the appropriate size Traction Boots (small, large, or optional extra-large) on the patient’s feet and secure while the patient is on the stretcher. 9. Transfer the patient to the table in the supine position. Mizuho OSI 2017 NW0508 Rev N... - Page 94 Pad and secure the patient’s non-operative leg. 17. If desired, install the optional Head-End and Foot-End Drape Rod Assemblies, and suspend the Patient Isolation Drapes. Figure 65: Patient Positioned for IM Femoral Nailing, Lateral Decubitus Position with Bilateral Skin Traction Mizuho OSI 2017 NW0508 Rev N...
- Page 95 Large or Small ® Traction Hook Extender Hana Arm Board with Pad Cross Arm Support (Optional) Clark Socket (Optional) Lower Leg Support (Optional) Accessory Clamp (Optional) Head-End Drape Rod Assembly Foot-End Drape Rod Assembly (Optional) (Optional) Mizuho OSI 2017 NW0508 Rev N...
-
Page 96: Im Tibial Nailing: Supine With Unilateral Skin Traction
8. Transfer the patient to the table in the supine position and secure with the Patient Safety Strap. 9. Insert the padded Perineal Post into the table. Move the patient to establish firm contact with the Perineal Post and adjust the Patient Safety Strap as appropriate. Mizuho OSI 2017 NW0508 Rev N... - Page 97 Patient Transfer Board by sliding it out from underneath the fully positioned patient. 15. Trial position the C-arm unit. Figure 67: Patient Positioned for Right IM Tibia Nailing, Supine Position with Unilateral Skin Traction Mizuho OSI 2017 NW0508 Rev N...
- Page 98 Lateral Perineal Post (Optional) Lateral Perineal Post Adapter (Optional) Well Leg Support Adapter Well Leg Support Assembly Articulating Bracket ® Hana Arm Board with Pad (1 or 2) Cross Arm Support (Optional) Clark Socket (Optional) Mizuho OSI 2017 NW0508 Rev N...
-
Page 99: Retrograde Im Femoral Nailing: Supine With Unilateral Skin Traction
Traction Unit Receiver facing the operative side of the table. 8. Attach the Traction Unit to the Tibial Traction Upright. 9. Attach the Traction Foot Plate Assembly to the Traction Unit. 10. Slide the Patient Safety Strap in place. Mizuho OSI 2017 NW0508 Rev N... - Page 100 Cross Arm Support using a Clark Socket to the non-operative side of the table, and secure the patient’s arms. ® 20. Remove the optional Hana Patient Transfer Board by sliding it out from underneath the fully positioned patient. 21. Trial position the C-arm unit. Mizuho OSI 2017 NW0508 Rev N...
- Page 101 Hana Radiolucent Leg Spar, Femur Lift Assembly (Left or Right) Left and Right Femur Lift Foot Pedal Pelvic Pad Accessory Clamp (Optional) Tibial Traction Upright (Optional) Traction Unit (Optional) Traction Foot Plate Assembly (Optional) Mizuho OSI 2017 NW0508 Rev N...
- Page 102 Lateral Perineal Post (Optional) Lateral Perineal Post Adapter Well Leg Support Adapter (Optional) ® Well Leg Support Assembly Articulating Bracket Hana Arm Board with Pad (1 or 2) Cross Arm Support (Optional) Clark Socket (Optional) Mizuho OSI 2017 NW0508 Rev N...
-
Page 103: Hip Pinning: Supine With Unilateral Skin Traction
9. Put the appropriate size Traction Boot (small, large, or optional extra-large) on the patient’s operative foot while the patient is on the stretcher. 10. Transfer the patient to the table in the supine position. Mizuho OSI 2017 NW0508 Rev N... - Page 104 Pad and secure the patient’s operative leg. 17. If desired, install the optional Head-End and Foot-End Drape Rod Assemblies, and suspend the Patient Isolation Drapes. Figure 71: Patient Positioned for Right Hip Pinning, Supine Position with Unilateral Skin Traction Mizuho OSI 2017 NW0508 Rev N...
- Page 105 Well Leg Support Assembly Articulating Bracket Hana Arm Board with Pad (1 or 2) Cross Arm Support (Optional) Clark Socket Lower Leg Support (Optional) Accessory Clamp (Optional) Head-End Drape Rod Assembly Foot-End Drape Rod Assembly (Optional) (Optional) Mizuho OSI 2017 NW0508 Rev N...
-
Page 106: Hip Pinning: Supine With Bilateral Skin Traction
9. Transfer the patient to the table in the supine position. 10. Insert the padded Perineal Post, move the patient to establish firm contact with the Perineal Post, and then secure with the Patient Safety Strap. Mizuho OSI 2017 NW0508 Rev N... - Page 107 15. Trial position the C-Arm. 16. If desired, install the optional Head-End and Foot-End Drape Rod Assemblies, and suspend the Patient Isolation Drapes. Figure 73: Patient Positioned for Hip Pinning, Supine, with Bilateral Skin Traction Mizuho OSI 2017 NW0508 Rev N...
- Page 108 Traction Hook Extender Hana Arm Board with Pad (1 or 2) Cross Arm Support (Optional) Clark Socket (Optional) Lower Leg Support (Optional) Accessory Clamp (Optional) Head-End Drape Rod Assembly Foot-End Drape Rod Assembly (Optional) (Optional) Mizuho OSI 2017 NW0508 Rev N...
-
Page 109: Anterior Approach Total Hip Arthroplasty
6. Insert the appropriate Femur Lift Assembly (left or right) on the operative side of the table and attach the Coiled Hook Motor Cable. Using the Foot Pedal, adjust the Femur Lift Assembly to its lowest position. Mizuho OSI 2017 NW0508 Rev N... - Page 110 17. Trial position the C-arm unit on the non-operative side of table. 18. Attach sterilized Femoral Hook Support and Femoral Hook during surgical procedure. Figure 75: Patient Positioned for Anterior Approach Right Total Hip Replacement Mizuho OSI 2017 NW0508 Rev N...
- Page 111 (Optional) Large or Small ® Traction Hook Extender (2) Hana Arm Board with Pad (2) Cross Arm Support (Optional) Clark Socket (Optional) Lower Leg Support (Optional) Accessory Clamp (Optional) Femoral Hook Support Femoral Hooks Mizuho OSI 2017 NW0508 Rev N...
-
Page 112: Hip Arthroscopy
7. Adjust the table to the appropriate height for patient transfer from the stretcher. 8. Put the appropriate size Traction Boots (large, small, or optional extra-large) on the patient’s feet while the patient is on the stretcher. Mizuho OSI 2017 NW0508 Rev N... - Page 113 14. If desired, attach the optional Lower Leg Support to the non-operative Leg Spar using an Accessory Clamp and lock in place. Secure the patient’s non-operative leg. 15. Trial position the C-arm unit on the non-operative side of the table. Figure 77: Patient Positioned for Hip Arthroscopy Mizuho OSI 2017 NW0508 Rev N...
- Page 114 Traction Boot (Pair), (Optional) Large or Small ® Large Diameter Perineal Post Traction Hook Extender (2) Hana Arm Board with Pad (2) Cross Arm Support (Optional) Clark Socket (Optional) Lower Leg Support (Optional) Accessory Clamp (Optional) Mizuho OSI 2017 NW0508 Rev N...
-
Page 115: Total Knee Arthroplasty (With Well Leg Support Assembly)
Well Leg Support Assembly, and then secure the patient with Patient Safety Strap. 10. Insert the padded Perineal Post into the table. Move the patient to establish firm contact with the Perineal Post and adjust the Patient Safety Strap as appropriate. Mizuho OSI 2017 NW0508 Rev N... - Page 116 Figure 79: Patient Positioned for Total Knee Arthroplasty (with Well Leg Support Assembly) Components for Total Knee Arthroplasty, with Well Leg Support Assembly ® Hana Radiolucent Leg Spar, Well Leg Support Adapter Articulating Bracket Left or Right Well Leg Support Assembly Pelvic Pad Lateral Board Mizuho OSI 2017 NW0508 Rev N...
-
Page 117: Total Knee Arthroplasty (With Left And Right Leg Spars)
Figure 80: Table Setup for Total Knee Arthroplasty (with Left and Right Leg Spars) NOTE: Each number in the setup image identifies the component(s) described in the corresponding step in the following setup instructions. Mizuho OSI 2017 NW0508 Rev N... - Page 118 12. Place the operative foot on the Foot Plate of the Knee Flexion System and secure according to surgeon protocol. Figure 81: Patient Positioned for Total Knee Arthroplasty (with Left and Right Leg Spars) Mizuho OSI 2017 NW0508 Rev N...
- Page 119 Radiolucent Leg Spar, Pelvic Pad Lateral Board Left and Right Patient Safety Strap Traction Boot (Left or Right), Perineal Post Large or Small ® ® ® Hana Arm Board with Pad (2) Hana Knee Flexion System Mizuho OSI 2017 NW0508 Rev N...
-
Page 120: Optional Accessories
Head-End and Foot-End Drape Rod Assemblies. The Foot-End Drape Rod Assembly includes an Attachment Clamp Assembly to facilitate attachment to the Leg Spar at the Foot-End of the table. (a) Attachment Clamp Assembly Mizuho OSI 2017 NW0508 Rev N... - Page 121 Traction Mount and may be used in procedures requiring skeletal traction. 5858-1 Patient Isolation Drapes (box of 3) Patient Isolation Drapes are available for use, if desired. These disposable accessories are single- use-only. See Section 7.2 for reorder information. Mizuho OSI 2017 NW0508 Rev N...
-
Page 122: Hana Table Recommended Optional Accessories
Adult Perineal Post that comes standard with the table, if desired. The Extended Perineal Post is 14 inches long (35.5 cm) and has a 3-inch (7.6 cm) diameter with pad. Mizuho OSI 2017 NW0508 Rev N... - Page 123 6300-93 90 Degree Pin and Wire Holder, Ovation The 90 Degree Pin and Wire Holder attaches to the ® Leg Spar Traction Mount with the ProFx Traction Boot Adapter Assembly and may be used in procedures requiring skeletal traction. Mizuho OSI 2017 NW0508 Rev N...
- Page 124 The optional Extra-Large size is available for use on patients when the standard sizes do not fit. The standard black boot liners can be replaced. In addition, disposable boot liners are available (see Section 7.2). FE00388 Boot Liners, Extra-Large Pair Mizuho OSI 2017 NW0508 Rev N...
- Page 125 Radiolucent Leg Spar, allowing various accessories to be mounted. ® 6875-500 Hana Equipment Cart ® The Hana Equipment Cart may be used to store ® Hana Table components and accessories when not in use. Mizuho OSI 2017 NW0508 Rev N...
- Page 126 This reusable 11” x 9” x 3/8” pad helps prevent potential pressure complications when used with standard and optional perineal posts available for ® the Hana Table. The pad is not compatible with the optional Large Diameter Perineal Post. Mizuho OSI 2017 NW0508 Rev N...
-
Page 127: Hana ® Patient Transfer Board Assembly
20° each so that the Hana Patient Transfer Board can be removed from between the Spars and the patient’s legs. ® Figure 82: Patient on the Table and Hana Patient Transfer Board Ready for Removal Mizuho OSI 2017 NW0508 Rev N... -
Page 128: Installing The Hana ® Patient Transfer Board On The Table
Figure 83: Hana Patient Transfer Board Ready to Install Small stop bolt contacts guide fin when Transfer Board is fully installed. ® Figure 84: Stop Bolt on Hana Patient Transfer Board in Contact with Guide Fin Mizuho OSI 2017 NW0508 Rev N... -
Page 129: Removing The Hana ® Patient Transfer Board From The Table
Hana Patient Transfer Board. ® 2. Grasp the Hana Patient Transfer Board by the hard plastic top and pull distally and slightly upward. ® Figure 86: Removing the Hana Patient Transfer Board Mizuho OSI 2017 NW0508 Rev N... -
Page 130: Optional Lateral Perineal Post
3. Attach the Lateral Perineal Post to the Mount Bracket. Rotate the upper T-Handle on the Mount Bracket to secure the Lateral Perineal Post (Figure 88). 4. To adjust the angle of the Lateral Perineal Post: Mizuho OSI 2017 NW0508 Rev N... - Page 131 WARNING: It is important that the Lateral Perineal Post be placed against the distal femur, two to three inches proximal to the popliteal fossa. Placement of the post into the fossa may result in a potential neurological or circulatory injury. Mizuho OSI 2017 NW0508 Rev N...
-
Page 132: Cross Arm Support
3. Insert the Cross Arm Support into the Cross Arm Support upright, and secure by turning the black knob clockwise, 4. Position the Cross Arm Support over, but not in contact with, the patient’s chest. 5. Pad and secure the patient’s arm to the Cross Arm Support. Mizuho OSI 2017 NW0508 Rev N... -
Page 133: Lower Leg Support
2. Rotate the black knob clockwise to secure the clamp in place. 3. Insert the Lower Leg Support Assembly in the Accessory Clamp. 4. Rotate the T-Handle on the clamp clockwise to secure the Leg Support Assembly in place. Mizuho OSI 2017 NW0508 Rev N... -
Page 134: Tibial Traction Assembly
Figure 92: Tibial Traction Assembly Attached to Leg Spar Gold Handle Accessory Clamp Black Knob Figure 93: Tibial Traction Assembly Attached to Leg Spar and Using Secondary Skeletal Traction (90 Degree Pin and Wire Holder) Mizuho OSI 2017 NW0508 Rev N... - Page 135 Attach the 90 Degree Pin and Wire Holder to the Traction Unit. b. Rotate the Gold Handle on the Traction Unit clockwise to secure the Holder. NOTE: The Kirschner Bow Holder may also be used. Mizuho OSI 2017 NW0508 Rev N...
-
Page 136: Drape Rod Assemblies
To attach the Head-End Drape Rod Assembly: ® 1. Slide the Modified Clark Socket on the table side rail at the Head-End of the Hana Table (Figure 95). Figure 95: Attaching Modified Clark Socket to Side Rail Mizuho OSI 2017 NW0508 Rev N... - Page 137 Figure 96: Securing Drape Hanger Upright into Modified Clark Socket 3. Attach the Head-End Drape Hanger Top Rail to the top of the Drape Hanger Upright and position over the table as shown in Figure 94. Mizuho OSI 2017 NW0508 Rev N...
-
Page 138: Foot-End Drape Rod Assembly
Figure 98: Drape Hanger Upright Secured to Attachment Clamp Assembly 4. Attach the Foot-End Drape Hanger Top Rail to the top of the Drape Hanger Upright and position over the table as shown in Figure 94. Mizuho OSI 2017 NW0508 Rev N... -
Page 139: Equipment Cart
The Equipment Cart Cover provided with the Cart serves as a dust cover and should be used while the products are in storage. Figure 99: Equipment Cart, Front and Back (Empty) Figure 100: Equipment Cart, Front and Back (Loaded) Mizuho OSI 2017 NW0508 Rev N... -
Page 140: Cleaning, Sterilization, And Maintenance
When handling a Tempur-Pedic Medical Pad, always grasp the entire thickness of the pad. ® CAUTION: DO NOT lift, slide, or carry Mizuho OSI Tempur-Pedic Medical Pads by grabbing the fabric cover. The cover may tear or rip. Mizuho OSI 2017... -
Page 141: Femoral Hook Support And Femoral Hook
The Femoral Hook Support, Femoral Hook(s), and Hana Knee Flexion System must be sterilized before use. Sterilization of these components is accomplished by steam. To achieve a sterility assurance level of , Mizuho OSI recommends the sterilization parameters listed below: Mizuho OSI 2017 NW0508 Rev N... -
Page 142: Maintenance
All components are lubricated for life at the factory and no other lubrication for the table is required. Preventative Maintenance: Contact Mizuho OSI Service for a complete preventative maintenance checklist. For detailed repair information or to order replacement parts, call, or contact via the web Mizuho OSI Service: 1-800-777-4674, Option 2 (calls within the USA) -
Page 143: Electrical System
Table Electrical Interconnect Diagram in Section 13.2 for details on the electrical system. The primary components of the electrical control system are contained in the Motion Control Box at the Head-End of the table. Mizuho OSI 2017 NW0508 Rev N... -
Page 144: Power Cord
Power Cord Receptacle Component Circuit Breakers Figure 101: Head-End Motion Control Box WARNING: Use only Mizuho OSI supplied Power Cords. NOTE: Country-specific Power Cords are available. Please contact your Mizuho OSI representative for proper selection. 11.3 On/Off Circuit Breaker Power Switch An illuminated On/Off Power Switch and Circuit Breaker is located on the Head-End of the table. -
Page 145: Component Circuit Breakers
To reset, press the button in and release. CAUTION: Determine the source of the overload prior to resetting this switch. If unable to determine and fix the source of the failure, contact Mizuho OSI Service for additional support. 11.5... - Page 146 Battery ordering number: NV0801. NOTE: Failure to use an approved Mizuho OSI battery voids the warranty and can cause harm to the table. CAUTION: Battery life can be shortened if the table remains unplugged and turned on for an extended period of time with the red battery charge light illuminated.
-
Page 147: Troubleshooting
Circuit Breaker access holes. To reset the Component Circuit Breakers, press the buttons. Find the source of the overload prior to resetting. If the problem persists, call Mizuho OSI Service. 1-800-777-4676, Option 2 (within the USA) +1-510-429-1500, Option 2 (outside the USA) - Page 148 If the table is on battery power, verify that the battery is adequately charged and the green battery light illuminates. If the problem persists, call Mizuho OSI Service. 1-800-777-4676, Option 2 (within the USA) +1-510-429-1500, Option 2 (outside the USA)
- Page 149 Leg spar is loose (not Verify whether the Spar Lock Handle is stripped. securely attached to the If the Spar Lock Handle is stripped, it needs to be replaced. Call Mizuho OSI table) Service. 1-800-777-4676, Option 2 (within the USA)
-
Page 150: Technical Drawings And Parts List
Column Cover Spacer, Teflon (16 Required) 6875-87 Column Cover Spacer, Brass (4 Required) 6875-88 Column Cover Shim (40 Required) 6875-214 Column Cover Rivet (2 per Spacer) AC012037 Femur Lift Assembly, Right 6875-600 Femur Lift Assembly, Left 6875-601 Mizuho OSI 2017 NW0508 Rev N... - Page 151 Gross Traction Bearing Carriage (1 per Spar) NA0210F Fine Traction Repair Kit 6850-2230 Power Cord, 120V NV0956 NOTE: Country specific Power Cords are available. Please contact your Mizuho OSI representative for proper selection. Table Lift Motor (2 Required) 6875-5034 ® Hana Main Table Pad...
-
Page 152: Interconnect Diagram, 100V, 120V, 220-230V Models
® Hana Orthopedic Surgery Table Owner’s Manual 13.2 Interconnect Diagram, 100V, 120V, 220-230V Models Mizuho OSI 2017 NW0508 Rev N... -
Page 153: Technical Support
14.2 Order Replacement Parts If unable to identify a part please call, fax, or e-mail Mizuho OSI Service before placing an order. Once the part number is obtained, follow the instructions below to order the replacement part. If part is known, please telephone, fax, or e-mail part number and description to Mizuho OSI Service for price and availability. -
Page 154: Send A Part For Repair
If unable to identify part, please call, fax, or e-mail Mizuho OSI Service for assistance. If the part number is known, please call, fax, or e-mail Mizuho OSI Service with the part number and description of the problem to obtain a Repair Authorization (RA) number. -
Page 155: Appendix
CISPR 11 that supplies buildings used for domestic purposes. Harmonic emissions Class A (230V) IEC 61000-3-2 Not applicable (100V) Voltage fluctuations / Complies (230V) flicker emissions IEC 61000-3-3 Not applicable (100 V) Mizuho OSI 2017 NW0508 Rev N... -
Page 156: Electromagnetic Immunity
60 Hz) magnetic field should be at levels characteristic of a typical location in a typical commercial or hospital environment. IEC 61000-4-8 Note: U is the a.c. mains voltage prior to application of the test level. Mizuho OSI 2017 NW0508 Rev N... - Page 157 Table should be observed to verify normal operation. If abnormal ® performance is observed, additional measures may be necessary, such as re-orienting or relocating the Hana Table. Over the frequency range 150kHz to 80MHz, field strengths should be less than 3 V/m. Mizuho OSI 2017 NW0508 Rev N...
-
Page 158: Recommended Separation Distances
Note 1: At 80 MHz and 800 MHz, the separation distance for the higher frequency range applies. Note 2: These guidelines may not apply in all situations. Electromagnetic propagation is affected by absorption and reflection from structures, objects and people. Mizuho OSI 2017 NW0508 Rev N...
Need help?
Do you have a question about the Hana 6875 and is the answer not in the manual?
Questions and answers