
Summary of Contents for JB Pipepuller 1700
- Page 1 The New Generation of Pipe Pullers MODEL 1700 PATENT #6969217 MADE IN THE USA Revised Addition 02 - October 2017...
-
Page 2: Table Of Contents
....................SPECIFICATIONS / FEATURES ..............GENERAL CONSIDERATIONS ................SAFETY ....................... PARTS DESCRIPTION ..................OPERATION ....................... MAINTENANCE ....................J-HOOK DIAGRAMS ..................POST ADJUSTMENT CHARTS ............... J-LINK DIAGRAMS ..................TROUBLESHOOTING ..................LIMITED WARRANTY ..................NOTES ......................JB Pipepuller l Table of Contents... -
Page 3: Introduction
Following these recommendations will provide the operator with safe, efficient use of this equipment. Keep this manual in a safe place for future reference. In the event your JB Pipepuller chang- es ownership, this manual MUST accompany the machine. Additional manuals are available by contacting Basinger Manufacturing. - Page 4 Steel Pallet — Used to Store All Parts on and Shipping Three Sizes of J-Hooks — Used to Hook onto Boxes Laser Friendly — Pipe Puller Design Allows Laser to Shoot thru Lower Shoe Adjustable Wheels — Allows for Perfect Fit in Round Pipe JB Pipepuller l Specifications l Features...
-
Page 5: General Considerations
Basinger Manufacturing may make periodic updates to the design or construction of the JB Pipepuller. These updates may cause a slight variation in design and/or construction. Directional identifiers including left, right, front, rear, top, bottom, etc. -
Page 6: Safety
If not avoided, the scenario could result in death or serious injury. This warning presents a lesser degree of injury than those labeled with DANGER. If not avoided, the scenario will result in death or serious injury. This indicates the most extreme circumstances. JB Pipepuller l Safety... - Page 7 SAFETY Continued Safety Warning Decals The following safety warning decals located on the JB Pipepuller indicate a potential for personal injury if appropriate precautions are not taken. It is the operator’s responsibility to review all safety and operational information prior to operating the JB Pipepuller.
- Page 8 In the event hydraulic fluid contacts your eyes or punctures your skin, you must immediately seek medical treatment by a physician. Even the smallest wound is considered a serious injury and will result in serious injury or death if not treated immediately. JB Pipepuller l Safety...
- Page 9 NEVER operate ANY kind of equipment while under the influence of drugs or alcohol. Always use equipment during the day or with sufficient supplemental lighting. ALWAYS know what’s below. Dial 811 if working near public utilities and pipelines. Safety l JB Pipepuller...
-
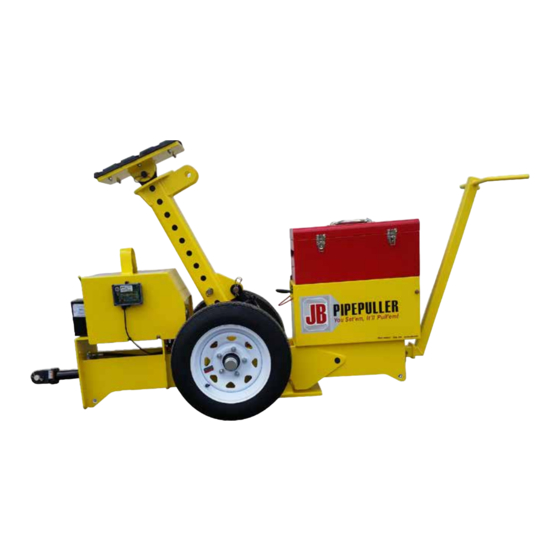
Page 10: Parts Description
PARTS DESCRIPTION JB Pipepuller with Front Mount Tube (Used on Culverts 4’ Tall and Shorter) Lift Here Front Mount Stabilizer Short Post Front Mount Tube Outer Post Strut Selector Valve Power Unit J-Hook Remote Receiver Battery Pull Clevis Bushings Lower Shoe... - Page 11 PARTS DESCRIPTION Continued JB Pipepuller Base Unit with Heavy Duty Strut (Used on Reinforced Concrete Culverts 4’-14’ Tall) 14’ Tall Upper Shoe 12’ Tall Inner Post 10’ Tall Always bolt heavy duty strut extentions first to lower strut. ALL Strut Extensions must be Strut Extensions 8’...
-
Page 12: Operation
OPERATION Setting up the JB Pipepuller The following steps will outline the steps necessary to set up the JB Pipepuller to pull reinforced concrete pipe. For additional instruction, a detailed training video is also available at www.jbpipepuller.com. Important! The wheel adjustment procedure should be followed depending on the type of pipe you will be working with. - Page 13 These specialized strut and extensions provide greater stability for the increased height of boxes over 10 feet. Contact JB Manufacturing about the use of these struts if you have questions. Operation l JB Pipepuller...
- Page 14 Outer Post. ■ ALL Strut Extensions must be bolted on with grade 8 bolts, ■ Decreasing the post length could cause damage nuts and lock washers. Torque at 100 ft. lbs. to the culvert. JB-7 JB Pipepuller l Operation...
- Page 15 The red arrow indicates the key link. Note the yellow shim under the back of the hook The yellow arrow shows the short J-Link to maintain parallel pulling force. positioned with the hook opening facing up. Operation l JB Pipepuller...
- Page 16 Step 3: Cylinder Selector Valve Operation After setting the valve to the left or the right, activate the remote. JB Pipepuller l Operation...
- Page 17 Fully extend the strut cylinder In Position to Set when setting the Strut. Push Strut Cylinder needs to be closed into ceiling before setting the strut and activate to ceiling hydraulics Tip Front End to Floor Operation l JB Pipepuller...
- Page 18 Step 5: Set up J-Links and Lock Puller in Position Position the JB Pipepuller in the direct line of pull and lay out the J-link and J-hook so they are in line with the direction of pull. Position the J-hook on the culvert. Note that the J-Hook may require shims to keep the pulling force parallel to the culvert.
- Page 19 Switch the Valve Selector to the left, and support the strut with your hand. Activate the remote- this will un-wedge the strut. With the strut cylinder completely retracted, the JB Pipepuller is ready to move forward. Repeat steps 5 & 6 until all culverts are set.
-
Page 20: Maintenance
MAINTENANCE Battery The JB Pipepuller is powered by an Interstate SRM-4D deep cycle battery. It has 1645 cranking amps and 1314 cold cranking amps. It is recommend- ed that the battery be fully charged at the end of its daily use. It is recom- mended that the battery be charged at a slow rate, preferably in deep cycle mode. -
Page 21: J-Hook Diagrams
9”. If pipe is thicker than J-Hook dimensions, this WILL HAPPEN! Example of using a J-Hook installing pipe backward using a precut oak block no less than 18” long! 12” Thick Culvert J-Hook Diagrams l JB Pipepuller... - Page 22 Outer Post. ■ ALL Strut Extensions must be bolted on with grade 8 bolts, ■ Decreasing the post length could cause damage nuts and lock washers. Torque at 100 ft. lbs. to the culvert. JB-7 JB Pipepuller l Post Adjustment Charts...
-
Page 23: Post Adjustment Charts
■ Always bolt heavy duty strut extentions first to lower strut. 3607 3632 26 1/2 ■ ALL Strut Extensions must be bolted on with grade 8 bolts, nuts and lock washers. Torque at 100 ft. lbs. 12’ 3658 27 1/2 Post Adjustment Charts l JB Pipepuller... - Page 24 ■ Decreasing the post length could cause damage to the culvert. ■ Always bolt heavy duty strut extentions first to lower strut. ■ ALL Strut Extensions must be bolted on with grade 8 bolts, nuts and lock washers. Torque at 100 ft. lbs. JB Pipepuller l Post Adjustment Charts...
-
Page 25: J-Link Diagrams
J-LINK DIAGRAMS J-Link Diagrams l JB Pipepuller... - Page 26 JB Pipepuller l J-Link Diagrams...
-
Page 27: Troubleshooting
Strut Cylinder is not fully extended Extend the cylinder to its full extension Strut cylinder not closed before Retract cylinder before you shove the strut engagment of ceiling to the cylinder Improper wheel setting Read manual for proper setting Troubleshooting l JB Pipepuller... - Page 28 Deep Cycle Battery Volt Meter (Minimum 11 Volts) Hydraulic Motor Solenoid Set Contact Solenoid Release Contact Cordless Remote “LODAR” 10 Amp Model# 110000 Standard Blade Style Fuse Set Solenoid Purple Set Coil Grn/Yel Release Solenoid Purple Release Coil JB Pipepuller l Troubleshooting...
- Page 29 (Minimum 11 Volts) Hydraulic Motor Solenoid Set Contact Solenoid Release Contact Cordless Remote Push Button 10 Amp Standard Blade Style Fuse Set Push Set Solenoid Button Purple Set Coil Grn/Yel Release Push Release Solenoid Button Purple Release Coil Troubleshooting l JB Pipepuller...
-
Page 30: Limited Warranty
Limited Warranty Basinger Manufacturing hereby warrants the original purchaser named below that this JB Pipepuller is free from defects in materials and workmanship for a period of two years from the date of purchase. Damage to this JB Pipepuller caused directly or indirectly by mis- use, abuse, negligence, accidents, unapproved repairs or alterations, and/or lack of maintenance voids all warranty terms. - Page 31 Notes Notes l JB Pipepuller...
- Page 32 JB Pipepuller l Notes...
Need help?
Do you have a question about the 1700 and is the answer not in the manual?
Questions and answers