
Related Manuals for NOVA BIOMEDICAL StatStrip Xpress-i

Summary of Contents for NOVA BIOMEDICAL StatStrip Xpress-i
- Page 1 For Export Only Nova StatStrip Xpress ® Glucose and ß-Ketone Hospital Meter Instructions for Use Manual...
-
Page 3: Table Of Contents
Table of Contents Symbols..................1 About.This.Manual...............2 Safety..................3 Intended.Use................8 Introduction..................9 Clinical.Utility................11 The.Sample................11 Interfering.Substances............12 Operation.Overview...............14 Meter.Sleep/Wakeup..............15 Setup..................17 Installing.the.Battery.(Replacing)...........17 Set.the.Time................19 Set.Date.Format..............22 Beeper.On.or.Off..............26 Testing.Glucose:.QC/Linearity/Proficiency/Blood.Samples..28 Testing.a.Glucose.Quality.Control.Solution......28 Testing.a.Glucose.Blood.Sample...........31 Testing.a.Glucose.Linearity/Proficiency.Solution....36... - Page 4 Table of Contents Testing.Ketone:.QC/Linearity/Proficiency/Blood.Samples..39 Testing.a.Ketone.Quality.Control.Solution......39 Testing.a.Ketone.Blood.Sample..........42 Testing.a.Ketone.Linearity/Proficiency.Solution.....47 Reviewing.Test.Results............50 Deleting.Stored.Test.Results..........51 Troubleshooting.................53 Battery.Check................53 Error.Codes................57 Appendix...................61 Specifications.................62 Reference.Values..............64 Glucose.Methodology............65 Ketone.Methodology..............66 Quality.Control.Solution............67 Chemistry.Measurement............67 Ordering.Information..............69 Cleaning.and.Care..............71 Warranty..................73...
-
Page 5: Symbols
Symbols The following are symbols that are used in this manual, on insert sheets, and on the meter. In vitro diagnostic medical Electronic Waste device Authorized Representative Catalog number in the European Community Product fulfills the requirements Temperature limitation of Directive 98/79 EC (IVDD) Caution, consult accompanying documents Upper Limit of Temperature... -
Page 6: About.this.manual
About This Manual This manual is for the Nova Biomedical StatStrip Xpress-i Glucose and ß-Ketone Hospital Meter. Unit of Measure Disclaimer The StatStrip Xpress-i Glucose and ß-Ketone Hospital Meter is factory set to report glucose results in mg/dL or mmol/L and ketone results in mmol/L. -
Page 7: Safety
Safety Personnel operating this meter must be proficient in the operating and maintenance procedures of the meter. The following safety procedures must be followed. 1. Read the safety and operating instructions before operating the meter. 2. Retain the safety and operating instructions for future reference. - Page 8 Safety Electrical Safety 1. Battery powered: 3-volt coin battery Chemical and Biological Safety 1. Observe all precautionary information printed on the original solution containers. 2. Operate the meter in the appropriate environment. 3. Dispose of all waste solutions according to standard hospital procedures.
- Page 9 Safety applicable collection point for the recycling of electri- cal and electronic equipment. Disposal of Used Meters for customers in Europe: • The meter may become infectious during the course of use. Discard in accordance with local regulations for biohazardous waste. Environmental •...
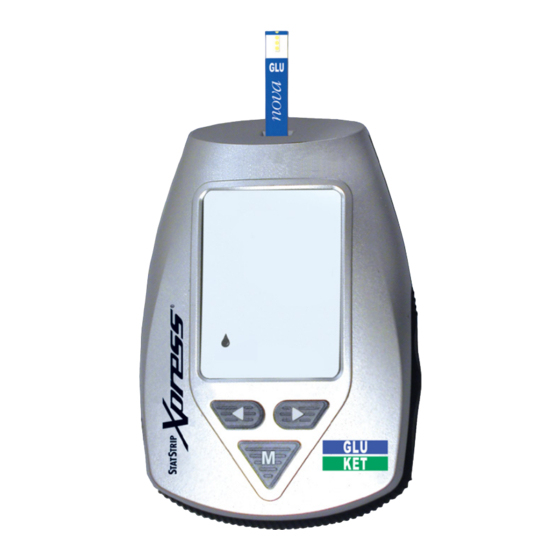
- Page 10 Test Strip LCD Display Results Results mg/dL mmol/L Left Arrow Button Right Arrow Button Mode Button Glucose Result Ketone Result Nova StatStrip Xpress-i Glucose and ß-Ketone Hospital Meter...
- Page 11 Ketone Beeper ON Indicator Glucose Glucose Test Blood or Control Result Drop Indicator Test Result mmol/L Low Battery Indicator Memory AM or PM Indicator Date/Day Hour/Minute Nova StatStrip Xpress-i Glucose and ß-Ketone Hospital Meter Screen...
-
Page 12: Intended.use
Weight: 75 g (2.65 oz) Intended Use The Nova StatStrip Xpress-i Glucose and ß-Ketone Hos- pital Meter System is intended for in vitro diagnostic use by health care professionals and for point-of-care usage in the quantitative measurement of Glucose (Glu) in fresh capillary, venous, arterial, and neonate whole blood and the quantitative determination of ß-Ketone (Ket) in fresh capil-... -
Page 13: Introduction
Introduction This manual provides all necessary instructions for the routine operation and maintenance of the Nova StatStrip Xpress-i Glucose and ß-Ketone Hospital Meter. Please read this manual carefully. It has been prepared to help you at- tain optimum performance from your Meter. WARNING: Healthcare professionals and others using this system on multiple patients should be aware that all products or objects that come into... - Page 14 This section introduces the meter and covers requirements, tests performed, procedural limitations, clinical utility, and sample handling. The Nova StatStrip Xpress-i Glucose and ß-Ketone Hospital Meter is a hand-held, battery-powered, in vitro diagnostic laboratory instrument that works in conjunction with Nova...
-
Page 15: Clinical.utility
Introduction Clinical Utility The measurement of glucose is used in the monitoring of carbohydrate metabolism disturbances including diabetes mellitus, and idiopathic hypoglycemia, and of pancreatic islet cell carcinoma. Ref. 1. Burtis, Carl A. and Ashwood, Edward R., ed. 1999. Tietz Textbook of Clinical Chemistry. Philadel- phia, PA: W. -
Page 16: Interfering.substances
Introduction Interfering Substances Glucose Interferences: The Nova StatStrip Xpress-i Glucose and ß-Ketone Hospital Meter exhibits no interference for glucose from the following substances up to the following concentration levels: Substances Conc Substances Conc mg/dL(mmol/L) mg/dL(mmol/L) Acetaminophen 10.0 (0.66) D(+) Maltose 240.0 (6.66) - Page 17 Introduction Ketone Interferences: The Nova StatStrip Xpress-i Glucose and ß-Ketone Hospital Meter exhibits no interference for ß-Ketone from the following substances up to the following concentration levels: Substances Concentration Substances Concentration mg/dL(mmol/L) mg/dL(mmol/L) Ibuprofen (2.33) Acetaminophen 20.0 (1.32) Acetone (1.72) L-Dopa (0.51)
-
Page 18: Operation.overview
Introduction Operation Overview • To perform a test, the operator inserts a test strip into the test strip port. Touch the end of the strip to a drop of blood, QC solution, or linearity solution. The results are obtained in 6 seconds for glucose and 10 seconds for ketone. -
Page 19: Meter.sleep/Wakeup
Introduction • The meter stores up to 400 patient, quality control, linearity, and proficiency test data. • A coin-size battery provides power to operate the meter. The battery provides sufficient power to operate for approximately 600 tests. A low-battery warning on the meter display alerts the operator to change the battery. - Page 20 Introduction If the meter goes into sleep mode, the following conditions should be expected: • If blanking occurs when a Patient Result screen is displaying, the result is automatically saved. • If the currently displayed screen is a Setup screen, any unconfirmed input data or menu selection are discarded prior to blanking.
-
Page 21: Setup
Setup This section describes how to setup the Nova StatStrip Xpress-i Glucose and ß-Ketone Hospital Meter. The operator can set the meter for local time and date, have the beeper On or Off, enable the sample counter, and set the date display format. - Page 22 Setup 3. Replace the battery cover. All segments flash 3 times. The software version and the default date and time will appear for 3 seconds then the screen will go blank. CAUTION: Upon installing the battery, the meter software version is displayed for 3 seconds. Software versions may be numeric (example 5.0); therefore, please exercise caution to ensure the software version is not reported as a glucose result. 4. Go to setup to configure the meter.
-
Page 23: Set.the.time
Setup Set the Time 1. Press the MODE button for longer than 3 seconds. The meter if in Sleep Mode wakes up and enters the SETUP Mode. 2. Select the hour (flashing) format: either 12 Hr or 24 Hr. Press the Right/Left Arrow buttons to toggle between the 2 time format options. - Page 24 Setup 3. Press the MODE button to accept the Hour Format. 4. The meter displays the current time or the default time with the hour digits flashing. 5. Press the Right/Left Arrow buttons to scroll from 1AM to 12PM (for 12 Hr Clock) or 0 to 23 (for 24 Hr Clock). 6.
- Page 25 Setup 7. Next set the minutes (digits flashing). Press the Right/Left Arrow buttons to scroll from 00 to 59 minutes. 8. Press the MODE button to accept the displayed Min- utes choice.
-
Page 26: Set.date.format
Setup Set Date Format 1. Next set the date format. The display is 1-31 2010 or 31.01.2010. 2. You can choose to have the date displayed as DD.MM or MM-DD. Press the Right/Left Arrow buttons to toggle between DD.MM or MM-DD. 3. - Page 27 Setup 4. The year should be flashing. Press the Right/Left Arrow buttons to select the current year. 5. Press the MODE button to accept the displayed Year.
- Page 28 Setup 6. The month should be flashing. Press the Right/ Left Arrow buttons to scroll through the 12 months (1 to 12). 7. Press the MODE button to accept the displayed Month.
- Page 29 Setup 8. The day should be flashing. Press the Right/Left Ar- buttons to scroll through the days of the month. 9. Press the MODE button to scroll the displayed Day.
-
Page 30: Beeper.on.or.off
Setup Beeper On or Off 1. Press the Right/Left Arrow buttons to toggle between Beeper ON or OFF (flashing). 2. Press the MODE button to accept the displayed ON or OFF. - Page 31 Setup End is displayed with the entered date and time. Press the Mode button for 1.5 seconds to exit Setup or the meter will time out in 1 minute.
-
Page 32: Testing.glucose:.qc/Linearity/Proficiency/Blood.samples
Testing Glucose: QC/Linearity/Proficiency/Blood Samples This section describes how to run QC (Quality Control), Linearity Solution, Proficiency Solution, and blood samples. Testing a Glucose Quality Control Solution 1. Insert a glucose test strip into the meter. All seg- ments of the screen will display for 2 seconds. Then a flashing blood drop will display. - Page 33 Testing a Glucose Quality Control Solution 2. Identify the sample as a Control; use the Left or Right button to find the desired control level: C1, C2, or C3. 3. Touch the end of the test strip to a drop of control solution until the test strip fills and the meter beeps.
- Page 34 Testing a Glucose Quality Control Solution 4. Glucose quality control test results are available on- screen in 6 seconds. Result Result Displayed in Displayed in mmol/L mg/dL 5. There is one long beep when the results are ready. There are 3 short beeps if test results are outside the measurement range of the test strip.
-
Page 35: Testing.a.glucose.blood.sample
Testing a Glucose Blood Sample NOTE: Do not test patient samples until control solution test results are within expected range. 1. Insert a glucose test strip into the meter. All seg- ments of screen will display for 2 seconds. Then a flashing blood drop will display. NOTE: If strip is re- moved before the test starts or is not used for over 2 minutes, the screen will go blank. - Page 36 Testing a Glucose Blood Sample 2. Wash patient's hand with water then dry thoroughly. Alternatively, use alcohol pads to clean area; dry thoroughly after cleaning. 3. Holding hand down- ward, massage finger with thumb toward tip to stimulate blood flow. 4.
- Page 37 Testing a Glucose Blood Sample 5. Squeeze the finger to form a drop of blood. 6. When the blood drop appears, touch the end of the test strip to the blood drop until the test strip fills and the meter beeps. 7.
- Page 38 Testing a Glucose Blood Sample Result in mg/dL Result in mmol/L 8. There is one long beep when the results are ready. There are 3 short beeps if test results are outside the range of the test strip.
- Page 39 Testing a Glucose Blood Sample If result is LO (less than the measurement range) or Hi (greater than the measurement range) repeat the test. Glucose Low Glucose High <10mg/dL >600mg/dL <0.6 mmol/L >33.3 mmol/L HI Result LO Result NOTE: Test results are automatically saved. If no activity for 1 minute, the meter will time-out: screen goes blank.
-
Page 40: Testing.a.glucose.linearity/Proficiency.solution
Testing a Glucose Linearity/Proficiency Solution 1. Insert a glucose test strip into the meter. All seg- ments of screen will display for 2 seconds. Then a flashing blood drop will display. NOTE: If strip is re- moved before the test starts or is not used for over 2 minutes, the screen will go blank. 2. Touch the end of the test strip to a drop of linearity solution or proficiency solution until the test strip fills and the meter beeps. - Page 41 Testing a Glucose Linearity/Proficiency Solution NOTE: LinearitylProficiency test results are stored in memory as a blood sample. NOTE: A quick beep sounds when sufficient linearity/ proficiency solution has been added to the test strip. 3. Linearity or proficiency test results are available on- screen in 6 seconds.
- Page 42 Testing a Glucose Linearity/Proficiency Solution Result in mg/dL Result in mmol/L 4. There is one long beep when the results are ready. There are 3 short beeps if test results are outside the measurement range of the test strip.
-
Page 43: Testing.ketone:.qc/Linearity/Proficiency/Blood.samples
Testing Ketone: QC/Linearity/Proficiency/Blood Samples This section describes how to run QC (Quality Control), Linearity Solution, Proficiency Solution, and blood samples. Testing a Ketone Quality Control Solution 1. Insert a ketone test strip into the meter. All segments of the screen will display for 2 seconds. Then a flashing blood drop will display. - Page 44 Testing a Ketone Quality Control Solution 2. Identify the sample as a Control; use the Left or Right button to find the desired control level: C1, C2, or C3. 3. Touch the end of the test strip to a drop of control solution until the test strip fills and the meter beeps.
- Page 45 Testing a Ketone Quality Control Solution 4. Ketone quality control test results are available on- screen in 10 seconds. Result Displayed in mmol/L 5. There is one long beep when the results are ready. There are 3 short beeps if test results are outside the measurement range of the test strip.
-
Page 46: Testing.a.ketone.blood.sample
Testing a Ketone Blood Sample NOTE: Do not test patient samples until control solution test results are within expected range. 1. Insert a ketone test strip into the meter. All segments of screen will display for 2 seconds. Then a flashing blood drop will display. NOTE: If strip is re- moved before the test starts or is not used for over 2 minutes, the screen will go blank. - Page 47 Testing a Ketone Blood Sample 2. Wash patient’s hand with water then dry thoroughly. Alternatively, use alcohol pads to clean area; dry thoroughly after cleaning. 3. Holding hand down- ward, massage finger with thumb toward tip to stimulate blood flow. 4.
- Page 48 Testing a Ketone Blood Sample 6. When the blood drop appears, touch the end of the test strip to the blood drop until the test strip fills and the meter beeps. 7. Ketone test results are available on-screen in 10 seconds.
- Page 49 Testing a Ketone Blood Sample Result in mmol/L 8. There is one long beep when the results are ready. There are 3 short beeps if test results are outside the range of the test strip.
- Page 50 Testing a Ketone Blood Sample If result is Hi (greater than the measurement range) repeat the test. Ketone High >8.0 mmol/L HI Result NOTE: Test results are automatically saved. If no activity for 1 minute, the meter will time-out: screen goes blank.
-
Page 51: Testing.a.ketone.linearity/Proficiency.solution
Testing a Ketone Linearity/Proficiency Solution 1. Insert a ketone test strip into the meter. All segments of screen will display for 2 seconds. Then a flashing blood drop will display. NOTE: If strip is re- moved before the test starts or is not used for over 2 minutes, the screen will go blank. 2. Identify the sample as a Control; use the Left or Right button to find the desired control level: C1 (for L1 or L2), C2 (for L3), or C3 (for L4 or L5). - Page 52 Testing a Ketone Linearity/Proficiency Solution 3. Touch the end of the test strip to a drop of linearity solution or proficiency solution until the test strip fills and the meter beeps. NOTE: A quick beep sounds when sufficient linearity/ proficiency solution has been added to the test strip. 4. Linearity or proficiency test results are available on- screen in 10 seconds.
- Page 53 Testing a Ketone Linearity/Proficiency Solution Result in mmol/L 5. There is one long beep when the results are ready. There are 3 short beeps if test results are outside the measurement range of the test strip.
-
Page 54: Reviewing.test.results
Reviewing Test Results The meter is able to store up to 400 test results. 1. To review test results, press the Mode button once for less than 3 seconds. 2. If there are no results in memory, the screen displays - - - on the mem (memory) screen. -
Page 55: Deleting.stored.test.results
Deleting Stored Test Results You can delete all stored test and QC results. Proceed as follows to delete all results: 1. Press the Mode button once to display the number of stored test results. 2. Press the Right and Left arrow button simultaneously for longer than 3 seconds. - Page 56 Deleting Stored Test Results 4. When the Screen displays dELEtE (flashing), press the left and right buttons simultaneously for greater than 3 seconds. All results are deleted. The screen will display OK and dELEtEd as shown below. 5. To exit without deleting results. press the MODE button once.
-
Page 57: Troubleshooting
Troubleshooting This section describes Battery status, Error Codes, and Actions for the Nova StatStrip Xpress-i Glucose Ketone Hospital Meter. Battery Check The battery provides sufficient power to operate for approximately 600 tests. A battery low warning will alert the user to replace the battery. Test results are stored in non-... - Page 58 Troubleshooting How to view the battery status of the meter: • Insert a test strip to the meter when it is turned off. • All segments will display for 2 seconds. • Battery is OK: a flashing blood drop appears at the lower left corner of the screen.
- Page 59 Troubleshooting • Battery is Low: a flashing blood drop and battery icon appear at the lower left corner of the screen: battery charge sufficient for up to 10 tests. Continue with testing as usual. Battery icon remains on the screen. Flashing Blood Drop Battery Icon...
- Page 60 Troubleshooting • Battery is very Low: battery icon at the lower left corner of the screen: battery charge insufficient for testing. Meter will not operate and battery icon disappears when the test strip is removed. Replace the battery. Battery Icon...
-
Page 61: Error.codes
Troubleshooting Error Codes There are 8 Error Codes to inform you of problems with the meter. This section provides action procedures when these Error Codes are displayed. The error code displays after the test strip is inserted and the all segments screen displays for 2 seconds. - Page 62 Troubleshooting E1 System Hardware Error A system hardware error has been detected. Action: Perform the test again. If you get the same error, con- tact your local Nova distributor. E2 Operating Temperature Error The Meter temperature is outside of the range for testing.
- Page 63 Troubleshooting E3 Used Strip Error The test strip was previously used. Action: Repeat the test with a new test strip. If the error persists, perform the test using an alternate test strip vial or alternate method. E4 Short Sample Error An insufficient sample volume (Control or blood) was drawn into the test strip.
- Page 64 Troubleshooting E5 Strip Not Recognized Error The test strip is not recognized. Action: Repeat the test with a new test strip. If the error persists, perform the test using an alternate test strip vial or alternate method. E8 Bad Strip Error The test strip is defective or bad.
-
Page 65: Appendix
Troubleshooting E9 Bad Sample Error A problem was detected with the sample. Action: Repeat the test with a new test strip. If the error persists, perform the test using an alternate test strip vial or alternate method. Appendix The Appendix includes solution and reagent specifications, accuracy and precision, consumable list, reference informa- tion, and warranty. -
Page 66: Specifications
Appendix Specifications Tests Measured Blood Glucose and Ketone (referred to Plasma Values) Glucose Methodology Enzyme, Amperometric Ketone Methodology Enzyme, Amperometric Test Results mmol/L Sample Type Whole blood Glucose Test Range 10 to 600 mg/dL or 0.6 to 33.3 mmol/L Ketone Test Range 0.0 to 8.0 mmol/L Test Time 6 seconds Glu/10 seconds Ket... - Page 67 Appendix Data Cable Serial or USB Operating Ranges: Temperature 5° to 40°C (41° to 104°F) Humidity 10% to 90% relative humidity Altitude 15,000 ft (4572 meters) Hematocrit 20% to 65% Weight 2.65 oz (75 g) Size 3.6x2.3x0.9 in(91.4x58.4x22.9 mm)
-
Page 68: Reference.values
Appendix Reference Values Each laboratory should establish and maintain its own refer- ence value. The value given here should be used only as a guide. Fasting Glucose 3.6 - 5.3 mmol/L 64.9 - 95.5 mg/dL Fasting Ketone 0.02 - 0.27 mmol/L 1. -
Page 69: Glucose.methodology
Appendix Glucose Methodology The glucose measurement is based on the following methodology: 1. Glucose + Enzymes(oxidized form) ––– > Gluconic Acid + Enzymes(reduced form) 2. Enzymes(reduced form) + Ferricyanide –– > Enzymes(oxidized form) + Ferrocyanide 3. Ferrocyanide ————— > Ferricyanide Electrode The current generated at the electrode is proportional to the glucose concentration of the sample. -
Page 70: Ketone.methodology
Appendix Ketone Methodology The ketone measurement is based on the following methodology: Enzyme 1. D-3-hydroxybutyrate + NAD ––––––> Acetoacetate + NADH + H 2. Mediator (ox) + NADH –––––> Mediator (red) + NAD 3. Mediator (red) ––––––> Mediator (ox) The current generated at the electrode is proportional to the ketone concentration of the sample. -
Page 71: Quality.control.solution
Appendix Quality Control Solution QC Solutions Levels 1, 2, 3 Linearity Solutions Levels 1, 2, 3, 4, 5 Chemistry Measurement The typical imprecision for glucose and ketone both for within-run and day-to-day in mmol/L (mg/dL) Glucose Levels Glucose Levels (mg/dL) (mmol/L) 22.2 33.3... - Page 72 Appendix Ketone Levels (mmol/L) or S.D. 0.20 mmol/L (S.D)
-
Page 73: Ordering.information
Appendix Ordering Information Supplies and parts for the Nova StatStrip Xpress-i Glucose and ß-Ketone Hospital Meter are available from Nova Bio- medical. DESCRIPTION ............Instructions for Use Manual ........46952 Quick Reference Guide .......... 46963 StatStrip Glucose Test Strips ........42214 Nova StatStrip Glucose and ß-Ketone... - Page 74 Appendix Nova StatStrip Glucose and ß-Ketone Control Solution, Level 3 ........46949 Nova StatStrip Glucose and ß-Ketone Linearity Kit . 46950 StatStrip ß-Ketone Test Strips ........46951 Battery (DL2450) ............ 41221...
-
Page 75: Cleaning.and.care
Appendix Cleaning and Care The meters should never be immersed in any cleaning agent. Always apply the cleaning agent to a soft cloth to wipe the meter surface. Once complete, immediately dry thoroughly. When cleaning the meter, please follow the guidelines listed below: •... - Page 76 Appendix CAUTION: DO NOT immerse the meter or hold the meter under running water. DO NOT spray the meter with a disin- fectant solution. CAUTION: Do Not attempt to open the meter to make any repairs. Your warranty and all claims will be void! Only Nova Biomedical authorized service personnel can repair the meter. Call Nova Biomedical or an authorized dealer if the meter needs to be repaired or checked.
-
Page 77: Warranty
Warranty Subject to the exclusions and upon the conditions specified below, Nova Biomedical or the authorized Nova Biomedical distributor warrants that he will correct free of all charges including labor, either by repair, or at his election, by replacement, any part of an instrument which fails within one (1) year from date of shipment because of defective material or workmanship. - Page 78 All requests for warranty replacement must be received by Nova or their authorized distributor within thirty (30) days after the component failure. Nova Biomedical reserves the right to change, alter, modify or improve any of its instruments without any obligation to make corresponding changes to any instrument previously sold or shipped.
- Page 79 ANY CLAIM OF DAMAGES IN CONNECTION WITH THE SALE OR FURNISHING OF GOODS OR PARTS, THEIR DESIGN, SUITABILITY FOR USE, INSTALLATION OR OPERATION. NOVA BIOMEDICAL WILL IN NO EVENT BE LIABLE FOR ANY SPECIAL OR CONSEQUENTIAL DAMAGES WHATSOEVER, AND OUR LIABILITY UNDER NO CIRCUMSTANCES WILL EXCEED THE CONTRACT PRICE FOR THE GOODS FOR WHICH THE LIABILITY IS CLAIMED.
- Page 81 Aston Lane South, Runcorn Cheshire, WA7 3FY UK For technical assistance outside the United States, call your local Nova subsidiary or authorized distributor. Nova Biomedical Canada, Ltd. Nova Biomedical UK Nova Biomedical GesmbH 17 - 2900 Argentia Road Innovation House...
- Page 82 Waltham, MA 02454-9141 Fax: 1-781-893-6998 U.S.A. Web: www.novabiomedical.com U.S. Patent Nos. 6,258,229; 6,837,976; and 6,942,770; CA 2,375,089; 2,375,092; 1 497 446; 1 497 449; JP 4060078 Made in the USA by Nova Biomedical Corporation Copyright 2011 Nova Biomedical Corporation 46952C 06.2011...
Need help?
Do you have a question about the StatStrip Xpress-i and is the answer not in the manual?
Questions and answers