Table of Contents
Advertisement
Advertisement
Table of Contents

Related Manuals for Focusrite Scarlett Solo


Summary of Contents for Focusrite Scarlett Solo
- Page 1 User Guide www.focusrite.com Version 1.0...
-
Page 2: Table Of Contents
Connecting Scarlett Solo to loudspeakers........ -
Page 3: Overview
User Guide so that you are fully aware of all the possibilities that the Scarlett Solo and accompanying software have to offer. If the main User Guide sections do not provide the information you need, be sure to consult https://support.focusrite.com/, which contains a comprehensive collection of... -
Page 4: Box Contents
The easiest way to check that your computer’s operating system (OS) is compatible with the Scarlett Solo is to use our online OS Checker at https://customer.focusrite.com/downloads/os. As new OS versions become available over time, you can continue to check for further compatibility information... -
Page 5: Getting Started
With the Third Generation, Scarlett interfaces introduce a new, faster way of getting up and running, using the Scarlett Quick Start tool. All you need to do is connect your Scarlett Solo to your computer. Once connected, you will see that the device is recognised by your PC or Mac and the Quick Start tool will guide you through the process from there. - Page 6 Scarlett, or to follow a step by step setup guide based on your choices. Once you have installed the Focusrite Control software to set up and confi gure your interface, the Scarlett will be switched out of MSD mode so that it no longer appears as a Mass Storage Device when connected to your computer.
-
Page 7: Windows Users Only
Windows users only: On connecting your Scarlett Solo to your PC, a Scarlett icon will appear on the desktop: (Note that the drive letter may be something other than D:, depending on what other devices you have connected to your PC.) Double-click on the pop-up message to open the dialogue box shown below: Double-click on “Open folder to view fi les”: this will open an Explorer window:... - Page 8 Scarlett, or to follow a step-by-step setup guide based on your choices. Once you have installed the Focusrite Control software to set up and configure your interface, the Scarlett will be switched out of MSD mode so that it no longer appears as a Mass Storage Device when connected to your computer.
-
Page 9: All Users
In order to force your Scarlett Solo out of MSD mode without first registering it, connect it to your host computer and press and hold the 48V button for five seconds. This will ensure that your Scarlett Solo has full functionality. -
Page 10: Audio Setup In Your Daw
Please note - your DAW may not automatically select the Scarlett Solo as its default I/O device. In this case, you must manually select Focusrite USB ASIO as the driver on your DAW’s Audio Setup* page. Please refer to your DAW’s documentation (or Help fi les) if you are unsure where to select the ASIO or Core Audio driver. - Page 11 Once the Scarlett Solo is set as the preferred Audio Device* in your DAW, its inputs and outputs will appear in your DAW’s Audio I/O preferences. Depending on your DAW, you may need to enable certain inputs or outputs before use. The two examples below show two Inputs and two outputs enabled in the Ableton Lite Audio Preferences.
-
Page 12: Examples Of Use
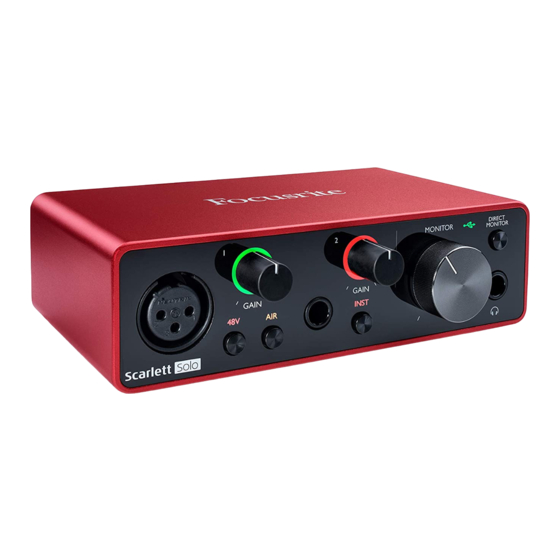
Scarlett Solo’s inputs are on the front panel: Input 1 uses a standard 3-pin XLR socket, and is configured to work with microphones of most types; you will probably have a male XLR connector on the end of your mic cable. -
Page 13: Using Direct Monitoring
The Scarlett Solo is fitted with a “Direct Monitoring” option, which overcomes this problem. Setting the front panel DIRECT MONITOR switch to ON will route your input signals directly to the Scarlett Solo’s headphone and main monitor outputs. -
Page 14: Connecting Scarlett Solo To Loudspeakers
Connecting Scarlett Solo to loudspeakers The ¼” jack outputs on the rear panel can be used to connect monitoring speakers. Self-powered monitors incorporate internal amplifiers with a volume control, and may be connected directly. Passive loudspeakers will require a separate stereo amplifier; in this case, the rear panel outputs should be connected to the amplifier’s inputs. - Page 15 Professional power amplifiers will generally have balanced inputs; we highly recommend using balanced cables to connect these to the outputs of the Scarlett Solo. NOTE: You run the risk of creating an audio feedback loop if loudspeakers are active at the same time as a microphone! We recommend that you always turn off (or turn down) monitoring loudspeakers while recording, and use headphones when overdubbing.
-
Page 16: Hardware Features
AIR – switch enabling AIR mode for the mic input. AIR modifies the frequency response of the input stage to model the classic, transformer-based Focusrite ISA microphone preamps. ‘AIR’ illuminates yellow when the mode is selected. Note that AIR may also be selected from Focusrite Control. -
Page 17: Back Panel
Back Panel RIGHT LEFT 12. K (Kensington security lock) – secure your Scarlett Solo to a suitable structure if desired. USB 2.0 port – Type C connector; connect to your laptop or computer with the USB cable supplied. 14. LINE OUTPUTS: LEFT and RIGHT – 2 x ¼” (6.35 mm) TRS jack sockets; +10 dBu output level (variable), electronically balanced. -
Page 18: Specifications
SPECIFICATIONS Performance Specifications NOTE: All performance figures measured in accordance with the provisions of AES17, as applicable. Clock Source Internal Supported sample rates 44.1 kHz, 48 kHz, 88.2 kHz, 96 kHz, 176.4 kHz, 192 kHz Microphone Input Dynamic Range 111 dB (A-weighted) Frequency Response 20 Hz to 20 kHz ±0.1 dB <0.0012% (minimum gain, -1 dBFS input with 22 Hz/22 kHz... -
Page 19: Physical And Electrical Characteristics
Balanced, via female 3-pin XLR on front panel Phantom power 48 V phantom power switch AIR function Front panel switch or via Focusrite Control Analogue Input 2 ¼” (6.35 mm) jack socket on front panel Connector INST mode: unbalanced, 2-pole (TS) -
Page 20: Troubleshooting
TROUBLESHOOTING Your Scarlett Solo has a two year warranty. Wherever you are in the world, you can rely on our warranty should any Focusrite hardware need repairing or replacing due to a manufacturing fault. For all troubleshooting queries, please visit the Focusrite Help Centre at http://support.focusrite.com/...
Need help?
Do you have a question about the Scarlett Solo and is the answer not in the manual?
Questions and answers