Advertisement
Seaboard Block Creator Manual
1 Introduction
Hello creator, and welcome to the Creator Manual for the Seaboard Block. We
think of the people who buy and use ROLI's products as creators more than
customers. Our products are designed to expand the bandwidth of creative
expression and thereby empower people as the creators they are. Everyone
who buys and uses BLOCKS is investing in this vision of creativity and therefore
is also a co-creator of ROLI.
BLOCKS is the most accessible and versatile music creation system ever made.
It is a modular music studio that lets anyone make music whether they're a
professional musician or a total beginner. Each individual Block is powerful and
1 Introduction
1.1 Support and Feedback
2 Glossary of Selected BLOCKS Terms
3 Getting Started
3.1 Charging
3.2 What is BLOCKS?
3.3 What's in the Box?
3.4 System Requirements
3.5 Product Registration and Setup
3.5.1 Connect Blocks
3.5.2 Updating Firmware
4 Hardware
4.1 Connections and Specifications
4.2 The Keywave Surface
4.3 Controls
4.4 USB Connection
4.5 DNA Connectors
Advertisement
Table of Contents

Related Manuals for Roli Seaboard Block

Summary of Contents for Roli Seaboard Block
- Page 1 1 Introduction 3.5.1 Connect Blocks 3.5.2 Updating Firmware Hello creator, and welcome to the Creator Manual for the Seaboard Block. We think of the people who buy and use ROLI’s products as creators more than 4 Hardware customers. Our products are designed to expand the bandwidth of creative 4.1 Connections and Specifications...
-
Page 2: Support And Feedback
You may already be playing your Seaboard Block and discovering its creative 5.2 Playing Techniques possibilities. This comprehensive Creator Manual explains the details about your Seaboard Block to ensure that you get the most out of it. 5.3 The Five MIDI Messages of the Five Dimensions of Touch The Seaboard Block is a multi-dimensional MIDI controller whose touch- sensitive interface –... - Page 3 The easiest way to reach us is to send a support enquiry from support.roli.com. We will respond as soon as possible. 2 Glossary of Selected BLOCKS Terms BLOCKS A modular music studio built of individual Blocks, each with specific...
- Page 4 Based on Equator – ROLI’s custom-built, multi-dimensional sound engine and software synthesizer – Equator Player is a Windows and MacOS app included with the Lightpad Block and Seaboard Block. Equator Player takes advantage of the Seaboard Block’s 5 dimensions of touch, maximizing your ability to express yourself using just the motions of your fingers on your Seaboard Block’s...
- Page 5 Lift: The release velocity or speed of liftoff fromLightpad surface or keywave surface. Grid A fixed configuration of pads on the NOISE interface and the Lightpad Block surface. Possible grid layouts include 2×2, 4×4, and 5×5. In each grid layout, the number of pads is the same on the X and Y axis. Keywave A wavelike element of the keywave surface of Seaboards that corresponds to a single key on a standard keyboard.
- Page 6 Master Block Master Blocks – including the Lightpad Block and Seaboard Block – are the central Blocks of the BLOCKS system. To use BLOCKS you need at least one Master Block. Additional Blocks, including Control Blocks, connect via DNA to...
- Page 7 Lightpad Block’s 5D Touch when used with NOISE or desktop applications. The Touch Block’s 10 buttons control the sensitivity of Strike, Glide, Slide, Press, and Lift, lock Strike or Glide, or put the Seaboard Block into “piano mode,” by turning off Glide. The Touch Block can also be used with BLOCKS Dashboard to...
-
Page 8: Getting Started
USB-C The type of USB connector used to connect and charge the Lightpad Block and Seaboard Block. There is a female connector on the block itself, and a male connector on the included USB-C-to-USB-A cable. 3 Getting Started 3.1 Charging... - Page 9 First connect the Seaboard Block to a USB 3 power source (like an iPad charger or Macbook USB 3 port) with the included USB-C cable. Connect the Control Block to the Lightpad or Seaboard Block via DNA connectors to begin charging it.
-
Page 10: What's In The Box
BLOCKS system. NOISE and BLOCKS connect wirelessly over Bluetooth. 3.3 What's in the Box? Seaboard Block USB-C cable Quick start guide Warranty information 3.4 System Requirements NOISE NOISE, the free iOS app, is the software engine of BLOCKS. It is a powerful standalone instrument for iPhones and iPads and responds to 3D Touch technology on newer iOS devices. - Page 11 BLOCKS Dashboard is a free desktop application available within My ROLI to all registered BLOCKS creators. BLOCKS Dashboard allows you to customise the behaviour of your Blocks – including the Seaboard Block – so that you may easily use your Blocks with third-party applications. To use BLOCKS Dashboard, your computer should meet the following minimum specifications:...
- Page 12 For Bluetooth connectivity: OSX 10.10+ Equator Player The Seaboard Block comes with Equator Player, which is based on Equator and includes over 200 presets optimised for the Seaboard Block’s 5D touch. Equator Player also allows you to control the most important aspects of each preset.
-
Page 13: Updating Firmware
Tap the Settings cog in the top right corner of NOISE and select ‘Connect BLOCKS’. Choose your ‘Seaboard Block’ from the Bluetooth MIDI Devices screen to complete MIDI-over-Bluetooth pairing. Connect via DNA any additional Blocks that you have purchased to connect them now. -
Page 14: Connections And Specifications
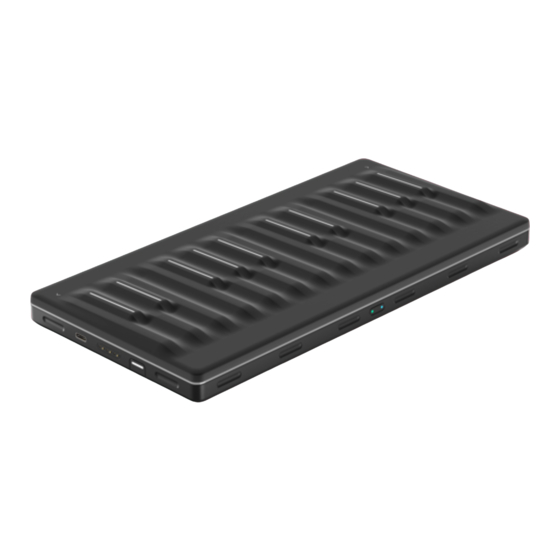
All Blocks need a certain amount of battery remaining in order to update the firmware. If you are not able to update your Block’s firmware, make sure it is charged first and try again. After updating your Block’s firmware, you may re-connect it to NOISE. 4 Hardware 4.1 Connections and Specifications... - Page 15 4 DNA connectors, and wireless Bluetooth connectivity. 4.2 The Keywave Surface The Seaboard Block features a continuous, elastic, silicone surface divided into 24 keywaves. Following the order of notes on a standard keyboard, the keywaves represent the same pitches and intervals found on a piano. The...
- Page 16 The power button is located in the centre at the front of the Seaboard Block (marked by the arrow in the above diagram). The power button turns the Seaboard Block on and off and contains two independently controlled LEDs indicating battery status & connectivity status. The left LED displays current battery level: green for full, yellow for medium, and red for low.
- Page 17 The mode button, on the Seaboard Block’s left side, contains two LEDs indicating instrument status. The mode LEDs are off when a project has not been loaded, and are white during firmware updates. Used in conjunction with the Octave Shift Buttons the mode button can change presets via MIDI program change messages.
-
Page 18: Usb Connection
In the left and right corners of the Seaboard Block’s upper ribbon are buttons that switch octaves to extend the range of the controller. Pressing the right octave shift button once raises the Seaboard Block’s pitch by an octave, and pressing the left octave shift button once lowers the Seaboard Block’s pitch by... - Page 19 The USB-C port connects to a USB 3 charger to charge the Seaboard Block. When connected by the USB-C port to a computer, the Seaboard Block acts as a USB MIDI controller. It is USB-powerable, and its battery will charge when connected to a computer that itself is plugged in to AC power.
-
Page 20: Bluetooth Connection
DNA connectors magnetically link multiple Blocks and share power and data across Blocks. DNA connectors are on the right and left sides and the back of the Seaboard Block (marked with arrows in the image above). With DNA connectors, you can connect multiple Seaboard Blocks to create a larger range, and you can connect other Blocks –... - Page 21 Choose your Seaboard Block from the Bluetooth MIDI Devices screen to complete MIDI-over-Bluetooth pairing. Your Lightpad Block will be listed as ‘Seaboard Block XXXX’ with the X’s representing the last 4 digits of the serial number which is located on the underside of the Block.
- Page 22 five dimensions of touch. Through simple movements and gestures, you can shape sound easily and discover new modes of expression. The icons below depict the Five Dimensions of Touch on the Seaboard Block and its accompanying software. The Five Dimensions of Touch are: ...
- Page 23 Press: The pressure applied to the keywave after the initial Strike. The keywaves respond to each moment of continuous touch, transmitting minute variations of pressure to sound. This continuous pressure-sensitivity allows for swells, fades, and other detailed expressions. Glide: Horizontal movements from side to side on a keywave and left right movements along the ribbons.
-
Page 24: Playing Techniques
5.2 Playing Techniques You can apply playing techniques associated with keyboard, string, and electronic instruments to the Seaboard Block. Playing techniques include: Strike and hold: Strike the keywave and hold for a duration without adding any additional movement. Glide vibrato: Pressing into a keywave and holding the point of your finger there, wiggle your finger from side to side. - Page 25 Seaboard Block’s MIDI messages to other applications. 6 Working with Other Hardware and Software In addition to NOISE and Equator Player, the Seaboard Block is compatible with any electronic instrument that can receive MIDI and produce sound in...
- Page 26 The receiving instruments that you use must be multi-timbral for you to experience the full expressive capabilities of the Seaboard Block. They should have a pitch bend range of at least +/- one octave and be able to respond to aftertouch.
- Page 27 DAW. In many DAWs, a single track can receive multiple MIDI channels from the Seaboard Block and send the MIDI data to a multi-timbral synth like Equator. Other DAWs are limited to a single channel per track, so configuring your project to take full advantage of the Seaboard Block’s dimensions of...
-
Page 28: Care And Maintenance
Do not use any abrasive cleansing agents on the Seaboard Block or its keywaves. When not in use, it’s best to store the Seaboard Block horizontally, as in normal playing position. If you anticipate not using your Seaboard Block for three months or longer, we recommend that you take the following steps to ensure its functionality: Keep it fully charged when not in use. - Page 29 10-25℃. Keep it away from corrosive gas. To protect the health of the lithium polymer battery, we recommend you charge your Seaboard Block every six months at the minimum. 8 ROLI Support 8.1 My ROLI Manuals and other resources on...
- Page 30 Power Supply Power for the Seaboard Block is supplied from either an internal lithium polymer battery (3.7V, 2000mAh), an external USB power source (such as a plug-in adapter or laptop) or via the DNA connectors. Circuitry ensures selection of the correct power source (if a USB source is present this takes precedence).
Need help?
Do you have a question about the Seaboard Block and is the answer not in the manual?
Questions and answers