Advertisement
Quick Links
Advertisement

Related Manuals for Kozyard 10’x12’ Caesar


Summary of Contents for Kozyard 10’x12’ Caesar
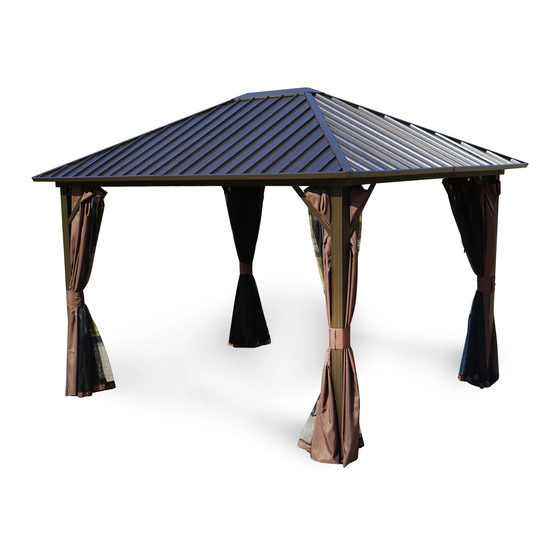
- Page 1 10’x12’ Caesar Hardtop Gazebo Assembly Manual Kozyard LLC Products...
- Page 2 IMPORTANT Read this assembly manual PRIOR to start assembly of the product. The hardtop gazebo must be ANCHORED by appropriate screws based on the ooring where is being anchored to.
-
Page 3: Operation
OPERATION CARE AND CLEANING 1. Hard top gazebo is a four-season products, meaning 1. For cleaning: use a domestic soap or a soft that it may be left up year-round. However, any detegentand wash with warm water using a sponge or accumulation of snow must always be removed from fabric cloth.Rinse with clean water. - Page 4 Required tools (Not Included) Stepladder Safety google level GLOVES Safety HAT Phillips screw driver...
- Page 5 A *4 B *2 B1 *2 C *2 C1 *2 D *6 E *4 F *4 F1 *4 Description ITEM Colunm Ogee Ogee H *4 Ogee Ogee Roof bar (optional) Corner Roof bar H1 *4 Connect bar Connect bar Mosquito sidewall...
- Page 6 G1 *4 G2 *4 G3 *2 K *1 J1 *4 J2 *4 K1 *1 L *4 ITEM Description Corner Roof Bar Eave Cover M1 *6 Eave Cover Q *36 For sidewall Ogee Connect Cover (optional) Ogee Connect Cover M2 *4 Q *36 Outside Roof Connector For mosquito...
- Page 7 O *4 S *4 O1 *4 N *4 S1 *4 N1 *4 Z *1 DESCRIPTION ITEM Wa *2 ROOF PANEL ROOF PANEL V M6 *15 93 ROOF PANEL ROOF PANEL X M6 *10(D10*20) 32 ROOF PANEL ROOF PANEL SCREW M6X15 X1 M4 *8 20 HOOK SCREW M6X10...
- Page 8 STEP-1 Parts required for this step: A *4 L *4 V *12...
- Page 9 STEP-2 Q *5 Q *4 Parts required for this step: For mosquito Q *36 B *2 For sidewall Q *36 B1 *2 (optional) C *2 C1X2...
- Page 10 STEP-3 Parts required for this step: B *2 P *4 V *40 B1 *2 C *2...
- Page 11 STEP-4 Parts required for this step: X *32...
- Page 12 STEP-5 Parts required for this step: J1 *4 J2 *4 Y *28...
- Page 13 STEP-6 Parts required for this step: F *4 Y *32 F1 *4...
- Page 14 STEP-7 Parts required for this step: E *4 K1 *1 V *8...
- Page 15 STEP-8 Parts required for this step: V *4...
- Page 16 STEP-9 Parts required for this step: V *18 D *6...
- Page 17 STEP-10 Parts required for this step: K *1 Wa *2 V *1...
- Page 18 STEP-11 Caution: It is recomended to wear protective gloves since some of the parts have sharp edges. O/S/O1 N/S1/N1 Parts required for this step: O *4 S *2 O1 * 4 N *4 N1 *4 S1 *2 X1 *...
- Page 19 STEP-12 Insert each the metal roof into the slots by this way. Parts required for this step: O *4 S *2 O1 *4 N *4 N1 *4 S1 *2...
- Page 20 STEP-13 Parts required for this step: M2 *4 M1 *6 G1 *4 G2 *4 G3 *4 VX *10...
- Page 21 STEP-14 (optional) Parts required for this step: (optional) H *4 H1 *4...
- Page 22 Kozyard LLC 2825 80th ST SE, Suite 202 Mercer Island, WA 98040 Email: info@kozyard.com www.kozyard.com Toll-free: 866-355-0018...
Need help?
Do you have a question about the 10’x12’ Caesar and is the answer not in the manual?
Questions and answers