
Summary of Contents for Crazy3DPrint CZ-300
- Page 1 ENGLISH CZ-300 USER MANUAL Version 1.2 from January 2019 © Crazy3DPrint Group Please always refer to the updated version of CZ-300 user manual: https://www.crazy3dprint.com/support...
-
Page 2: Table Of Contents
PRODUCT FEATURES - - - - ---- --- ---- --- ----- ------- ------- ------- ------- -- 4 CZ-300 APPEARANCE - - - - ---- --- ---- --- -- ------- ------- ------- ------- ----- 5 SPECIFICATIONS - - - - - - - - - --- --- ---- --- ------ ------- ------- ------- ------- -- 5... -
Page 3: Safety And Compliance
SAFETY AND COMPLIANCE This manual is designed for users to understand how to use the CZ-300 3D printer in a safe manner. Please read through all sections, especially the safety instructions carefully before unpacking, assembling, operating, replacing, and removing any part of this product. -
Page 4: Hazards
There is a risk of burns from touching the heated-up device unit during the printing process. This is because the nozzle tip can reach temperatures of up to 260 °C; and the print bed can reach temperatures of up to 100 °C. High temperatures can cause harm to human body. SAFETY AND COMPLIANCE Crazy3DPrint CZ-300... -
Page 5: Introduction
You can easily assemble this kit yourself and instantly build it from anywhere at any time. This printer is not heavy, and particularly, it does not occupy too much space. You can hand carry our CZ-300 to anywhere to do your 3D printing job. -
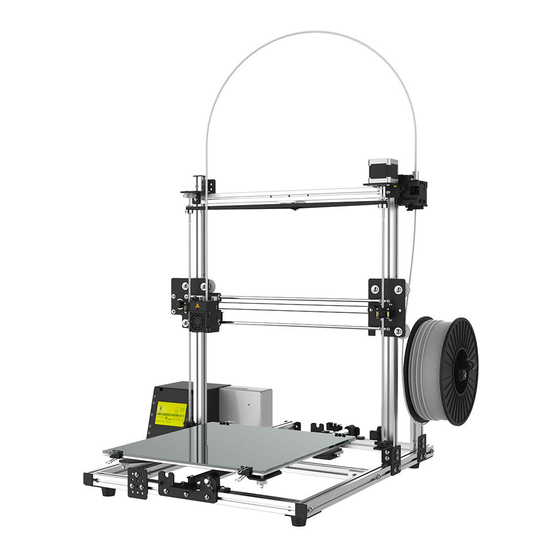
Page 6: Cz-300 Appearance
Spool Holder Platform Clips x4 Filament Tube SPECIFICATIONS PRINTING Product Name CZ-300 3D Printer Print Technology FFF (Fused Filament Fabrication) DIMENSIONS & WEIGHTS Machine Dimensions (WxDxH) 534 x 503 x 582 mm (21.0 x 19.8 x 22.9 in) Packing Dimensions (WxDxH) 558 x 592 x 295 mm (22.0 x 23.3 x 11.6 in) -
Page 7: Unpacking And Installation
(1) Remove the outer carton box packaging material; following use a cutting tool to remove the tape. (2) Open the box and take out the whole set of CZ-300 3D printer; following cut the pp strap off. Lifting up the set of printer gently to prevent intentional damage of the device and loss of the accessories. -
Page 8: Installation
(1) Insert a nut into the spool holder groove; following insert a screw M4x10 into the corner bracket hole and lock up onto the spool holder by using a screwdriver. Do not fully tighten both screw and nut first, and keep it freely moving. UNPACKING AND INSTALLATION Crazy3DPrint CZ-300... - Page 9 (1) Insert two screws M4x8 through the upper-middle metal plate hole and lock up by the nuts for both sides of the lower frame respectively. For locking up, you may use tools if desired. Do not fully tighten all screws and nuts first, and keep the metal plate freely moving. INSTALLATION Crazy3DPrint CZ-300...
- Page 10 Be careful the print bed glass and avoid to damage as well as get hurt. All screws on the metal plates can be fully tightened up (but not including the ones of the spool holder. INSTALLATION Crazy3DPrint CZ-300...
- Page 11 The 3D printer parts can be referred to the names in the table of CZ-300 APPEARANCE. The height of extruder motor should be parallel to the upper frame end – avoiding collision to the release arm when Z shaft rising.
- Page 12 The 3D printer parts can be referred to the names in the table of CZ-300 APPEARANCE. (2) Move the extruder module holder to the middle of the roller shaft; following directly mount the extruder module on the holder.
- Page 13 1) Remove the screw from the X-motor; following place the ground wire ring on the screw hole and tighten by the screw. 1) Plug the 6-pin black housing into the X-motor socket; following plug the 3-pin black housing into the X-sensor socket. INSTALLATION Crazy3DPrint CZ-300...
- Page 14 1) Plug the 6-pin blue housing into the extruder motor socket; following plug the 3-pin white housing into the z-motor socket. 2) Press the cable into the groove; following tie-up cable ties and cut them to a proper length. INSTALLATION Crazy3DPrint CZ-300...
- Page 15 (1) Take out the platform clip; following install the cable with it and clip back to the print bed. INSTALLING FILAMENT TUBE Accessory Preparation Filament Tube (*1) (1) Fully insert the filament tube into the extruder motor and the extruder module. INSTALLATION Crazy3DPrint CZ-300...
- Page 16 Before turning the power on, do make sure to switch the AC input at either 110 or 220 volts depending on the region/area’s voltage. It is suggested to use extra cable ties to secure the extruder module harness while printing; they can be tightened onto the aluminum extrusion, filament tube and holder locker where suitable. INSTALLATION Crazy3DPrint CZ-300...
-
Page 17: Operation
- - - - - - - - - - - - - - - - - - - - - - - - - - - - - - - - - - - - - - - - - - - - - - - - - - - - - - - - - - - - - - - - - - - - - - - - - - - - - - - - - - - - - - - - - - - - OPERATION Crazy3DPrint CZ-300... - Page 18 (1) Turn on the control box power and the panel will immediately display. 0° 0° 38° 21° 100% 00:00 CZ-300 ready. (2) Knob control: Press = enter the function Info Screen Prepare Control No SD card Init. SD card (3) Knob control: Turn = scroll up or down for selection.
- Page 19 Move Y Move Y : 150.0 Turn Anti-Clockwise “ - ” decrease the value. For the adjustment of Z axis and extruder movement, users may turn the knob to “Move 1mm” or “Move 0.1mm” for further setting. PREPARE Crazy3DPrint CZ-300...
-
Page 20: Print Bed Calibration
000.10 Preheat PLA conf Preheat ABS conf PRINT BED CALIBRATION (1) Prepare a sheet of A4 paper for calibration. It is suggested to use a standard folded A4 paper for printing material of PLA; non-folded for ABS. CONTROL Crazy3DPrint CZ-300... - Page 21 Users may use a tool to prevent the metal setscrew from spinning while doing the adjustment. 4.3) Turn the setscrew clockwise direction, the print bed is moving up; oppositely, the print bed is moving down. PRINT BED CALIBRATION Crazy3DPrint CZ-300...
-
Page 22: Software Settings
SOFTWARE SETTINGS The CZ-300 printer can make your scratch design become solid objects with generated G-code from 3D files by using software such as Slic3r, and Cura etc. This manual assumes that users have already had the up-to-date version of software well-downloaded and installed under relevant operating system. -
Page 23: First Print
SLIC3R SOFTWARE – 3D PRINTER MANUAL SETTING (1) After installation, double-click the Slic3r icon to display the default pag. (2) Select “File” -> “Load Config”; following browse the file of “Crazy3DPrint CZ-300.ini”. (3) Select “Settings” -> “Filament Settings”; following check the parameters as below: •... - Page 24 (2) Select “Browse my computer for driver software”; following browse a suitable driver file for the version of your Windows. Users can find the drivers from zip file format in the SD Memory Card 12; or download it from the website via: https://www.crazy3dprint.com/support (3) Close the window as below after completing the update. Crazy3DPrint CZ-300...
-
Page 25: Maintenance
PRINTER LUBRICATION To keep the CZ-300 printer running its best condition as expected, it is highly recommended to lubricate all the moving parts periodically. Users can put two to three small drops of sewing machine oil onto the shafts of extruder module and print bed. -
Page 26: Trouble Shooting
ENDSTOPS Sensor has detected the signal, and stop running If sensor does not connect well and easily cause misjudgment. Check SD card and the SD read error SD read the error information to cause mistakenly files whether abnormal. Crazy3DPrint CZ-300...
Need help?
Do you have a question about the CZ-300 and is the answer not in the manual?
Questions and answers