Advertisement
Advertisement

Summary of Contents for Chili Technology ChiliPAD cube Single Zone
- Page 1 USER MANUAL ...
- Page 2 Single Zone Dual Zone Use this guide to describe use and set up as well as offer trouble shooting tips with your Chili Product. If the issue still occurs, please contact customer service at customerservice@chilitechnology.com or call 1‐877‐235‐6271. Note: Please read these instructions carefully before use. pg. 2 ...
-
Page 3: Table Of Contents
Table of Contents Introduction. Page 5 Before you get started. Page 6 Safety instructions. Page 7‐8 Contents. Page 9 Using the Cube. Page 10 Set‐up instructions. Page 11‐15 Maintenance. Page 16‐17 Storage. Page 18 Technical Parameters. Page 19 Troubleshooting. Page 20 pg. 3 ... - Page 4 Chili Technology™ welcomes you to a new sleep experience! We are dedicated to advances in sleep engineering. Our goal is to give you a perfect night’s sleep by enabling you to personalize your sleep environment. As you set up your ChiliPad™ Cube, we hope you enjoy your experience and find your own sleep temperature and individual degree of comfort. pg. 4 ...
-
Page 5: Introduction
INTRODUCTION The Chili Technology™ Cube is a revolutionary cooling and warming system that regulates the surface temperature of your mattress for a perfect night’s sleep. Chili Technology™ can be used 12 months out of the year and is designed to improve your sleep, night after night. The silicone circulation tubes run conditioned water throughout the mattress surface to maintain your ideal sleep temperature. The control unit for your ChiliPad™ is referred to in this manual as the Cube. The Chili Technology™ cooling and warming system allows adjustments to be made to your bedding surface. The Cube cools or warms water to your set temperature and circulates it through the pad, generally achieving temperatures well below a cool 55º F (13º C) and easily above a very warm 110º F (43º C). The Cube motor 45 dB and only uses 170 Watts of power. Use the ChiliPad™ Cube to set the temperature of your bed instead of heating or cooling your entire house while you sleep. Keeping your home thermostat at a more moderate temperature translates into real energy savings that allow your Chili™ product to pay for itself! pg. 5 ... -
Page 6: Before You Get Started
BEFORE YOU GET STARTED Keep the Cube away from areas that might become damp or wet, such as an open window. The Cube should be placed on a dry, firm floor, in a well‐ventilated area, free from surrounding fabric. Spacing of at least 24 inches (60cm) should be left on all sides and top of the unit. Never operate the Cube under a bed. 2. Never turn the cube on before the connection hose coming from the pad has been connected to the Cube. 3. The Cube must have water added before initial use. You will need to add additional water on initial set‐up as the mattress fills with water. Refer to the “Set‐Up” section of this manual for full instructions. 4. Avoid any bends or kinks of the hose between the Cube and the ChiliPad™ 5. Be careful with sharp objects near the ChiliPad™ to avoid punctures of the circulation tubing. 6. Children, some individuals with disabilities or individuals with cognitive impairments must be under adult supervision when using the ChiliPad™ Cube. 7. The Cube is to be used on a standard AC power circuit of the proper voltage. 8. Turn OFF or unplug when not in use. 9. The Cube is programmed to turn off automatically after 10 hours of continual use. The Cube can be turned on again manually after it automatically turns itself off. 10. Overheating may result from using the Cube in any manner other than as described in this manual. 11. Wrapping the power cord around the Cube may damage the cord. Please wrap the power cord loosely during storage. 12. If the Cube is not working properly, unplug, discontinue use and immediately contact Chili Technology™ Customer Service at customerservice@chilitechnology.com or 877‐235‐6271. pg. 6 ... - Page 7 Save these instructions Sketch A. GROUNDING INSTRUCTIONS This product must be grounded. If it should malfunction or breakdown, grounding provides a path of least resistance for electric current to reduce the risk of electric shock. This product is equipped with a cord having an equipment‐grounding conductor and a grounding plug. The plug must be plugged into an appropriate outlet that is properly installed and grounded in accordance with all local codes and ordinances. DANGER! Improper connection of the equipment‐grounding conductor can result in a risk of electric shock. Check with a qualified electrician or serviceman if you are in doubt as to whether the product is properly grounded. Do not modify the plug provided with the product – if it will not fit the outlet, have a proper outlet installed by a qualified electrician. This product has a grounding plug that looks like the plug illustrated in sketch A. Make sure that the product is connected to an outlet having the same configuration as the plug. No adapter should be used with the product. pg. 7 ...
- Page 8 IMPORTANT SAFETY INSTRUCTIONS Use of electrical appliances requires the following precautions to reduce the risk of fire, electric shock, and injury. 1) Read all instructions before using this cooling and warming bed system. 2) WARNING – Do not use this cooling and warming bed system with infants, individuals with diminished capacity or anyone insensitive to heat such as a person with poor blood circulation unless under supervision. 3) WARNING – Do not use this cooling and warming bed system with any other heated blanket, comforter, quilt, sheet, mattress pad, mattress, foot warmer, throw blanket, or similar cooling or heating bedding. 4) WARNING – To prevent a possible fire, do not block air intakes or exhaust in any manner. Do not use the electrical device on soft surfaces, like a bed, where openings may become blocked. Do not operate under the bed. 5) Use close supervision when this cooling and warming bed system is being used by and around children or individuals with cognitive impairments. 6) Do not immerse the cooling and heating devise in water. 7) Do not place power cord between mattress and foundation. Do not run under carpeting. Do not cover cord with throw rugs, runners, or similar coverings. Do not route power cord under furniture or appliances. Arrange power cord away from traffic areas and where it could be tripped over. Do not allow the cords to be pinched. 8) Do not operate this product in the event that the power cord or plug becomes damaged. 9) Keep power cord away from heated surface. 10) Always plug this product directly into the wall outlet/receptacle. Never use with an extension cord or a power/outlet strip that can be relocated. 11) In the event that the cooling and heating system malfunctions, is not operating or if dropped in water or damaged in any manner, please contact Chili Technology™. 12) Turn off or unplug when not in use. 13) Do not use outdoors.
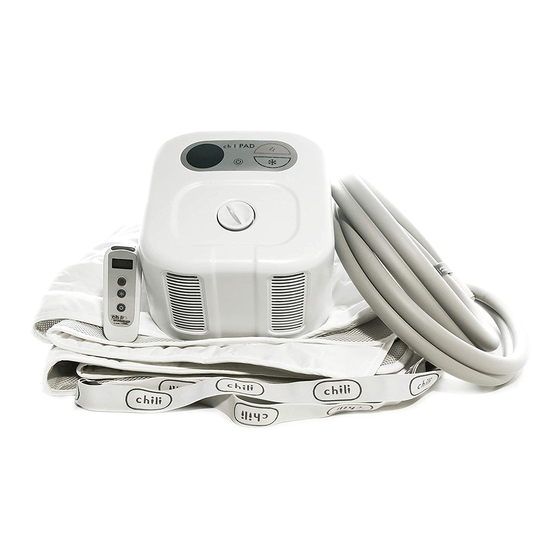
- Page 9 CONTENTS The Cube One Cube per Zone. The Pad Pad will fit snuggly over your mattress & supportive straps will keep the pad in place. The Remote One Remote per Zone. pg. 9 ...
-
Page 10: Using The Cube
USING THE CUBE pg. 10 ... -
Page 11: Set-Up Instructions
SET‐UP INSTRUCTIONS Mattress, Waterproof Mattress Protector, ChiliPad™, Fitted Sheet, Then Comforter. Completely unfold the ChiliPad™ and place it flat on top of your waterproof mattress protector which is on top of your mattress (see set up order above). The tail pipe (tube that connects the pad to the Cube), can be at the head or the foot of the bed. Position the elastic strap underneath the mattress to keep the ChiliPad™ in place. Place your fitted sheet directly over the ChiliPad™. For optimal performance, a dense blanket or comforter should be placed over the body when the ChiliPad™ Cube is in use to provide the needed insulation to keep the bedding surface cool or warm. Connecting ChiliPad™ tubing to the Cube. Place your Chili Technology™ Cube on a hard flat surface near your bed. Remember that spacing of at least 24 inches (60cm) should be left on all sides and above the unit (this is critical to optimal performance of the system). Connect the tubing from your ChiliPad™ product to the Cube as shown below. You must hear a “click” sound to ensure proper connection. Note: If you need to disconnect the tubing, press the tube disconnect button located on the bottom of the Cube. Please note that a few drops of water may result when disconnecting the tubing. pg. 11 ... - Page 12 SET‐UP CONTINUED Connecting the Power. Plug the power cord into an outlet. Note: This device has a grounded plug. To reduce the risk of electric shock, this plug is intended to fit in a grounded outlet only one way. If it does not fit, contact a qualified electrician. Do not modify the plug in any way. Filling the Cube with Water. Distilled water is recommended You will need to fill the water reservoir before the first use. The water reservoir is located on the top center of the Cube. Unscrew and remove the cap, then add water until the reservoir is full (approximately 14oz/390ml). Note: Have additional water ready to pour after Cube is started to fill the tubing in the Pad. Turn the Cube on by touching the ON/OFF button. The Cube will beep and the pump will begin to run (This is where additional water will be needed as the water in the reservoir will be pumped into the Pad). As water starts circulating through the tubing in your Chili product. Continue to slowly fill the reservoir until the water level reaches the bottom of the cap thread lines (this amount will vary depending on the size of your pad). o Use clean water. Distilled water is recommended. o Do not immerse the Cube in water to fill. o Be careful not to spill water on the Cube. o Refill the water reservoir when the water level gets low or the Low Water light comes on. The Cube will not operate when the water level in the reservoir is too low or empty. Turning the Cube On. Press the ON/OFF button on the Cube or remote. The Cube will beep and the pump will begin to run. pg. 12 ...
- Page 13 SET‐UP CONTINUED To Cool: Press the COOLER button to select your desired temperature. The digital reading on the display will blink 3 times to indicate the setting was accepted. The Cube will start to work and display the actual temperature. To Warm: Press the WARMER button to select your desired temperature. The digital reading on the display will blink 3 times to indicate the setting was accepted. The Cube will start to work and display the actual temperature. Note: The temperature adjustment steps can be completed with the remote control or on the Cube display panel. Using the Remote. Remote Pairing: Plug in the Cube. Touch the “ON/OFF” button on the Cube display panel and hold for 5 seconds. The Cube will sound a long beep and the display will show a blinking “888”. Turn the remote control ON. The Cube will sound a short “beep” and display the actual temperature. Switching Between ºF and ºC: Turn OFF the remote control. Turn ON the Cube on the display panel. Press the “ON/OFF” button the remote control and hold for 2 seconds. pg. 13 ...
- Page 14 SET‐UP CONTINUED Turning the Cube Off. Press the ON/OFF button on the Cube or remote. The Cube will beep, then the pump and fan will stop running. The pump and/or fan may continue to run for a short time once the unit has been turned off. If the unit is not to be used for a 24‐hour period, unplug from the wall. Adjusting the Temperature. The Cube must be turned on to adjust the temperature. The Cube cools or warms water in individual degree increments between 55º F (13º C) and 110º F (43º C). The Cube will cool below 55º F (13º C) on the cool “LO” setting and above 110º F (43º C) on the cozy “HI” setting. Once desired temperature is set, water circulates through the pad generally achieving your desired temperature. In some cases the maximum and minimum temperatures will not be reached due to some of the following factors: ambient air temperature, humidity, individual body heat, insulation, allowing the unit sufficient air flow and heat load on top of the Chili product. For maximum performance, it is recommended that each individual have his or her own Cube. Maximum Temperature Change. Condensation may occur on the tubing and/or pad based on ambient air temperature, humidity, and individual body heat. To address this – adjust the air temperature of the room lower and/or the Cube temperature higher. Please see the troubleshooting guide for information on how to solve this issue or refer to the Chili Guru Videos on our web site (www.chilitechnology.com) for troubleshooting or further assistance. Operational Tips. Insure there is ample space around the Cube for ventilation. The Cube uses fresh air to cool the electronics, so sufficient fresh air is necessary for optimal performance and long life of your system. Clearance of 24 inches (60cm) on all sides and above is recommended for optimal performance and longevity. The Cube can never be operated under the bed. Frequently inspect the connection tubes to insure there are no kinks or restrictions that may prevent free flow of the water through your system. Use the following link to access cleaning tips: http://www.chilitechnology.com/chili‐guru‐help‐videos/ pg. 14 ...
- Page 15 SET‐UP CONTINUED FCC Compliance. The remote device complies with part 15 of the FCC rules. Operation is subject to the following two conditions: (1) This device may not cause harmful interference, and (2) this device must not accept any interference received, including interference that may cause undesired operation. Warning: Changes or modifications to this unit will void the manufactures warranty. Note: This equipment has been tested and found to comply with the limits for a Class B digital device, pursuant to part 15 of the FCC rules. These limits are designed to provide reasonable protection against harmful interference in a residential installation. This equipment generates, uses and can radiate radio frequency energy. If not installed and used in accordance with these instructions, it may cause harmful interference to radio communications and there is no guarantee that interference will not occur in a particular situation. If this equipment does cause interference with TV or radio reception, which can be determined by turning the device on and off, the user is encouraged to try to correct the interference by one or more of the following measures. Reorient or relocate the receiving antenna. Increase the separation between the two devices. Plug the two devices into different wall outlets. Consult Chili Technology Customer Service for assistance. pg. 15 ...
-
Page 16: Maintenance
MAINTENANCE Once a month maintenance Water Maintenance Distilled water is recommended. One time per month add ¼ cup (2 oz / 59 ml) of hydrogen peroxide into the water reservoir to keep the circulation system clean. Procedure: Set temperature to 90ºF (32ºC). Remove the water reservoir cap and add the hydrogen peroxide. LEAVE THE WATER RESERVOIR CAP OFF. The hydrogen peroxide will react with any dirt or other foreign particles to clean the system. Once the reaction has stopped (bubbles no longer form) or 20 minutes has passed, replace the cap, reset the Cube to your desired sleep temperature and enjoy. Cleaning the Cube With the Cube turned off and unplugged, use a clean damp cloth to clean the outside of the Cube and remote control. Use only mild soap if necessary. Be careful not to get water inside of the Cube. Use can of compressed air (or similar) to blow through the intake/exhaust vents on all sides removing dust and debris. Never submerge or get water inside the Cube. Washing the Pad as needed The Pad is washable in a frontloading washing machine – COLD WATER ONLY. Secure the tail pipe (part that runs from the pad to the Cube) with a thick rubber band or other means to minimize risk of it flailing in the spin cycle and damaging the connector. Use only GENTLE/DELICATE washing cycle and feel free to add a little OxyClean™ or similar cleaner that includes peroxide in the active ingredients. ... - Page 17 MAINTENANCE ‐ CONTINUED Every three months Deep Cleaning Empty all water from control unit(s) Fill unit(s) with ½ cup (4 oz / 118 ml) of hydrogen peroxide Completely fill unit(s) with distilled water Run unit(s) on “HI” setting with CAP OFF for 6‐8 hours. Place unit(s) higher than pad to ensure water does not spill out of the top of the unit(s) After heating cycle dump water / hydrogem peroxide mixture and refill with distilled water. o If cleaning has not been performed before, or has been longer than 3 months, repeating this process may further improve performance. Once this cleaning process is complete, run system as normal, including the normal hydrogem peroxide additive. pg. 17 ...
-
Page 18: Storage
STORAGE Disconnect the Tubing If you need to disconnect the tubing from the Cube: Press the tube disconnect button located on the bottom of the Cube (refer to page 9). Remove the tube from the connector. Note: Removing the tube without pressing the tube disconnect button located on the bottom of the unit can damage the connectors. How to remove water from the ChiliPad™ If the Cube will not be in use for an extended period, you should purge the water from both the Cube and the Pad. To drain the ChiliPad™ you would use water drainage adapter. To obtain one of these please contact customerservice@chilitechnology.com or call 1‐877‐235‐ 6271. To drain the water from the Cube (after unplugging and disconnecting the pad), take the cube to a sink or bucket, remove the water reservoir cap and drain the water (pour away from the display panel, i.e. drain from opposite side of the connectors in order to avoid getting any water on the display panel). Storing the Cube Disconnect the connection tubing from the Cube using the disconnect button on the bottom on the Cube (refer to page 12). Drain any remaining water from the unit by removing the water reservoir cap. Gently tilt the Cube so the water drains through the reservoir opening. Replace the cap. Wrapping the power cord around the Cube may damage the cord. Please wrap the power cord loosely during storage. Remove the batteries from the remote control. ... -
Page 19: Technical Parameters
TECHNICAL PARAMETERS Rated Voltage AC 90~230V Rated Frequency 50Hz – 60Hz Lower than 55ºF (13ºC) and Temperature Control Higher than 110ºF (43ºC) Rated Power 170W Power 170W Rated Amperage 2.2 – 2.3 A Use this guide to address problems with your Chili Product. If the issue still occurs, please contact customer service at customerservice@chilitechnology.com or call 1‐877‐235‐6271. pg. 19 ... -
Page 20: Troubleshooting
TROUBLESHOOTING Don’t forget to visit our ChiliGuru help section for more helpful tips and tricks! Visit www.chilitechnology.com and click the FAQ tab. Issue Possible Reason Solution Check to see if the outlet has power. If the electrical cord is No Power damaged, unplug and immediately call customer service. Be sure power cord is securely Disconnected from power Does not turn on inserted into Cube power source socket. Add water by following the Set‐ Reservoir is out of water Up Instructions in this manual. Remote is not working Replace the batteries. Add water by following the Set‐ Up instructions in this manual. Reservoir is low on water Make sure the Chili Product is Poor Tubing is kinked flat on the bed and there are no cooling/warming kinks in the tubing. effect Use a covering like a blanket or No covering over your comforter over your body to body when you sleep. help insulate your sleeping environment. 20ºF (10ºC) difference in Adjust the Cube setting up 2º ‐...
Need help?
Do you have a question about the ChiliPAD cube Single Zone and is the answer not in the manual?
Questions and answers