Table of Contents
Advertisement
Advertisement
Table of Contents

Subscribe to Our Youtube Channel
Related Manuals for AT&T IFWA-40


Summary of Contents for AT&T IFWA-40
- Page 1 User Guide AT&T Wireless Internet...
- Page 3 Welcome To AT&T Thank you for purchasing the AT&T Wireless Internet device (Model: IFWA-40). To get the most from your new device, check out our videos and interactive tutorials at att.com/devicehowto.
-
Page 5: Table Of Contents
Contents Getting Started ............................1 In The Box .......................................1 Getting To Know Your Device ............................2 How It Works ....................................4 Installation ..................................... 5 Voicemail ......................................12 Setup .......................................12 Message Waiting ................................12 Retrieving Messages ..............................12 Remote Retrieval ................................12 Transferring A Phone Number ..........................13 AT&T Wireless Internet Manager ..........................13 Using Your Device .......................... - Page 6 Checking Your Voice And Data Usage ........................21 Helpful Tips ....................................23 Home Answering Machines ..........................23 Adjusting Volume .................................23 Powering On/Off ................................24 TTY Support ..................................24 Important Information ........................25 E911 Service ....................................25 Power Outages ..................................25 Backup Battery ..................................26 Device Compatibility ................................26 In-Home Wiring ..................................27 Frequently Asked Questions ......................28 Troubleshooting .............................31 General ......................................31...
- Page 7 Device Configuration ...........................38 Navigating The User Interface...........................38 Help ........................................39 Status ......................................39 Connected Devices ................................40 Wi-Fi Settings ...................................41 Messages ......................................45 Networking ....................................46 Data Usage ....................................54 Call Log/Blocking ..................................55 Parental Control ..................................56 System ......................................58 Safety Information................................62 FCC regulations..................................63 RF Exposure Information ...............................64 CTIA ........................................65 Warranty......................................66...
-
Page 9: Getting Started
Getting Started In The Box The package contains the following items: AT&T Wireless Internet Device Backup Battery Phone Cable (Optional) Power Cord Ethernet Cable (Optional) Also included: Let’s get started AT&T Wireless Internet Quick Start User Guide... -
Page 10: Getting To Know Your Device
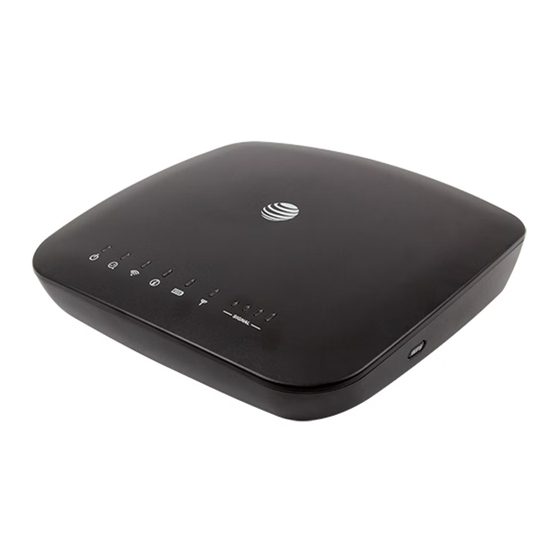
Getting To Know Your Device Power Signal Strength Voicemail Network Status Indicator Wi-Fi Battery Level Information (See AT&T Wireless Internet Manager on page 13) On/Off Ethernet Antenna Port Antenna Port (Optional) (Optional) Telephone Power Ports Input... - Page 11 LED Indicator Lights The table below describes possible states for each of the indicator lights. Indicator Name Status Meaning Green solid On (AC power) Power Green blinking On (battery power) No power Green blinking New voicemail Voicemail No new voicemail Wi-Fi on Green solid Wi-Fi...
-
Page 12: How It Works
Indicator Name Status Meaning No SIM Red blinking SIM error Network Status Red solid No service Indicator Blue solid 3G/HSPA+ service Green solid LTE service Signal Green solid More bars indicates higher signal strength Strength or OFF How It Works The AT&T Wireless Internet device uses the AT&T cellular network to provide phone service to your cordless or corded home phone(s) and Internet access to your computer and Wi-Fi enabled devices. -
Page 13: Installation
Installation Before You Begin The AT&T Wireless Internet device works exclusively with the AT&T cellular network and DOES NOT use your home phone wall jacks. Your device should be located: • Where you have a strong signal from a cell tower, typically near a window or outer wall. - Page 14 Step 1: Setting Up The AT&T Wireless Internet Device A Install The Backup Battery Open the battery compartment by pushing the tab in and then lifting up the cover. Ports Insert the backup battery. Battery Replace the cover. NOTES: • The backup battery is intended for backup purposes only and can take up to four (4) hours to fully charge.
- Page 15 Step 1: Setting Up The AT&T Wireless Internet Device (continued) B Turn On Your Device Plug the power cord in to an electrical wall outlet. Connect the other end of the power cord to the Power Input port on the back of your AT&T Wireless Internet device.
- Page 16 Step 2: Connecting Your Phone A Unplug Your Phone From The Wall Jack The AT&T Wireless Internet device is not used with your home phone wall jack. NOTE: If you have a cordless phone, keep it plugged into a power outlet. B Connect Your Phone To The Device Plug your phone into the “Phone”...
- Page 17 Step 2: Connecting Your Phone (continued) C Place A Test Call Place a test call from your connected home phone. Make sure to dial the 10-digit phone number, including area code. For best results, place the cordless phone base at least twelve (12) inches from the AT&T Wireless Internet device.
- Page 18 Step 3: Connecting To The Internet (Requires purchase of a Wireless Internet Data plan) A Select Your Internet Connection To Connect via Wi-Fi: Open the Wi-Fi network manager on your computer or Wi-Fi enabled device. Find and select the AT&T Wireless Internet Wi-Fi network name (SSID) (e.g., AWI-XXXXXX).
- Page 19 Step 3: Connecting To The Internet (continued) C Confirm Internet Connection Go to att.net (or your favorite website) to confirm your Internet connection. When your device is transmitting to and from the Internet, the Wi-Fi light will flicker green. Important Internet Tips To check your data usage or manage your account, go to att.com/myatt.
-
Page 20: Voicemail
Voicemail Your AT&T Wireless Internet device comes with standard wireless voicemail. Follow the steps below to set up and use your voicemail. Setup Dial 1 on any home phone connected to the AT&T Wireless Internet device and wait four (4) seconds to be connected to your AT&T wireless voicemail. Simply follow the voice prompts to complete setup. -
Page 21: Transferring A Phone Number
Transferring A Phone Number Transferring a landline phone number to your AT&T Wireless Internet device can take about four (4) days. Outgoing calls can be made immediately using your AT&T Wireless Internet device; however, incoming calls (including 911) will continue through your old service until the transfer is complete. - Page 22 Wi-Fi – Customize your device’s Wi-Fi and security settings (see Wi-Fi Settings on • page 41). • Messages – View messages from AT&T about your service plan (see Messages on page 45). Networking – Access a wide range of network and security settings (see •...
-
Page 23: Status Indicators
Status Indicators In addition to the indicators on the device itself (see LED Indicator Lights on page 3), you can find information about your device’s current status at the top of the AT&T Wireless Internet Manager page. Battery Level Green: High Service Provider Yellow: Medium AT&T or No Service... -
Page 24: Using Your Device
Using Your Device Calling Making Calls Using a phone connected to your AT&T Wireless Internet device, place and receive calls as you normally would. The AT&T Wireless Internet device supports dialing with either a cordless or corded phone. NOTE: Make sure to dial the 10-digit phone number, including area code. Placing A Call On Hold While on a call, you can press the Flash (or Phone/Talk) key to put the other party on hold. -
Page 25: Call Waiting
Call Waiting You will hear two tones if someone calls while you are already on a call. When this happens, you have several options: To hang up on the first call and connect the incoming call, press the 1 key and •... -
Page 26: Call Forwarding
Call Forwarding To forward all calls, dial: *21* • • The 10-digit number to which you wish to forward your calls • (For example: dialing “*21*1234567890#” would forward your calls to the phone number 123-456-7890.) Please wait at least three (3) seconds to hear a confirmation tone before hanging up. To stop forwarding calls, dial #21#, and wait at least three (3) seconds to hear a confirmation tone before hanging up. -
Page 27: Internet Access
Internet Access Connect Other Devices You can simultaneously connect up to twenty (20) devices per Wi-Fi network (2.4 GHz and 5 GHz), forty (40) total, including smartphones, tablets, and laptops, to your AT&T Wireless Internet device. Open the Wi-Fi network manager on your Wi-Fi enabled device. Find and select the Wi-Fi network name (SSID): AWI-XXXXXX or AWI-XXXXXX- GUEST (guest network disabled by default). -
Page 28: Changing Wi-Fi Network Name And Password
Changing Wi-Fi Network Name And Password You can customize your AT&T Wireless Internet device’s Wi-Fi network name (SSID) and password using the AT&T Wireless Internet Manager. On any device that is connected to the AT&T Wireless Internet device, enter http://attwirelessinternet directly into your browser address field. -
Page 29: Checking Your Voice And Data Usage
Checking Your Voice And Data Usage You can check your voice and data plan usage for your current billing cycle by either downloading the free myAT&T™ app to your smartphone or tablet, or visiting att.com/myatt on your computer. To download the myAT&T app, go to your device’s app store, or go to att.com/myattapp from your smartphone or tablet. - Page 30 You can view your voice and data usage once you have logged in to your account. You may need to select the tab for your wireless plan and See all usage to see the usage details for your AT&T Wireless Internet device’s phone number. If you did not provide an email address for email notifications when you purchased your AT&T Wireless Internet device, you can choose to do so at att.com/myatt.
-
Page 31: Helpful Tips
Helpful Tips Home Answering Machines If you choose to use your home answering machine instead of the voicemail provided by your AT&T Wireless Internet device, you will need to set your answering machine to pick up calls before four (4) rings, so that it picks up before the network voicemail service. -
Page 32: Powering On/Off
Powering On/Off The On/Off button is used to turn your AT&T Wireless Internet device on or off. When powered off, the AT&T Wireless Internet device will no longer send or receive calls, but it will continue to charge the backup battery if still connected to the wall outlet. To turn on your AT&T Wireless Internet device, press the On/Off button so that it is depressed. -
Page 33: Important Information
Important Information E911 Service For emergency calls, you may have to provide your location address to the 911 operator. Power Outages The AT&T Wireless Internet device has a backup battery, for use in the event of a power outage, with talk time of approximately 180 minutes and standby time of approximately 29 hours (depending on environmental factors). -
Page 34: Backup Battery
Backup Battery A new backup battery should last for approximately five (5) years, but the life of any backup battery can be adversely affected by environmental conditions like moisture and heat. To get the longest service from your backup battery, do not place the AT&T Wireless Internet device in direct sunlight or in wet or extremely cold environments. -
Page 35: In-Home Wiring
In-Home Wiring Interconnecting with home telephone wiring is not necessary but is possible; however, it is not recommended unless you possess sufficient knowledge of electrical systems. Use with home wiring requires the physical disconnection from other services, including the landline coming into your home. Use of a qualified licensed electrician is highly recommended. -
Page 36: Frequently Asked Questions
Frequently Asked Questions What kind of phone do I need to work with the AT&T Wireless Internet device? Most standard touch-tone phones may be used. Rotary phones are not supported. Cordless phone systems provide the most flexibility and allow you to easily place additional handsets throughout your home. - Page 37 Why don’t I see the name of the caller when Caller ID is displayed? The AT&T Wireless Internet device, similar to other wireless devices, supports calling number identification. However, contact names stored on your cordless home phone display for incoming calls.
- Page 38 How many devices can I connect to my AT&T Wireless Internet device? There are two (2) phone ports to connect your phone or answering machine. For data, you can simultaneously connect up to twenty (20) devices per Wi-Fi network (2.4 GHz and 5 GHz), forty (40) total, and one (1) via Ethernet. How can I check my data speed? You can check your data speed by visiting att.com/speedtest.
-
Page 39: Troubleshooting
Troubleshooting General Problem Possible Solution None of the LED • Make sure there is AC power to the AT&T Wireless Internet lights on the face device. Do not connect to an AC outlet controlled by a wall of the device are switch. -
Page 40: Phone
Phone Problem Possible Solution No dial tone • Make sure there is AC power to the AT&T Wireless Internet device. Do not connect to an AC outlet controlled by a wall switch. • Make sure your AT&T Wireless Internet device is powered on. - Page 41 Phone Problem Possible Solution Poor voice quality • Use the phone cable included with the AT&T Wireless Internet device. • Make sure all connections are firmly in place. • Move your device to another area with sufficient network signal (three [3] to four [4] bars). •...
- Page 42 Phone Problem Possible Solution I hear an • You will hear an intermittent dial tone when you have a new Intermittent dial voicemail message waiting. tone Dial 1 from your home phone that is connected to the AT&T • Wireless Internet device to listen to your voicemail messages. My phone doesn’t •...
-
Page 43: Internet
Internet Problem Possible Solution Can’t access the • Make sure your AT&T Wireless Internet device is powered on. Push the On/Off button so that it is in the ON position Internet (depressed). The Power light should turn solid green. • For Wi-Fi: Make sure your AT&T Wireless Internet device is located in the general area of your Wi-Fi enabled device(s). - Page 44 Internet Problem Possible Solution Check your speed at att.com/speedtest. Download or • upload speeds • Check your Signal Strength lights. If it shows less than three are slow (3) green bars, choose an alternative location. • Other connected devices may be transferring a large amount of data.
- Page 45 Internet Problem Possible Solution Can’t connect to • Check that you are connecting to your AT&T Wireless my AT&T Wireless Internet Wi-Fi network name (SSID) (e.g., AWI-XXXXXX). If Internet device connected via Ethernet, make sure the Ethernet cable is firmly attached. •...
-
Page 46: Device Configuration
Device Configuration You can manage your AT&T Wireless Internet device settings using the AT&T Wireless Internet Manager. To access this page, first connect to your AT&T Wireless Internet device and enter http://attwirelessinternet directly into your browser address field. Log in using “attadmin” (or your customized login). Navigating The User Interface The AT&T Wireless Internet user interface presents a navigation menu down the left side of the screen. -
Page 47: Help
Help Click the Help button located on any page to expand a window containing information on the setting displayed on that page. The Networking and System sections have additional pages with a sub-menu displayed horizontally at the top of the screen, for example: Status The Status page displays an overview of the device’s status such as whether there are new voicemails, Wi-Fi radio status, battery level, firmware version, network... -
Page 48: Connected Devices
Connected Devices The Connected devices page displays a list of both Wi-Fi and Ethernet devices that are currently connected to your AT&T Wireless Internet. This can be used to monitor who has access to your network and block (or unblock) devices as required. -
Page 49: Wi-Fi Settings
Wi-Fi Settings You can manage your AT&T Wireless Internet device’s Wi-Fi Settings by selecting the Wi-Fi menu from the left side of the screen. This displays a summary of the current configuration of the 2.4 GHz and 5 GHz Wi-Fi settings. Wi-Fi... - Page 50 To make changes to the configuration, click the EDIT button of the 2.4 GHz or 5 GHz settings.
-
Page 51: Radio Configuration
Radio Configuration Operating frequency: • Mode: Indicates which mode is active for connecting via Wi-Fi. The default is Automatic and allows the device to accept connections from devices supporting 802.11b/g/n (on 2.4 GHz) and 802.11a/n/ac (on 5 GHz). • Channel: Indicates the wireless channel that the radio is operating on. In most situations, leaving this as Automatic will work best, but you can manually override the channel selection using this option. - Page 52 Wi-Fi: WPS WPS, or Wi-Fi Protected Setup, is a standard that allows easy establishment of a secure wireless home network. This feature is turned on by default. If you change these settings, currently connected devices may be disconnected. To connect a client device using WPS, on the Wi-Fi overview page, select a WPS mode. The modes are described below.
-
Page 53: Messages
Messages The Messages page is used to access text messages on your AT&T Wireless Internet device. This may include messages from AT&T about your service plan. Up to 100 messages can be displayed. When there are more than 100 messages, older messages will be automatically deleted to make room for the new messages. -
Page 54: Networking
Networking LAN Settings LAN Setting These settings affect the Local Area Network connection. -
Page 55: Lan Settings
LAN Settings (continued) Ethernet Port: Use this setting to enable or disable the Ethernet port on the • back of the device. • IPv4 Address: This is the IPv4 address of the AT&T Wireless Internet device. By default, this is set to 192.168.1.1. IPv4 Netmask: The IPv4 Netmask of the AT&T Wireless Internet device. - Page 56 The DMZ or “Demilitarized Zone” opens up all ports to a specific local host. This means the specified host will not be protected by the built-in firewall and therefore this feature should be used with care. Under normal operation, this feature should remain disabled.
-
Page 57: Port Forwarding
Port Forwarding Port forwarding allows remote computers on the Internet to connect to a specific computer or service within the private LAN. It operates based on rules specifying a protocol, the external ports, the internal IP address and internal ports. You can create a new rule by entering the required details and then pressing the ADD button. - Page 58 MAC/IP/Port Filtering This feature can be used to allow or block certain users and/or ports from accessing the Internet. It operates based on rules specifying the direction of packets, the source MAC and IP, the destination IP, protocol, source ports, destination ports and an action to perform on the packets that match the rule.
-
Page 59: Vpn Passthrough
VPN Passthrough This feature allows VPN client software on connected devices to connect through this device to remote VPN servers. You can specify the VPNs allowed by protocol. Under normal operation, these should be left as Enabled. Security Level This feature protects the internal network according to the preconfigured security policy. - Page 60 UPnP Universal Plug and Play allows clients on the local network to automatically configure the router to allow certain traffic to pass through the AT&T Wireless Internet device.
- Page 61 Active UPnP Redirects Displays the active UPnP redirects on the AT&T Wireless Internet device. UPnP Settings • Start UPnP and NAT-PMP service: Starts or kills the UPnP and NAT-PMP service to allow UPnP and NAT-PMP functionality. Enable UPnP functionality: Enables or disables the UPnP functionality on the •...
-
Page 62: Data Usage
Data Usage The Data Usage page shows the approximate Internet data usage of each client. Detailed data usage: Turns on the detailed logging of data per client. When • this setting is enabled, the speed of your AT&T Wireless Internet service may be affected. -
Page 63: Call Log/Blocking
Call Log/Blocking This feature displays a log of the last 100 calls to and from the AT&T Wireless Internet device as well as allowing you to block up to 30 phone numbers. You can block numbers from the call log by selecting the call in the Call log and then clicking the BLOCK NUMBER button. -
Page 64: Parental Control
Parental Control The Parental Control page is used to keep a list of rules to control access to specific websites. Rules can be applied to specific devices on your local area network and at specific times. To create a rule: Click the ADD button. - Page 65 Parental Control (continued) To allow this device Internet access, check the Allow Internet checkbox. To deny Internet access to this device, click the checkbox so that it is not checked. Click the EDIT button. In the Blocked websites field, enter the domain name of the site you want to block.
-
Page 66: System
System Date & Time The Date & Time page lets you set the time, time zone and the Network Time Protocol (NTP) server to use for synchronization. The time on your AT&T Wireless Internet device is important for accurate logging of calls, messages, data usage statistics and parental control. - Page 67 To synchronize the time on the AT&T Wireless Internet device with a time server, enter the domain name of the time server in the NTP server candidates fields. The AT&T Wireless Internet device will attempt to synchronize with the first server in the list.
- Page 68 Configuration This page is used to backup and restore the configuration of your AT&T Wireless Internet device or reset it to the factory default settings. Take care with using this feature as all settings and messages stored on the device will be lost when the device is factory reset.
-
Page 69: Power Saving Mode
Power Saving mode Select from three Power saving modes to manage the maximum time of functioning telephone services when the AT&T Wireless Internet device is operating on the backup battery. The default setting is the Balanced (Temporary connectivity) mode set for a time out period of five minutes or once the battery reaches 50% charge. -
Page 70: Safety Information
Safety Information • Some electronic devices may be susceptible to electromagnetic interference. Locate the router away from TV set, radio and other electronic equipment to avoid electromagnetic interference. • The router may interfere with medical devices like hearing aids and pacemakers. -
Page 71: Fcc Regulations
FCC regulations Federal Communications Commission Notice (United States): Before a wireless device model is available for sale to the public, it must be tested and certified to the FCC that it does not exceed the limit established by the government-adopted requirement for safe exposure. -
Page 72: Rf Exposure Information
RF Exposure Information Your device contains a transmitter and a receiver. When it is on, it receives and transmits RF energy. When you communicate with your device, the system handling your connection controls the power level at which your device transmits. •... -
Page 73: Ctia
CTIA • Do not disassemble or open, crush, bend or deform, puncture or shred the battery. • Do not modify or remanufacture, attempt to insert foreign objects into the battery, immerse or expose to water or other liquids, expose to fire, explosion or other hazard. -
Page 74: Warranty
Warranty The AT&T Wireless Internet device comes with a limited warranty that the enclosed subscriber unit and its enclosed accessories will be free from defects in material and workmanship for a period that expires one (1) year from the date of sale of the Product to you, provided that you are the original end-user purchaser of the Product and provided that your purchase was made from a supplier authorized by the Seller. -
Page 75: Limited Warranty
LIMITED WARRANTY TO THE EXTENT PERMITTED BY APPLICABLE LAW, THIS LIMITED WARRANTY IS YOUR SOLE AND EXCLUSIVE REMEDY AGAINST AT&T AND AT&T’S SOLE AND EXCLUSIVE LIABILITY IN RESPECT OF DEFECTS IN PRODUCT. HOWEVER, THIS LIMITED WARRANTY SHALL NOT EXCLUDE NOR LIMIT ANY OF YOUR LEGAL (STATUTORY) RIGHTS UNDER THE APPLICABLE NATIONAL LAWS. - Page 76 The AT&T Wireless Internet device is a mobile device. It may be used in the U.S. with home phone equipment, computers, and other Wi-Fi compatible devices. For emergency calls, you may have to provide your location address to the 911 operator. The AT&T Wireless Internet device has a backup battery in the event of a power outage.
Need help?
Do you have a question about the IFWA-40 and is the answer not in the manual?
Questions and answers