
Subscribe to Our Youtube Channel
Related Manuals for ZOSI IPC


Summary of Contents for ZOSI IPC
- Page 1 PROFESSIONAL SECURITY MADE EASY Quick Start Guide App store Google play Zosi Smart IPC Quick Start Guide --- 1 Z18.5.T.1 For more information of your new system, please refer to www.zositech.com...
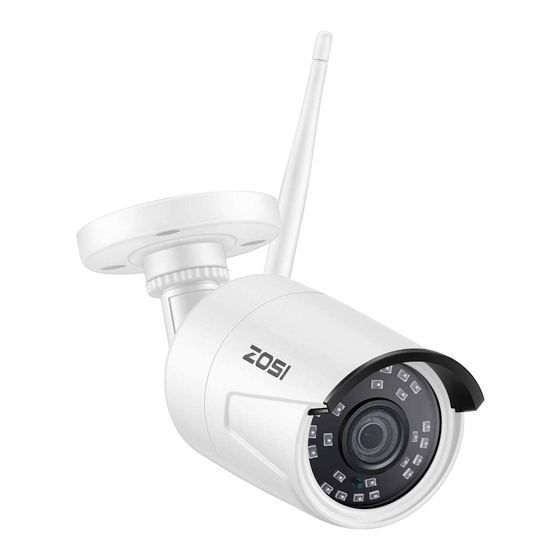
- Page 2 1. Camera Overview Wi-Fi antenna To receive the wifi signal IP66 Metal Housing Durable weatherproof 24pcs, 5mm LEDs up to 65ft (20m) 3.6mm lens See wider angle SD Card Slot Micro SD(Max 64GB) Reset Button RJ45 Port Power Port (DC12V/1A) 2.
-
Page 3: Before Installing The Camera
For initial setup, connect the camera to the LAN port of the router by an Ethernet cable. Then follow the steps below. Make sure your camera and smart device are connected to the same router. 2.2 Before Installing the Camera A. -
Page 4: Wired Connection
The following instructions are for the Android APP; instructions for the iOS version are slightly different. • Start and install the mobile app “Zosi Smart”, which can be downloaded by scanning the QR Code shown on the front page of this manual ). - Page 5 Note: if add the device unsuccessful, please hold the reset button on the camera to reset it, and then reconnect from steps A to E above, until you can see the video on your phone Pause for 5 seconds then you can hear crisp switch voice from the switcher inside the camera, As show in the figure 4.2 Convert Wired Connection to Wireless Connection A.
-
Page 6: Device Information
5. App Function Introduction 5.1 App Information (1) Change Password: modify the login password of the app; (2) Check for Updates: update your app to the latest version; (3) Fingerprint Login: no need to enter password if fingerprint touch function is available in your phone. -
Page 7: Device Management
6. PC Client Remote Monitoring The PC Client (AVSS) is applied for DVR/NVR/IPC preview with features like real-time view, device management, remote video playback and etc. 6.1 Login Double click the icon “AVSS” to stall the PC Client. Select the language and log in. - Page 8 6.2.3 Add Device: Right click the Area Name to add device and change type of the device. Enter the device name, device ID, user name, device password and channel number, then click “OK” to save.
- Page 9 6.3 Preview Click preview to find device list, right click device to Play All and Stop All, preview video can be displayed or stopped. 6.4 Playback Click “PlayBack”; select device ID, channel number, date and then search to find the video. Double click record time to set the exact time and click “Start Play”.
- Page 10 1. Why can't I add a device using local search? A: Make sure that your device is in the same LAN as your phone. If you cannot make both devices in the same LAN, manually enter the UID of your device to complete the adding.
- Page 11 All rights reserved. No part of this publication may be reproduced by any means without written permission from ZOSI. The information in this publication is believed to be accurate in all respects. ZOSI cannot assume responsibility for any consequences resulting from the use thereof.
Need help?
Do you have a question about the IPC and is the answer not in the manual?
Questions and answers