Table of Contents
Advertisement
Advertisement
Table of Contents

Related Manuals for Alere Triage MeterPro


Summary of Contents for Alere Triage MeterPro
- Page 1 Alere Triage ® MeterPro User Manual...
-
Page 3: Table Of Contents
Sample Log Sheets ..... . 97 Contact Alere ......100 Limited Warranty . -
Page 4: How To Use This Guide
How to Use This Guide This manual contains: • Instructions for the operation and maintenance of the Alere Triage MeterPro, and; ® • Basic instructions for testing samples Note: To run specific tests, ® such as the Alere Triage Cardiac Panel, you... - Page 5 = Shift key = Symbol key (used with Shift key) = Print key = Paper Feed key = Enter key = Exit key Bolded Font. Screen commands and options are indicated by a © 2017 Alere. All rights reserved 3...
-
Page 6: Introduction
® The Alere Triage MeterPro is a portable fluorescence instrument used to measure the ® results of tests manufactured by Alere San Diego, Inc. The Alere Triage MeterPro can be used in a laboratory or in a point-of-care setting. ®... -
Page 7: Unpacking
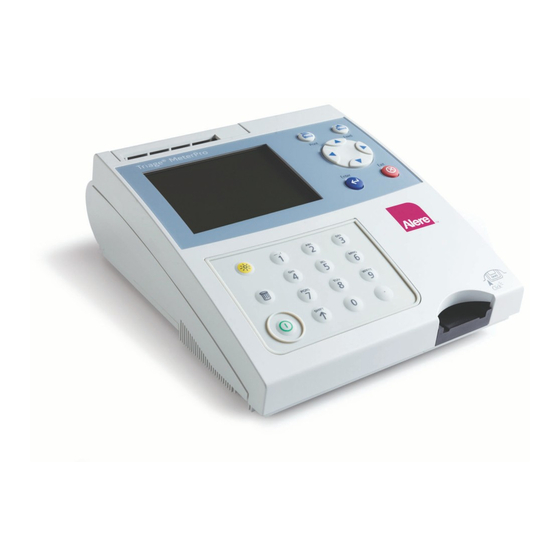
Alere Triage test devices are packaged separately and include instructions for running package inserts included in each test kit for more specific tests. If you have any questions, contact Alere (refer to the Contact Alere section). information. Contents: ® • Alere Triage MeterPro •... - Page 8 Parts of the Alere Triage ® MeterPro Thermal Printer LCD (liquid crystal display) Printer cover Backlight Delete Power button Test device insertion port Battery cover Printer cover Power supply port Data port CODE CHIP module port 6 © 2017 Alere. All rights reserved.
- Page 9 The cover, which when pulled straight up, reveals the paper roll. LCD Screen The LCD (Liquid Crystal Display) Screen shows the menu of possible tests and tasks and prompts the operator to take the next step. © 2017 Alere. All rights reserved 7...
-
Page 10: Specifications
® Data Management Software with LIS Connectivity. Test Device Specifications Test device specific information is provided in the applicable product insert. The instrument analyzes immunoassay test devices manufactured by Alere San Diego, Inc. 8 © 2017 Alere. All rights reserved. -
Page 11: Warnings, Precautions And Limitations
• Ensure all sample fluids have absorbed into the test device prior to running the test to prevent internal contamination of the meter. ® • Use only the AC/DC power adapter provided with the Alere Triage MeterPro. An identifying tag has been placed on the cord for quick identification. - Page 12 (Intentionally blank) 10 © 2017 Alere. All rights reserved.
-
Page 13: Installation
AC Power Supply Remove the power supply from the box. Plug one end into an AC outlet. Plug the opposite end into the round hole in the back of the meter. © 2017 Alere. All rights reserved 11... - Page 14 Press the key twice, paper will feed through the printer and extend out the meter. f. Place the roll of paper into the paper compartment. g. Replace the printer cover and continue operation. 12 © 2017 Alere. All rights reserved.
- Page 15 INSTALL NEW CODE CHIP CODE CHIP module inserted. SET PARAMETERS DELETE RESULTS SELECT WITH v OR ^ AND PRESS ENTER PRESS EXIT TO EJECT DEVICE The Supervisor’s Main Menu CODE CHIP module CODE CHIP module port © 2017 Alere. All rights reserved 13...
- Page 16 Min 1 1-20 Characters Misc ID Max 20 1-20 Aux. ID Enable/Disable Disabled Disabled, Enabled For reference, record your settings in the space provided. e. Press the key to save changes to ID Settings. 14 © 2017 Alere. All rights reserved.
- Page 17 Communication Settings. For more details about h. Press the key to save changes to Meter Settings. Communications, including entry of an Alere provided, meter specific password, see page 28. © 2017 Alere. All rights reserved 15...
- Page 18 MeterPro normally requires a User ID to be entered prior to running a patient test, QC test, or Misc test, and prior to recalling patient results. Refer to page 32 for instructions. Alternately, this feature may be bypassed. See page 18. 16 © 2017 Alere. All rights reserved.
- Page 19 None, 8HR, Daily, QC Sample Freq. Monthly page 38. Weekly, Monthly Number of Controls 1 or 2 Num Quant Std Devs 2 or 3 d. Press the key to save changes to QC Parameters. © 2017 Alere. All rights reserved 17...
- Page 20 Caution: Use only the power supply provided with the meter, failure to do supervisor. Optional so may cause permanent damage to the meter. settings allow automated turnoff after hour, 1 hour, 2 hours, 4 hours or NONE. 18 © 2017 Alere. All rights reserved.
- Page 21 MeterPro); contains data about how the meter should read its matching QC Device. (Dark gray.) ® • Supervisor Access CODE CHIP module – included with each Alere Triage MeterPro; contains code to activate Supervisor functions. (Light gray.) Software Upgrade CODE CHIP module ®...
-
Page 22: Set Parameters
To insert the Supervisor CODE CHIP module into the Alere Triage MeterPro, slide the chip labeled “SPR” into the meter’s CODE CHIP module port as shown in the picture. CODE CHIP module CODE CHIP module Port 20 © 2017 Alere. All rights reserved. -
Page 23: How To Set Parameters: Basic Instructions
This setting will set the minimum and maximum number of characters in the User ID. 1. From a list of programmable parameters, choose Instrument Settings using the keys. 2. Press the key. 3. Use the keys to select ID Settings. 4. Press the key. © 2017 Alere. All rights reserved 21... - Page 24 8. Use the keys to choose the largest number of characters that will appear in the Patient ID. The maximum number of characters possible is 20. 9. Press the key to save changes. 22 © 2017 Alere. All rights reserved.
- Page 25 Disabled or Enabled If Disabled is selected, the Auxiliary ID prompt screens will never appear. If Enabled is selected, an Auxiliary ID is mandatory for each patient test. 7. Press the key to save changes. © 2017 Alere. All rights reserved 23...
- Page 26 4. Press the key. 5. Use the keys to highlight the name to the right of Language. ® 6. Use the keys to change the language of the Alere Triage MeterPro’s screen and printouts. 7. Press the key to save changes.
- Page 27 (patient, QC, Misc. Test). If Manual is selected, the user must use the button on the keypad to print out results. 7. Press the key to save changes. © 2017 Alere. All rights reserved 25...
- Page 28 Contrast. 6. Use the keys to change the contrast of the meter’s screen. The range is from 0 – 8 (8 being the greatest contrast). 7. Press the key to save changes. 26 © 2017 Alere. All rights reserved.
- Page 29 (Intentionally blank) © 2017 Alere. All rights reserved 27...
-
Page 30: Communication Settings
Prior to activating the LIS feature, obtain the meter’s serial number located underneath Main Menu the meter and contact Alere (Refer to the Contact Alere section). Set Parameters The Alere™ Representative will provide you with a password that, when entered, will allow Meter Settings data to be transmitted. Comm Settings Baud Rate 1. - Page 31 If the test has been rejected, the display and printout will be flagged with Pat. Result Rejected or Results Rejected by User. Recalled results will display an R before the patient ID in the rejected record. © 2017 Alere. All rights reserved 29...
- Page 32 8. If Disabled was selected, a screen showing LIS Disabled will appear. Press key. 9. If Enabled was selected, a screen showing Enter LIS Password will appear. Enter the password provided by the Alere™ Representative. Press the key. 10. Acknowledge the LIS Enabled message by pressing the key.
-
Page 33: Clock
Date Format. 11. Use the keys to select MM-DD-YY, DD-MM-YY or YY-MM-DD. The previously entered Date changes as the Date Format changes. 12. Press the key to save changes. © 2017 Alere. All rights reserved 31... -
Page 34: User Id
MeterPro recognizes leading 0’s as a unique character. Therefore, ‘4341’ will be recognized separately from ‘04341’. ® Using the barcode scanner or alpha mode (shift key) will allow the Alere Triage MeterPro to accept alpha characters and the following symbols: # ( ) * - . / \... - Page 35 The message on the screen states: USER ID ### WILL BE DELETED. 7. Press the key to delete. A message on the screen tells you that the ID has been deleted: USER ID ### DELETED. © 2017 Alere. All rights reserved 33...
- Page 36 The numbers you type will appear from the right and move left as you continue to type. To correct, press the key to clear the entire date. Then type in the correct date. 7. Press the key. 8. To print the list you have chosen, press 34 © 2017 Alere. All rights reserved.
-
Page 37: Ranges
• Analytes with a dash – Two ranges. The normal range is any value between the two numbers displayed. Depending on the product, the normal range may be inclusive or exclusive of the upper number. Consult the product package insert or contact Alere for clarification. These values will be in reverse video on the patient results. - Page 38 If these options are not available for a test, the meter skips over the setting as the supervisor scrolls through the options. See pages 37 and 49 for more details. 36 © 2017 Alere. All rights reserved.
-
Page 39: Test Settings
Inactive that test may be out of QC Sample date. As always for a test with an expired QC Sample, a passing QC Sample test will need to run before a patient sample can report a result for that test. © 2017 Alere. All rights reserved 37... -
Page 40: Qc Parameters
QC Sample Freq. 4. Using the keys, select on of these options: None, 8 hours, Daily, Weekly, Monthly. 5. Press the key to save changes. 38 © 2017 Alere. All rights reserved. -
Page 41: Bypass
5. Press the key. Note: If the bypass is , the User ID requirement is disabled and therefore not required. When the bypass is , the User ID requirement operates as normal and is required. © 2017 Alere. All rights reserved 39... -
Page 42: Install Code Chip
Lot number begins with a C. • QC Device CODE CHIP module – included in the black ® QC Device box (comes with the Alere Triage MeterPro) and is labeled with the serial number of the QC Device. • Supervisor Access CODE CHIP module –... - Page 43 The Supervisor CODE CHIP needs only to be inserted into the CODE CHIP module Port to activate the supervisor functions. This is an automatic function and standard CODE CHIP module installation is not necessary. © 2017 Alere. All rights reserved 41...
-
Page 44: Operation
Supervisor CODE CHIP module is inserted into the CODE CHIP module Port. The Supervisor CODE CHIP module should be removed from the meter during routine patient, quality control, and Misc. testing. 42 © 2017 Alere. All rights reserved. -
Page 45: Run Test
(QC) results are unacceptable, exclamation points (!) will be displayed on the screen in the place of the patient results. To obtain results repeat the test using a new device. © 2017 Alere. All rights reserved 43... -
Page 46: Qc Device
QC ® Device CODE CHIP 8. Gently insert the QC Device into the Alere Triage MeterPro until you feel module if the QC Device the QC Device catch on the pin and hear an audible ‘click.’... - Page 47 QC Device. After cleaning the device, repeat the QC Device test. • If the QC Device test fails after you have cleaned the device, contact Alere. • Note: the QC Device does not expire. © 2017 Alere. All rights reserved 45...
-
Page 48: Qc Sample
Menu screen as it looks when operator selects QC Sample. preceding alpha character. 7. Press the key. 8. Enter the QC lot number from the label on the side of the vial containing the QC Sample. 46 © 2017 Alere. All rights reserved. - Page 49 (instead will be flagged with a # symbol). ® d. If an individual analyte is outside the specified range, the Alere Triage MeterPro allows the user to rerun only the failed analyte on the next QC Sample Test.
-
Page 50: Patient Sample
Then type in the correct ID. the scanner handle and wait for the beep. The ID 9. Press the key. will appear on the display. 48 © 2017 Alere. All rights reserved. - Page 51 TNI indicates that TNI is currently selected, but can be deselected by pressing 3 on the numeric keypad to display 3 TNI. Pressing the number again toggles the test between select and deselect. © 2017 Alere. All rights reserved 49...
- Page 52 Screen, the test proceeds Important instructions for all tests: after waiting 30 seconds. a. Gently insert the test device into the Alere Triage Meter until you feel the ® device catch on the pin. You will hear an audible ‘click’ that tells you the test device has been inserted properly.
-
Page 53: Misc. Test
The ID will appear on the display. • Press the key to clear the entire ID, or select the incorrect character using the keys. Then type in the correct ID. • Press the key. © 2017 Alere. All rights reserved 51... - Page 54 Run Test Important Instructions for All Tests: ® a. Gently insert the test device into the Alere Triage Meter until you feel the After the test device catch on the pin. You will hear an audible ‘click’ that tells you...
-
Page 55: Recall Results
Recall Results Purpose ® Recall Results is used to retrieve results stored in the Alere Triage MeterPro’s memory. Function The Recall Results function can retrieve these results: Note: If a result was rejected by the • Last Record • QC Results “R”... -
Page 56: Patient Results
ID, or select the incorrect character by using the keys. Then type in the correct ID. c. To select a patient ID number with alpha characters, use the key to enter alpha characters. 54 © 2017 Alere. All rights reserved. - Page 57 Patient Results 11. Use the keys to view the entire record. 12. Press the key to make a printed copy. 13. Press the key to upload the selected results to LIS. © 2017 Alere. All rights reserved 55...
- Page 58 Then type in the correct number. 13. Press the key. 14. All results from tests run on the requested lot number for the selected panel are displayed. 15. Use the keys to view the entire record. 56 © 2017 Alere. All rights reserved.
- Page 59 Main Menu 16. Press the key to make a printed copy. Recall Results 17. Press the key to upload the selected results to LIS. Patient Results © 2017 Alere. All rights reserved 57...
- Page 60 User ID Main Menu ® To retrieve results from tests run on the Alere Triage MeterPro starting with the user you Recall Results select: Patient Results ® 1. Press the key to power the Alere Triage MeterPro on. 2. From the Main Menu select Recall Results using the keys.
- Page 61 From Date Main Menu ® To retrieve results from tests run on the Alere Triage MeterPro starting with a date Recall Results you select: Patient Results ® 1. Press the key to power the Alere Triage MeterPro on. 2. From the Main Menu select Recall Results using the keys.
- Page 62 Till Date Main Menu ® To retrieve results from tests run on the Alere Triage MeterPro before and including a Recall Results date you select: Patient Results ® 1. Press the key to power the Alere Triage MeterPro on. 2. From the Main Menu select Recall Results using the keys.
-
Page 63: Qc Results
ENTER key. View All (Default) Reagent Lots - QC (Defaults to View All) To retrieve QC Results for the QC Sample and the QC Device, select the option desired and follow the directions. © 2017 Alere. All rights reserved 61... - Page 64 Note: To display 15. Press the key to make a printed copy. all results for the selected panel, leave the 16. Press the key to upload the selected results to LIS. QC Sample L/N blank. 62 © 2017 Alere. All rights reserved.
- Page 65 13. All QC results that have been run on the requested lot number for the selected panel are displayed. 14. Use the keys to view the entire record. 15. Press the key to make a printed copy. 16. Press the key to upload the selected results to LIS. © 2017 Alere. All rights reserved 63...
- Page 66 User ID Main Menu ® To retrieve QC results from tests run on the Alere Triage MeterPro starting with the user you Recall Results select: QC Results QC Sample Results ® 1. Press the key to power the Alere Triage MeterPro on.
- Page 67 From Date Main Menu To retrieve QC results from tests run on the Alere Triage ® MeterPro starting with a date you Recall Results select: QC Results QC Sample Results ® 1. Press the key to power the Alere Triage MeterPro on.
- Page 68 Till Date Main Menu To retrieve QC results from tests run on the Alere Triage ® MeterPro before and including a Recall Results date you select: QC Results ® 1. Press the key to power the Alere Triage MeterPro on.
-
Page 69: Reagent Lots-Qc
Archive Last Test This function will save detailed information regarding the last performed test for analysis by Alere. Use this function when requested by Alere. This function should be used when a very unusual test result is received and when the laboratory wishes to have the meter evaluated further. -
Page 70: Misc. Test Results
Alere ® Triage MeterPro’s memory. When you choose multiple options, first input values in all the categories you have chosen. Then press the ENTER key. 68 © 2017 Alere. All rights reserved. - Page 71 • If you want to see all Misc. Test results, press the key. All the ® Misc. Test results in the Alere Triage MeterPro’s memory for the selected panel will be displayed. • For individual Misc. Test results: a. Select Misc. Test ID using the keys.
- Page 72 12. All results from tests run on the requested lot number for the selected panel are displayed. 13. Use the keys to view the entire record. 14. Press the key to make a printed copy. 15. Press the key to upload the selected results to LIS. 70 © 2017 Alere. All rights reserved.
- Page 73 User ID Main Menu Recall Results ® To retrieve results from tests run on the Alere Triage MeterPro starting with the user you Misc. Test Results select. 1. Press the key to power the Alere Triage ® MeterPro on. 2. From the Main Menu select Recall Results using the keys.
- Page 74 From Date Main Menu Recall Results ® To retrieve results from tests run on the Alere Triage MeterPro starting with a date you Misc. Test Results select: ® 1. Press the key to power the Alere Triage MeterPro on. 2. From the Main Menu select Recall Results using the keys.
- Page 75 Till Date Main Menu Recall Results ® To retrieve results from tests run on the Alere Triage MeterPro before and including a Misc. Test Results date you select: ® 1. Press the key to power the Alere Triage MeterPro on.
-
Page 76: Print All Results
Print All Results Main Menu Recall Results ® Options: All stored results can be printed from the Alere Triage MeterPro’s memory. • Patient Results • QC Sample Results • QC Device Results • Misc. Test Results Main Menu Patient Results... - Page 77 LIS. Prior to the first upload, the LIS feature must be activated from the Set Main Menu Parameter menu item using the Supervisor CODE CHIP™ module. Recall Results Upload Results to LIS © 2017 Alere. All rights reserved 75...
-
Page 78: Delete Results
Delete Results Purpose The Delete function is used to remove all patient test information from the Alere Triage ® MeterPro memory. Note: The Alere Triage ® MeterPro Memory The delete function is ® Within the Alere Triage MeterPro, Patient Result memory can hold 750 data sets, QC available only when the Supervisor CODE CHIP™... - Page 79 6. A message on the screen states: All patient results will be deleted. 7. Press the key to delete all patient results. (If you do not want to delete all patient results, press the key). © 2017 Alere. All rights reserved 77...
-
Page 80: Display Backlight
Subsequent presses cycle the backlight from bright to dim and then to off. To save power, the backlight turns off if no keys have been pressed for 15 seconds. Pressing any key will restore the backlight to the previous level. 78 © 2017 Alere. All rights reserved. -
Page 81: Alpha Numeric Mode
If more than three seconds pass without the operator pressing the button, the next press of that button causes the first character to be displayed. If a new button is pressed, the first character of the new button is displayed with subsequent presses repeating the sequence. © 2017 Alere. All rights reserved 79... -
Page 82: Total Quality Assurance
If the product is stored under specified conditions, proper functioning of the assay controls indicates that the test device is valid and proper adherence to assay protocol has been followed. The assay controls in the Alere Triage tests require the need ®... - Page 83 A Trace QC algorithm has been programmed which evaluates the size, location and signal to noise ratio of each zone on the device. Aberrations in zone quality exceeding preset limits will cause rejection of one or more of the assay results. © 2017 Alere. All rights reserved 81...
- Page 84 A Patient ID is required for all patient tests performed. All QC sample and patient results are stored in the meter’s memory and can be downloaded to a laboratory information system (LIS) or an external data management software program for further viewing and printing of quality control reports. 82 © 2017 Alere. All rights reserved.
- Page 85 ® tests have been designed to maximize Total Quality Assurance in ® any testing environment. The combination of the QC features of the Alere Triage tests reduce the impact of procedural errors, ensure reagent integrity, and assure that patient results are accurate each and every time a test is performed. Based on the current CLIA guidelines and other regulating bodies, Alere makes the following QC recommendations: •...
- Page 86 To prevent misuse, the Supervisor CODE CHIP™ module is required for access to the SET PARAMETERS and DELETE RESULTS functions of the software. The ® Supervisor CODE CHIP™ is universal and may be used on any Alere Triage MeterPro. 84 © 2017 Alere. All rights reserved.
-
Page 87: Service And Maintenance Procedures
Paper Replacement Changing Paper Between Functions 1. Tear off any excess paper sticking out of the Alere Triage ® MeterPro. 2. Remove the paper compartment cover by pulling up on the cover as indicate by the arrow on the back of the cover. - Page 88 5 previous lines. 10. After the paper has appered above the printer, replace the printer cover, taking care to ensure the paper does not get caught inside the meter. 86 © 2017 Alere. All rights reserved.
- Page 89 Insert four size AA 1.5 volt batteries into the battery compartment. Be sure that the plus (+) and minus (-) signs of the batteries match the same signs embossed in the battery compartment. • Replace the cover to the battery compartment. © 2017 Alere. All rights reserved 87...
-
Page 90: Troubleshooting
Blinking battery icon. Meter contains no batteries or All data is saved in the Meter batteries are low when facility except date and time. Reset date has loss of power. and time. Contact Alere 88 © 2017 Alere. All rights reserved. - Page 91 Sample running slowly issue with device. Have customer immediately reinsert device into meter (if within 30 minutes of sample addition). Contact Alere © 2017 Alere. All rights reserved 89...
- Page 92 No action is required as the meter or space left for less than 20 Records. will delete the oldest result once patient records when running the memory is full. patient sample. Contact Alere 90 © 2017 Alere. All rights reserved.
-
Page 93: Return And Disposal Procedure
Return and Disposal Procedure Return Procedure Should a malfunction occur, contact Alere. If Alere determines that the meter should be returned, you will be assigned a return authorization number and be provided shipping instructions. Immediately after the return has been authorized, Alere will send out a replacement ®... - Page 94 (Intentionally blank) 92 © 2017 Alere. All rights reserved.
-
Page 95: Glossary
Lot number: L/N; identification number given to a group of test devices. CODE CHIP™ module Port: The small slot on the underneath side of the Alere L/N: Lot number; the number that identifies ® Triage MeterPro where a CODE CHIP™... - Page 96 Retrieve: Find, bring back. Reverse Video: Light text displayed on a dark background. ® Screen: The part of the Alere Triage MeterPro that displays words and numbers. Scroll to: Use arrow keys go to the information you want on the screen.
-
Page 98: Labeling Symbols
The following log sheets are provided as alternate methods of tracking test results. The Alere Triage ® MeterPro is capable of tracking and printing out test history and providing QC Lockouts to prevent patient testing when outside QC requirements. 96 © 2017 Alere. All rights reserved. -
Page 102: Contact Alere
Contact Alere Alere™ Product Support Contact one of the following Alere™ Product Support Care Centers or your local distributor if you have any questions regarding the use of your Alere™ product. You may also contact us at www.alere.com. Region Phone E Mail Address Europe &... -
Page 103: Limited Warranty
AGENCIES REQUIRED FOR THE SALE OF PRODUCTS FOR THEIR INTENDED USE (the “LIMITED WARRANTY”). IF THE PRODUCT FAILS TO MEET THE REQUIREMENTS OF THE LIMITED WARRANTY, THEN AS CUSTOMER’S SOLE REMEDY, ALERE SHALL EITHER REPAIR OR REPLACE, AT ALERE’S DISCRETION, THE PRODUCT. EXCEPT FOR... - Page 104 30175 Hannover, Germany www.alere.com Protected by US Patent Number 6,830,731. The Alere Logo, Alere, Code Chip, MeterPro, Triage, and Triage Census are registered trademarks of the Alere group of companies. © 2017 Alere. All rights reserved. PN: 26213en Rev. E...
Need help?
Do you have a question about the Triage MeterPro and is the answer not in the manual?
Questions and answers