Table of Contents
Advertisement
Advertisement
Table of Contents

Related Manuals for Proxxon PD 250/E


Summary of Contents for Proxxon PD 250/E
- Page 1 PD 250/E Manual...
- Page 2 23 22 2 21 26 3 Fig. 2 12 11 Fig. 1 Fig. 3 Fig. 4 Fig. 5 Fig. 6 Fig. 7 Fig. 8 Fig. 9 - 2 -...
- Page 3 Fig. 10 Fig. 11 Fig. 12 1 4 5 Fig. 14 Fig. 15 Fig. 13 Fig. 17 Fig. 18 Fig. 16 Fig. 19 Fig. 20 Fig. 21 - 3 -...
- Page 4 Fig. 22 Fig. 23 Fig. 24 Fig. 27 Fig. 26 Fig. 25 Fig. 28 Fig. 29 - 4 -...
-
Page 5: Table Of Contents
Dear Customer, • Visually inspect application tools to ensure they are in good By purchasing your PROXXON Lathe PD 250/E, you have chosen working order and suitable for the task prior to setting up the job. a good-quality, high-grade machine. The latest production and •... -
Page 6: General Safety Instructions
General safety instructions Warning Additional safety instructions for lathes: For Your Own Safety Read Instruction Manual Before Operating Lathe Read and become familiar with this entire instructions manual. a) Wear eye protection. Learn the tool`s applications, limitations and possible hazards. b) Do not wear gloves, necktie, or loose clothing. -
Page 7: Legend
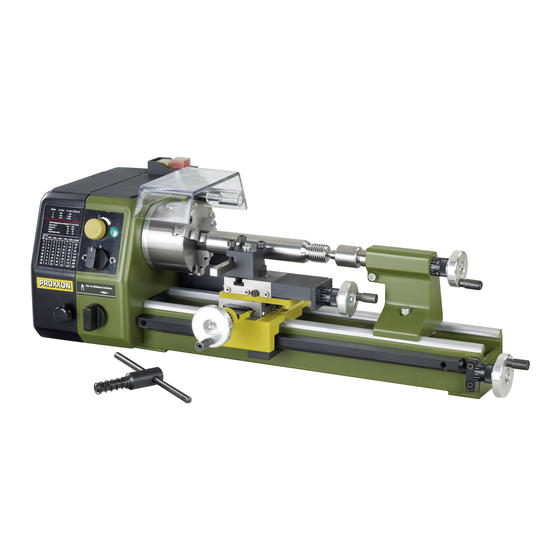
Description of the machine Always work with hearing protection! The PROXXON lathe PD 250/E is an extensible system which consists of Wear safety glasses! • solid shaft electronics for high torques over the entire speed range •... -
Page 8: Switching On The Machine
Please comply with the following when commissioning and wor- 2. Turn the switch to the left to switch off the feed. king with the PD 250/E: Your machine is equipped with an auto- If stiff, slightly move the handwheel of the leadscrew. -
Page 9: Selecting The Turning Tool
1. Release the clamp screw 4 (Fig. 7), push the tailstock (2) on the 3. Insert the turning tool (3) and tighten the fastening screws (1). guide into the required position and retighten the clamp screw. 4. Move the turning tool to the centre (4) and check whether the 2. -
Page 10: Turning The Jaws Of The Lathe Chuck
Note: Note: The normal lathe chuck has three steel jaws, which are uniformly If the top slide is not necessary, it is advisable to clamp it with the adjusted and centre round work pieces automatically. screw 4 (Fig. 14). The turning performance is improved by elimina- ting play. -
Page 11: Fitting Change Gears For Thread Cutting
The thickness of the newspaper should correspond to the required tooth play. The PD 250/E is supplied with installed gear arm and the change gear combination for the automatic feed of 0.05 mm/revolution. It 8. -
Page 12: Cutting Left Threads
7. Tighten all four jaws evenly, alternating crosswise. Installation and operation are as described above. Collet set with ER 20 collets (No. 24038) Accessories for Lathe PD 250/E Important Always use the correct collet chuck to suit the work piece. -
Page 13: Care And Maintenance
Any attempt to repair or replace electrical parts on this lathe may create a hazard unless repair is done by a qualified service techni- cian. Repair service is available at your PROXXON service center. Lubricating: Lubricate or oil all parts according to lubrication diagram (Fig. 26). -
Page 14: Spare Parts List
Spare parts list Assembly 00: Change gears 9 10 11 12 13 14 22/23/24 20 18/19 17 25/26 - 14 -... - Page 15 Spare parts list Please order spare parts in writing from PROXXON Central Service (Address on back of instruction manual) Assembly 00: Change gears Part No.: Designation 24002-00-01 Fastening screw 24002-00-02 Washer 24002-00-03 Change gear 30/16 24002-00-04 Toothed belt T 5 - 40...
- Page 16 Spare parts list Assembly 00: Change gears - 16 -...
- Page 17 Spare parts list Please order spare parts in writing from PROXXON Central Service (Address on back of instruction manual) Assembly 00: Change gears Part No.: Designation Part No.: Designation 24002-01-01 Brand-Logo 24002-01-38 Ball bearing 34002-01-02 Speed table 24002-01-39 Shaft 24002-01-03...
- Page 18 - 18 -...
- Page 19 Spare parts list Please order spare parts in writing from PROXXON Central Service (Address on back of instruction manual) Assembly 02: Bed with leadscrew Part No.: Designation 24002-02 - 01 Lathe bed 24002-02 - 02 Cover 24002-02 - 03 Screw...
- Page 20 Spare parts list Assembly 03: Support 12 11 - 20 -...
- Page 21 Spare parts list Please order spare parts in writing from PROXXON Central Service (Address on back of instruction manual) Assembly 03: Support Part No.: Designation 24002-03 - 01 Screw 24002-03 - 02 24002-03 - 03 Set screw 24002-03 - 04...
- Page 22 Spare parts list Assembly 04: Tailstock - 22 -...
- Page 23 Spare parts list Please order spare parts in writing from PROXXON Central Service (Address on back of instruction manual) Assembly 04: Tailstock Part No.: Designation 24002-04 - 01 Screw 24002-04 - 02 Washer 24002-04 - 03 Tailstock body 24002-04 - 04...
- Page 24 Prox-Tech, Inc., (“Seller”) warrants to the original purcha- Any implied warranties shall be limited in duration to two ser only, that all PROXXON consumer power tools will be years from date of purchase. Some states in the U.S. and free from defects in material or workmanship for a period some Canadian provinces do not allow limitations on how of two years from the date of purchase.
- Page 25 Notes: - 25 -...
Need help?
Do you have a question about the PD 250/E and is the answer not in the manual?
Questions and answers