Table of Contents
Advertisement
Available languages
Available languages
Quick Links
Advertisement
Chapters
Table of Contents

Related Manuals for Dual DT 210 USB


Summary of Contents for Dual DT 210 USB
- Page 1 DUAL DT 210 USB Automatik-Plattenspieler mit USB-Anschluss Bedienungsanleitung...
- Page 2 • Verschiedene Elemente der Bedienungsanleitung sind sicheren • mit festgelegten Gestaltungsmerkmalen versehen. So Gebrauch Ihres Plattenspielers DT 210 USB, im können sie leicht feststellen, ob es sich um folgenden Plattenspieler oder Gerät genannt. normalen Text, Aufzählungen oder •...
-
Page 3: Table Of Contents
Inhaltsverzeichnis Abspielen einer Schallplatte........12 Automatischer Start ............12 Sicherheit und Aufstellen des Plattenspielers ... 4 Manueller Start ............. 12 Sicherheit ................ 4 Stop-Taste ..............12 Aufstellen ................ 5 Bevor Sie den USB-Anschluss herstellen....13 Die Beschreibung des Plattenspielers......6 Systemvoraussetzungen .......... -
Page 4: Sicherheit Und Aufstellen Des Plattenspielers
Sicherheit und Aufstellen des Plattenspielers Sicherheit und Aufstellen des Bei Störungen oder Rauch- und Geruchsbildung aus • dem Gehäuse sofort Netzstecker aus der Steckdose Plattenspielers ziehen! Ziehen Sie vor Ausbruch eines Gewitters den • Lesen Sie bitte alle Sicherheitshinweise sorgfältig durch Netzstecker. -
Page 5: Aufstellen
Sicherheit und Aufstellen des Plattenspielers Stellen Sie keine Behälter mit Flüssigkeit, z.B. Zur Reinigung des Gerätes und der Schallplatten • • Blumenvasen, auf das Gerät. Diese könnten umfallen, dürfen nur dafür vorgesehene Reinigungsmittel und die auslaufende Flüssigkeit kann zu erheblicher (antistatisch) verwendet werden. -
Page 6: Die Beschreibung Des Plattenspielers
Die Beschreibung des Plattenspielers • Verwenden Sie einen geeigneten, leicht zugänglichen Bitte stellen Sie sicher, dass alle nachfolgend aufge- Netzanschluss und vermeiden Sie die Verwendung von führten Zubehörteile vorhanden sind: Mehrfachsteckdosen! Der Plattenspieler, • • Netzstecker nicht mit nassen Händen anfassen, Gefahr Plattenteller mit Antriebsriemen, •... -
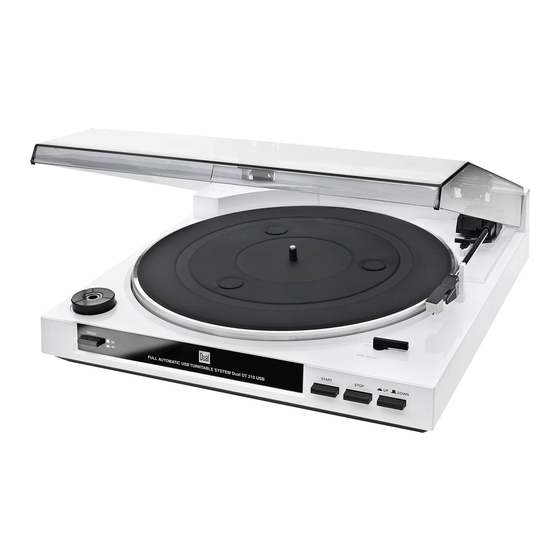
Page 7: Die Gerätevorderseite
Die Beschreibung des Plattenspielers Die Gerätevorderseite Netzkabel Plattenteller Abdeckhaube Cinch-Audio-Kabel (mit Stecker weiß und rot) Plattentellerbelag Tonarm Nadel mit System Wahlhebel Plattengröße (SIZE 30/17) Taste Tonarm-Lift (UP/DOWN) 10 Taste-Stop (STOP) 11 Taste-Start (START) 12 Taste-Drehzahl (SPEED 33/45) 13 USB-Anschluss... -
Page 8: Die Geräterückseite
Die Beschreibung des Plattenspielers Die Geräterückseite 14 Cinch-Audio-Kabel (mit Stecker weiß und rot) 15 Schalter PHONO/LINE 16 USB-Anschluss 17 Netzkabel... -
Page 9: Wie Sie Den Plattenspieler Zum Betrieb Vorbereiten
Wie Sie den Plattenspieler zum Betrieb vorbereiten Wie Sie den Plattenspieler zum Plattentellerbelag Betrieb vorbereiten Legen Sie nun den Plattentellerbelag 5 mit der richtigen Seite nach oben auf den Plattenteller auf. Riemen und Plattenteller Zentrierpuck Der Antriebsriemen liegt bei Lieferung bereits auf der Der Zentrierpuck wird z.B. -
Page 10: Anschluss Des Plattenspielers
Anschluss des Plattenspielers Anschluss des Plattenspielers Schalter PHONO/LINE: 1 – auf LINE 2 – auf PHONO 3 – USB-Anschluss an PC... -
Page 11: Anschluss An Den Verstärker
Anschluss des Plattenspielers Anschluss an den Verstärker Abnehmen/Anbringen der Nadelschutzkappe ! Schließen Sie die Cinch-Audiokabel 14 an die LINE/AUX- oder Phono-Buchsen am Verstärker an. ! Vor der Wiedergabe einer Schallplatte muss die Hinweis: Nadelschutzkappe vom Tonabnehmer 7 entfernt Dabei auf den richtigen Anschluss des linken und werden. -
Page 12: Abspielen Einer Schallplatte
Abspielen einer Schallplatte Abspielen einer Schallplatte ! Den Tonarm von der Tonarmstütze nehmen und über die Einlaufrille der Platte schwenken. Der Automatischer Start Plattenteller beginnt, sich in der voreingestellten Drehzahl zu drehen. Durch erneutes Drücken der Taste LIFT (DOWN) 9 wird der Tonarm abgesenkt. ! Platte auflegen. -
Page 13: Bevor Sie Den Usb-Anschluss Herstellen
Bevor Sie den USB-Anschluss herstellen Bevor Sie den USB-Anschluss Hinweis: Die mitgelieferte Software Audacity® vor der • herstellen Verbindung und Inbetriebnahme des Gerätes am PC bzw. MAC installieren. Systemvoraussetzungen Die Audacity®-Software ist Freeware. Sehen Sie bitte • auf der Homepage nach, ob ein Update verfügbar ist. Bitte stellen Sie vor dem Anschluss sicher, dass Ihr Unter http://audacity.sourceforge.net steht ggf. -
Page 14: Wie Sie Ihre Musik Digitalisieren
Wie Sie Ihre Musik digitalisieren Wie Sie Ihre Musik digitalisieren Software installieren Starten Sie Ihren Rechner, legen Sie die CD ein und installieren Sie die Audacity-Software. Sehen Sie bitte auf der Homepage nach, ob ein Update verfügbar ist (http://audacity.sourceforge.net) und installieren Sie ggf. -
Page 15: Musik Aufzeichnen Und Speichern
Wie Sie Ihre Musik digitalisieren Musik aufzeichnen und speichern 1. Legen Sie eine Schallplatte auf. Starten Sie die Wiedergabe. 2. Klicken Sie auf die rote Aufnahme-Taste in der Software. 3. Klicken Sie auf die blaue PAUSE-Taste zum vorübergehenden Unterbrechen der Aufnahme. 4. -
Page 16: Wie Sie Den Plattenspieler Reinigen
Wie Sie den Plattenspieler reinigen Wie Sie den Plattenspieler Auswechseln der Nadel reinigen Die Abtastnadel ist durch den Abspielvorgang natürlichem Verschleiß ausgesetzt. Wir empfehlen daher eine regelmäßige Überprüfung, die bei Diamant- Stromschlag Abtastnadeln nach min. 500 Spielstunden erfolgen sollte. Um die Gefahr eines elektrischen Schlags zu Hinweis: vermeiden, dürfen Sie das Gerät nicht mit einem nassen Tuch oder unter fließendem Wasser reinigen. -
Page 17: Wie Sie Fehler Beseitigen
Wie Sie Fehler beseitigen Wie Sie Fehler beseitigen Symptom Mögliche Ursache/Abhilfe Wenn das Gerät nicht wie vorgesehen funktioniert, Schlechte Tonqualität, starke Die Nadel ist verschmutzt überprüfen Sie es anhand der folgenden Tabellen. Störgeräusche, Tonaussetzer oder abgenutzt. Die Nadel mit usw. einem Pinsel säubern bzw. -
Page 18: Technische Daten
Technische Daten Technische Daten Technische Änderungen und Irrtümer vorbehalten. Die Abmessungen sind ungefähre Werte. Abmessungen (Breite x Höhe x Tiefe): 350 mm x 95,4 mm x 348 mm Richtlinien und Normen Gewicht: 2,75 kg Dieses Produkt entspricht (ohne Batterien) der EMV-Richtlinie (89/336/EC) und der •... -
Page 19: Entsorgungshinweise
Wie Sie den Hersteller erreichen Wie Sie das Gerät entsorgen Wie Sie den Hersteller erreichen Altgeräte sind kein wertloser Abfall. Durch DGC GmbH umweltgerechte Entsorgung können wertvolle Rohstoffe Graf-Zeppelin-Str. 7 wiedergewonnen werden. Erkundigen Sie sich in Ihrer D-86899 Landsberg Stadt- oder Gemeindeverwaltung nach Möglichkeiten einer umwelt- und sachgerechten Entsorgung des Entsorgungshinweise Gerätes. - Page 20 DUAL DT 210 USB Platine tourne-disque avec branchement USB Manuel d'utilisation...
- Page 21 Différents éléments de ce manuel présentent des sûre • caractéristiques de présentation déterminés. Ainsi, vous pourrez rapidement vous rendre compte s'il s'agit Utilisation de votre platine tourne-disque DT 210 USB, nommée ci-après platine tourne-disque ou appareil. de texte normal, d'énumérations ou •...
- Page 22 Table des matières Avant de procéder au raccordement USB....13 Configuration requise............ 13 Consignes de sécurité et installation de la platine Comment numériser votre musique ......14 tourne-disque ..............4 Installation du logiciel............ 14 Consignes de sécurité.............4 ...
-
Page 23: Consignes De Sécurité Et Installation De La Platine Tourne-Disque
Consignes de sécurité et installation de la platine tourne-disque Consignes de sécurité et En cas de dérangements ou de formation de fumée • et d'odeurs provenant de l'appareil, retirer installation de la platine tourne- immédiatement la fiche d'alimentation de la prise ! Débranchez la fiche secteur si un orage menace. -
Page 24: Installation De L'appareil
Consignes de sécurité et installation de la platine tourne-disque Ne posez pas de récipient contenant des liquides, p. Installation de l'appareil • ex. vases à fleurs, sur l'appareil. Ils pourraient se • La platine tourne-disque ne doit être placée que sur renverser et le liquide qui s'écoule risquerait une surface horizontale stable, exempte de d'entraîner des dommages considérables ou même... -
Page 25: Description De La Platine Tourne-Disque
Description de la platine tourne-disque • Débrancher la fiche secteur avant un orage. Principales fonctions • Si l'appareil n'est pas utilisé pendant une période prolongée, par exemple à la veille d'un voyage Cet appareil vous permet de lire des disques 33 et •... -
Page 26: Face Avant De L'appareil
Description de la platine tourne-disque Face avant de l'appareil Cordon d'alimentation Plateau Capot Câble audio Cinch (avec fiche blanche et rouge) Tapis Bras de lecture Aiguille de lecture Levier de sélection pour le réglage de la taille des disques (SIZE 30/17) Interrupteur Lift du bras de lecture (UP/DOWN) Touche STOP Touche START... -
Page 27: Face Arrière De L'appareil
Description de la platine tourne-disque Face arrière de l'appareil 14 Câble audio Cinch (avec fiche blanche et rouge) Interrupteur PHONO/LINE Port USB 17 Cordon d'alimentation... -
Page 28: Préparatifs
Préparatifs Préparatifs Revêtement du plateau Appliquez maintenant le revêtement 5 avec le bon côté vers le haut sur le plateau. Courroie et plateau Lors de la livraison, la courroie d'entraînement [1] est Adaptateur de centrage déjà en place sur la bande de roulement de courroie du plateau 2. -
Page 29: Raccordement De La Platine Tourne-Disque
Raccordement de la platine tourne-disque Raccordement de la platine tourne-disque Interrupteur PHONO/LINE 1 – sur LINE 2 – sur PHONO 3 – Branchement USB sur le PC... -
Page 30: Raccordement À L'amplificateur
Raccordement de la platine tourne-disque Raccordement à l'amplificateur Retirer / Mettre la protection de l'aiguille Raccordez le câble audio Cinch 14 sur les prises LINE/AUX ou Phono sur l'amplificateur. Avant la lecture d'un disque, la protection de Remarque : l'aiguille [1] doit être retirée de la tête de lecture 7. -
Page 31: Lecture D'un Disque
Lecture d'un disque Lecture d'un disque Retirez le bras de lecture du support et l'amener au- dessus des sillons du disque. Le plateau commence Démarrage automatique à tourner à la vitesse préréglée. Si vous appuyez de nouveau sur l'interrupteur LIFT (DOWN) 9, le bras ... -
Page 32: Avant De Procéder Au Raccordement Usb
Avant de procéder au raccordement USB Avant de procéder au Remarque : Installer le logiciel Audacity® livré avec l'appareil • raccordement USB avant de raccorder et de mettre en service l'appareil sur PC et/ou MAC. Configuration requise Le logiciel Audacity® est un gratuiciel. Vérifiez sur la •... -
Page 33: Comment Numériser Votre Musique
Comment numériser votre musique Comment numériser votre musique Installation du logiciel Démarrez votre ordinateur, insérez le CD et installez le logiciel Audacity. Veuillez consulter la page d'accueil pour voir si une mise à jour est disponible (http://audacity.sourceforge.net) et installez le cas échéant la mise à jour. Raccorder la platine tourne-disque Raccordez le branchement USB 15 de la platine tourne- disque à... -
Page 34: Enregistrement Et Mémorisation De La Musique
Comment numériser votre musique Enregistrement et mémorisation de la musique 1. Mettez un disque. Démarrez la lecture. 2. Cliquez sur la touche d'enregistrement rouge au niveau du logiciel. 3. Cliquez sur la touche bleue PAUSE pour une interruption temporaire de l'enregistrement. 4. -
Page 35: Nettoyage De La Platine Tourne-Disque
Nettoyage de la platine tourne-disque Nettoyage de la platine tourne- Changement de l'aiguille disque L'aiguille de lecture subit une usure naturelle à l'usage. Nous vous recommandons donc de contrôler régulièrement son état, au bout de 500 heures de service Choc électrique pour les aiguilles de diamant. -
Page 36: Comment Remédier Aux Erreurs
Comment remédier aux erreurs Comment remédier aux erreurs Problème Cause possible / remède Si l'appareil ne fonctionne pas comme prévu, faites une Mauvaise qualité du son, L'aiguille est sale ou usée. À vérification à l'aide des tableaux suivants. nombreux parasites, l'aide d'un pinceau, nettoyez déraillement du son, etc. -
Page 37: Données Techniques
Données techniques Données techniques Sous réserve de modifications techniques et d'erreurs. Les dimensions sont des valeurs approximatives. Dimensions (largeur x hauteur x 350 mm x 95,4 mm x 348 mm Directives et normes profondeur) : Ce produit est conforme à Poids : 2,75 kg (sans piles) -
Page 38: Consignes D'élimination
Contacter le fabricant Contacter le fabricant Élimination de l'appareil Les appareils usagés ne sont pas des déchets sans DGC GmbH valeur. Une élimination respectueuse de l'environnement Graf-Zeppelin-Str. 7 permet de recycler des matières brutes précieuses. D-86899 Landsberg Renseignez auprès de l'administration de votre ville ou de votre commune concernant les possibilités d'une Consignes d'élimination élimination réglementaire et respectueuse de... - Page 39 DUAL DTJ 210 USB Giradischi automatico con connessione USB Istruzioni d'uso...
- Page 40 Diversi elementi del manuale sono contrassegnati con a quanto prescritto simboli particolari. In questo modo risulta facile capire se il giradischi DT 210 USB, di seguito indicato come si tratta di giradischi o apparecchio. testo normale,...
- Page 41 Indice Riproduzione di un disco........... 12 Avvio automatico ............12 Sicurezza e montaggio del giradischi ......4 Avvio manuale .............. 12 Sicurezza ................ 4 Tasto stop ..............12 Installazione ..............5 ...
-
Page 42: Sicurezza E Montaggio Del Giradischi
Sicurezza e montaggio del giradischi Sicurezza e montaggio del Qualora l'apparecchio non venga utilizzato per lungo tempo, ad esempio nel caso di un lungo viaggio, giradischi estrarre la spina. Staccare la spina dalla presa di corrente, nel caso in cui Leggere attentamente le norme di sicurezza e l’apparecchio non venga utilizzato per lungo tempo. -
Page 43: Installazione
Sicurezza e montaggio del giradischi Installazione Se dovessero penetrare corpi estranei nell'apparecchio, estrarre subito la spina dalla presa. Installare il giradischi su una superficie orizzontale Far controllare l'apparecchio da personale esperto stabile, priva di vibrazioni. altamente qualificato prima di rimetterlo in funzione. In Non collocare l’apparecchio vicino a fonti di calore caso contrario, vi è... -
Page 44: Descrizione Del Giradischi
Descrizione del giradischi Descrizione del giradischi Caratteristiche particolari Confezione Con questo apparecchio è possibile riprodurre dischi da 33 e 45 giri. Estrarre l'apparecchio e tutti gli accessori Dispone di funzioni di comando completamente automatiche. dall'imballaggio. Al completamento del disco, il braccio del pick-up viene Conservare il cartone e il materiale d'imballaggio per automaticamente riportato indietro. -
Page 45: Lato Anteriore Dell'apparecchio
Descrizione del giradischi Lato anteriore dell’apparecchio Cavo di alimentazione Piatto giradischi Coperchio Cavo audio cinch (con spina bianca o rossa) Base di gomma Braccio del pick-up Puntina, con sistema Leva di selezione per la dimensione del disco (SIZE 30/17) Tasto per sollevamento braccio pick-up (UP/DOWN) 10 Tasto Stop (STOP) 11 Tasto Start (START) -
Page 46: Lato Posteriore Dell'apparecchio
Descrizione del giradischi Lato posteriore dell'apparecchio 14 Cavo audio cinch (con spina bianca o rossa) 15 Interruttore PHONO/LINE 16 Collegamento USB 17 Cavo di alimentazione... -
Page 47: Preparazione Del Giradischi Prima Della Messa In Funzione
Preparazione del giradischi prima della messa in funzione Preparazione del giradischi Rivestimento del piatto giradischi (base) prima della messa in funzione Posare la base 5 con il lato giusto rivolto verso l'alto sul Cinghia e piatto giradischi piatto giradischi. Al momento della fornitura, la cinghia di trazione poggia Dischetto di centraggio già... -
Page 48: Collegamento Del Giradischi
Collegamento del giradischi Collegamento del giradischi Interruttore PHONO/LINE: 1 – su LINE 2 – su PHONO 3 – connessione USB a PC... -
Page 49: Collegamento All'amplificatore
Collegamento del giradischi Collegamento all'amplificatore Rimozione/applicazione della calotta protettiva della puntina Collegare il cavo audio Cinch 14 alle prese LINE/AUX o phono dell'amplificatore. Prima della riproduzione di un disco, occorre Nota: rimuovere la calotta protettiva della puntina dal pick- collegare correttamente il canale sinistro e destro (rosso up 7. -
Page 50: Riproduzione Di Un Disco
Riproduzione di un disco Riproduzione di un disco Premere il tasto START 11. Il piatto giradischi inizia a girare alla velocità preimpostata. Il braccio del Avvio automatico pick-up si posiziona automaticamente sul disco. La riproduzione viene avviata. Inserire un disco. Nel caso di un 45 giri, utilizzare ... -
Page 51: Prima Di Creare La Connessione Usb
Prima di creare la connessione USB Prima di creare la connessione Nota: Installare sul PC o sul MAC il software Audacity® in dotazione, prima del collegamento e della messa in funzione dell'apparecchio. Configurazione di sistema Il software Audacity® è un freeware. Controllare nella homepage se è... -
Page 52: Digitalizzazione Della Musica
Digitalizzazione della musica Digitalizzazione della musica Installazione software Avviare il proprio computer, inserire il CD e installare il software audacity. Controllate se sulla homepage è disponibile un aggiornamento (http://audacity.sourceforge.net) ed eventualmente installarlo. Collegare il giradischi Collegare la connessione USB 15 del giradischi con una porta USB libera del computer. -
Page 53: Registrazione E Memorizzazione Della Musica
Digitalizzazione della musica Registrazione e memorizzazione della musica 1. Posare un disco sul piatto giradischi. Avviare la riproduzione. 2. Cliccare sul tasto rosso di registrazione nel software. 3. Cliccare sul tasto azzurro PAUSE per interrompere provvisoriamente la riproduzione. 4. Per terminare la registrazione, cliccare sul tasto STOP giallo. -
Page 54: Pulizia Del Giradischi
Pulizia del giradischi Pulizia del giradischi Sostituzione della puntina Il processo di riproduzione comporta la naturale usura Scossa elettrica della puntina. Consigliamo pertanto una verifica regolare che, nel caso di puntine di riproduzione di diamante, Al fine di evitare il pericolo di scossa elettrica, non deve essere effettuata dopo min. -
Page 55: Eliminazione Delle Anomalie
Eliminazione delle anomalie Eliminazione delle anomalie Anomalia Possibile causa/rimedio Qualora l'apparecchio non funzioni come previsto, Qualità del suono scadente, La puntina è sporca o effettuare una verifica utilizzando le seguenti tabelle. forti rumori anomali, usurata. Pulire la puntina con intermittenze nel suono, ecc. un pennello o sostituirla. -
Page 56: Dati Tecnici
Dati tecnici Dati tecnici Con riserva di modifiche tecniche ed errori. Le dimensioni sono approssimative. Dimensioni (larghezza x altezza x 350 mm x 95,4 mm x 348 mm Direttive e norme profondità): Questo prodotto è conforme 2,75 Kg Peso: direttiva per la bassa tensione (2006/95/CE), (senza batterie) alla direttiva CEM (2004/108/CE) Tensione:... -
Page 57: Indicazioni Per Lo Smaltimento
Come contattare il produttore Come contattare il produttore Smaltimento dell'apparecchio I vecchi apparecchi non sono rifiuti privi di valore. Grazie DGC GmbH allo smaltimento nel rispetto dell’ambiente, è possibile Graf-Zeppelin-Str. 7 recuperare materie prime utili. Informarsi presso la D-86899 Landsberg propria amministrazione cittadina o comunale circa le opportunità... - Page 58 DUAL DT 210 USB Automatic record player with USB terminal Operating manual...
- Page 59 Various items in the operating manual are provided with safe set layout features. This ensures you can easily use of your DT 210 USB record player, referred to determine whether you are dealing with below as "record player" or "unit".
- Page 60 Contents Playing a record............13 Automatic start.............. 13 Important notes for users in the U.K......4 Manual start ..............13 Mains plug ............... 4 Stop button ..............13 How to connect a plug............. 4 ...
-
Page 61: Important Notes For Users In The U.k
Important notes for users in the U.K. Important notes for users in the U.K. How to connect a plug Mains plug The wires in the mains lead are coloured with the following code: This apparatus is fitted with an approved 13 Amp plug. blue = neutral (N), brown = live (L). -
Page 62: Safety And Setting Up The Record Player
Safety and setting up the record player Safety and setting up the record Before a thunderstorm breaks, pull the mains plug. If the unit is not going to be used for a prolonged player period, e.g. in the event of a long trip, remove the mains plug from the socket. -
Page 63: Setup
Safety and setting up the record player Keep the unit away from devices that produce strong checked by a specialist before starting to use it again. magnet fields. Otherwise you are at risk of receiving an electric shock! Do not place any heavy objects on the unit. Do not open the housing. -
Page 64: Description Of The Record Player
Description of the record player Description of the record player Special characteristics This unit allows you to: play records for 33 and 45 rpm. Included in delivery It offers fully automated control functions. The tone arm is retracted automatically when the end of Remove the unit and all accessory parts from the a record has been reached. -
Page 65: The Front Of The Unit
Description of the record player The front of the unit Mains cable Turntable Dust cover Cinch audio cable (with white and red connectors) Turntable mat Tone arm Stylus with system Record size selector lever (SIZE 30/17) Tone arm lift button (UP/DOWN) 10 Stop button (STOP) 11 Start button (START) 12 Speed button (SPEED 33/45) -
Page 66: The Rear Of The Unit
Description of the record player The rear of the unit 14 Cinch audio cable (with white and red connectors) 15 PHONO/LINE switch 16 USB terminal 17 Mains cable... -
Page 67: How To Prepare The Record Player For Operation
How to prepare the record player for operation How to prepare the record player Turntable mat for operation Now lay the turntable mat 5 right-side-up onto the turntable. Belt and turntable Spindle adapter The drive belt is delivered already seated on the belt The spindle adapter is required, for example, for singles contact surface of the turntable 2. -
Page 68: Connecting The Record Player
Connecting the record player Connecting the record player PHONO/LINE switch: 1 – to LINE 2 – to PHONO 3 – USB port to computer... -
Page 69: Connection To The Amplifier
Connecting the record player Connection to the amplifier Removing/attaching the stylus protection cap Connect the cinch (RCA) audio cable 14 to the LINE/AUX or phono jack on the amplifier. Before playing a record, you must remove the stylus Note: protection cap from the pickup 7. -
Page 70: Playing A Record
Playing a record Playing a record Take the tone arm from its support and swivel it over the record's lead-in groove. The turntable begins Automatic start turning at the set speed. Pressing the LIFT (DOWN) button 9 again lowers the tone arm. ... -
Page 71: Before Establishing The Usb Connection
Before establishing the USB connection Before establishing the USB Note: Install the supplied Audacity® software on a PC or Mac connection before connecting and operating the unit. The Audacity® software is freeware. Please check their System requirements website to see if an update is available. Newer versions or updates are available from Before making the connection, please ensure that the http://audacity.sourceforge.net as needed. -
Page 72: How To Digitalise Your Music
How to digitalise your music How to digitalise your music Installing the software Start your computer, insert the CD and install the Audacity software. Check the website to see if an update is available (http://audacity.sourceforge.net) and if there is, install the update. -
Page 73: Recording And Saving Music
How to digitalise your music Recording and saving music 1. Put on a record. Start the playback. 2. Click the red record button in the software. 3. Click the blue PAUSE button to interrupt the recording temporarily. 4. Click the yellow STOP button to end the recording. 5. -
Page 74: How To Clean The Record Player
How to clean the record player How to clean the record player Replacing the stylus The stylus is naturally exposed to wear by the playback Electric shock process. Therefore we recommend regular inspection, which for diamond styluses should take place after at To avoid the danger of an electric shock, you must least 500 playing hours. -
Page 75: Troubleshooting
Troubleshooting Troubleshooting Symptom Possible cause/remedy If the unit does not function as intended, perform checks Poor tone quality, loud static The stylus is dirty or worn. using the following tables. noise, sound dropouts etc. Clean the stylus with a brush or replace it. -
Page 76: Technical Specifications
Technical specifications Technical specifications We reserve the right to make technical modifications and correct errors. Dimensions The dimensions are approximate values. (width x height x depth): 350 mm x 95.4 mm x 348 mm Weight: 2.75 kg Directives and standards (without batteries) This product conforms to Voltage:... -
Page 77: Disposal Instructions
Graf-Zeppelin-Str. 7 can be regained. Inquire at your city or municipal D-86899 Landsberg administration about possibilities for disposing of the unit www.dual.de properly and in an environmentally sound manner. This unit is labelled according to 2002/96/EC, the Waste Disposal instructions Electrical and Electronic Equipment Directive (WEEE).
Need help?
Do you have a question about the DT 210 USB and is the answer not in the manual?
Questions and answers