
Related Manuals for Canon Rayo S1


Summary of Contents for Canon Rayo S1
-
Page 1: User Manual
Rayo S1 Portable Mini Projector Rayo S1 User Manual Read this user manual carefully before using the product. It is essential to read the section "For Safe Use" to correctly use the product. -
Page 2: Table Of Contents
Name of Each Part My App Button functions Browser Multimedia Basic control Setting Charging functions Wi-Fi network connection Standard charge time and usage time Turning On/Off Sound ® Turning on in Bluetooth Mode Display Turning on in Projector Mode Storage Turning Off Battery Rayo S1 User Manual... - Page 3 Application (My App) FCC CAUTION Using an application Music Product specification Video Albums FileExplorer Calculator Clock APKinstaller Downloads EshareServer Camera Connect WPS Office Connecting a USB Using the projector as a portable disk Detecting a USB Detecting a USB mouse Updating the product firmware with a USB memory Using as a portable battery Using an external speaker Troubleshooting When the power does not turn on When you cannot connect to a wireless network When the screen is trapezoid If the product is not operating or it does not power off Rayo S1 User Manual...
-
Page 4: Before Use
Before Use Notices Product images and display screens in this manual are for illustrations purposes only and may differ from the actual product or screen. Furthermore, they are subject to change; new components can be added or deleted without prior notice for product quality improvement. We appreciate your kind understanding. For safe use The purpose of the following contents is to protect the safety of the user and to prevent property damage. Before using the product, make sure to read the user manual and familiarize yourself with all precautions and control methods. Do not use near a medical device, such as a pacemaker. If you use it near a medical device such as a pacemaker, the electromagnetic signals from the product may affect the performance of the medical device. Do not use near a microwave oven. If you use it near a microwave oven, electromagnetic signals can interfere resulting in a loss of communication or reduction in the communication speed. Rayo S1 User Manual... -
Page 5: Communication Cannot Be Made If There Are Metals, Steel, Or Concrete Between The Projector And A Wireless Device
3. If the product generates an electronic magnetic signal that is harmful to specific low power wireless stations or amateur wireless stations, or there is a problem, contact the customer center. Safety Warnings and Caution Indicates the possibility for injury or death if handled improperly. Warning: For safe use, make sure to follow the warning. Indicates the possibility for injury if handled improperly. For safe Caution: use, make sure to follow the precautions. Rayo S1 User Manual... -
Page 6: Installing
• Do not group or tie the USB cables. It may cause fire or electrical shock. • Make sure that the power adapter is fully inserted into the power outlet. It may cause fire or electrical shock. Rayo S1 User Manual... -
Page 7: Handling
• Periodically check the power adapter and make sure there is no heat emitting, rust, bending, wearing, or cracks. If you continue to use a damaged product, it may lead to fire or electrical shock. Risk Group 2 CAUTION. Possibly hazardous optical radiation emitted from this product. Do not stare at operating lamp. May be harmful to the eye. Rayo S1 User Manual... -
Page 8: Product Characteristics
Product characteristics Bluetooth speaker function You can use it as a Bluetooth speaker and since it has a microphone function, it can be used as a mic/speaker for audio conferences. Sub battery functions You can use it as a standalone sub battery. Connect it to a device that you want to charge. Caution While charging an iOS device, it is necessary to keep the power turned on for this product. While charging an Android device, it is not necessary to keep the power turned on for this product. Projector function Simply connect wirelessly to other devices and use it as a projector. Caution To connect the project to other devices such as smart devices, only wireless connections are supported. Connection via a wired cable is not supported. Android OS mounting You can use the touch pad to access the Internet from the product. Caution It requires an Internet environment, such as a separate mobile Wi-Fi router. Rayo S1 User Manual... -
Page 9: Basic Package
Basic package Check for In Box Accessories Note Please check whether the following accessories are included in the box: Accessories included in the box are subject to change without prior notice. Main body USB cable (1m) Quick Guide Type-A to Micro-USB USB Charger (2.0A) Warranty Card Rayo S1 User Manual... -
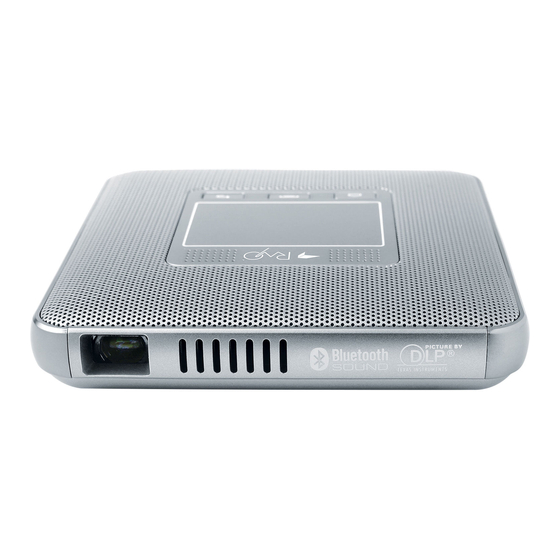
Page 10: Name Of Each Part
Projection lens ring Tripod mount hole Air vent 1 2 3 4 5 6 7 1 2 Power switch Audio terminal 3 USB Type-A terminal 4 5 6 Charging lamp Power input terminal 7 Reset button Rayo S1 User Manual... -
Page 11: Button Functions
Reset button • If the projector does not operate or turn off, press the Reset button for about a second with a paperclip. The power will be turned off and the device will be initialized. Rayo S1 User Manual... -
Page 12: Basic Control
Basic control Charging functions 1. Connect the micro USB charging jack to the power terminal of the projector. Caution • You must only use an authentic charger (DC 5V/2A). Use of a non-certified charger can cause a malfunction. • If you charge the product using a publically available portable battery, make sure to check whether the rated output fits the projector specification before use. (Projector spec: 5V/2A) If you use a charger with a rated output lower than the required specification, it can cause the main unit to malfunction. 2. When the charging lamp turns green, disconnect the charger from the projector. Note • A red charging lamp means it is charging, a green charging lamp means charging is complete. Standard charge time and usage time If you are using the projector for the first time, or have not used it for a long time, charge the battery before use. Rayo S1 User Manual... -
Page 13: Turning On/Off
1. Check whether the device is turned off. If the power switch is in the center, the device is turned off. 2. Slide the power switch to the left (Bluetooth mode 3. It will enter Bluetooth connection mode. When you hear the beeping sound, it means that the device has entered Bluetooth connection waiting mode. Rayo S1 User Manual... -
Page 14: Turning On In Projector Mode
If the power switch is in the center, the device is turned off. 2. Slide the power switch to the right (Projector mode As the projector turns on, the screen will be projected via the projection lens. Note Android OS is operated in Projector mode, thus it takes around 10 seconds for the projection lens to emit light. Turning Off Slide the power switch to the center ( ) in Bluetooth or Projector mode to turn off the power. Rayo S1 User Manual... -
Page 15: Focus Adjustment
• Gently turn the focus adjustment ring to set the focus. If you exert excessive force on the focus adjustment ring, it can cause damage or breakage. • The projection may be out of focus if the projection distance is out of the range. • The larger the projection distance (distance between the product and the screen), the larger and darker the screen. Minimum focus distance 1.5 ft Screen size: About 14 inches Maximum focus distance 10 ft Screen size: About 84 inches Recommended projection distance 3 ft Screen size: About 28 inches Volume button Adjust the audio volume with the volume button (+, -). When you press the volume button while using the device, the volume status is displayed on the screen so you can adjust accordingly. Rayo S1 User Manual... -
Page 16: Reset
Reset Reset the product if it is not operating or it is not powering off. 1. Use a thin non-conducting tool, such as a toothpick, and press the Reset button for about one second. 2. The product will turn off and enter the reset status. The product is temporarily turned off and then on again. Touchpad You can control the touchpad to select a menu, run an application, click a button, or input via the keyboard on the projected screen. Touchpad Rayo S1 User Manual... -
Page 17: Select/Run
Note • Make sure that the touchpad does not come in contact with any electrical objects. Any flow of electrical current, such as an electrical shock can cause a malfunction or failure. • Please note that the edge of the touchpad does not detect touch so it may not respond correctly to touch. • Use your fingers to touch the touchpad. Select/Run Gently tap the touchpad to run an application, select a desired menu, click displayed buttons on the screen, or for keyboard input. Menu Displays To open the additional operation menu e.g. file copy/move/paste, tap twice with a long press tap on the second tap. Rayo S1 User Manual... -
Page 18: Moving The Screen Up And Down
Moving the Screen Up and Down To move the screen up or down, use two fingers to tap and drag up or down. Moving the Screen Left and Right To move the screen left or right, two quick taps holding on second and then dragging left or right with one finger (like shown in picture). Or, tap the page arrows or the point on the page. Rayo S1 User Manual... -
Page 19: Bluetooth
The company is not liable for any problems resulting from these actions. Bluetooth ® pairing 1. Slide the power switch to the left to put Bluetooth in waiting mode. A beep will sound. Note ® • For more information on how to turn on Bluetooth mode, see "Turning on in Bluetooth Mode" on page 13. • When Bluetooth connection is in waiting mode, the blue lamp on top of the main body will blink fast. 2. When a Bluetooth connection is successful, a sound will emit and the blue lamp on top of the main body will light up. Note • To disconnect Bluetooth or stop use, slide the power switch to the center and power off. • If the device was once paired with this projector, it will connect automatically. Rayo S1 User Manual... -
Page 20: Bluetooth Ⓡ Pairing From The Source Device
Ⓡ connection is complete, the Bluetooth connection icon will be displayed on the status bar of the device. Disabling Bluetooth Ⓡ pairing with the source device 1. On the Settings screen, select Bluetooth. 2. The name of paired devices will be displayed. 3. Tap the device name that you want to disable pairing for. 4. Select Unregister. Using the Bluetooth Speaker (Hands-free) ® The product can be used as a Bluetooth speaker. With its hands-free function, you can dial, receive, or end a call while connected to the Bluetooth speaker. Note • If you make a call by pressing the Call button, the most recent number in the call history will be dialed. • The audio terminal will not operate while you use the Bluetooth speaker function. 1. When the power is off, slide the power switch to the left to turn on in Bluetooth mode. 2. Turn on the Bluetooth function in the device to be connected. 3. In the device search list for Bluetooth, select "MiniPJ BT SPK." 4. You can press the buttons on the product to use the Bluetooth speaker and the hands-free function. Rayo S1 User Manual... -
Page 21: Bluetooth Speaker (Hands-Free) Button
• Move to the next track Short press the “-” volume button. • Make a call: Press the "Call/End" button twice. • End a call: Press the "Call/End" button during a call. • Answer a call: Press the "Call/End" button during an incoming call. Rayo S1 User Manual... -
Page 22: Projector
• The wireless quality may vary depending on the wireless environment or a connected device. • A connection to the OS mounted in each device is an independent check by Canon Korea Business Solutions Inc., and it does not assure the device operation of each manufacturer. -
Page 23: Home Screen
:Indicates that Wi-Fi is turned on but not connected to the Internet. • :Indicates that Wi-Fi is turned on and is connection to the Internet. • :Alarm display • :Current time display • :Current date and day display Rayo S1 User Manual... -
Page 24: Mirroring
• Make sure that Wi-Fi is turned ON. 2. Switch the smart device to Mirroring mode. ❶ Turn on the Wi-Fi on the smart device. (No need for an Internet connection.) ❷ In the Menu Settings, tap the mirroring function icon to activate it. Note Different names or icons can be used depending on the smart device manufacturer or the Android OS versions. (e.g., Screen mirroring, Smart View, Miracast, Wireless Display, and Smart View.) Rayo S1 User Manual... -
Page 25: Mirroring Connection (Windows Os)
Search for a connectable device from the smart device. ❹ Select the same device name as the device name on the projection screen. Note • The access confirmation screen for a device to be connected to the projector will be displayed where you can choose to connect or disable the connection. • If you select Connect and a connection is set up successfully, the screen of the smart device will be projected on the projector. • After use, make sure to turn off the mirroring function on your smart device. Mirroring connection (Windows OS) 1. On the home screen, click the "Mirroring " icon to switch to waiting mode. Rayo S1 User Manual... - Page 26 Select Add Device and select the device name again. ※ The device name is shown as "MINI-xxxx." If the mirroring screen is displayed on the projector, the connection is complete. 3. After use, make sure to disable mirroring from the computer. Note During the mirroring connection, press the Windows key on the bottom left of the keyboard together with the K key to display the Windows Settings. In the Windows Settings, tap Disconnect. Rayo S1 User Manual...
-
Page 27: Sharing
Sharing Sharing connection (iOS) 1. On the home screen, click the "Sharing " icon to switch to waiting mode. 2. In the Wi-Fi setting on the iOS device, select a name of device to connect and connect to the Wi-Fi network. ※ The device name is shown as "MINI-xxxx." 3. On the iOS device's screen, swipe up from the bottom of the screen to turn on AirPlay mirroring and select the name of device to be connected to your iOS device. If the mirroring screen from your iOS device is projected after selecting the name of device to be connected, the setup is complete. Note • Make sure to play videos from the beginning when playing from a smart device. • A slight delay may be cause during the video depending on the wireless connection. Rayo S1 User Manual... -
Page 28: My App
Prepare the Wi-Fi environment which can be used to access the Internet. ❷ Click My App > EShareServer ( ) to run the app. If correctly connected to the internet, registration is complete. My App 1. To see the application list, click the "My App " icon on the home screen. 2. Click the icon of the application to run. Rayo S1 User Manual... -
Page 29: Browser
Browser You can access the website to search for information or add it to your bookmarks. However, you must have a connection to the Internet before using a browser. 1. Click the "Browser " icon on the Home screen to run the web browser application. Note It requires an Internet environment, such as a separate mobile Wi-Fi router. 2. Click the address bar. 3. Enter a website address or keyword then click Move. 4. Gently drag down the screen to display the address bar and the toolbar. Rayo S1 User Manual... -
Page 30: Multimedia
Video: You can see a list of videos and select a file to play. ❷ Music: You can see a music library and select a file to play. ❸ Albums: You can see a list of images and select a file to view. Setting Click the "Setting " icon on the Home screen to move to the screen to check or change the device settings. Note You can configure the user environment of features and applications. Rayo S1 User Manual... -
Page 31: Wi-Fi Network Connection
A confirmation window will appear to check the connection to the computer. To connect, select OK. ❸ A connection is complete. To disconnect with the computer, select Disconnect. Sound You can change the volume. ❶ Select Sound from the Settings screen. ❷ Sound: You can adjust the volume in eight levels. Rayo S1 User Manual... -
Page 32: Display
Storage You can check the current usage and the remaining capacity on each storage or delete data within the storage. In addition, you can check if the USB memory is connected to the product. Battery You can check the current usage and maximum battery level. You can manage installed applications and change settings. You can check or manage the list of applications for Downloads/SD Card/Currently Running/All. ❶ Select an application for the Setting screen. ❷ Application settings: You can configure the user environment of applications. Security You can specify whether or not to allow installation of unknown applications. Language & Input You can set the input environment displayed on the screen, such as languages and characters. Some options may not be available depending on the selected language. Language : Select the language to use in the application. Rayo S1 User Manual... -
Page 33: Date & Time
Default : Select the keyboard to use to enter characters. Choose for each language being used. Reset Factory reset : Initialize all the settings, internal memory, and storage for the product. Date & Time Select [Date & Time] on the Setting screen to set the time and date display format. When the battery dies, the [Date and Time] can be reset. Date/time auto settings : Enable or disable the application of time from the network. Date settings : Manually set the current date. Time settings : Manually set the current time. Standard time zone selection : Select the standard time zone for your city. Developer options This option can be used to adjust USB functions. Do not use it if possible. It can affect product operation or performance. About Device Select [About Device] on the Settings screen to check product information. Rayo S1 User Manual... -
Page 34: Application (My App)
Select a video from the list to play. Albums Stored images are displayed on the screen. You can customize the playback environment to your preference. ❶ Select [Album ] on the My App screen. ❷ Select an image to display from the list. FileExplorer If you connect a built-in memory or a USB memory, you can see the files stored in them. ❶ Select [Resource Manager] on the My App screen. Rayo S1 User Manual... -
Page 35: Calculator
] on the My App screen → and click the Alarm icon on the top left of the screen. ❷ From the alarm list, click the trash bin icon for the alarm you wish to delete. Rayo S1 User Manual... -
Page 36: Apkinstaller
❷ Call the soft keyboard and enter the timer records. ❸ Click [Start] to start the timer. ❹ When you hear an alarm, click [Cancel] to end the timer. APKinstaller You can install the APK file from your product or a USB memory. Downloads The list of files downloaded from the Internet is displayed. You can install (for APK file), delete, or change the name. Rayo S1 User Manual... -
Page 37: Eshareserver
EshareServer This is a feature related to the usage registration required for using the mirroring feature in an iOS device. If the source device is not found for the sharing feature, the device registration through EshareServer may be incomplete. Click the EshareServer icon to register your device. Also, an additional Internet connection environment is required for EshareServer registration. Camera Connect You can set up a Wi-Fi connection to a Cannon digital camera to project images and videos from the camera on to the projector. Note You can only use this feature for Cannon digital cameras that supports Wi-Fi connections (some do not support Wi-Fi connection). WPS Office The Document Viewer can be used to view Office documents. For more about how to use it, see Help in the application or visit the website (https://www.wps.com/ android). Rayo S1 User Manual... -
Page 38: Connecting A Usb
The product can be detected as a portable disk. Also, by controlling the connected computer, you can exchange files between the product and the computer. Note • During file transmission, make sure that the connection to the USB cable (Micro-USB to USB-A) included in the box is maintained. A disconnection can cause damage in the product and data. • You may experience problems while connecting from the USB-HUB. Directly insert the USB to the USB port. • USB-Type A cannot be used for this feature. 1. Turn on the device in Projector mode. Note For more information on how to turn on Projector mode, see "Turning on in Projector Mode" on page 14. 2. Connect the product and the computer with the included USB cable (Micro- USB to USB-A). 3. Click the USB menu in [Settings] of the product. 4. Check the USB connection with the computer then click Connection. 5. When a connection is complete, transfer files between the product and the computer. Detecting a USB Note • During file transmission, do not disconnect the USB memory. It can damage data and the product. • You cannot use a USB memory with security features. 1. Turn on the device in Projector mode. Rayo S1 User Manual... -
Page 39: Detecting A Usb Mouse
When a mouse is recognized, it can be used just like your touchpad. Updating the product firmware with a USB memory Note • During file transmission, do not separate the USB memory. It can damage data and the product. • Updates requires a minimum of 30% battery level, so make sure to connect to an authentic charger (DC 5V/2A) to successfully run an update. 1. Turn on the device in Projector mode. Note For more information on how to turn on Projector mode, see "Turning on in Projector Mode" on page 14. 2. Before updating, check the software build version installed in the device. You can check the build number in Settings : Device Information. 3. If you have any queries on the update software, please contact our customer support. Note Check if the build number of the software to update later than the currently installed version. 4. Rename the received update file to "update.zip". Rayo S1 User Manual... - Page 40 Update will take place automatically. Note • During the update, the power of the device will turn off/on several times. Do not operate with the device until the update is complete. • Please note that if you forcefully turn off the power, the software may be damaged. 8. After the update is complete, remove the USB memory. For a sharing connection after the update, you must register the device in EShareServer. For more details about sharing connection, see "Sharing" on page 27. Rayo S1 User Manual...
-
Page 41: Using As A Portable Battery
Using as a portable battery Note While charging an iOS device, it is necessary to keep the power turned on for this product. While charging an Android device, it is not necessary to keep the power turned on for this product. 1. Connect the product and the device to charge using the USB cable. (Micro-USB terminal on the main unit) Note • Charging capacity: DC 5V, 1A/h • The maximum charging time differs from device to device. • Please not that if the USB cable is used to connect the main unit's USB terminal (USB Type-A) to the power input terminal (USB micro 5pin), it can cause problems, such as a malfunction. 2. Check if the device is being charged correctly. Rayo S1 User Manual... -
Page 42: Using An External Speaker
Using an external speaker You can connect external speakers to the product to generate audio output. Note • When you connect to external speakers, the internal speakers will not operate. • You must use external speakers only. • Make sure to disconnect the external speakers when not in use. 1. Connect the external speakers to the audio terminal. 2. Check for correct sound output from the connected external speakers. Rayo S1 User Manual... -
Page 43: Troubleshooting
• If it does not play due to the incorrect video format, use a codec converter to convert it into a general format. Other • You must use an authentic charger with DC 5V, 2A. If you do not use an authentic charger, it won't charge correctly and may cause problems in features. Rayo S1 User Manual... -
Page 44: Legal Notice
Legal notice Registered trademark DLNA is a unique trademark or registered trademark of DLNA.org. Wi-Fi is a trademark or registered trademark of www.wi-fi.org. Bluetooth is a trademark or registered trademark of Bluetooth.org. Ⓡ Android is a trademark or registered trademark of Google Inc. AirPlay is a trademark for Apple Inc., which is registered in the USA and other countries. Windows is trademark or registered trademark for Microsoft Corporation in the USA, Japan and other countries. Other company names or product names are trademarks or registered trademarks of each company. FCC (Federal Communications Commission) Projector Model Rayo S1 FCC ID: XXXXXXXX This device complies with part 15 of the FCC Rules. Operation is subject to the following two conditions: (1) This device may not cause harmful interference, and (2) this device must accept any interference received, including interference that may cause undesired operation. FCC CAUTION This equipment may generate or use radio frequency energy. Changes or modifications to this equipment may cause harmful interference unless the modifications are expressly approved in the manual. The user could lose the authority to operate this equipment if an unauthorized change or modifications is made. This equipment has been tested and found to comply with the limits for a Class B digital device, pursuant to part 15 of the FCC Rules. These limits are designed to provide reasonable protection against harmful interference in a residential installation. This equipment generates, uses and can radiate radio frequency energy and, if not installed and used in accordance with the instructions, may cause harmful interference to radio communications. However, there is no guarantee that interference will not occur in a particular installation. Rayo S1 User Manual... - Page 45 If this equipment does cause harmful interference to radio or television reception, which can be determined by turning the equipment off and on, the user is encouraged to try to correct the interference by one or more of the following measures: • Reorient or relocate the receiving antenna. • Increase the separation between the equipment and receiver. • Connect the equipment into an outlet on a circuit different from that to which the receiver is connected. • Consult the dealer or an experienced radio/TV technician for help. This transmitter must not be co-located or operated in conjunction with any other antenna or transmitter. This equipment complies with FCC radiation exposure limits set forth for an uncontrolled environment and meets the FCC radio frequency (RF) Exposure Guidelines. This equipment should be installed and operated keeping the radiator at least 8 inches or more away from person’s body. Canon U.S.A., Inc. 1 Canon Park, Melville, NY 11747 U.S.A. Phone: +1 631-330-5000 http://www.usa.canon.com/ Rayo S1 User Manual...
-
Page 46: Rayo S1
Product specification Product name Projector Model name Rayo S1 Display Resolution WVGA (854x480) Maximum input resolution Full HD (1920x1080) Light source RGB LED Brightness 100 lumens Optics Screen size 3.3 ft Focus adjustment Manual Aspect ratio 16 : 9 Screen offset 100 % Contrast ratio 800 : 1 Throw ratio 1.6 : 1... - Page 47 Canon U.S.A., Inc. One Canon Park, Melville, NY 11747 U.S.A. Phone: +1 631-330-5000 http://www.usa.canon.com/ Rayo S1 User Manual...