Table of Contents
Advertisement
Advertisement
Table of Contents

Related Manuals for GRAVOGRAPH M20 PIX


Summary of Contents for GRAVOGRAPH M20 PIX
- Page 1 User Manual M20 PIX Machine Electronic Engraving Machine First Contact M20 PIX Before installing and using this machine, you must read this user guide care- fully. Keep it in a safe place, in case you need to refer to it later.
- Page 2 BP 15 - Z.I. - 10600 LA CHAPELLE SAINT LUC - FRANCE Importer's address This publication and its contents are proprietary to Gravotech Marking SAS (trademark Gravograph), and are intended solely for the contractual use of Gravotech Marking SAS customers.
-
Page 3: Table Of Contents
Physical installation advice ......................10 Electric installation advice ......................11 Electrical connections of the machine ....................11 Connecting the M20 PIX machine to a PC ..................12 Switching the machine on ....................... 14 Problems ............................14 Switching the machine off ....................... 14 Mechanical block.......................... -
Page 4: Information About Regulations
o f o u r n a t u r a l r e s o u r c e s , a n d p r o t e c t i n g h u m a n h e a l t h . M20 PIX Machine - Electronic Engraving machine . 4... -
Page 5: Presentation
• Do not place any object on the machine other than that to be engraved. • The machine should never be used with anything other than Gravograph accessories and tools. • Never hold the material to be engraved in your hands. Only use the GRAVOGRAPH clamping systems designed for your machine. -
Page 6: Stages Of Unpacking
One USB cable (for the machines which are controlled by PC) One pair of jigs Content of the accessories bag One short allen key (2 mm ) One brush One allen key (1.5 mm ) M20 PIX Machine - Electronic Engraving machine . 6 First Contact... -
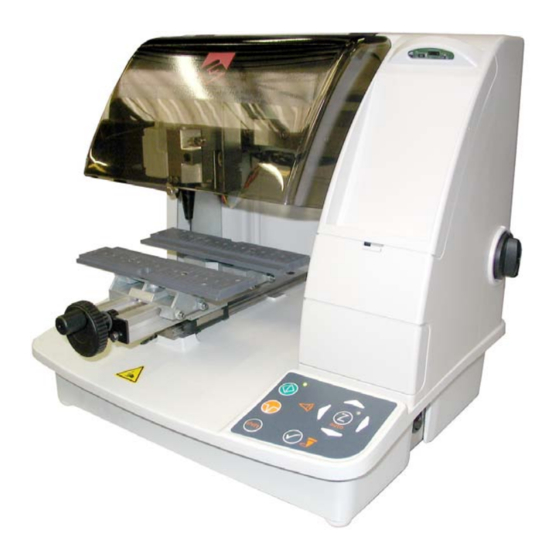
Page 7: Description
The M20 PIX is a machine for flat work : - It is supplied with a vice. The M20 PIX machine cover a maximum engraving surface area of 3.9"x 3.9" (100 x 100 mm) (Max. pen diameter = 1.1" =28 mm). -
Page 8: Rear View Of The Machine
Not available with this machine - Very low security level The machine must always be switched off before connecting or disconnecting a cable as indicated on label displayed on the back of the machine : M20 PIX Machine - Electronic Engraving machine . 8 First Contact... -
Page 9: Control Panel Of The Machine
ENGRAVING CYCLE PAUSE JOYSTICK VALIDATION MANUAL Z REF SHIFT SPINDLE MOTOR (Spindle motor On/Off) AUTO Z REF RED, LASER POINTER (Laser pointer On/Off) X,Y MACHINE SETTING Z MACHINE SETTING First Contact M20 PIX Machine - Electronic Engraving machine . 9... -
Page 10: Installation
- Brusque temperature changes, - Dust (exhaust pipe), - Liquid splashes, spillages on the electronic rack, cables and connections, and any other part of the machine; unless recommended by GRAVOTECH MARKING SAS (ex. : lubrication), - Vibrations, - Electric or electronic radiation. M20 PIX Machine - Electronic Engraving machine . 10 First Contact... -
Page 11: Electric Installation Advice
If other things are connected to the machine (such as a computer and the M20 PIX engraving machine), the machines should be connected to the same mains line. • Avoid using the same line to supply inductive or capacitive machines as well as the Gravograph machine (motors, electrosluices, chargers...) • Avoid using a manual or automatic commutator on the same mains line as the Gravograph machine (relay, temporiser,... -
Page 12: Connecting The M20 Pix Machine To A Pc
Connecting the M20 PIX machine to a PC The computer and the M20 PIX Machine must both be switched off. As PCs and the Windows graphical environment are in widespread use in the IT sector, ® we have used these products as the basis for defining the installation and operating pro- cedure for the M20 PIX machine If you don’t have equipment which is compatible and you encounter some problems of installation or use, contact your... - Page 13 Plug the USB cable (P) into the USB port of the PC. Refer to the installation manual of the computer for the USB port (1.1). First Contact M20 PIX Machine - Electronic Engraving machine . 13...
-
Page 14: Switching The Machine On
If this happens, switch the machine off. Wait 30 seconds and switch it on again. Respect this rule. This time allows any electric shock to the machine, possibly damaging the power supply, to be avoided M20 PIX Machine - Electronic Engraving machine . 14 First Contact... -
Page 15: Installing The Engraving Software In Windows Xp
Then indicate from Windows (printer properties) the virtual USB port created previously by Windows as the destination port of this "generic/text only" printer. To engrave the first plate, launch the Tutorial and execute the «Engraving a plate» lesson. First Contact M20 PIX Machine - Electronic Engraving machine . 15... -
Page 16: From The Transfer To The Engraving
In the engraving programme, make sure that you have indicated the good engraving parame- ters, the good machine parameters, the Z speed and the engraving sense : For a flat work you should select the function (1) which activates the automatic ZRef. function (3) You can indicate a personalized origin (2) to use the "point and shoot" function. 3. Transfer the composition to the M20 PIX machine, by pressing OK. The machine shortly beeps ("Operation was finished successfully") Positioning the plate onto the vice 4. Open the protective housing (E) of the machine. M20 PIX Machine - Electronic Engraving machine . 16 First Contact... - Page 17 9. Using the tightening knob, tighten the plate so that it cannot move during engraving. If the plate is correctly tightened, noise and vibrations are reduced to a minimum when the machine is engraving. Check that the object is tightened correctly to ensure that it is not ejected during engra- ving. Check that the jigs (T) are removed and that the vice is opened as much as possible be- fore using the pen attachment. First Contact M20 PIX Machine - Electronic Engraving machine . 17...
-
Page 18: Adjusting The Spindle Pressure
Adjusting the spindle pressure 10. Set the spindle pressure with the knob (K) on the position (2). Adjust if it is necessary. (Position (4) = Rigid spindle and position (1) = Supple spindle) (pict. 1). 11. Close the protective housing (E) of the machine. To avoid any risks of getting burnt and any projections of swarf, the protective housing of the machine must be always closed, except when carrying out adjustments. M20 PIX Machine - Electronic Engraving machine . 18 First Contact... -
Page 19: Launching The Engraving
The spindle lowers until the diamond tip touches the plate. As soon as the position of the Z Ref. point on the Z axis is saved, the engraving starts. In the event of a problem, press the PAUSE key The machine will momentarily pause . To continue with the rest of the engraving, press the START key To stop engraving completely, press one of the arrows on the joystick (arrow keys). To increase the travel speed of the spindle during engraving, press the arrow key To reduce the travel speed of the spindle during engraving, press the arrow key First Contact M20 PIX Machine - Electronic Engraving machine . 19... -
Page 20: General Maintenance
General maintenance Before carrying out any maintenance, unplug the mains supply cable (label No internal part of the Gravograph machine requires user intervention : general maintenance is limited to external clea- ning. If you wish to have the inside of your machine cleaned, contact a Gravograph technician. The mains cable should always be replaced if it is damaged in any way : flattened, nicked, cracked etc..., or if there are bare wires. M20 PIX Machine - Electronic Engraving machine . 20... -
Page 21: Adjusting The Machine
The tool-holder moves towards the zero point of the LASER diode. 10. Set the zero point of the diode D(0,0,0) on the machine's X axis using the 2 keys 11. Save the position of the zero point O(0,0) on the X axis by pressing the key for 3 seconds until it shortly beeps. First Contact M20 PIX Machine - Electronic Engraving machine . 21... - Page 22 3. Press the keys simultaneously. The tool-holder moves towards the centre of the vice. The spindle lowers until the diamond tip touches the plate. 4. Set the zero point (0,0,0) on the machine's Z axis using the 2 keys 5. Save the position of the zero point O(0,0,0) on the Z axis by pressing the key for 3 seconds until it shortly beeps. M20 PIX Machine - Electronic Engraving machine . 22 First Contact...
-
Page 23: Technical Characteristics
Min Z clearance 0.25 mm - 0.01in X,Y engraving precision < 0,1 mm - 0.004 in Engraving repeatability < 0,05 mm - 0.002 in < 0.1 mm - < 0.004 in Flatness (Vice) Cutter Diamond First Contact M20 PIX Machine - Electronic Engraving machine . 23... -
Page 24: Electrical Characteristics
M20 PIX Input : EN 61000-6-2 ------------- Integrated 1.7 - 0.75 50 - 60 Machine (industrial Norms 100 - 240 V environment) EN 61000-3-2 EN 61000-3-3 Output : 24 V M20 PIX Machine - Electronic Engraving machine . 24 First Contact... -
Page 25: Engraving Softwares Characteristics
Control panel Membrane with raised tactile points Nomber of keys Display Inputs/Outputs Sub - D female 15 - pin connection Engraving softwares characteristics Engraving software Engraving software GravoStyle QuickPix (version >___) Operating system Windows 2000 ; Windows XP ; Windows Vista (for the engraving software) Languages Fre, Eng, Ger, Ita, Spa, Nld File formats Binary Optional accessories First Contact M20 PIX Machine - Electronic Engraving machine . 25...
Need help?
Do you have a question about the M20 PIX and is the answer not in the manual?
Questions and answers