Table of Contents
Advertisement
Advertisement
Table of Contents

Related Manuals for Razer Raiju Ultimate


Summary of Contents for Razer Raiju Ultimate
- Page 1 RAZER RAIJU ULTIMATE MASTER GUIDE...
- Page 2 The Razer Raiju Ultimate is the wireless PS4 controller that allows advanced customization via our own mobile app. Whether it’s remapping multi-function buttons or adjusting sensitivity options, you have full control from the palm of your hand. Take it further with interchangeable thumbsticks, and choose either a tilting or individual D-Pad button layout.
-
Page 3: Table Of Contents
2. REGISTRATION / TECHNICAL SUPPORT ....................4 3. TECHNICAL SPECIFICATIONS ........................5 4. DEVICE LAYOUT ............................6 5. SETTING UP YOUR RAZER RAIJU ULTIMATE ................... 8 6. USING YOUR RAZER RAIJU ULTIMATE ....................16 7. USING THE RAZER RAIJU MOBILE APP ....................22 8. -
Page 4: Package Contents / System Requirements
1. PACKAGE CONTENTS / SYSTEM REQUIREMENTS PACKAGE CONTENTS ▪ Razer Raiju Ultimate gaming controller for PS4® ▪ USB to Micro-USB cable ▪ Carrying case ▪ Tilting D-pad module ▪ 2 thumbstick modules ▪ Important Product Information Guide SYSTEM REQUIREMENTS PRODUCT REQUIREMENTS ▪... -
Page 5: Registration / Technical Support
REGISTRATION Register your product online at razerid.razer.com/warranty to get real-time information on your product’s warranty status. If you haven’t registered for a Razer ID yet, register now at razerid.razer.com to get a wide range of Razer benefits. Your product’s serial number can be found here. -
Page 6: Technical Specifications
▪ USB/Bluetooth Connectivity ▪ 4 multi-function buttons ▪ Mecha-Tactile triangle, circle, X, square action buttons ▪ Multi-color Razer Chroma™ Lighting strip ▪ Trigger stops for quick-firing action ▪ Quick Control Panel ▪ 3.5 mm audio port for stereo audio output and microphone input (USB Mode only) ▪... -
Page 7: Device Layout
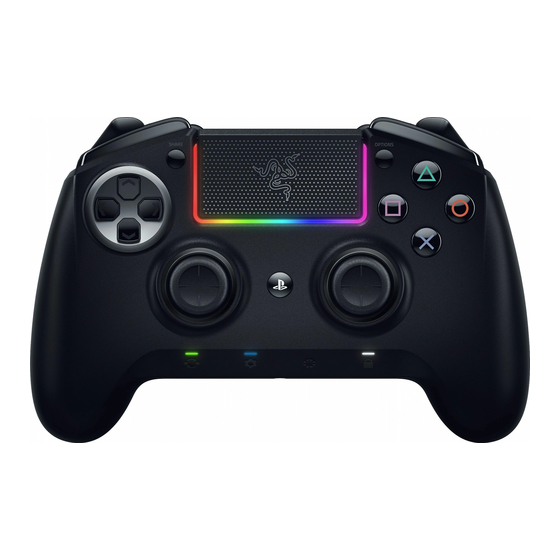
PS button SHARE button Profile/Remap button OPTIONS button Configure button Individual D-pad module Lighting button Razer Mecha-Tactile action buttons Lock button Razer Chroma status indicator Stereo headset jack* Standard thumbstick modules (L3/R3 buttons) *Audio function only available in USB mode ™... - Page 8 Multi-Function Buttons (M1-M4) Mode switch Trigger stop switches Triggers (L2/R2) Bumpers (L1/R1) Micro-USB port USB to Micro-USB cable Tilting D-pad module Long/convex thumbstick modules ™ F O R G A ME R S . B Y G A M E R S .
-
Page 9: Setting Up Your Razer Raiju Ultimate
5. SETTING UP YOUR RAZER RAIJU ULTIMATE CHARGING YOUR RAZER RAIJU ULTIMATE For first time activation, please plug your controller to a powered USB port or use wired mode. It takes approximately 4 hours to fully charge your Razer Raiju Ultimate. Low power Charged CONNECTING TO YOUR PLAYSTATION®4 CONSOLE... - Page 10 3. Plug the USB connector of your Razer Raiju Ultimate to your PlayStation®4 console. 4. Press the PS button and your Razer Raiju Ultimate is ready to go. WIRELESS MODE Make sure your gaming console is already powered on. Before pairing in wireless mode, you will need either a PS4 or PS3 controller to navigate the menu.
- Page 11 2. Press and hold the SHARE and PS buttons for at least 5 seconds. When the status indicator changes from slow to rapid blinking, it is now in pairing mode.. 3. On your PS4, go to Settings > Devices > Bluetooth Devices and select Razer Raiju Ultimate. ™...
- Page 12 4. Choose Yes when asked to register the Bluetooth device. 5. Wait until the status indicator stops blinking and your Razer Raiju Ultimate is ready to go. Pairing mode can be cancelled by holding the PS button until the controller is turns off. Pairing mode will automatically stop if it does not pair with a device after 60 seconds.
- Page 13 CONNECTING TO YOUR PC WIRED MODE 1. Set the Mode switch to USB. 2. Plug the micro USB connector to your Razer Raiju Ultimate. ™ F O R G A ME R S . B Y G A M E R S .
- Page 14 3. Plug the USB connector to your PC. 4. Wait until the drivers are automatically installed or manually update the drivers through the Device Manager. WIRELESS MODE Make sure your PC is turned on and Bluetooth connectivity is activated before proceeding. 1.
- Page 15 3. On your PC, go to Settings > Devices > Bluetooth & other devices > Add Bluetooth or other device > Bluetooth and select Razer Raiju Ultimate. ™...
- Page 16 4. Click Done to close the confirmation screen and your Razer Raiju Ultimate is ready to go. Pairing mode can be cancelled by holding the PS button until the controller is turns off. Pairing mode will automatically stop if it does not pair with a device after 60 seconds.
-
Page 17: Using Your Razer Raiju Ultimate
USING THE DETACHABLE THUMBSTICK MODULES The Razer Raiju Ultimate has a long and a convex module which you can use to replace the standard modules for a more comfortable fit. Simply pull the standard modules to remove then insert the other modules into the controller. - Page 18 USING THE D-PAD MODULES The Razer Raiju Ultimate has a tilting D-Pad module which you can use to replace the individual D-Pad module which you can use for games that require quickly sliding your thumb in different directions such as fighting/arcade games. Simply lift the individual D-Pad module from its edge, remove the module, and then insert the tilting D-Pad module into the controller.
- Page 19 REMAPPING THE MULTI-FUNCTION BUTTONS (MFB) To remap the MFBs without using the app, you will first need to select which profile to customize. After you have selected the profile, follow these instructions: 1. Press and hold the Remap button until the active Profile Indicator starts blinking rapidly. 2.
- Page 20 When connected to the mobile app, you can change each profile’s button mappings, vibration levels, thumbstick sensitivity clutch levels, and lighting effects. USING THE CONFIGURE BUTTON The Razer Raiju Ultimate has a Configure button which you can use to connect/disconnect with the mobile app. Connected Disconnected When connected to the mobile app, you can change your controller’s button mappings, vibration...
- Page 21 USING THE LIGHTING BUTTON The Lighting button allows you to select different Chroma lighting effects on-the fly. You can cycle lighting effects by pressing the Lighting button repeatedly or select a specific lighting effect by holding down the Lighting button and pressing the D-pad left/right to choose the lighting effect. Listed here are the lighting effects and their short description: Name Description...
- Page 22 You can also change the brightness by holding down the Lighting button and pressing D-pad up to increase or D-pad down to decrease luminosity. USING THE LOCK BUTTON The Razer Raiju Ultimate has a Lock button which you can use to enable/disable the PS, SHARE, OPTIONS, Profile/Remap, Configure, and Lighting buttons. Unlocked...
-
Page 23: Using The Razer Raiju Mobile App
7. USING THE RAZER RAIJU MOBILE APP The Razer Raiju mobile app is an advanced configuration software that allows you to easily fine-tune your controller. 1. Once you have downloaded and launched the app*, you will need to add your controller. - Page 24 2. Once paired, you will have access to the main menu where you can create, edit, and store profiles. You can also switch controllers or reset all profiles to default using the dropdown option ( ™ F O R G A ME R S . B Y G A M E R S .
- Page 25 3. Sign in using your Razer ID or sign up for an account, by tapping the account icon ( ). From here, you can change your account settings, check the paired controller’s status, send feedback, visit the FAQ list, view the Razer legalese, send log files to Razer Support, and sign out of your Razer ID.
- Page 26 4. To activate an onboard profile, simply select it from the onboard memory list. Selecting the miscellaneous icon ( ) allows you to rename or copy an existing profile. ™ F O R G A ME R S . B Y G A M E R S .
- Page 27 ( ) or select an open slot from the bottom of the profiles list. Selecting the miscellaneous icon ( ) enables you to activate, rename, copy, or delete the custom profile. Note: To learn how to sign in or sign up for a Razer ID account, click here. ™...
- Page 28 6. To edit your controller’s settings, tap any profile from the list. From the Key Mapping section, you can remap any of the Multi-Function Buttons to a PlayStation controller button or a Sensitivity Clutch. ™ F O R G A ME R S . B Y G A M E R S .
- Page 29 Once you have assigned an MFB to Sensitivity Clutch, further options will become available. By default, the Sensitivity Clutch is set to the middle of the slider which reduces the movement speed of your analog stick/s by half. To further reduce the sensitivity, move the slider to the left or move the slider to the right to increase it.
- Page 30 7. The Vibrations section allows you to set the intensity of each motor on the controller, while the Chroma section enables you to customize the lighting effects by selecting the Open Chroma Effects button. ™ F O R G A ME R S . B Y G A M E R S .
- Page 31 8. From here you can select an effect, choose colors via color chart or hex color code, and other options as mentioned in Using The Lighting Button. ™ F O R G A ME R S . B Y G A M E R S .
-
Page 32: Safety And Maintenance
8. SAFETY AND MAINTENANCE SAFETY GUIDELINES In order to achieve maximum safety while using your Razer Raiju Ultimate, we suggest that you adopt the following guidelines: Should you have trouble operating the device properly and troubleshooting does not work, unplug the device and contact the Razer hotline or go to support.razer.com... -
Page 33: Legalese
Product. In no event shall Razer’s liability exceed the retail purchase price of the Product. - Page 34 Product was purchased. If any term herein is held to be invalid or unenforceable, then such term (in so far as it is invalid or unenforceable) shall be given no effect and deemed to be excluded without invalidating any of the remaining terms. Razer reserves the right to amend any term at any time without notice.
Need help?
Do you have a question about the Raiju Ultimate and is the answer not in the manual?
Questions and answers