Advertisement
Advertisement
Table of Contents

Summary of Contents for HD Smart Ear HD Smart Ear
- Page 1 Instruction Manual...
-
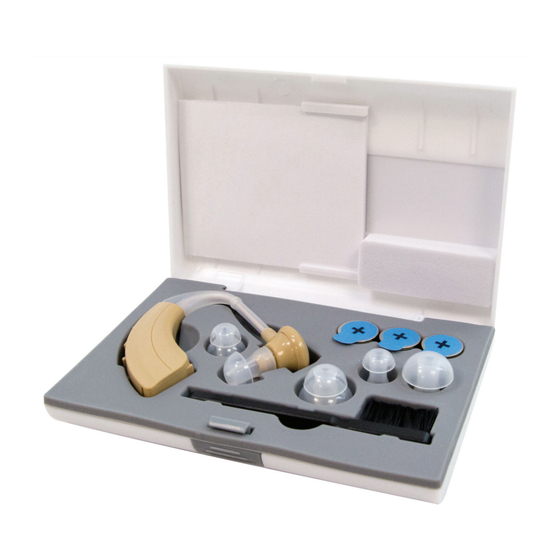
Page 2: Package Contains
Package Contains Hearing Ampli er Earphone Earpiece Stem Base Earpiece Mode Button Battery Compartment Volume Up + / Volume Down – Power ON/OFF 3 single dome silicone earpieces 3 Size 675/PR44 Zinc Air (1 on the Hearing Ampli er 2 inside package) (Small, Medium &... - Page 3 HD Smart Ear Personal Sound Amplifier lets you enjoy the sounds around you again! To get acclimated, start by wearing the HD Smart Ear amplifier 1 – 2 hours per day at home, while watching TV or engaging in conversation. Next, move to an open area, such as a park.
- Page 4 If you are experiencing any progressive hearing loss consult your doctor or audiologist. • Consult a doctor before using HD Smart Ear if you are experiencing ear problems or have an ear infection, vertigo, exostosis, or ear pain/discomfort.
- Page 5 • Always check the unit before use. Do not use if the unit is damaged as personal injury may occur. • Do not use in or near an Xray or MRI machine. • Shut off when not in use. If the HD amplifier is not used for a long period, remove the Battery to avoid Battery corrosion.
-
Page 6: Battery Installation
1. When using Zinc Air batteries*, remove adhesive tab (IMAGE 1) on the Battery to activate. Allow Battery to sit for a full minute prior to inserting into the HD Smart Ear Battery Compartment. NOTE: HD Smart Ear can also use alkaline batteries. - Page 7 IMAGE 1 IMAGE 2 Peel adhesive tab Pull open from notch IMAGE 3 Slide Battery into Compartment Press here to close...
-
Page 8: Getting Started
3. Turn the power switch to the ON position (IMAGE 6). 4. Start by lowering the volume to the lowest possible setting before wearing your HD Smart Ear (see Volume Adjustment page 10). 5. Hook the Base of the Hearing Amplifier over the top of your ear so it rests behind it, making sure it fits comfortably and securely. - Page 9 IMAGE 4A - Single Dome Long Stem IMAGE 4B - Double Dome Short Stem Stem Stem Small Medium Large Small Large Earphone Earphone Tip of Tip of Earpiece Earpiece IMAGE 5A IMAGE 5B IMAGE 6...
-
Page 10: Volume Adjustment
Volume Adjustment 1. Always begin with the volume on the lowest possible setting. To increase the volume, press the (+) on the volume toggle button to adjust. You will hear a “Beep” as you increase the volume one click at a time. Be sure to slowly regulate the volume to the level that is most comfortable to you. - Page 11 IMAGE 7A IMAGE 7B IMAGE 8...
-
Page 12: Mode Button
Mode Button The Mode button offers four adjustments for different uses (IMAGE 9). We recommend using Modes 2 or 3 when you first start your device and adjust according to the environment for the most comfortable usage. Mode 1 = Quiet Environment – When you need more amplification for nature walks or around the home and quiet indoor settings. - Page 13 IMAGE 9...
-
Page 14: Maintenance
Maintenance Make sure your ear is clean and that you clean your Silicone Earpiece regularly with the brush provided and/or with an antibacterial wipe (IMAGE 10). - Page 15 IMAGE 10...
-
Page 16: Frequently Asked Questions
If the volume is still too loud, your hearing may be volume is too low too sensitive for HD Smart Ear. You may reach out to or too loud us and arrange a return and refund. Check the Earpiece for blockage. Ensure the opening of the Tip and Stem of Earpiece are clean. - Page 17 Make sure Battery Compartment is completely closed. Be sure you have allowed yourself to become acclimated to your HD Smart Ear by using it in small If there is a increments and slowly increasing your usage time. It is important to get used to both sounds you are disturbing noise focusing on and background noise, as well.
- Page 18 FCC Statement This device complies with part 15 of the FCC Rules. Operation is subject to the following two conditions: (1) This device may not cause harmful interference, and (2) this device must accept any interference received, including interference that may cause undesired operation.
- Page 19 Wayne, NJ 07470 © 2017 Ideavillage customerservice@ideavillage.com HDHEAR_041318_MW...
- Page 20 Quick Start Guide + facing Peel Stem outward adhesive Earphone Base Tip of Earpiece Battery Compartment Door Install the Battery Choose Dome Earpiece Turn Power ON Remove adhesive tab on Zinc Choose the best fit for your Push Power Switch ON (up). Air Battery.
Need help?
Do you have a question about the HD Smart Ear and is the answer not in the manual?
Questions and answers
Doesn't work already changed batteries
The HD Smart Ear may not be working after changing the batteries due to several reasons:
1. Power Issue – Ensure the device is turned ON.
2. Battery Activation – If using Zinc Air batteries, remove the adhesive tab and let the battery sit for a full minute before use.
3. Battery Compartment – Make sure the battery compartment is completely closed.
4. Battery Insertion – Verify that the battery is correctly inserted.
5. Battery Quality – Try using a new battery in case the current one is depleted or faulty.
6. Earpiece Blockage – Ensure the opening of the Tip and Stem of the Earpiece are clean.
If the issue persists after these checks, the device may require further troubleshooting or replacement.
This answer is automatically generated
@Sara Flores
What is the # of the battery?
The battery number for HD Smart Ear is 675.
This answer is automatically generated
Doesn’t work not even changing batteries
If your HD Smart Ear is not working even after changing the batteries, do the following:
1. Make sure it is turned ON.
2. Ensure the battery is correctly inserted.
3. Confirm the battery compartment is fully closed.
4. Check that the opening of the tip and stem of the earpiece are clean.
5. Try adjusting the volume.
6. Switch to another listening mode.
7. If it still does not work, the amplifier may need replacement.
This answer is automatically generated