Table of Contents
Advertisement
Advertisement
Table of Contents

Related Manuals for Electrolux EHG313BD


Summary of Contents for Electrolux EHG313BD
- Page 1 EHG313BD EHG645SD EHG645BD EHG755SD EHG955SD EHG955BD Cooking User manual...
-
Page 2: Table Of Contents
• Bed and breakfast type environments may result in personal injury, property damage and affect your ability to make a claim under the Electrolux • Catering and similar non-retail applications manufacturer’s warranty provided with your product. -
Page 3: Important Instructions
IMPORTANT INSTRUCTIONS BEFORE USING YOUR APPLIANCE CAUTION Read the following carefully to avoid an electric Before you use the appliance, we recommend that shock or fire. you read through the relevant sections of this manual, which provides the description of your appliance and It is important to use your cooktop safely. -
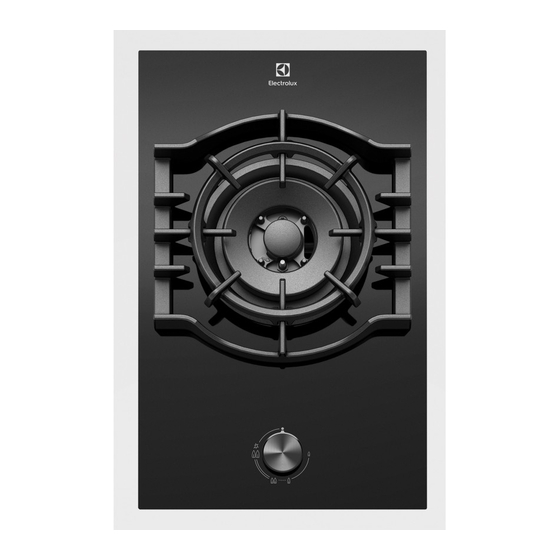
Page 4: Part Names
Ignition spark plug Flame safeguard sensor Figure 2a EHG313BD Dual wok burner Enamelled burner skirt Ceramic Glass hob – the glass hob is resistant to heat, cold and rapid temperature changes, but is vulnerable to impact. A pepper mill falling on the hob could crack it. - Page 5 Figure 2c Figure 2b EHG645SD EHG645BD Burners – this unit has a small, medium, large and Burners – this unit has a small, medium, large and dual wok burner dual wok bu rner Removable cast iron trivet (right) Ceramic Glass hob – the glass hob is resistant to heat, cold and rapid temperature changes, but is Control knob vulnerable to impact.
- Page 6 PART NAMES (CONTINUED) Figure 2d Figure 2e EHG755SD EHG955BD Burners – this unit has a small, medium (2 per), large Burners – this unit has a small, medium (2 per), large and dual wok burner and dual wok burner...
- Page 7 Figure 3 Figure 2f Wok support trivet (optional) EHG955SD Burners – this unit has a small, medium (2 per), large and dual wok burner Removable cast iron trivet (2 per) for centre and right Stainless Steel hob Control knob Removable cast iron trivet (left)
-
Page 8: Before First Use
BEFORE FIRST USE INSTALLATION CONTROLS • An authorised person must install this appliance and Each burner is controlled by a control knob. The markings MUST provide a Certificate of Compliance. on the control panel indicate which burner the knob This certificate should be retained along with controls, and the setting for that burner (see Figure 4). -
Page 9: Using Your Cooktop
USING YOUR COOKTOP BURNERS Choice of burner Figure 4 For your convenience there is a choice of burners: Standard burner • A small burner for special low heat and slow cooking. • A medium burner for normal cooking and simmering (one on the four burner models and two on the five burner models). -
Page 10: Cleaning And Care
CLEANING AND CARE How to use the razor blade scraper: CAUTION Pull back the protective cover until the blade is visible. Ensure the appliance is off and cool before cleaning. Make sure that the razor blade is clean and not worn. -
Page 11: Troubleshooting
TROUBLESHOOTING If you have a problem with the cooktop, check the table below. You may be able to solve the problem and this will save you from paying for a service call. You will have to pay for a service call even in the warranty period if the problem is one listed below. -
Page 12: Technical Data
TECHNICAL DATA We reserve the right to alter these specifications. This appliance conforms to AS 5263. Table 2 features EHG313BD EHG645BD EHG645SD Cooking zones Yes, dual Yes, dual Yes, dual Ignition 220-240V 220-240V 220-240V Trivet Cast Cast Cast Hob material... - Page 13 Table 2 continued features EHG755SD EHG955SD EHG955BD Cooking zones Yes, dual Yes, dual Yes, dual Ignition 220-240V 220-240V 220-240V Trivet Cast Cast Cast Hob material Stainless steel Stainless steel Ceramic glass Features Ignition through knob Ignition through knob Ignition through knob Flame safeguard Colours Stainless steel...
-
Page 14: Installation Instructions
The particular instructions as given below. A certificate of compliance MUST be given to the customer after the application is successfully installed. Figure 6a – EHG313BD gas supply connection location 63 min* 116 min* * to combustible surface (dimension is not relevant if the adjacent... - Page 15 Figure 6b – EHG645SD & EHG645BD gas supply connection location 146 min* 146 min* * to combustible surface (dimension is not relevant if the adjacent surface is non-combustible).
- Page 16 INSTALLATION INSTRUCTIONS (CONTINUED) Figure 6c – EHG755SD 149 min* 146 min* gas supply connection location * to combustible surface (dimension is not relevant if the adjacent surface is non-combustible).
- Page 17 Figure 6d – EHG955SD & EHG955BD 124 min* 146 min* gas supply connection location * to combustible surface (dimension is not relevant if the adjacent surface is non-combustible).
-
Page 18: Installation Procedure
5-burner models. Fit the clamps as shown in Figure 8. No clamps are needed for model EHG313BD as it is fitted with To ensure clearances of 200mm from burners to spring clips on the sides which locate on the inner edge of vertical combustible surfaces observe the minimum the bench cutout. - Page 19 Figure 7a – EHG313BD combustible surface Figure 7b – EHG645SD & EHG645BD combustible surface...
- Page 20 INSTALLATION PROCEDURE (CONTINUED) combustible surface Figure 7c – EHG755SD...
- Page 21 combustible surface Figure 7d – EHG955SD & EHG955BD...
- Page 22 INSTALLATION PROCEDURE (CONTINUED) Figure 8 – Clamp fitment seal benchtop burner box clamp screw...
- Page 23 Figure 8a - Mastic seal position for model EHG645SD 25mm 12mm 12mm...
- Page 24 INSTALLATION PROCEDURE (CONTINUED) Figure 8b - Mastic seal position for model EHG755SD 25mm Figure 8c - Mastic seal position for model EHG955SD 25mm...
-
Page 25: Gas Connection
GAS CONNECTION OPERATION ON N.G./S.N.G ELBOW POSITIONING This appliance is supplied for use with Natural Gas. It is possible to reposition the elbow if required by However, it can be converted for use with LPG. loosening the locking nut and elbow by using two Refer to LP conversion on page 27. - Page 26 GAS CONNECTION (CONTINUED) CHECKING THE GAS SUPPLY Assembly of the regulator The assembly of the regulator to the cooktop manifold is Check the manometer zero point is correct. achieved via the elbow union and sealing washer supplied, refer to figure 9.
- Page 27 LPG CONVERSION supply line in the correct orientation, the arrow on the base of the body indicates the direction of gas flow. This appliance is supplied set up for Natural Gas usage. Once these checks have been completed, if the A conversion kit is included with the product for Universal regulator still fails to perform in a satisfactory manner LPG usage.
-
Page 28: Electrical Connection
Diagram 1 is a schematic of the wiring in the appliance. WEIGHT of the unit is printed on the appliance packaging label. Diagram 1a – All models except EHG313BD BODY 220-240V IGNITION... -
Page 29: Testing Appliance Operation
TESTING APPLIANCE OPERATION After installation, test the appliance and ensure that it CAUTION operates correctly before handing it over to the customer. The following procedure is recommended: Servicing must only be carried out by an authorised service person. Turn on the gas and electricity supply and attempt ignition on all burners, both separately and in Injector sizes required for various gas types are shown in combination. - Page 30 NOTES...
-
Page 31: Warranty
Guarantee Act does not apply. warranty. 11. C onfidentiality: You accept that if you make a warranty claim, Electrolux 7. Exclusions: You may not make a claim under this warranty unless the and its agents including ASC may exchange information in relation to you defect claimed is due to faulty or defective parts or workmanship. - Page 32 0800 225 088 email: customercare@electrolux.co.nz web: electrolux.co.nz To add a touch of professional inspiration to your home, visit electrolux.com.au or electrolux.co.nz electrolux.com.au or electrolux.co.nz P/No. ANC A15356701 Drawing D0140027 © 2018 Electrolux Home Products Pty Ltd. ABN 51 004 762 341 EMAN_GASCT_Aug18...
Need help?
Do you have a question about the EHG313BD and is the answer not in the manual?
Questions and answers