Advertisement
Advertisement

Summary of Contents for Dry:Soon 21736
- Page 1 INSTRUCTION BOOKLET 3 TIER HEATED AIRER Model: 21736...
-
Page 2: Table Of Contents
DRY:SOON 3 TIER HEATED AIRER Thank you for choosing the Dry:Soon 3 Tier Heated Airer. Please take a little time to read this booklet before getting started and keep it in a safe place for future reference. You can dry your washing quickly and easily no matter what the weather with our 3 Tier Heated Airer –... -
Page 3: Product Features
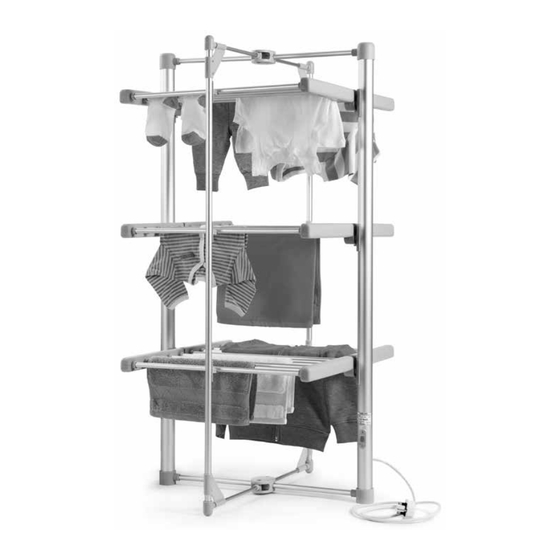
PRODUCT FEATURES 1. Supports 2. Clips 3. Heated bars 4. Power button 5. Cord and plug... -
Page 4: Safety Cautions
SAFETY CAUTIONS Carefully read all the instructions before using the appliance and keep in a safe place for future reference. Always follow these safety cautions when using the appliance to avoid personal injury or damage to the appliance. This appliance should be used only as described in this instruction book. - Page 5 • Do not allow the lead to be compressed or curled, or touch sharp edges. • Do not connect this appliance to an external timer or remote control system. • An extension cable may be used with care. The electrical rating of the cable should be at least as great as the appliance.
-
Page 6: Setting Up The Airer And Using For The First Time
SETTING UP THE AIRER AND USING FOR THE FIRST TIME 1. Carefully unpack the airer and remove all the packaging materials. 2. The airer needs to be set up on a dry level surface near a socket, with plenty of space around it. -
Page 7: Instructions For Use
INSTRUCTIONS FOR USE WARNING Ensure the airer is folded out securely before loading it with laundry and switching it on. Do not overload the airer, the maximum load of the airer is 15kg. Load evenly across the surface to avoid the airer tipping over. 1. -
Page 8: Storing Your Airer
STORING YOUR AIRER 1. Leave the airer to cool down completely before closing it to store. 2. Close the airer by folding down the heated bars on each side, top and bottom. Then fold in the supports. 3. Do not wind the power cord around the airer. 4. -
Page 9: Electrical Connections
ELECTRICAL CONNECTIONS THIS APPLIANCE MUST BE EARTHED This appliance is fitted with a fused three-pin plug to BS1363 which is suitable for use in all homes fitted with sockets to current specifications. If the fitted plug is not suitable for your socket outlets, it should be cut off and carefully disposed of. To avoid an electric shock, do not insert the discarded plug into a socket. - Page 12 Lakeland Alexandra Buildings, Windermere, Cumbria, UK LA23 1BQ Tel: +44(0)15394 88100 www.lakeland.co.uk...
Need help?
Do you have a question about the 21736 and is the answer not in the manual?
Questions and answers