Mitsubishi Electric S Series Manual
Hide thumbs
Also See for S Series:
- Handling and maintenance (94 pages) ,
- Installation manual (120 pages) ,
- Manual (248 pages)
Table of Contents
Advertisement
Back to Index page
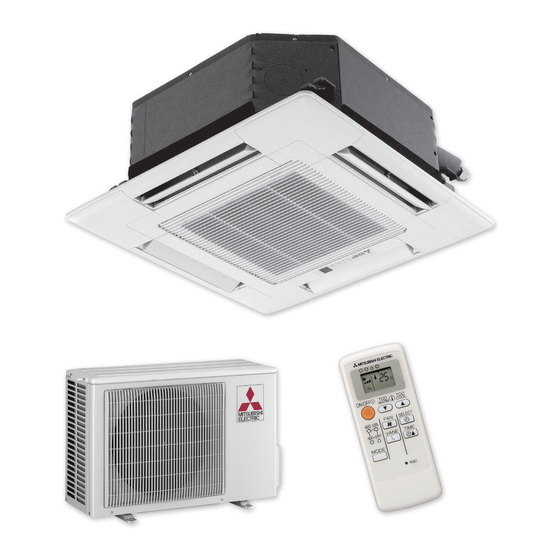
S series Model List
Combination Table .........................................................................................B-2
B.1 600 o 600 CEILING CASETTE (SLZ) ....................................................B-3
SLZ-KA25VA
SLZ-KA25VAL
SLZ-KA35VA
SLZ-KA35VAL
SLZ-KA50VA
SLZ-KA50VAL
B.2 CEILING CONCEALED (SEZ) ................................................................B-39
SEZ-KD25VA
SEZ-KD25VAL
SEZ-KD35VA
SEZ-KD35VAL
SEZ-KD50VA
SEZ-KD50VAL
SEZ-KD60VA
SEZ-KD60VAL
SEZ-KD71VA
SEZ-KD71VAL
B.3 OUTDOOR UNIT (SUZ)..........................................................................B-85
SUZ-KA25VA
SUZ-KA35VA
SUZ-KA50VA
SUZ-KA60VA
SUZ-KA71VA
Advertisement
Chapters
Table of Contents
Troubleshooting

Related Manuals for Mitsubishi Electric S Series


Summary of Contents for Mitsubishi Electric S Series
- Page 1 Back to Index page S series Model List Combination Table ..................B-2 B.1 600 o 600 CEILING CASETTE (SLZ) ............B-3 SLZ-KA25VA SLZ-KA25VAL SLZ-KA35VA SLZ-KA35VAL SLZ-KA50VA SLZ-KA50VAL B.2 CEILING CONCEALED (SEZ) ..............B-39 SEZ-KD25VA SEZ-KD25VAL SEZ-KD35VA SEZ-KD35VAL SEZ-KD50VA SEZ-KD50VAL SEZ-KD60VA SEZ-KD60VAL SEZ-KD71VA SEZ-KD71VAL B.3 OUTDOOR UNIT (SUZ)................B-85...
-
Page 2: Combination Table
S series S series model Combination Table MODELS INVERTER Models TYPE Heat pump Refrigerant R410A Outdoor unit Inddor unit SLZ-KA25VA SLZ-KA25VAL SLZ-KA35VA SLZ-KA35VAL SLZ-KA50VA SLZ-KA50VAL SEZ-KD25VA SEZ-KD25VAL SEZ-KD35VA SEZ-KD35VAL SEZ-KD50VA SEZ-KD50VAL SEZ-KD60VA SEZ-KD60VAL SEZ-KD71VA SEZ-KD71VAL... -
Page 3: Table Of Contents
Back to Index page B.1 600o600 CEILING CASSETTE (SLZ) B.1.1 SPECIFICATIONS..................B-4 B.1.2 OUTLINES AND DIMENSIONS ..............B-5 B.1.2.1 INDOOR UNIT ................B-5 B.1.2.2 WIRELESS REMOTE CONTROLLER ......... B-6 B.1.2.3 WIRED REMOTE CONTROLLER ..........B-7 B.1.3 WIRING DIAGRAM ..................B-8 B.1.4 REFRIGERANT SYSTEM DIAGRAM ............ -
Page 4: B.1.1 Specifications
CEILING CASSETTE S series B.1.1 SPECIFICATIONS Model Name Indoor Unit SLZ-KA25VA(L) SLZ-KA35VA(L) SLZ-KA50VA(L) Outdoor Unit SUZ-KA25VA SUZ-KA35VA SUZ-KA50VA Power Supply Source Outdoor power supply Phase Single Single Single Phase Refrigerant R410A R410A R410A Cooling Capacity Rated Max. Min. Rated 0.86 0.77... -
Page 5: Outlines And Dimensions
S series CEILING CASSETTE B.1.2 OUTLINES AND DIMENSIONS B.1.2.1 INDOOR UNIT SLZ-KA25VAL Unit : mm SLZ-KA35VAL SLZ-KA50VAL SLZ-KA25VA SLZ-KA35VA SLZ-KA50VA... -
Page 6: Wireless Remote Controller
CEILING CASSETTE S series B.1.2.2 WIRELESS REMOTE CONTROLLER SLZ-KA25/35/50VAL Unit : mm 17.5 ON/OFF WARM COOL SELECT AUTO COOL VANE TIME HEAT MODE RESET Installation area • Area in which the remote controller is not exposed to direct sunshine. • Area in which there is no heating source nearby. -
Page 7: Wired Remote Controller
S series CEILING CASSETTE B.1.2.3 WIRED REMOTE CONTROLLER SLZ-KA25/35/50VA Unit : mm 19.5... -
Page 8: Wiring Diagram
CEILING CASSETTE S series B.1.3 WIRING DIAGRAM SLZ-KA25VAL SLZ-KA25VA SLZ-KA35VAL SLZ-KA35VA SLZ-KA50VAL SLZ-KA50VA GRILLE TO OUTDOOR UNIT AC220-240V CNSK(RED) TRANS (D·HEATER) (D·U·M) (POWER (FAN) (POWER) BOARD) CNDK (CONTROL) FUSE CN3C DC13.1V CN2S(WHT) PINK LED2 SKY BLU X5 X4 LED1 (POWER... -
Page 9: Refrigerant System Diagram
S series CEILING CASSETTE B.1.4 REFRIGERANT SYSTEM DIAGRAM SLZ-KA25VAL SLZ-KA25VA SLZ-KA35VAL SLZ-KA35VA SLZ-KA50VAL SLZ-KA50VA Strainer Heat exchanger Refrigerant GAS pipe connection (Flare) Condenser/evaporator temperature thermistor (TH5) Refrigerant flow in cooling Refrigerant flow in heating Refrigerant LIQUID pipe connection (Flare) Pipe temperature... -
Page 10: Performance Data
CEILING CASSETTE S series B.1.5 PERFORMANCE DATA COOLING operation at Rated frequency SLZ-KA25VA(L) / SUZ-KA25VA CAPACITY : 2.5(kW) INPUT : 690(W) SHF : 0.86 OUTDOOR D.B.( ) INDOOR INDOOR D.B.( ) W.B.( ) SHC SHF INPUT SHC SHF INPUT SHC SHF INPUT SHC SHF INPUT 2.94 2.00 0.68... - Page 11 S series CEILING CASSETTE COOLING operation at Rated frequency SLZ-KA25VA(L) / SUZ-KA25VA CAPACITY : 2.5(kW) INPUT : 690(W) SHF : 0.86 OUTDOOR D.B.( ) INDOOR INDOOR D.B.( ) W.B.( ) SHC SHF INPUT SHC SHF INPUT SHC SHF INPUT 2.45 1.67 0.68 2.25 1.53 0.68...
- Page 12 CEILING CASSETTE S series COOLING operation at Rated frequency SLZ-KA35VA(L) / SUZ-KA35VA CAPACITY : 3.5(kW) INPUT : 1060(W) SHF : 0.77 OUTDOOR D.B.( ) INDOOR INDOOR D.B.( ) W.B.( ) SHC SHF INPUT SHC SHF INPUT SHC SHF INPUT SHC SHF INPUT 4.11 2.43 0.59...
- Page 13 S series CEILING CASSETTE COOLING operation at Rated frequency SLZ-KA35VA(L) / SUZ-KA35VA CAPACITY : 3.5(kW) INPUT : 1060(W) SHF : 0.77 OUTDOOR D.B.( ) INDOOR INDOOR D.B.( ) W.B.( ) SHC SHF INPUT SHC SHF INPUT SHC SHF INPUT 3.43 2.02 0.59 1039 3.15 1.86 0.59...
- Page 14 CEILING CASSETTE S series COOLING operation at Rated frequency SLZ-KA50VA(L) / SUZ-KA50VA CAPACITY : 4.6(kW) INPUT : 1630(W) SHF : 0.68 OUTDOOR D.B.( ) INDOOR INDOOR D.B.( ) W.B.( ) SHC SHF INPUT SHC SHF INPUT SHC SHF INPUT SHC SHF INPUT 5.41...
- Page 15 S series CEILING CASSETTE COOLING operation at Rated frequency SLZ-KA50VA(L) / SUZ-KA50VA CAPACITY : 4.6(kW) INPUT : 1630(W) SHF : 0.68 OUTDOOR D.B.( ) INDOOR INDOOR D.B.( ) W.B.( ) SHC SHF INPUT SHC SHF INPUT SHC SHF INPUT 4.51 2.25...
- Page 16 CEILING CASSETTE S series HEATING operation SLZ-KA25VA(L) / SUZ-KA25VA at Rated frequency CAPACITY : 3.0(kW) INPUT : 830(W) OUTDOOR W.B.( ) INDOOR D.B.( ) INPUT INPUT INPUT INPUT INPUT INPUT INPUT 1.89 2.28 2.67 3.06 3.45 3.81 4.20 1.80 2.16 2.55...
-
Page 17: 4-Way Air Flow System
S series CEILING CASSETTE B.1.6 4-WAY AIR FLOW SYSTEM 1. FRESH AIR INTAKE (LOCATION FOR INSTALLATION) At the time of installation, use the duct holes (cut out) located at the positions shown in following diagram, as and when required. Fresh air intake Detail drawing of fresh air intake 73.4... - Page 18 CEILING CASSETTE S series 4. FIXING OF HORIZONTAL VANE Horizontal vane of each air outlet can be fixed according to the environment where it is installed. Setting procedure 1) Turn off a main power (Turn off a breaker). 2) Remove the vane motor connector in the direction of the arrow shown below while pressing the unlock button as in the picture below.
- Page 19 S series CEILING CASSETTE B.1.7 NOISE CRITERION CURVES <50Hz> <50Hz> SLZ-KA25VAL SLZ-KA35VAL SPL(dB) LINE SPL(dB) LINE NOTCH NOTCH SLZ-KA25VA SLZ-KA35VA High High Medium Medium NC-70 NC-70 NC-60 NC-60 NC-50 NC-50 NC-40 NC-40 NC-30 NC-30 APPROXIMATE APPROXIMATE THRESHOLD OF THRESHOLD OF...
-
Page 20: Outlet Air Speed And Coverage Range
CEILING CASSETTE S series B.1.8 OUTLET AIR SPEED AND COVERAGE RANGE SLZ-KA25VA SLZ-KA35VA SLZ-KA50VA SLZ-KA25VAL SLZ-KA35VAL SLZ-KA50VAL Air flow /min. Air speed m/sec. Coverage range The air coverage range is the distance to which the 0.25m/sec air can reach, when air is blown out horizontally from the unit at the High notch position. The coverage range should be used only as a general guideline since it varies according to the size of the room and the furni- ture in the room. B.1.9 CENTER OF GRAVITY POSITION Refrigerant pipe Refrigerant piping side Model SLZ-KA25VA(L) -
Page 21: Remote Controller
S series CEILING CASSETTE B.1.10 REMOTE CONTROLLER B.1.10.1 WIRELESS REMOTE CONTROLLER TEMPERATURE SETTING button To set any desired room temperature. ON/OFF WARM COOL ON / OFF button To start and to stop operation. SELECT AUTO COOL TIMER SELECT button To set time to start or stop... - Page 22 CEILING CASSETTE S series B.1.10.2 WIRED REMOTE CONTROLLER “Sensor” indication Display Section Displayed when the remote controller sensor is used. Day-of-Week For purposes of this explanation, Shows the current day of the week. all parts of the display are shown as lit.
-
Page 23: Troubleshooting
S series CEILING CASSETTE B.1.11 TROUBLESHOOTING 1. CAUTIONS ON TROUBLESHOOTING (1) Before troubleshooting, check the followings: 1Check the power supply voltage. 2Check if the indoor/outdoor connecting wire is correct. (2) Take care of the followings during servicing. 1 Before servicing the air conditioner, be sure to turn off the remote controller first to stop the main unit, and then turn off the breaker. - Page 24 CEILING CASSETTE S series • Refer to the following tables for details on the check codes. [Output pattern A] Beeper sounds Beep Beep Beep Beep Beep Beep Beep OPERATION · · · Repeated INDICATOR lamp flash pattern Approx. 2.5 sec.
- Page 25 S series CEILING CASSETTE • On wireless remote controller The continuous buzzer sounds from receiving section of indoor unit. Blink of operation lamp • On wired remote controller Check code displayed on the LCD. • If the unit cannot be operated properly after the test run, refer to the following table to find out the cause.
-
Page 26: Installation Procedure
CEILING CASSETTE S series B.1.12 INSTALLATION PROCEDURE 1. Safety precautions • Be sure to read "Safety precautions" before installing the air conditioner. • After reading this manual, be sure to keep it together with the instruction • Be sure to observe the cautions specified here as they include important manual in a handy place on the customer`s site. - Page 27 S series CEILING CASSETTE 3. Installation diagram 3.1. Indoor unit (Fig. 3-1) (mm) Ceiling Grille Obstacle Min. 1000 m Min. 500 mm (Entire periphery) If setting the maintenance space for , be sure to leave 700 mm at minimum. Warning: Mount the indoor unit on a ceiling strong enough to withstand the weight of the unit.
- Page 28 CEILING CASSETTE S series 4. Installing the indoor unit 4.3. Installation of duct (in case of fresh air intake) (mm) (Fig. 4-3) Caution: Linkage of duct fan and air conditioner ln case that a duct fan is used, be sure to make it linked with the air conditioner when outside air is taken.
- Page 29 S series CEILING CASSETTE 5. Refrigerant piping work 5.1. Refrigerant pipe (Fig. 5-1) Indoor unit Outdoor unit Piping preparation 6.35 • Refrigerant pipes of 3, 5, 7, 10 and 15 m are available as optional items. (1) Table below shows the specifications of pipes commercially available.
- Page 30 CEILING CASSETTE S series 5. Refrigerant piping work 5.4. Pipe connection (Fig. 5-8) Indoor unit 1) When using commercially available copper pipes: • Apply thin layer of refrigerant oil to pipe and joint seating surface before tightening flare nut. • Use two wrenches to tighten piping connections.
- Page 31 S series CEILING CASSETTE 6. Drainage piping work 1. Connect the drain socket (supplied with the unit) to the drain port. (Fig. 6-2) (mm) (Affix the tube using PVC adhesive then secure it with a band.) 2. Install a locally purchased drain pipe (PVC pipe, O.D. ø32).
- Page 32 CEILING CASSETTE S series 7. Electrical work Perform wiring as shown in the diagram to the lower left. (Procure the cable locally). • Indoor terminal block (Fig. 7-4) Make sure to use cables of the correct polarity only. Earth wire (green/yellow) Connecting cable Cable 3-core 1.5 mm...
- Page 33 S series CEILING CASSETTE 7. Electrical work 7.4. Function settings 7.4.1 Function setting on the unit (Selecting the unit functions) Mode number 1) AUTO RESTART FUNCTION Setting number Indoor controller board Refrigerant address This model is equipped with the AUTO RESTART FUNCTION.
- Page 34 CEILING CASSETTE S series 8. Installing the grille 8.1. Check the grille accessories (Fig. 8-1) • The grille should be supplied with the following accessories. Accessory name Q`ty Remark Grille 650 (mm) Screw with washer 25 (mm) Gauge Fastener Band Fig.
- Page 35 S series CEILING CASSETTE 8. Installing the grille 8.3.2. Temporary installation of the grille (Fig. 8-6) • Align the electric component box of the main unit and the receiver of the grille, and then temporarily secure the grille using the bell shaped holes.
- Page 36 CEILING CASSETTE S series 8. Installing the grille 8.5. Installing the intake grille (Fig. 8-11) Perform the procedure that is described in "8.2. Preparing to attach the grille" in • reverse order to install the intake grille and the corner panel.
- Page 37 S series CEILING CASSETTE 9. Test run 9.2.2. Wired remote controller (Fig. 9-2) ON/OFFbutton Turn on the power at least 12 hours before the test run. Liquid pipe (Indoor unit) Press the [TEST] button twice. “TEST RUN” liquid crystal display temperature display Press the [Mode selection] button and switch to the cooling (or heating) mode.
- Page 38 CEILING CASSETTE S series B-38...
-
Page 39: B.2 Ceiling Concealed (Sez)
Back to Index page B.2 CEILING-CONCEALED (SEZ) B.2.1 SPECIFICATIONS..................B-40 B.2.2 OUTLINES AND DIMENSIONS ..............B-41 B.2.2.1 INDOOR UNIT ................B-41 B.2.2.2 WIRED REMOTE CONTROLLER ..........B-42 B.2.2.3 WIRELESS REMOTE CONTROLLER ......... B-42 B.2.3 WIRING DIAGRAM ..................B-43 B.2.4 REFRIGERANT SYSTEM DIAGRAM ............B-44 B.2.5 PERFORMANCE DATA ................ - Page 40 CEILING-CONCEALED S series B.2.1 SPECIFICATIONS Model Name Indoor Unit SEZ-KD25VA(L) SEZ-KD35VA(L) SEZ-KD50VA(L) SEZ-KD60VA(L) SEZ-KD71VA(L) Outdoor Unit SUZ-KA25VA SUZ-KA35VA SUZ-KA50VA SUZ-KA60VA SUZ-KA71VA Power Supply Source Outdoor power supply Phase Single Single Single Single Single Phase Refrigerant R410A R410A R410A R410A R410A...
- Page 41 S series CEILING-CONCEALED B.2.2 OUTLINES AND DIMENSIONS B.2.2.1 INDOOR UNIT Unit : mm SEZ-KD25VA(L) SEZ-KD35VA(L) SEZ-KD50VA(L) SEZ-KD60VA(L) SEZ-KD71VA(L) 157.5 37 100 outlet inlet L- 2.9 2XE- 2.9 Air filter 625 (Suspension bolt pitch) Knockout hole 27 Suspension bolt hole (Remote controller transmission line)
- Page 42 CEILING-CONCEALED S series Unit : mm B.2.2.2 WIRED REMOTE CONTROLLER B.2.2.3 WIRELESS REMOTE CONTROLLER 19.5 B-42...
-
Page 43: Wiring Diagram
S series CEILING-CONCEALED B.2.3 WIRING DIAGRAM SEZ-KD25VA(L) SEZ-KD35VA(L) SEZ-KD50VA(L) SEZ-KD60VA(L) SEZ-KD71VA(L) INSIDE SECTION OF CONTROL BOX TB15 TO MA REMOTE CONTROLLER I.B. CN01 (Black) CN32 CN3C (Blue) CN51 CN41 ZNR02 L1:only CN2L (Blue) CN22 ON OFF DC310~340V FUSE ZNR01 SEZ-KD71VA(L) -
Page 44: Refrigerant System Diagram
CEILING-CONCEALED S series B.2.4 REFRIGERANT SYSTEM DIAGRAM SEZ-KD25VA(L) SEZ-KD35VA(L) SEZ-KD50VA(L) SEZ-KD60VA(L) SEZ-KD71VA(L) Strainer Heat exchanger Refrigerant GAS pipe connection (Flare) Condenser/evaporator temperature thermistor (TH5) Refrigerant flow in cooling Refrigerant flow in heating Refrigerant LIQUID pipe connection (Flare) Pipe temperature thermistor/liquid... -
Page 45: Performance Data
S series CEILING-CONCEALED B.2.5 PERFORMANCE DATA COOLING operation at Rated frequency SEZ-KD25VA(L) / SUZ-KA25VA CAPACITY : 2.5(kW) INPUT : 778(W) SHF : 0.80 OUTDOOR DB( ) INDOOR INDOOR DB( ) WB( ) SHF INPUT SHF INPUT SHF INPUT SHF INPUT 2.94... - Page 46 CEILING-CONCEALED S series COOLING operation at Rated frequency SEZ-KD25VA(L) / SUZ-KA25VA CAPACITY : 2.5(kW) INPUT : 778(W) SHF : 0.80 OUTDOOR DB( ) INDOOR INDOOR INPUT DB( ) WB( ) SHF INPUT SHF INPUT 2.45 1.52 0.62 2.25 1.40 0.62 2.08...
- Page 47 S series CEILING-CONCEALED COOLING operation at Rated frequency SEZ-KD35VA(L) / SUZ-KA35VA CAPACITY : 3.5(kW) INPUT : 1090(W) SHF : 0.78 OUTDOOR DB( ) INDOOR INDOOR SHF INPUT SHF INPUT SHF INPUT SHF INPUT DB( ) WB( ) 4.11 2.47 0.60 3.94...
- Page 48 CEILING-CONCEALED S series COOLING operation at Rated frequency SEZ-KD35VA(L) / SUZ-KA35VA CAPACITY : 3.5(kW) INPUT : 1090(W) SHF : 0.78 OUTDOOR DB( ) INDOORINDOOR DB( ) WB( ) SHF INPUT SHF INPUT INPUT 1177 3.43 2.06 0.60 1068 3.15 1.89 0.60...
- Page 49 S series CEILING-CONCEALED COOLING operation at Rated frequency SEZ-KD50VA(L) / SUZ-KA50VA CAPACITY : 5.0(kW) INPUT : 1780(W) SHF : 0.76 OUTDOOR DB( ) INDOOR INDOOR DB( ) WB( ) SHF INPUT SHF INPUT SHF INPUT SHF INPUT 5.88 3.41 0.58 1424 5.63...
- Page 50 CEILING-CONCEALED S series COOLING operation at Rated frequency SEZ-KD50VA(L) / SUZ-KA50VA CAPACITY : 5.0(kW) INPUT : 1780(W) SHF : 0.76 OUTDOOR DB( ) INDOOR INDOOR DB( ) WB( ) SHF INPUT SHF INPUT INPUT 1922 4.90 2.84 0.58 1744 4.50 2.61...
- Page 51 S series CEILING-CONCEALED COOLING operation at Rated frequency SEZ-KD60VA(L) / SUZ-KA60VA CAPACITY : 5.5(kW) INPUT : 1890(W) SHF : 0.79 OUTDOOR DB( ) INDOOR INDOOR DB( ) WB( ) SHF INPUT SHF INPUT SHF INPUT SHF INPUT 6.46 3.94 0.61 1512 6.19...
- Page 52 CEILING-CONCEALED S series COOLING operation at Rated frequency SEZ-KD60VA(L) / SUZ-KA60VA CAPACITY : 5.5(kW) INPUT : 1890(W) SHF : 0.79 OUTDOOR DB( ) INDOOR INDOOR DB( ) WB( ) SHF INPUT SHF INPUT INPUT 2041 5.39 3.29 0.61 1852 4.95 3.02...
- Page 53 S series CEILING-CONCEALED COOLING operation at Rated frequency SEZ-KD71VA(L) / SUZ-KA71VA CAPACITY : 7.1(kW) INPUT : 2530(W) SHF : 0.74 OUTDOOR DB( ) INDOOR INDOOR DB( ) WB( ) SHF INPUT SHF INPUT SHF INPUT SHF INPUT 8.34 4.67 0.56 2024 7.99...
- Page 54 CEILING-CONCEALED S series COOLING operation at Rated frequency SEZ-KD71VA(L) / SUZ-KA71VA CAPACITY : 7.1(kW) INPUT : 2530(W) SHF : 0.74 OUTDOOR DB( ) INDOOR INDOOR DB( ) WB( ) SHF INPUT SHF INPUT INPUT 2732 6.96 3.90 0.56 2479 6.39 3.58...
- Page 55 S series CEILING-CONCEALED HEATING operation SEZ-KD25VA(L) / SUZ-KA25VA at Rated frequency CAPACITY : 3.0(kW) INPUT : 830(W) OUTDOOR WB( ) INDOOR DB( ) INPUT INPUT INPUT INPUT INPUT INPUT INPUT 1.89 2.28 2.67 3.06 3.45 3.81 4.20 1.80 2.16 2.55 2.91...
-
Page 56: Noise Criteria Curves
CEILING-CONCEALED S series B.2.6 NOISE CRITERIA CURVES NOTE: The sound level is measured in an anechoic room where echoes Aux.duct are few, when compressor stops. The sound may be bigger than the indicated level in actual use due to surrounding echoes. The sound level can be higher by about 2 dB than the indicated level during cooling and heating operation. - Page 57 S series CEILING-CONCEALED SEZ-KD35VA(L) SEZ-KD35VA(L) NOTCH LINE NOTCH SPL(dB) LINE SPL(dB) External static pressure: 5Pa High External static pressure: 15Pa High Middle Middle NC-70 NC-70 NC-60 NC-60 NC-50 NC-50 NC-40 NC-40 NC-30 NC-30 APPROXIMATE APPROXIMATE THRESHOLD OF THRESHOLD OF HEARING FOR...
- Page 58 CEILING-CONCEALED S series SEZ-KD50VA(L) SEZ-KD50VA(L) NOTCH LINE NOTCH LINE SPL(dB) SPL(dB) External static pressure: 5Pa High External static pressure: 15Pa High Middle Middle NC-70 NC-70 NC-60 NC-60 NC-50 NC-50 NC-40 NC-40 NC-30 NC-30 APPROXIMATE APPROXIMATE THRESHOLD OF THRESHOLD OF HEARING FOR...
- Page 59 S series CEILING-CONCEALED SEZ-KD60VA(L) SEZ-KD60VA(L) NOTCH SPL(dB) LINE NOTCH SPL(dB) LINE External static pressure: 5Pa High External static pressure: 15Pa High Middle Middle NC-70 NC-70 NC-60 NC-60 NC-50 NC-50 NC-40 NC-40 NC-30 NC-30 APPROXIMATE APPROXIMATE THRESHOLD OF THRESHOLD OF HEARING FOR...
- Page 60 CEILING-CONCEALED S series SEZ-KD71VA(L) SEZ-KD71VA(L) NOTCH LINE NOTCH LINE SPL(dB) SPL(dB) External static pressure: 5Pa High External static pressure: 15Pa High Middle Middle NC-70 NC-70 NC-60 NC-60 NC-50 NC-50 NC-40 NC-40 NC-30 NC-30 APPROXIMATE APPROXIMATE THRESHOLD OF THRESHOLD OF HEARING FOR...
-
Page 61: Indoor Fan Performance And Corrected Air Flow
S series CEILING-CONCEALED B.2.7 INDOOR FAN PERFORMANCE AND CORRECTED AIR FLOW 1. SEZ-KD•VA(L) INDOOR FAN PERFORMANCE AND CORRECTED AIR FLOW SEZ-KD25VA(L) SEZ-KD25VA(L) (External static pressure 5Pa) 220-240V 50/60Hz (External static pressure 15Pa) 220-240V 50/60Hz Limit Limit High Middle High Rated point... - Page 62 CEILING-CONCEALED S series SEZ-KD35VA(L) SEZ-KD35VA(L) (External static pressure 5Pa) 220-240V 50/60Hz (External static pressure 15Pa) 220-240V 50/60Hz Limit Limit High High Middle Rated point Middle Rated point Airflow rate(m /min) Airflow rate(m /min) SEZ-KD35VA(L) SEZ-KD35VA(L) (External static pressure 35Pa) 220-240V 50/60Hz...
- Page 63 S series CEILING-CONCEALED SEZ-KD50VA(L) SEZ-KD50VA(L) (External static pressure 5Pa) 220-240V 50/60Hz (External static pressure 15Pa) 220-240V 50/60Hz Limit Limit High High Middle Middle Rated point Rated point Airflow rate(m /min) Airflow rate(m /min) SEZ-KD50VA(L) SEZ-KD50VA(L) (External static pressure 35Pa) 220-240V 50/60Hz...
- Page 64 CEILING-CONCEALED S series SEZ-KD60VA(L) SEZ-KD60VA(L) (External static pressure 5Pa) 220-240V 50/60Hz (External static pressure 15Pa) 220-240V 50/60Hz Limit Limit High Middle High Middle Rated point Rated point Airflow rate(m /min) Airflow rate(m /min) SEZ-KD60VA(L) SEZ-KD60VA(L) (External static pressure 35Pa) 220-240V 50/60Hz...
-
Page 65: Center Of Gravity Position
S series CEILING-CONCEALED SEZ-KD71VA(L) SEZ-KD71VA(L) (External static pressure 5Pa) 220-240V 50/60Hz (External static pressure 15Pa) 220-240V 50/60Hz Limit Limit High Rated point High Middle Middle Rated point Airflow rate(m /min) Airflow rate(m /min) SEZ-KD71VA(L) SEZ-KD71VA(L) (External static pressure 35Pa) 220-240V 50/60Hz... -
Page 66: Remote Controller
CEILING-CONCEALED S series B.2.9 REMOTE CONTROLLER B.2.9.1 WIRED REMOTE CONTROLLER “Sensor” indication Display Section Displayed when the remote controller sensor is used. Day-of-Week For purposes of this explanation, Shows the current day of the week. all parts of the display are shown as lit. -
Page 67: Wireless Remote Controller
S series CEILING-CONCEALED B.2.9.2 WIRELESS REMOTE CONTROLLER When cover is open Transmission area Transmission indicator Remote controller display Timer indicator *For explanation purposes, all of the items that appear in the display are shown. *All items are displayed when the Reset button is pressed. -
Page 68: Troubleshooting
CEILING-CONCEALED S series B.2.10 TROUBLESHOOTING 1. CAUTIONS ON TROUBLESHOOTING (1) Before troubleshooting, check the followings: 1 Check the power supply voltage. 2 Check if the indoor/outdoor connecting wire is correct. (2) Take care the followings during servicing. 1 Before servicing the air conditioner, be sure to turn off the remote controller first to stop the main unit, and then turn off the breaker. -
Page 69: Installation Procedure
S series CEILING-CONCEALED B.2.11 INSTALLATION PROCEDURE Installation Procedure is described from page B-76 (These fi gures are for page B-77-84) [Fig. 3-1] 50~150 Access door 600 mm or more Electrical parts box 100 mm or more Air inlet 10 mm or more... - Page 70 CEILING-CONCEALED S series [Fig. 6-1] ØB ØA Model 9.52 6.35 SEZ-KD25, 35 SEZ-KD50 12.7 6.35 SEZ-KD60 15.88 6.35 Indoor unit SEZ-KD71 15.88 9.52 Outdoor unit [Fig. 6-3] [Fig. 6-4] [Fig. 6-5] Burr Spare reamer Copper tubes No good Uneven Flare nut...
- Page 71 S series CEILING-CONCEALED [Fig. 7-1] Air inlet Air outlet Access door Ceiling surface Canvas duct Air filter Inlet grille [Fig. 8-1] Indoor unit Outdoor unit Signal receiving unit Wireless remote controller Main switch/fuse Grounding For Power supply For Power supply [Fig.
- Page 72 CEILING-CONCEALED S series [Fig. 8-3] Indoor terminal block Indoor terminal block Outdoor terminal block Indoor controller Earth wire (green/yellow) Always install an earth wire (1-core 1.5 CN90 board Earth wire (green/yellow) ) longer than other cables Indoor/outdoor unit connecting wire 3- core 1.5 mm...
- Page 73 S series CEILING-CONCEALED [Fig. 8-10] Signal receiving unit external Center of Switch box Switch box Installation pitch 6.5 mm (1/4 inch) 70 mm (2 - 3/4 inch) 83.5 0.4 mm (3 - 9/32 inch) Protrusion (pillar, etc) [Fig. 8-11] Ceiling cassette type, Ceiling concealed type...
- Page 74 CEILING-CONCEALED S series [Fig. 8-16] Insert the minus screwdriver toward the arrow pointed and wrench it to remove the cover. A flat screwdriver whose width of blade is between 4 and 7 mm (5/32 - 9/32 inch) must be used.
- Page 75 S series CEILING-CONCEALED [Fig.8-22] CHECK CHECK CHECK Hour button Minute button ON/OFF TEMP TEMP button TEMP button ON/OFF button CHECK CHECK AUTO STOP CHECK button MODE VANE AUTO START CHECK LOUVER TEST RUN RESET CLOCK [Fig. 9-1] TEST RUN ON/OFF...
- Page 76 CEILING-CONCEALED S series 1. Safety precautions Symbols put on the unit • Please report to or take consent by the supply authority before connection to the system. : Indicates an action that must be avoided. • Be sure to read “The following should always be observed for safety” before : Indicates that important instructions must be followed.
- Page 77 S series CEILING-CONCEALED 3. Selecting an installation site & Accessories 3.2. Securing installation and service space • Select a site with sturdy fixed surface sufficiently durable against the weight of unit. • Before installing unit, the routing to carry in unit to the installation site should be •...
- Page 78 CEILING-CONCEALED S series 6. Refrigerant piping work 6.1. Refrigerant pipe 6.2.4. Flaring work [Fig. 6-6] [Fig. 6-1] Flaring tool Indoor unit Outdoor unit Copper tube Flare nut Refer to the Instruction Manual that came with the outdoor unit for the restrictions on...
- Page 79 S series CEILING-CONCEALED 6. Refrigerant piping work 1.Remove and discard the rubber bung which is inserted in the end of the unit piping. 2.Flare the end of the site refrigerant piping. Pipe length : Pipe length exceeding 7 m 3.Pull out the thermal insulation on the site refrigerant piping and replace the insula-...
- Page 80 CEILING-CONCEALED S series 8. Electrical work 8.1. Power supply Signal receiving unit cable (accessory) (wire length : 5 m) Signal receiving unit Electrical specification Input capacity Main Switch/Fuse (A) Power supply cord Power supply SEZ-KD25 SEZ-KD35 SEZ-KD50 SEZ-KD60 SEZ-KD71 Cable 3-core 2.0 mm or more, in conformity with Design 60245 IEC 57.
- Page 81 S series CEILING-CONCEALED 8. Electrical work For pair number settings, the following 4 patters (A-D) are available. Indoor controller circuit board side Pair number setting pattern Pair number on remote controller side Point where the daisy wire is disconnected Not disconnected...
- Page 82 CEILING-CONCEALED S series 8. Electrical work 8.5. Function settings Selecting a mode Enter 04 to change the power voltage setting using the buttons. 8.5.1 Function setting on the unit (Selecting the unit functions) Direct the wireless remote controller toward the receiver of the indoor unit and...
- Page 83 S series CEILING-CONCEALED 9. Test run [Output pattern A] Errors detected by indoor unit Wired remote Wireless remote controller controller Symptom Remark Beeper sounds/OPERATION INDICATOR lamp flashes Check code (Number of times) Intake sensor error P2, P9 Pipe (Liquid or 2-phase pipe) sensor error...
- Page 84 CEILING-CONCEALED S series 9. Test run For description of each LED (LED1, 2, 3) provided on the indoor controller, refer to the following table. LED 1 (power for microcomputer) Indicates whether control power is supplied. Make sure that this LED is always lit.
-
Page 85: B.3 Outdoor Unit (Suz)
Back to Index page B.3 OUTDOOR UNIT (SUZ) B.3.1 OUTLINES AND DIMENSIONS ..............B-86 B.3.2 WIRING DIAGRAM ..................B-88 B.3.3 REFRIGERANT SYSTEM DIAGRAM ............B-92 B.3.4 PERFORMANCE CURVES ................. B-95 B.3.5 NOISE CRITERIA CURVES ................ B-99 B.3.6 ACTUATOR CONTROL ................B-100 B.3.7 TROUBLESHOOTING ................. -
Page 86: Outdoor Unit (Suz)
OUTDOOR UNIT S series B.3.1 OUTLINES AND DIMENSIONS SUZ-KA25VA Unit: mm SUZ-KA35VA OUTDOOR UNIT REQUIRED SPACE Basically open 100mm or more without any obstruction in front and on both sides of the unit. Drain hole 42 (SUZ-KA25/KA35VA) Air in Air in... - Page 87 S series OUTDOOR UNIT SUZ-KA50VA Unit: mm SUZ-KA60VA SUZ-KA71VA OUTDOOR UNIT REQUIRED SPACE Open as a rule 500mm or more if the front and both sides are open 100mm or more 200mm or more if 100mm or more there are obstacles...
-
Page 88: Wiring Diagram
OUTDOOR UNIT S series B.3.2 WIRING DIAGRAM SUZ-KA25VA SUZ-KA35VA OUTDOOR UNIT B-88... - Page 89 S series OUTDOOR UNIT SUZ-KA50VA MODELS WIRING DIAGRAM OUTDOOR UNIT B-89...
- Page 90 OUTDOOR UNIT S series SUZ-KA60VA MODELS WIRING DIAGRAM OUTDOOR UNIT B-90...
- Page 91 S series OUTDOOR UNIT SUZ-KA71VA MODEL WIRING DIAGRAM OUTDOOR UNIT B-91...
-
Page 92: Refrigerant System Diagram
OUTDOOR UNIT S series B.3.3 REFRIGERANT SYSTEM DIAGRAM SUZ-KA25VA Unit: mm OUTDOOR UNIT Refrigerant pipe ø9.52 4-way valve (with heat insulator) Muffler Outdoor heat exchanger Stop valve temperature (with service port) thermistor Outdoor Muffler RT68 Discharge heat Flared connection temperature... - Page 93 S series OUTDOOR UNIT SUZ-KA50VA Unit: mm OUTDOOR UNIT Muffler #100 4-way valve Refrigerant pipe ø12.7 (with heat insulator) Stop valve (with service port) Outdoor Flared connection Discharge heat Ambient temperature exchanger temperature thermistor Defrost thermistor RT62 thermistor RT65 RT61...
- Page 94 OUTDOOR UNIT S series SUZ-KA71VA Unit: mm OUTDOOR UNIT Capillary tube 1.8 x 0.6 x 1000 Oil separator High-pressure Refrigerant pipe 15.88 4-way valve switch (with heat insulator) Stop valve (with service port) Outdoor Strainer Defrost Flared connection heat Ambient...
-
Page 95: Performance Curves
S series OUTDOOR UNIT B.3.4 PERFORMANCE CURVES FOR THE COMBINATION OF OUTDOOR UNIT SUZ-KA25VA Cooling capacity Indoor intake air Wet-bulb temperature ( ) Outdoor intake air Dry-bulb temperature ( ) Total input (cooling) Indoor intake air Wet-bulb temperature ( ) - Page 96 OUTDOOR UNIT S series FOR THE COMBINATION OF OUTDOOR UNIT SUZ-KA35VA Cooling capacity Indoor intake air Wet-bulb temperature ( ) Outdoor intake air Dry-bulb temperature ( ) Total input (cooling) Indoor intake air Wet-bulb temperature ( ) Outdoor intake air Dry-bulb temperature ( )
- Page 97 S series OUTDOOR UNIT FOR THE COMBINATION OF OUTDOOR UNIT SUZ-KA50/60/71VA Cooling capacity Indoor intake air Wet-bulb temperature ( ) Outdoor intake air Dry-bulb temperature ( ) Total input (cooling) Indoor intake air Wet-bulb temperature ( ) Outdoor intake air Dry-bulb temperature ( )
- Page 98 OUTDOOR UNIT S series FOR THE COMBINATION OF OUTDOOR UNIT SUZ-KA25/35/50/60/71VA Heating capacity Outdoor intake air Dry-bulb temperature( ) Total input (cooling) Outdoor intake air Dry-bulb temperature ( ) B-98...
-
Page 99: Noise Criteria Curves
S series OUTDOOR UNIT B.3.5 NOISE CRITERIA CURVES SUZ-KA25VA SUZ-KA35VA FAN SPEED FUNCTION SPL(dB(A)) LINE FAN SPEED FUNCTION SPL(dB(A)) LINE COOLING COOLING High High Med. Med. HEATING HEATING Test conditions, Test conditions, Cooling : Dry-bulb temperature 35 Wet-bulb temperature (24 ) -
Page 100: Actuator Control
OUTDOOR UNIT S series B.3.6 ACTUATOR CONTROL SUZ-KA25VA SUZ-KA35VA SUZ-KA50VA SUZ-KA60VA SUZ-KA71VA 1. Outdoor fan motor control The fan motor turns ON/OFF, interlocking with the compressor. [ON] The fan motor turns ON 5 seconds before the compressor starts up. [OFF] The fan motor turns OFF 15 seconds after the compressor has stopped running. -
Page 101: Troubleshooting
S series OUTDOOR UNIT B.3.7 TROUBLESHOOTING SUZ-KA25VA SUZ-KA35VA SUZ-KA50VA SUZ-KA60VA SUZ-KA71VA 1. Cautions on troubleshooting 1-1. Before troubleshooting, check the following: 1) Check the power supply voltage. 2) Check if the indoor/outdoor connecting wire is correct. 1-2. Take care the following during servicing. - Page 102 OUTDOOR UNIT S series 2. Failure mode recall function As this air conditioner has a function to memorize all the failures that had happened, the latest failure detail can be recalled by following the procedures below. Use this function when the check code is not displayed with wired remote controller or the remote controller at use is wire- less type.
- Page 103 S series OUTDOOR UNIT 2-2. Wired remote controller Turn on the power. Press the [CHECK] button twice. Set address with [TEMP] button if system control is used. Press the [ON/OFF] button to stop the self-check. CHECK button Address TEMP. button...
- Page 104 OUTDOOR UNIT S series 2-4. Outdoor unit failure mode table Inverter P.C. board (Parts side) SUZ-KA25VA SUZ-KA35VA SUZ-KA50VA NOTE 1. The location of LED is illustrated at the right figure. blinking 2. LED lights up during normal operation. LED indication...
- Page 105 S series OUTDOOR UNIT SUZ-KA60VA SUZ-KA71VA Outdoor electronic control P.C. board(Parts side) LED2 LED1 Lighting NOTE 1. The location of LED is illustrated at the right figure. 2. LED is lighted during normal operation. Outdoor LED indication Abnormal point Details of abnormal...
- Page 106 OUTDOOR UNIT S series Outdoor LED indication Abnormal point Details of abnormal Detecting method Check point (Failure mode) LED1 LED2 Overcurrent protection IPM protection When overcurrent is detected after • Check the connection of the compressor Once Goes out 30 seconds of compressor start-up.
-
Page 107: Earthquake-Proof Strength Analysis
S series OUTDOOR UNIT B.3.8 EARTHQUAKE-PROOF STRENGTH ANALYSIS Earthquake-proof strength analysis <Anchor bolt> S Series Inverter Outdoor unit 1.Type: 2.Model name: SUZ-KA25VA 3.Specification (1) Unit mass (2) Anchor bolt 1.The total number of bolts. 2.The size and shape. = "... - Page 108 OUTDOOR UNIT S series Earthquake-proof strength analysis <Anchor bolt> S Series Inverter Outdoor unit 1.Type: 2.Model name: SUZ-KA35VA 3.Specification (1) Unit mass (2) Anchor bolt 1.The total number of bolts. 2.The size and shape. = " 3.The axis section area per one bolt.
- Page 109 S series OUTDOOR UNIT Earthquake-proof strength analysis <Anchor bolt> S Series Inverter Outdoor unit 1.Type: 2.Model name: SUZ-KA50VA, SUZ-KA60VA 3.Specification (1) Unit mass (2) Anchor bolt 1.The total number of bolts. 2.The size and shape. = " 3.The axis section area per one bolt.
- Page 110 OUTDOOR UNIT S series Earthquake-proof strength analysis <Anchor bolt> S Series Inverter Outdoor unit 1.Type: 2.Model name: SUZ-KA71VA 3.Specification (1) Unit mass (2) Anchor bolt 1.The total number of bolts. 2.The size and shape. = " 3.The axis section area per one bolt.
-
Page 111: Capacity Correction Ratio Curve Piping Length
S series OUTDOOR UNIT B.3.9 CAPACITY CORRECTION RATIO CURVE PIPING LENGTH Correction ratio of capacity according to the length of piping (cooling) 100% SUZ-KA25VA SUZ-KA35VA SUZ-KA50VA SUZ-KA60VA SUZ-KA71VA Actual length of refrigerant piping (m) Correction ratio of capacity according to the length of piping (heating) -
Page 112: Installation Procedure
OUTDOOR UNIT S series B.3.10 INSTALLATION PROCEDURE 1. The following should always be observed for safety • Please provide an exclusive circuit for the air conditioner and do not connect Caution: Could lead to serious injury in particular environments when operated incor- other electrical appliances to it. - Page 113 S series OUTDOOR UNIT 3. Installation diagram 3.1. Outdoor unit (Fig. 3-1) SUZ-KA25/KA35VA Ventilation and service space SUZ-KA25/KA35VA 100 mm or more 350 mm or more Basically open 100 mm or more without any obstruction in front and on both sides of the unit.
- Page 114 OUTDOOR UNIT S series 5. Refrigerant piping work 5.1. Refrigerant pipe (Fig. 5-1) Check that the difference between the heights of the indoor and outdoor units, the length of refrigerant pipe, and the number of bends in the pipe are within the limits shown below.
- Page 115 S series OUTDOOR UNIT 5. Refrigerant piping work 5.2.5. Check (Fig. 5-7) • Compare the flared work with a figure in right side hand. • If flare is noted to be defective, cut off the flared section and do flaring work again.
- Page 116 OUTDOOR UNIT S series 6. Electrical work 6.1. Outdoor unit (Fig. 6-1, Fig. 6-2, Fig. 6-3, Fig. 6-4) Remove the service panel. Wire the cables referring to the Fig. 6-1, Fig. 6-2, Fig. 6-3 and the Fig. 6-4. Indoor unit...
- Page 117 S series OUTDOOR UNIT 6. Electrical work 6.2. Field electrical wiring Outdoor unit model SUZ-KA25/KA35 SUZ-KA50/KA60/KA71 Outdoor unit power supply ~/N (single), 50 Hz, ~/N (single), 50 Hz, 230 V 230 V Outdoor unit input capacity 10 A 20 A...
- Page 118 OUTDOOR UNIT S series B-118...