
Related Manuals for Willow Wearable Breast Pump 2.0


Summary of Contents for Willow Wearable Breast Pump 2.0
-
Page 1: Instructions For Use
Instructions for Use Willow Wearable Breast Pump 2.0 The first all-in one, in-bra breast pump... -
Page 2: Table Of Contents
TABLE OF CONTENTS 1. Overview 2. Getting Started Flange Sizing Guide Get the Right Bra ™ Boil Flange & Flextube Wake Up Willow 3. Pumping Turn on Pump Assembly Alignment Initiate Latch Phases of Willow Secure Pump in Bra Suction Levels Realignment Tips 4. -
Page 3: Overview
This is a personal care product for a single user and should not be shared between users. Only use Willow Breast Pump 2.0 parts; do not substitute. Do not modify equipment. Close supervision is necessary when product is used near children. - Page 4 27. Pump will not work when connected to Charger; always disconnect Pump from Charger before using. 28. Only use Charger supplied with Willow Breast Pump 2.0. 29. Plug Charger into an electrical outlet that is visible and easily accessible. To remove line voltage (mains power), unplug the power supply from the wall.
-
Page 5: Product Description
Who should use the Willow Wearable Breast Pump 2.0? The Willow Wearable Breast Pump 2.0 is intended to express milk from lactating women in order to collect breast milk from their breasts. The device is intended for a single user. - Page 6 Willow Pump 2.0 Flange (24mm) Flextube ™ Compatible with Willow 2.0 only Charger Cleaning Brushes Milk Bag Additional Flange sizes (27mm) and spare parts are available for available for purchase at willowpump.com. instructional videos willowpump.com l text or call 1-888-WILLOW-3...
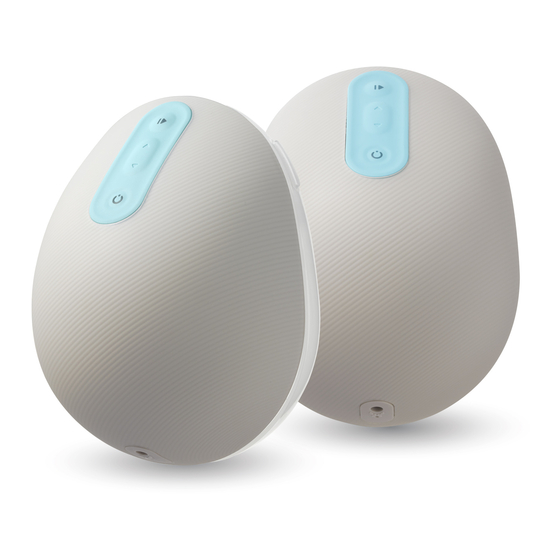
- Page 7 The Willow Breast Pump 2.0 is a personal use, cordless breast Pump for single and double pumping. The product includes: re-chargeable Pump(s), Flange(s), Flextube(s) and disposable Milk Bags. ™ Flange Exterior Pump Exterior Thumbpad Pump/Pause Suction Controls Door Increase/Decrease On/Off...
- Page 8 Willow lets milk in, but prevents Breast Pump 1.0 Flange. leaks and spills. No cap needed. Volume Indicators approximate Additional Flange sizes and spare parts are available for purchase at www.willowpump.com. instructional videos willowpump.com l text or call 1-888-WILLOW-3...
-
Page 9: Getting Started
Willow Pump Kit a nickel 27mm Larger than a nickel but available for smaller than purchase on a quarter willowpump.com 30mm Larger than a quarter not offered Willow Wearable Breast Pump 2.0 Instructions for Use... - Page 10 Your flange size may fluctuate with birth, breastfeeding, and pumping. We recommend you revisit your flange fit from time to time. instructional videos willowpump.com l text or call 1-888-WILLOW-3...
-
Page 11: Get The Right Bra
GET THE RIGHT BRA The bra you wear while pumping with Willow needs to keep the Pump pressed firmly and securely against your breast. Pick the right bra: No gaps! › Full coverage The blue thumbpad on the › Has a flap Flange should be firmly ›... -
Page 12: Boil Flange & Flextube
DO NOT put Flange or Milk Bag in microwave or microwave sterilizer bags. Milk Bag is disposable and NOT for reuse; discard after use. After boiling, allow Flange to cool before touching metal parts. instructional videos willowpump.com l text or call 1-888-WILLOW-3... -
Page 13: Wake Up Willow
WAKE UP WILLOW Pump comes partially charged, but needs to wake up. a. Plug Charger into outlet, then into Pump. b. Wait until Pump lights up. c. Unplug Charger from Pump. Willow Wearable Breast Pump 2.0 Instructions for Use... -
Page 14: Pumping
› Wear a nursing bra that keeps Pump firmly and securely in place. If it feels like Willow will shift when you move, tighten the bra straps or pick a different bra. › Do not slide Pump directly into your bra; follow step-by-step instructions. -
Page 15: Assembly
Collar into top of Flange. onto Flange Spout. Listen for Collar to ‘click’ click! into place. Make sure the edges are flush. TIP: Flextube™ must be pushed all the way down onto the Flange Spout. Willow Wearable Breast Pump 2.0 Instructions for Use... - Page 16 Attach Milk Bag fig 3d Slide Flange Door fig 3e After sliding open by pushing the blue Door up, pull open. thumb pad in and sliding up. instructional videos willowpump.com l text or call 1-888-WILLOW-3...
- Page 17 3g Firmly press Milk Bag over Flange Milk Bag’s One- with writing “THIS way Valve onto SIDE UP” facing away Flextube™ collar. from Flange. Make sure Valve is securely attached to collar. Willow Wearable Breast Pump 2.0 Instructions for Use...
- Page 18 3j Tuck bag under tabs on Flange. Make sure the bag is completely tucked under the metal. TIP: It’s normal for the bag to appear crinkled – just no folds please. instructional videos willowpump.com l text or call 1-888-WILLOW-3...
-
Page 19: Alignment
If you still experience discomfort even with proper alignment, you may need a different Flange size. See Section 2. GETTING STARTED - Flange Sizing Guide or contact Willow Customer Care. a. Open bra flap, ensuring fabric is out of the way. Stimulate your nipple. - Page 20 To align Willow, bring the Flange to your breast so your nipple is centered in the Flange Tunnel. You may need to bend forward. fig 3l Bring the Flange to your breast, fig 3m Using your other hand, making sure your nipple is centered...
- Page 21 You may also assemble the Flange and Pump before aligning. To assemble, bring Pump and Flange together until they securely connect. Then, align Willow by bringing the pump to your breast in the direction your nipple points, ensuring your nipple is centered in the Flange Tunnel.
-
Page 22: Initiate Latch
Press Pump/Pause button to initiate latch and begin pumping. c. Continue to hold Pump firmly against your breast. Wait until Pump reaches Stimulation. d. Do not secure your bra until Willow is firmly latched. Trouble Initiating Latch? See Section 6. TROUBLESHOOTING. -
Page 23: Phases Of Willow
You cannot go back to Expression, try leaning back. Stimulation phase. If at any point you experience excessive discomfort, pause the pump, then break latch and make sure you are aligned properly. Willow Wearable Breast Pump 2.0 Instructions for Use... -
Page 24: Secure Pump In Bra
If necessary, tighten bra strap to keep Pump securely in place. b. When double pumping, put the second Pump on after the first Pump is latched, secured in your bra and in Stimulation. instructional videos willowpump.com l text or call 1-888-WILLOW-3... - Page 25 Once you reach Expression phase, move as you wish. If you are still in Stimulation phase after 5-7 minutes... › Make sure your bra is keeping Willow pressed securely against your breast, especially at the top of the Pump. › Press Pump/Pause button, break latch and check alignment (See Section 3.
-
Page 26: Suction Levels
SUCTION LEVELS Willow has seven suction levels to choose from. Suction level starts at 1, and can be adjusted once the Pump enters Expression. fig 3o Adjust fig 3p Expression phase suction level automatically starts using increase/ at Level 1. Increase to... -
Page 27: Realignment Tips
› Remove Pump from breast, keeping Flange side up to avoid spilling milk not yet pumped into Milk Bag. › Realign Willow with the Pump and Flange assembled (reference Section 3. PUMPING - Alignment). Bend over to avoid spilling milk and bring the Pump to your breast in the direction your nipple points, centering your nipple in the Flange Tunnel. - Page 28 You may also separate the Pump from the Flange to realign. To do this, perform Flip to Finish before realigning (reference Section 4. ENDING YOUR SESSION - Flip to Finish). instructional videos willowpump.com l text or call 1-888-WILLOW-3...
-
Page 29: Ending Your Session
Milk Bag and follow instructions starting with Section 3. PUMPING. fig 4a Pause Pump fig 4b Unhook bra and by pressing bend forward; support Pump/Pause button. bottom of Pump with one hand. Willow Wearable Breast Pump 2.0 Instructions for Use... -
Page 30: Break Latch & Remove Pump
TIP: There will be some milk in the Flange; the next step will help you capture it. fig 4c Break latch fig 4d Tilt Pump by placing a few away from fingers between breast, keeping Pump and breast. Flange side up. instructional videos willowpump.com l text or call 1-888-WILLOW-3... -
Page 31: Flip To Finish
TIP: You may notice, with a full Milk Bag, the Flange starts to separate from the Pump. This is normal. Squeeze pump and Flange together during Flip to Finish. Willow Wearable Breast Pump 2.0 Instructions for Use... - Page 32 (typically 3 to 4 gulps at this point). fig 4h FLIP all the way over with the Flange opening facing the floor and wait until gulps stop (a total of 8 gulps). instructional videos willowpump.com l text or call 1-888-WILLOW-3...
- Page 33 Pump, keeping the Flange facing up to avoid spills. Be careful not to tip the Flange too far. TIP: To easily separate Flange from Pump, hold near the bottom and pull apart. Willow Wearable Breast Pump 2.0 Instructions for Use...
- Page 34 Flip to Finish. TIP: A few drops left is completely normal. If you repeat Flip to Finish with only a few drops left or multiple times, the Milk Bag may fill up with air. instructional videos willowpump.com l text or call 1-888-WILLOW-3...
-
Page 35: Remove Milk Bag
The Flextube Collar. and sliding up. One-way Valve allows it to be laid ™ flat without leaking. CLEAN Flange and Flextube as instructed ™ (reference Section 5 - CLEANING, TRANSFER & STORAGE). Willow Wearable Breast Pump 2.0 Instructions for Use... -
Page 36: Charging Willow
Enough charge for 1 session Orange Solid Low battery – inadequately charged for session Red Solid IMPORTANT: Pump will not operate while plugged into electrical outlet. ONLY USE Charger supplied with the Willow Breast Pump. instructional videos willowpump.com l text or call 1-888-WILLOW-3... -
Page 37: Cleaning, Transfer & Storage
ARE DISHWASHER SAFE USING TOP RACK ONLY. WARNINGS: DO NOT wash or sanitize Pump. Wipe with clean, damp cloth, if needed. DO NOT use harsh chemicals to clean Flange and Flextube. ™ Use mild dish washing soap. Willow Wearable Breast Pump 2.0 Instructions for Use... - Page 38 Insert small fig 5b Use large brush to clean inside brush into top opening and body being Spout and clean. careful NOT to push brush all the way through Tip at bottom. instructional videos willowpump.com l text or call 1-888-WILLOW-3...
- Page 39 IMPORTANT: Take care not to damage parts when cleaning. Replace Flange, Flextube and/or Cleaning Brushes after signs of excessive wear. ™ TIP: Replace Flange and Flextube™ every 3 months. Willow Wearable Breast Pump 2.0 Instructions for Use...
- Page 40 * The preference is to refrigerate or chill milk right after it is expressed. WARNINGS: DO NOT microwave breast milk. DO NOT use hot water to thaw frozen breast milk. DO NOT place filled Milk Bag in refrigerator door to avoid temperature fluctuations. instructional videos willowpump.com l text or call 1-888-WILLOW-3...
- Page 41 Use clean scissors to cut on dotted line below Label Area on Milk Bag. fig 5e Place spout fig 5f Pour milk into into bottle and bottle. To release as slowly tilt bag. much as possible, squeeze bag. Discard Milk Bag, please recycle. Willow Wearable Breast Pump 2.0 Instructions for Use...
-
Page 42: Troubleshooting
To resolve issue: Pump does • Press On/Off button until Pump lights up. not wake up. • Plug into Charger to ensure battery has enough charge. No Color instructional videos willowpump.com l text or call 1-888-WILLOW-3... - Page 43 Pump paused and waiting for next command, • To continue pumping, press Pump/Pause button. Pumping time • To end session, break latch and remove Pump. exceeded 25 minutes, White Pulsing so automatically paused. Willow Wearable Breast Pump 2.0 Instructions for Use...
- Page 44 TO RESOLVE ISSUE • If this is your first time using Willow, you may need to Wake Up Willow by plugging the charger into an outlet and into Willow (reference Section 2. GETTING STARTED – Wake up Willow). Pump does •...
- Page 45 • Pump/Pause button may have been pressed - Pump/Pause button pulses white - Press Pump/Pause button to continue pumping. • Check to see if low battery - On/Off button light is solid red. Willow Wearable Breast Pump 2.0 Instructions for Use...
- Page 46 • Reset by gently inserting end of a small object, such as a paper clip or earring back, to be reset. into the reset Button beneath the Power Port. The Willow Breast Pump 2.0 is not a serviceable device. instructional videos willowpump.com l text or call 1-888-WILLOW-3...
-
Page 47: Technical Information
THE DATE OF PURCHASE BY THE ORIGINAL PURCHASER. In the event the product is found by Willow to not meet the above limited warranty in the Warranty Period, as purchaser’s sole and exclusive remedy Willow will repair or, at the option of Willow, replace this product without charge for such replacement or parts or labor. NOTE: The purchaser... - Page 48 WRITTEN OR IMPLIED WARRANTY. If you wish to make a claim under this limited warranty, you must return the product to Willow prepaid, together with your dated bill of sale or other dated proof of purchase and a brief statement of the problem, along with a Returned Goods Authorization number.
-
Page 49: Technical Specifications
TECHNICAL SPECIFICATIONS POWER REQUIREMENTS Only use the Willow Breast Pump 1.0 or 2.0 Charger Manufacturer: Delta Electronics Inc., Part Number MDS-030AAC05 ZB Specifications: 100 - 240 vac, 50-60Hz, 0.5A-0.3A SPECIFICATIONS Pump Dimensions 141mm x 85mm x 112mm Pump Weight 355 g... - Page 50 Willow pump. › In Industrial Settings: Avoid using the pump near arc welding equipment, radar installations, and similar industrial settings.
- Page 51 Warning: Use of accessories other than those specified by Exploramed NC7 may result in increased emissions or decreased immunity of the Willow Breast Pump 2.0. The Willow Breast Pump 2.0 has no essential performance; however, it was tested for immunity to electromagnetic disturbances. The Willow Breast Pump 2.0 passed with the following acceptance criteria: pumping vacuum does not exceed a safe level and no components fail.
- Page 52 NOTE 1: At 80 MHz and 800 MHz, the separation distance for the higher frequency range applies. NOTE 2: These guidelines may not apply in all situations. Electromagnetic propagation is affected by absorption and reflection from structures, objects and people. instructional videos willowpump.com l text or call 1-888-WILLOW-3...
- Page 53 GUIDANCE AND MANUFACTURER’S DECLARATION – ELECTROMAGNETIC EMISSIONS The Willow Breast Pump 2.0 is intended for use in the electromagnetic environment specified below. The customer or user of the Breast Pump should assure that it is used in such an environment.
- Page 54 GUIDANCE AND MANUFACTURER’S DECLARATION – ELECTROMAGNETIC EMISSIONS The Willow Breast Pump 2.0 is intended for use in the electromagnetic environment specified below. The customer or user of the Breast Pump should assure that it is used in such an environment.
- Page 55 GUIDANCE AND MANUFACTURER’S DECLARATION – ELECTROMAGNETIC EMISSIONS The Willow Breast Pump 2.0 is intended for use in the electromagnetic environment specified below. The customer or user of the Breast Pump should assure that it is used in such an environment.
- Page 56 GUIDANCE AND MANUFACTURER’S DECLARATION – ELECTROMAGNETIC EMISSIONS The Willow Breast Pump 2.0 is intended for use in the electromagnetic environment specified below. The customer or user of the Breast Pump should assure that it is used in such an environment.
- Page 57 If the measured field strength in the location in which the Willow Breast Pump is used exceeds the applicable RF compliance level above, the Willow Breast Pump should be observed to verify normal operation. If abnormal performance is observed, additional measures may be necessary, such as reorienting or relocating the Willow Breast Pump.
- Page 58 GLOSSARY & SYMBOLS PUMP CONTROL BUTTONS BUTTON FUNCTION ON / OFF PUMP / PAUSE UP ARROW = INCREASE Suction Strength DOWN ARROW = DECREASE Suction Strength instructional videos willowpump.com l text or call 1-888-WILLOW-3...
- Page 59 Manufacturer Keep away from heat Date of Manufacture Temperature Limit Lot Number Humidity Limitation Catalog Number Atmospheric Limitation Serial Number Consult Instructions For Use Do not use if package is Caution damaged Willow Wearable Breast Pump 2.0 Instructions for Use...
- Page 60 Do not throw in trash. Indoor use only Send to a recycling center. Do not reuse. Radiation Product tested by Intertek Recycling and found in compliance with standards listed. instructional videos willowpump.com l text or call 1-888-WILLOW-3...
- Page 61 1-888-WILLOW-3 email: care@willowpump.com ©2019 Willow. All rights reserved. Willow, Flextube and the stylized “W” are trademarks or registered trademarks of Willow in the United States and other countries. Patent: www.willowpump.com/patents/ CAREFULLY READ ALL INSTRUCTIONS PRIOR TO USE Save instructions and sales receipt for future reference.
Need help?
Do you have a question about the Wearable Breast Pump 2.0 and is the answer not in the manual?
Questions and answers