Table of Contents
Advertisement
Quick Links
Assembly and Use Instructions for Traveler Series Racks
HR6000 3-Bike Rack for 2" receiver
HR8000 4 Bike Rack for 2" receiver
HR9200 5 Bike Rack for 2" receiver
Warning!
This product
Drive slowly when using the rack on bumpy or dirt roads.
Check the rack bikes and straps regularly during use.
If you have any questions or installation problems, please see your Hollywood Racks retailer or
contact Hollywood Engineering at 800-747-4085.
After opening the Traveler box, you
should have the following parts:
1. Parts bag including two male knobs
and two spacer blocks. (Fig. 1)
.2. Parts bag including: threaded hitch
pin, hitch pin clip, star and flat washers,
¾" head through bolt, large washers and
self-fastening (nyloc) nut. (Fig. 2)
3. Hitch Insert Tube (Fig. 3 ) and Upright beam assembly
4. Two Support arms with bike cradles and anti-sway blocks attached (Fig. 5 and 6).
5. One long attachment/safety strap (86" long) – Not shown.
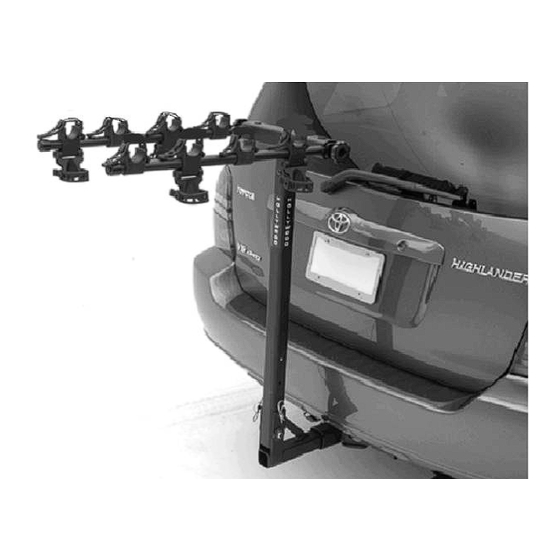
Traveler Hitch Rack
HR6100 3 Bike Rack for 1-1/4" receiver
HR8100 4 Bike Rack for 1-1/4" receiver
NOT
to be used on any trailer or trailered vehicle.
Advertisement
Table of Contents

Related Manuals for Hollywood Racks HR6000


Summary of Contents for Hollywood Racks HR6000
- Page 1 Check the rack bikes and straps regularly during use. If you have any questions or installation problems, please see your Hollywood Racks retailer or contact Hollywood Engineering at 800-747-4085. After opening the Traveler box, you should have the following parts: 1.
- Page 2 FIG. 1: Black Knob with threaded FIG. 2: Clockwise from upper left, rod attached and pivoting spacer hitch pin clip, star washer, flat block. washer and threaded hitch pin. Vertical Cylinder Fig. 4 Fig. 3 Insert tube (1-1/4” shown) Tools required: 2 adjustable wrenches or two ¾” wrenches (open, box or socket). 1.
- Page 3 Installing the Traveler rack on your vehicle: 1. Within the parts bag, locate the hitch pin, flat and star washers and clip (Fig. 2). The hitch pin may be black or silver. 2. When inserting the rack into the trailer hitch, try to get the insert tube as parallel to the receiver hitch as possible, then slide the rack in a couple of inches until the hole on insert tube of the rack lines up with the hole in your receiver.
- Page 4 (at its option) a defective part or the complete rack without charge for labor or parts. Hollywood Racks may elect (at its option) to issue a refund equal to the purchase price paid for the product.
Need help?
Do you have a question about the HR6000 and is the answer not in the manual?
Questions and answers