Table of Contents
Advertisement
Quick Links
Thank you for purchasing The Revolution electornic caller. To see more Lucky Duck™ products please visit your local
Sporting Goods dealer or online at www.luckyduck.com.
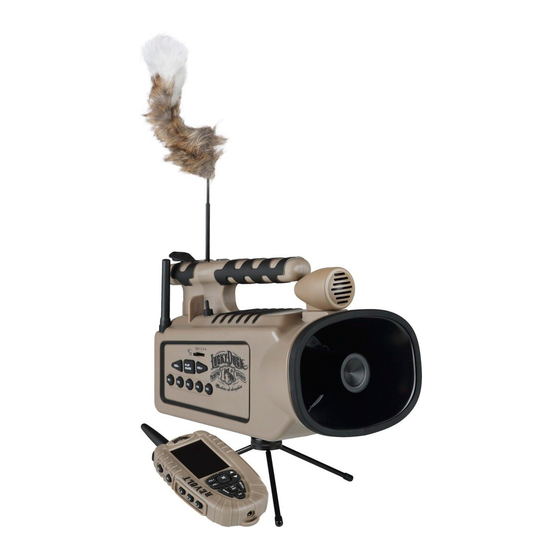
Directions for use: Unpack the box and make sure all parts are present.
1 – Revolution Electronic Call
1 – Remote Control
1 – Tripod Stand
1 – Antenna (inside handle)
1 – Decoy (inside handle)
2 – SD Cards (installed)
Battery Installation: The call uses 10AA batteries (not included). The battery holder is located on the bottom of the call.
Simply remove the battery cover, disconnect the battery holder if necessary, and install the batteries. The remove control
uses 3AA batteries (not included). Remove the battery cover on the back of the remote control and install the batteries.
Antenna: The antenna will either be in the box or stored in the handle of the call. Simply locate the antenna port on the
back right of the caller and screw the antenna onto the caller.
Decoy: The decoy will either be in the box or stored in the handle of the call. Insert the decoy into the hole on the top of
the handle. Make sure to aling the groove on the decoy with the slot on the decoy joint located in the handle. A strong
magnet holds the decoy in place.
Tripod Base: Install tripod base on the bottom of the Revolution. The tripod base allows the caller to rotate to broadcast
sound and position the video camera. Make sure to aling the groove on the bottom of the Revolution with the slot on the
tripod stand. A strong magnet holds the tripod to the caller. The tripod base can be disassembled to adapt to most
standard camera tripods or any other base system that utilizes a ¼ 20 thread. This may be helpful if you want to elevate
the call depending on the hunting terrain.
Electronic Call Operation: Flip the power switch on the electronic call forward to the "on" position. A red LED light on the
side of the call will illuminate when the power is on. Hold down the power button on the remote control. The remote will
turn on. The remote screen will display "Finding Caller" "Waiting" while it searches for the caller. Once connected the main
home screen for the caller screen will be displayed. On the bottom of the home screen it should say SD Link OK
confirming the remote and caller are connected and in sync. DO NOT PRESS ANY BUTTONS WHEN REMOTE IS
SEARCHING FOR CALLER.
Reboot: For 2018 and newer callers, a reboot function is available to resync the remote and call if the connection
between the two is lost while hunting or the sound files are not displayed correctly. Simply press and hold the "auxillarary"
button to reboot the remote and resync. The remote screen should turn blue and go through the "Finding Caller" "Waiting"
proces as described in the Electronic Call Operation section above. DO NOT PRESS ANY BUTTONS WHEN REMOTE
IS SEARCHING FOR THE CALLER.
Remote Control Operation:
Sound Selection – Use the up/down arrows to highlight the folder you want to select. Press the play/pause button to select
the folder. Use the up/down arrows to highlight the sound you want to play. Press the play/pause button to play the sound.
Holding the up/down arrows down for 1 second will cycle through the folders/sounds faster.
Volume Selection – Use the vol- and vol+ buttons to lower or increase the volume level. The volume level ranges from 1
to 32. Holding the vol- or vol+ buttons for 1 second will raise or lower the volume level quickly.
Back Button – The back button is used to go from the sound list back to the folder list.
Recall Button – The recall button will play the previous sound.
The Revolution
#20215-9 v3
Advertisement
Table of Contents

Summary of Contents for LuckyDuck Revolution
- Page 1 Tripod Base: Install tripod base on the bottom of the Revolution. The tripod base allows the caller to rotate to broadcast sound and position the video camera. Make sure to aling the groove on the bottom of the Revolution with the slot on the tripod stand.
- Page 2 Adjust Gain – Press the G key to cycle through the gain levels. The gain level will display on the display screen. Auxiliary Function: The Revolution is designed with an auxiliary function which allows a separate decoy to be controlled remotely by connecting a compatible decoy (not included) to the back of the caller using a 3.5mm cord (not included).
- Page 3 Care and Maintenance 1. The Revolution is not waterproof. Take caution to keep rain and snow away from the caller and remote. If the caller or remote becomes wet make sure to dry it off/out.
- Page 4 Proof of purchase is required. Abuse of the product (water damage, dropped, mistreatment etc.) is not covered. Please return and exchange the defective unit to the store where you purchased the product. If the store will not accept the return, please email or call customer service at customerservice@luckyduck.com or 715-338-3183.
- Page 5 The Revolution Layout Decoy Camera SD Card Slot On/Off Antenna HD Video Camera Decoy Storage Power Indicator Light Volume – Play/Pause Volume + Tripod Base G – Gain Favorite Sounds 1-4 Adjustment Timer Volume Level Power Auxiliary Remote Battery Level...
Need help?
Do you have a question about the Revolution and is the answer not in the manual?
Questions and answers