
Related Manuals for Insignia NS-CLOPP2


Summary of Contents for Insignia NS-CLOPP2
- Page 1 USER GUIDE Digital AM/FM Clock Radio NS-CLOPP2 Before using your new product, please read these instructions to prevent any damage.
-
Page 2: Table Of Contents
This User Guide explains how to correctly set up, operate, and get the best performance from your Insignia clock radio. Read this guide carefully before setting up your clock radio, then keep it handy for quick reference. - Page 3 Digital AM/FM Clock Radio 7 Do not block any ventilation openings. Install in accordance with themanufacture’s instructions. 8 Do not install near any heat sources such as radiators, heat registers, stoves, or other apparatus (including amplifiers) that product heat. 9 Do not defeat the safety purpose of the polarized or grounding plug.
-
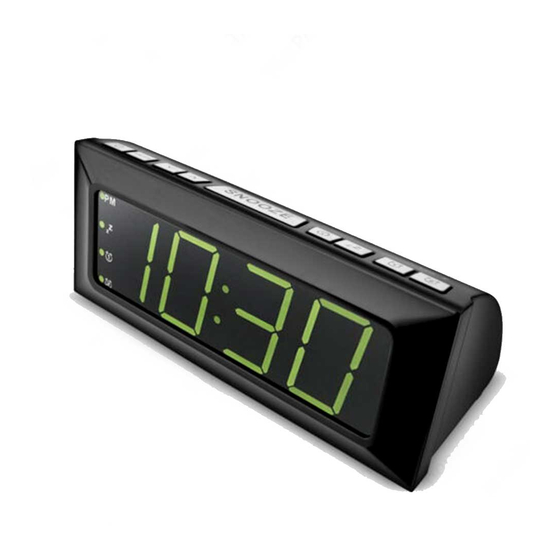
Page 4: Features
NS-CLOPP2 18 WARNING: The batteries (battery pack or batteries installed) shall not be exposed to excessive heat, such as sunshine, fire, or the like. The lightning flash with arrowhead symbol within an equilateral triangle is intended to alert the user to the presence of non-insulated “dangerous voltage”... - Page 5 Digital AM/FM Clock Radio LED display Item Description PM indicator When lit, indicates that the time shown is after noon (PM). TIME/ALARM/ In standby mode, digits show current time or FREQUENCY alarm time hours and minutes. display In radio mode, digits show the current radio frequency.
- Page 6 NS-CLOPP2 Top panel Item Description (power) Press to turn the radio on. Press again to turn the button radio to standby mode. AM/FM Press to toggle between AM and FM channels. (RADIO) button In radio mode, press to tune the radio to the previous or next station.
- Page 7 Digital AM/FM Clock Radio Item Description (sleep) Press to set the sleep timer. You can select 90 button min, 60 min, 45 min, 30 min, 15 min, or OFF. The time appears on the display. VOL –/ In AM or FM mode, press to decrease the volume. button In alarm mode, press to set alarm 1.
-
Page 8: Set Up Your Clock Radio
NS-CLOPP2 Set up your clock radio Install the backup batteries The clock radio uses a backup battery system to provide continuous alarm operation and clock settings in the event of a power failure. If the backup batteries have been installed and a... - Page 9 Digital AM/FM Clock Radio CAUTION: • Do not recharge, short, disassemble, or heat the batteries, or dispose of in a fire. • Dispose of batteries in the proper manner, according to federal, state, and local regulations. • Remove the batteries when the charge is depleted or if your clock radio will be left unplugged for an extended period.
- Page 10 NS-CLOPP2 Set the clock Plug in the AC power adapter. The hour digits will blink on the display. PM indicator Minutes digits Hour digits Press TUNE repeatedly to set the correct hour, then press /MEM/PRESET to confirm the setting. The minutes digits will blink.
-
Page 11: Use Your Clock Radio
Digital AM/FM Clock Radio Notes: • When you set the clock to a time after noon, the PM indicator lights. • 12:00 PM = Noon. • To reset the clock in standby mode, press and hold MEM/PRESET. The hour digits will blink on the display. Use your clock radio Before using your clock radio, make sure the AC power adapter is securely connected. - Page 12 NS-CLOPP2 Press VOL –/ or VOL +/ (depending upon the alarm you want to set). The indicator lights up. PM indicator Hour digits Minutes digits Alarm 1 indicator Alarm 2 indicator Press and hold VOL –/ (or VOL +/ ). The hour digits will blink on the display.
- Page 13 Digital AM/FM Clock Radio Mute, turn off, or cancel the alarm Press SNOOZE/DIMMER to mute the alarm for nine minutes. The alarm can be muted as many times as you want within 59 minutes of the preset alarm time. Press any button except SNOOZE/DIMMER to turn the alarm off for 24 hours.
- Page 14 NS-CLOPP2 Use radio station presets Your clock radio can store 20 station presets for AM and FM. Press (power) to turn on your clock radio, then press AM/FM repeatedly to select radio band you want to listen to. Press TUNE to tune your clock radio to the station you want to save.
-
Page 15: Clean Your Clock Radio
Digital AM/FM Clock Radio Clean your clock radio • Use a soft, dry, clean cloth to clean the exterior of your clock radio. • Do not let liquid drip into the inside of your clock radio. • For stubborn stains, use a soft cloth dampened with a weak solution of mild detergent and water. -
Page 16: Specifications
NS-CLOPP2 Problem Cause/Solution The clock radio • This is normal. Turn down the volume to let gets warm after the radio cool. extended play at high volume levels Specifications Specifications are subject to change without notice. Power requirement AC 120 V 60 Hz... - Page 17 Digital AM/FM Clock Radio This equipment has been tested and found to comply with the limits for a Class B digital device, pursuant to Part 15 of the FCC Rules. These limits are designed to provide reasonable protection against harmful interference in a residential installation.
- Page 18 NS-CLOPP2 By disposing of this product correctly, you will help to conserve natural resources and will help prevent potential negative effects on the environment and human health that could otherwise be caused by inappropriate waste handling of this product. For more information about...
-
Page 19: One-Year Limited Warranty
Product at no charge with new or rebuilt comparable products or parts. Products and parts replaced under this warranty become the property of Insignia and are not returned to you. If service of Products or parts are required after the Warranty Period expires, you must pay all labor and parts charges. - Page 20 Damage due to incorrect operation or maintenance • Connection to an incorrect voltage or power supply • Attempted repair by any person not authorized by Insignia to service the Product • Products sold “as is” or “with all faults” •...
- Page 21 RIGHTS, WHICH VARY FROM STATE TO STATE OR PROVINCE TO PROVINCE. Contact Insignia: 1-877-467-4289 www.insigniaproducts.com INSIGNIA is a trademark of Best Buy and its affiliated companies. *Distributed by Best Buy Purchasing, LLC 7601 Penn Ave South, Richfield, MN 55423 U.S.A. ©2019 Best Buy. All rights reserved.
- Page 22 1-877-467-4289 (U.S. and Canada) or 01-800-926-3000 (Mexico) INSIGNIA is a trademark of Best Buy and its affiliated companies. Distributed by Best Buy Purchasing, LLC 7601 Penn Ave South, Richfield, MN 55423 U.S.A. V5 ENGLISH ©2019 Best Buy. All rights reserved.
Need help?
Do you have a question about the NS-CLOPP2 and is the answer not in the manual?
Questions and answers
How to turn off alarm?
how to put clock in stand by mode to set the clock
To set the clock on the Insignia NS-CLOPP2, plug in the AC power adapter. The hour digits will blink on the display, indicating it is ready for time setting.
This answer is automatically generated
how to cut off alarm
To disable the alarm on the Insignia NS-CLOPP2 clock radio, follow these steps:
1. Mute the Alarm Temporarily: Press the SNOOZE/DIMMER button to mute the alarm for nine minutes. You can do this multiple times within 59 minutes of the preset alarm time.
2. Turn Off the Alarm for 24 Hours: Press any button except SNOOZE/DIMMER to stop the alarm for 24 hours.
3. Cancel the Preset Alarm Completely: Press and hold the VOL –/ (or VOL +/) button to cancel the alarm.
These steps will either temporarily mute, turn off for a day, or completely cancel the alarm.
This answer is automatically generated
How do you Set clock