Table of Contents
Advertisement
Advertisement
Table of Contents

Related Manuals for Skydrop Halo Sprinkler Controller

Summary of Contents for Skydrop Halo Sprinkler Controller
- Page 1 Installation and Quick Start Guide...
- Page 2 For We’re here to help! Please ™ installation video more information, check out contact skydrop support for our step-by-step installation assistance rather than the retailer. video or visit our website. skydrop.com/support Installation video. support@skydrop.com skydrop.com/install-video...
-
Page 3: Before You Begin
Before you begin Power Down. Wireless access. Installing outdoors. If you need to remove The skydrop controller uses The skydrop controller is ™ ™ the controller, it is highly WiFi and must be installed close designed to be installed recommended to power down to a strong signal source for indoors. - Page 4 Contents...
- Page 5 Step 1: Remove existing sprinkler controller Take note of your valve wire Disconnect wiring and remove Straighten and strip wire numbering and common wire(s), the existing controller from the ends to expose leads to the usually white. wall. recommended length. 3/8"...
- Page 6 Step 2: Mount the skydrop wall plate ™ Position the skydrop wall plate ™ TIP: Install at eye level for using the integrated level, and optimal screen viewing. secure using anchor screws (included). NOTE: Wall anchors are not necessary for mounting to drywall. Pre-drilling with a 1/8”...
- Page 7 Step 3: Install power and wiring Insert the power cable through bottom wiring Push each valve wire firmly into a zone (1-8) and slot (or through the breakaway tab on the rear of pull back slightly to verify it is secure. The “C” the wall plate) and secure into the top, center plug.
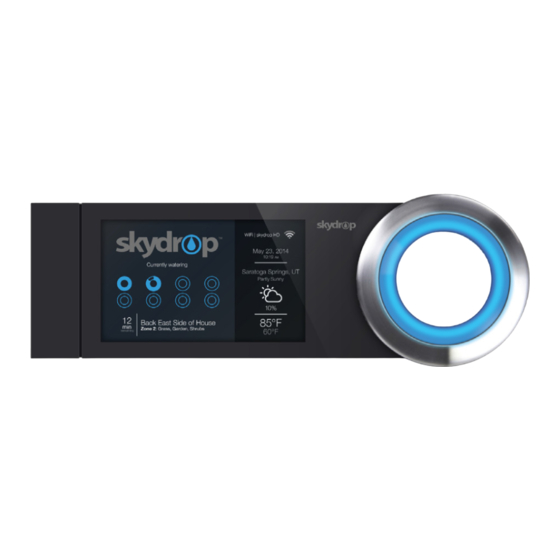
- Page 8 Step 4: Place controller onto wall plate Align the snap pegs on the back of the controller with the corresponding holes in the wall plate, then push the two firmly together. The skydrop logo will ™ illuminate when the controller is powered.
-
Page 9: Step 5: Initial Setup
Step 5: Initial setup The first time you power up the Using the jog dial. skydrop™ controller, you will be Make selections on the guided through the initial setup controller using the illuminated process to connect to your WiFi jog dial. Rotate the dial to... - Page 10 Step 6: Mobile control The skydrop controller can be ™ managed directly on the device, via the web, or through an iOS or Android device. Download the mobile app. Visit skydrop.com/mobile...
-
Page 12: Limited Warranty
Skydrop’s sole discretion. If the Product or a component incorporated within it is no longer available, Skydrop may replace the Product with a similar product... -
Page 13: Disclaimer Of Warranties
(b) handling, storage, installation, testing, or use not in accordance IN ADDITION TO THE ABOVE WARRANTY DISCLAIMERS, IN NO EVENT with instructions provided by Skydrop; (c) abuse or misuse of the Product; (d) WILL SKYDROP BE LIABLE FOR ANY CONSEQUENTIAL, INCIDENTAL,... - Page 14 (“Product”), you agree to the terms of this End User License Agreement SOFTWARE, YOU ARE ACCEPTING AND AGREEING TO THIS EULA ON (“EULA”) between you and Skydrop, LLC (“Skydrop” or “we”). IF YOU DO NOT BEHALF OF YOURSELF OR THE ENTITY YOU REPRESENT IN CONNECTION AGREE TO THE TERMS OF THIS EULA, YOU MAY NOT USE THE PRODUCT WITH THE ACCESS.
-
Page 15: Automatic Software Updates
You party without prior written approval of Skydrop for each such release. also agree that Skydrop does not waive any rights to use similar or related ideas previously known to Skydrop, developed by its employees, or obtained from... -
Page 16: Term And Termination
Open Source Software, and Skydrop’s modifications to that Open Source SOFTWARE WILL BE UNINTERRUPTED, FREE OF VIRUSES OR OTHER Software, available by written request to Skydrop at the email or mailing HARMFUL CODE, TIMELY, SECURE, OR ERROR-FREE. address listed below. - Page 17 Confidential Information at all times, both during the term hereof and for or knowledge. From time to time, Skydrop may use the Product Software to a period of at least 3 years after termination of this EULA, provided, however, provide you with information that is unique to you and your water usage and that any source code you receive shall be held in confidence in perpetuity.
-
Page 18: Export Compliance
Skydrop. You shall not use any Confidential 12. EXPORT COMPLIANCE Information other than in the course of the activities permitted hereunder. You The Product Software and related technology are subject to U.S. export control shall notify Skydrop in writing immediately upon discovery of any unauthorized laws and may be subject to export or import regulations in other countries. - Page 19 Connect the equipment into an outlet on a circuit different from that to which All waivers by Skydrop will be effective only if in writing. Any waiver or failure the receiver is connected. by Skydrop to enforce any provision of this EULA on one occasion will not be deemed a waiver of any other provision or of such provision on any other Consult the dealer or an experienced radio/TV technician for help.
- Page 20 CAUTION: Battery May Explode If Mistreated. Do Not Recharge, Disassemble Or Dispose Of In Fire. TM and © 2015 Skydrop, LLC...
Need help?
Do you have a question about the Halo Sprinkler Controller and is the answer not in the manual?
Questions and answers