Table of Contents
Advertisement
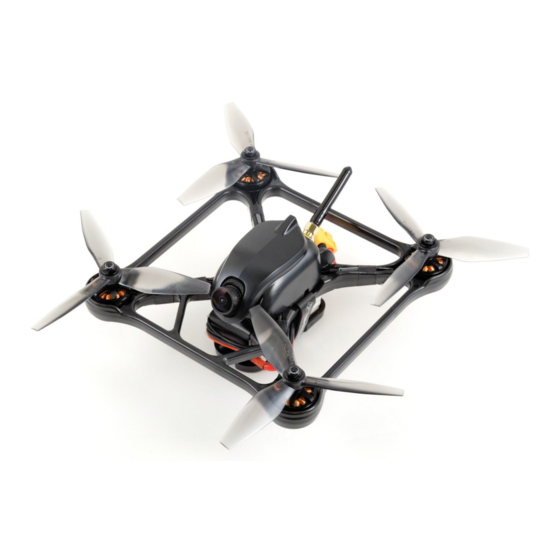
TBS OBLIVION FPV Racer
Ultra strong and lightweight fpv racer
Perfect ready to fly racing, freestyle or dynamic aerial cinematography! Defy gravity at 120km/h (80mph) in
nearly indestructible, insanely aerodynamic and ultra lightweight drone. Powerful OSD functions to allow
tuning every aspect of your drone. HD camera mounts included. Up to 11 minutes hover time or 2.5
minutes of full throttle! Ready to fly out of the box.
Key features
●
Lightweight fpv racer
Box-shaped ultra strong frame
●
●
Easy battery release and protection skid
Quick propeller replacement kit
●
●
Cobra 2205 2400kV motors, HQ 5x4.5x3 Props
●
TBS POWERCUBE with COLIBRI F3, 20A ESCs and FPVISION OSD/VTX
Fully configurable via OSD, no PC required
●
●
GoPro Hero and Session HD camera mounts
315g weight excl. battery and HD camera
●
1
Revision 2018-05-14
Advertisement
Table of Contents

Summary of Contents for Team Blacksheep TBS OBLIVION
- Page 1 TBS OBLIVION FPV Racer Revision 2018-05-14 Ultra strong and lightweight fpv racer Perfect ready to fly racing, freestyle or dynamic aerial cinematography! Defy gravity at 120km/h (80mph) in nearly indestructible, insanely aerodynamic and ultra lightweight drone. Powerful OSD functions to allow ...
-
Page 2: Table Of Contents
Table of content Attention isclaimer Overview Quick Start Guide - RTF set Detailed Setup Binding using CROSSFIRE receiver Installing the receiver Receiver configuration for Crossfire/CRSF System calibration Adjusting camera tilt angle Putting on propellers Mounting battery Adjusting camera focus ... - Page 3 345g weight without battery and HD camera Kit contents: RTF kit: 1x TBS OBLIVION RTF, 8x HQ 5x4.4x3 propellers, 1x battery skid and strap, 2x HD camera mounts and strap, 1x Stubby antenna, 1x Propeller mounting kit, 1x ZeroZero Pilot camera backplate ...
-
Page 4: Attention
Attention Thank you for buying a TBS product! The TBS OBLIVION is a new racing multirotor aircraft from Team BlackSheep (TBS). It features the best design practices available on the market to date. A general rule for RC aircrafts is that they must be controlled always under sight of view, check your RC ... -
Page 5: Overview
Overview The following diagram shows the main features of the frame and the layout of the internals. 5 ... -
Page 6: Quick Start Guide - Rtf Set
Quick Start Guide - RTF set The following steps will get you setup and ready to fly quickly. It is a condensed version intended for experienced pilots. Each step is elaborated in more detail in this manual if you are new to this. In the RTF set, you will only need to adjust VTX frequency if necessary, insert the battery and go fly. ... - Page 7 Things to Note 1. The Tango in the RTF set comes pre-installed with a limiter in both beginner and intermediate mode to assist with getting used to the power and speed of a racing drone. Beginner mode is limited to 60% of the throttle curve, intermediate mode is limited to 80% of the throttle curve.
-
Page 8: Detailed Setup
Detailed Setup Instructions / Oblivion PNP Getting set up and ready to fly is a quick and simple task, as mostly everything comes pre-built from the TBS factory. When using TBS equipment, it is plug & play to get ready. Follow these easy steps and you will be shredding the sky in just a few minutes! ... -
Page 9: Binding Using Crossfire Receiver
Position the receiver on top of the POWERCUBE with a adhesive pad and feed the receiver antenna leads down through the side to the frame arms. For further instructions please consult the TBS PowerCube manual/ Pairing the radio and receiver as covered in your receiver’s manufacturer instructions. For further instructions on installing receivers please consult the TBS PowerCube manual. ... -
Page 10: Receiver Configuration For Crossfire/Crsf
Receiver configuration for Crossfire/CRSF To set up COLIBRI and CROSSFIRE Nano to use the CRSF control- and telemetry-protocol, you need to configure the receiver to output the CRSF protocol. Power on the CROSSFIRE TX and Nano RX, open the CROSSFIRE TX configuration menu, go to the Nano TX settings and change the channel map for CH1 and CH2 to “CRSF RX”... -
Page 11: Adjusting Camera Tilt Angle
Calibrating flight modes is not required. You Follow the instructions on the screen and can ROLL RIGHT to skip, or assign a free 3-pos move your sticks accordingly. If the direction switch in your R/C to take advantage of this does not match, it needs to be adjusted in ... -
Page 12: Putting On Propellers
Putting on propellers The provided propellers has two rotational profiles, counter-clockwise and clockwise. Getting these right is important for a safe and proper first flight. The kit comes with two sets of three-blade 5x4.5-inch props. Separate the propellers into two bulks, with the characters on the blades facing up; counter-clockwise and clockwise. ... -
Page 13: Mounting Battery
. Feed one of the smaller battery strap through the tight cap on the left side, with the “TEAM BLACKSHEEP” text facing up and loop it through the hook - it can be tricky but wiggle it until the end passes through the ... -
Page 14: Adjusting Camera Focus
When you are ready to tune and test fly, just plug in the XT60 cable to the XT60 lead from the frame to power up. Adjusting camera focus Power on the OBLIVION and FPV system to get a picture, loosen the adjustment ring just behind the lens. Turn the lens until the picture is in perfect focus, fasten the adjustment ring again. ... -
Page 15: Mounting Hd Camera
Mounting HD camera A GoPro, Mobius or Runcam be mounted on top of the frame to capture beautiful HD footage. Included in the kit is a special cinematography canopy, two different 30 tilt foam mounts and a large ... -
Page 16: Flight Controller
Flight Controller Calibration Before the first flight, the FC needs to know the absolute flat and level position relative to the earth’s surface. Calibrating the accelerometer and gyro is easily done using a bubble/spirit level and stick inputs from the radio. ... -
Page 17: Replacing Parts
Replacing parts The best part of the OBLIVION is that all parts are modular and can be replaced without soldering or adapting parts. It is all plug & play and can be done in the field or in the car in a snap with a small toolkit. Replacing canopy ... -
Page 18: Replacing Colibri Fc
Replacing COLIBRI FC Use the TBS POWERCUBE 5mm hex nut screwdriver (available separately) or use a plier to carefully remove the four top nuts. Use a plastic spudger to lift the board from all four corners at the same time (avoiding bending the pin header). -
Page 19: Replacing Vtx Antenna Socket
Replacing VTX antenna socket Remove the entire POWERCUBE stack, either from the bottom four screws or by removing all the boards from the top. Remove the locking nut from the SMA connector using a plier. Feed the socket through the holder and replace with a new lead. ... -
Page 20: Replacing Power Cable
Replacing power cable Remove the entire POWERCUBE stack, either from the bottom four screws or by removing all the boards from the top. Remove the VTX SMA socket and feed the XT60 connector through the slot in the frame. Unsolder the power lead and replace with a new one. ... -
Page 21: Replacing Motors
To get access to the other end of the camera lead, remove the four hex screws from the underside of the frame holding the POWERCUBE stack in place. Disconnect the lead from the CAM1 socket on the FPVISION board. - Page 22 Disconnect the bullet connectors and make a note of which order the lead exits the motor casing, this makes it easier to get the spinning direction right at first try. If the motor is spinning the wrong direction, swap either two of the bullet connects to change the direction. ...
-
Page 23: Further Configuration
Further Configuration Changing settings on the TBS OBLIVION (CORE PRO, POWERCUBE, UNIFY PRO) is all done through the OSD and R/C radio inputs, using the sticks to navigate the menus and make changes. Further in-depth changes of the COLIBRI flight controller can be made via the USB-interface. ... -
Page 24: R/C Calibration
R/C calibration CORE PRO needs to be calibrated/mapped with the channel mapping from BetaFlight. Go into “FLIGHT CONTROLLER”, “CALIBRATION” and “READ FLIGHT CONTROLLER RC DATA”. This maps the settings to the CORE PRO and you are ready to go. Required procedure every time the R/C channel inputs are changed. Changing VTX channel ... -
Page 25: Colibri Fc Configuration
COLIBRI FC configuration The OBLIVION comes preconfigured with tuned BetaFlight settings and test flown. Changing the essential flight controller settings such as PID, rates, filters, general settings and accelerometer calibration can be made using the OSD in the field, or via the USB interface. Changing settings via OSD: ... -
Page 26: Osd Configuration
OSD configuration The OSD is built around the full-fledged TBS CORE PRO OSD and detailed description of all the parameters is outlined in the official manual: ttp://www.team-blacksheep.com/tbs-core-pro-manual.pdf The following is a concise summary specific for the OBLIVION. On-Screen Display ... -
Page 27: Flight Controller
● General - OSD specific settings Show Position - No/Yes - Display the GPS coordinates on the bottom of the screen, update ○ rate 1Hz - useful while watching a DVR recording to recover a downed aircraft ○ Show Heading... -
Page 28: Firmware Upgrade
Firmware upgrade Updates to the transmitter and receiver are applied using our TBS AGENT software. This takes care of all the downloading of the latest firmware, verification- and upgrade process. Installing TBS Agent Download the installer from h ttp://www.team-blacksheep.com/corepro/agent... -
Page 29: Updating Colibri Race Firmware
Updating COLIBRI RACE firmware Getting the latest firmware flashed via TBS Agent is a fast and easy process. 1. Install the latest STM32 VCP drivers: ttp://www.st.com/web/en/catalog/tools/PF257938 2. Open TBS Agent and click on the “UPDATE COLIBRI RACE”-tab 3. -
Page 30: Good Practices
Good practices We have compiled a list of all of practices which have been tried and tested in countless environments and situations by the TBS crew and other experienced FPV pilots. Follow these simple rules, even if rumors on the internet suggest otherwise, and you will have success in FPV. ... - Page 31 ● Improving the antenna gain on the receiver end is better than increasing the output power (except in RF-noisy areas). More tx power causes more issues with RF noise on your plane. 500mW is plenty of power! Try to achieve as much separation of the VTx and R/C receiver as possible to lower the RF noise ●...
Need help?
Do you have a question about the TBS OBLIVION and is the answer not in the manual?
Questions and answers