Table of Contents
Advertisement
Available languages
Available languages
Consumer Helpline
Australia
Phone: 1800 126 659
Fax: 1800 007 289
www.delonghi.com.au
New Zealand
Phone: 0508 200 300
Fax: 0508 200 301
www.delonghi.co.nz
Distributed by De'Longhi Australia Pty Ltd.
ABN 49 104 012 857
P.O. Box 4540 Casula Mall, NSW 2170
Distributed by De'Longhi New Zealand Ltd.
NZBN 9429035952824
P.O. Box 58-056 Botany, MANUKAU 2163
is a registered Trademark
of De'Longhi Australia Pty Ltd.
ABN 49 104 012 857.
© 2017 De'Longhi Australia Pty Ltd.
360° Oscillation Axial
Pedestal Fan
Model
DEAPF40.BK
DEAPF40.WH
Please read this user guide carefully and retain for future reference
USER GUIDE
Advertisement
Chapters
Table of Contents

Subscribe to Our Youtube Channel
Related Manuals for DeLonghi DEAPF40.BK


Summary of Contents for DeLonghi DEAPF40.BK
- Page 1 360° Oscillation Axial Pedestal Fan Consumer Helpline Model DEAPF40.BK DEAPF40.WH Australia Phone: 1800 126 659 Fax: 1800 007 289 www.delonghi.com.au New Zealand Phone: 0508 200 300 Fax: 0508 200 301 www.delonghi.co.nz Distributed by De’Longhi Australia Pty Ltd. ABN 49 104 012 857 P.O.
-
Page 2: Table Of Contents
Contents Safety Guidelines 1. Safety Guidelines………..………………………………………………………………3-5 Safety FOR EUROPEAN MARKET ONLY • Read these instructions carefully and • This appliance shall not be used by 2. Features………………………………………………………………………………………5 retain for future reference. children. Keep the appliance and its 3. Parts Drawing………………………………………………………………………………6-7 • Remove all packaging and any labels. -
Page 3: Safety Guidelines
• Do not place heavy objects on the or you find any defects, please send it power cord, it will damage the cord. or bring it to an authorized DeLonghi • If the plug or the power cord is Service Centre. To find up to date... -
Page 4: Parts Drawing
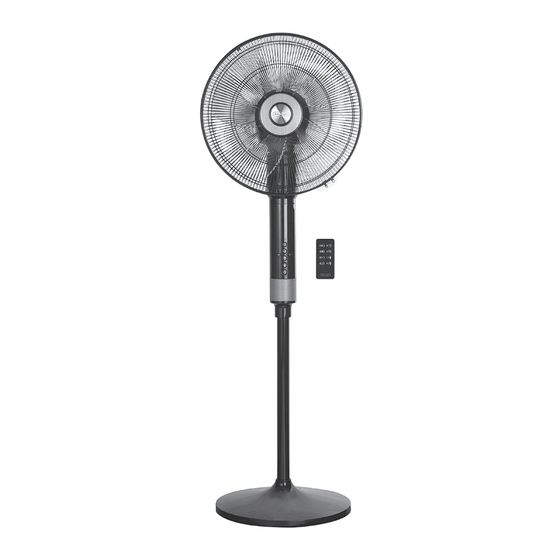
Parts Drawing Display panel Display Control panel Oscillation angles Timer Timer Swing Left Right Mode Swing Fan speed Normal Nature Sleep On/Off Medium High Remote control panel Fan speed On/Off 1. Front guard 2. Spinner Mode Timer 3. Fan blade 4. -
Page 5: Installation & Operation Instructions
Installation & Operation Instruction Figure 1 Figure 2 Figure 5 Figure 6 Installation 1. Take out parts for assembling: checking whether the manual, remote control, spare parts are all packed. 2. Assemble the fan as showing and indication below, 2.1. Put the column through the hole of base, and fix tightly by screw (Figure 1). -
Page 6: Installation & Operation Instructions
Installation & Operation Instruction 4. MODES 4.3. Sleep mode: Choice of high and 5. TIMER medium fan speed. High: Start with 30 minutes "Nature" Normal Nature Sleep mode high waveform pattern, then T h e f a n is d efa ul ted i n n or ma l 30 minutes "Nature"... -
Page 7: Usage Of Remote Control
Clean & Maintenance Usage for remote control WARNING - KEEP BATTERIES OUT OF This product requires button cell battery Clean REACH OF CHILDREN to operate and this is hazardous to young 1. Suggested to clean the dust from children. Swallowing lead serious the fan once a month. - Page 8 INDICE Istruzioni per la sicurezza 1. Istruzioni per la sicurezza…………………………………………………………………3-5 Sicurezza rimuovere la griglia di protezione per la pulizia • Vi preghiamo di leggere attentamente 2. Caratteristiche………………………………………………………………………………5 le presenti istruzioni e di conservarle • L’utilizzo improprio del dispositivo può 3. Disegno dei componenti…………………………………………………………………6-7 per consultazione futura.
-
Page 9: Istruzioni Per La Sicurezza
2. 4 diversi settaggi per il timer: 1, 2, 4, alimentazione elettrica corrisponda a motivi di sicurezza, essere sostituito quella indicata sull’etichetta energetica. infiammabili nelle vicinanze del da DeLonghi o da un suo riparatore 8 ore • Assicurarsi che la presa sia superiore prodotto, poiché ciò potrebbe danne autorizzato. -
Page 10: Disegno Dei Componenti
Disegno dei componenti Pannello Display Pannello di controllo L'angolazione di oscillazione Timer Timer Oscillazione Sinistro Destro Modalità Oscillazione Velocità Normale Natura Sonno On/Off Middle High Telecomando Velocità On/Off 1. Griglia di protezione anteriore 2. Albero motore Modalità Timer 3. Ventola 4. -
Page 11: Istruzioni Per L'installazione E L'uso
Istruzioni per l’installazione e l’uso Figura 1 Figura 2 Figura 5 Figure 6 Installazione 1. Estrarre le parti per l'assemblaggio: controllare che il manuale, il telecomando e le parti di ricambio siano tutti imballati. 2. Assemblare il ventilatore come mostrato qui di seguito. 2.1. - Page 12 Istruzioni per l’installazione e l’uso 4. MODALITÀ 4.3. Modalità Sonno: È possibile 5. TIMER scegliere tra le velocità costanti High e Medium. High: Inizia con 30 minuti di Normale Natura Sonno modalità Natura cadenza L’impostazione predefinita è ondulata elevata, quindi 30 minuti Nor male.
-
Page 13: Telecomando
Pulizia e manutenzione Telecomando Attenzione - Tenere le batterie lontano Smaltire le batterie a bottone usate Pulizia dalla portata dei bambini immediatamente e in modo sicuro. Le 1. Si consiglia spolverare batterie usate possono ancora essere L'ingestione può portare serie ventilatore una volta al mese.
Need help?
Do you have a question about the DEAPF40.BK and is the answer not in the manual?
Questions and answers