Snapper 3317523BVE Safety Instructions & Operator's Manual
Rear engine riding mower series 23
Hide thumbs
Also See for 3317523BVE:
- Safety instructions & operator's manual (40 pages) ,
- Safety instructions & operator's manual (40 pages) ,
- Safety instructions and operator's manual (37 pages)
Table of Contents
Advertisement
NOTE: Specifications are correct at time of printing and are subject to change without notice.
* Actual sustained engine power will likely be lower due to operating limitations and environmental factors. Please refer to 'Engine Power Rating Information' for
further details.
Safety Instructions & Operator's Manual for
REAR ENGINE RIDING MOWER
SERIES 23
Models
2811523BV (7800102)
2812523BVE (7800104)
3011523BV (7800103)
3012523BVE (7800105)
3317523BVE (7800254)
Manual No. 7101572 (I.R. 10/30/2007)
TP 100-5306-IR-RE-N
Advertisement
Table of Contents

Related Manuals for Snapper 3317523BVE


Summary of Contents for Snapper 3317523BVE
- Page 1 * Actual sustained engine power will likely be lower due to operating limitations and environmental factors. Please refer to ‘Engine Power Rating Information’ for further details. Safety Instructions & Operator's Manual for REAR ENGINE RIDING MOWER SERIES 23 Models 2811523BV (7800102) 2812523BVE (7800104) 3011523BV (7800103) 3012523BVE (7800105) 3317523BVE (7800254) Manual No. 7101572 (I.R. 10/30/2007) TP 100-5306-IR-RE-N...
-
Page 2: Product Registration
Serial Number ______________________________________________________________ Engine Model_________________________Type__________________Trim___________________ It is very important that you register your purchase with Snapper to ensure warranty coverage. Please mail your product registration card to: Snapper at P.O. Box 777, McDonough, Georgia 30253. Or you may register online at www.snapper.com. -
Page 3: Table Of Contents
Battery ............25 Snapper Rear Engine Rider Accessories ....... . .27 Service Schedule . -
Page 4: Operator Safety
If you have any questions pertaining to your machine which your dealer cannot answer to your satisfaction, call or write the Customer Service Department at SNAPPER, McDonough, Georgia 30253. Phone: (1-800-935-2967). Protection for Children Tragic accidents can occur if the operator is not alert to the presence of children. -
Page 5: Safe Handling Of Gasoline
14. Exercise CAUTION when pulling loads. Limit loads to those you can safely control and attach loads to hitch plate as specified with SNAPPER attachment instructions. 15. On slopes, the weight of the towed equipment may cause loss of traction and loss of control. When towing, travel slowly and allow extra distance to stop. - Page 6 13. DO NOT test for spark by grounding spark plug next to spark plug hole; spark plug could ignite gas exiting engine. 14. Have machine serviced by an authorized SNAPPER dealer at least once a year and have the dealer install any new safety devices.
-
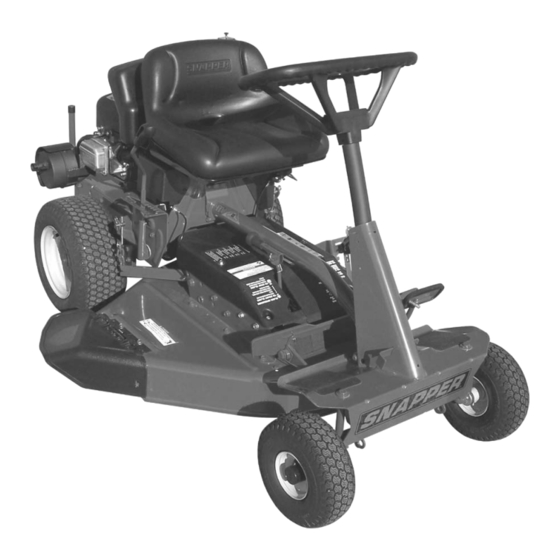
Page 7: Features And Controls
Features and Controls IMPORTANT The figures and illustrations in this manual are provided for reference only and may differ from your specific model. Contact your Snapper dealer if you have questions. Features and Controls Steering Wheel Engine Speed Control (hidden from view) -
Page 8: Operation
After adjustment, tighten the knobs securely. NOTE: If the seat does not move after loosening the knobs, it may be necessary to loosen the 5/16” patch lock screws or hex nuts (C) located at the rear of the seat. Figure 3: Operator seat adjustment www.snapper.com... -
Page 9: Starting And Operation
Operation (Continued) Starting and Operation Engine (Electric Start) IMPORTANT: When the ignition key is turned to “START”, the engine will turn over, but will not start unless the Clutch/Brake pedal is pressed all the way down, and the Blade Lever is in the “OFF” position. The operator should be in the seat. - Page 10 NOTE: Always guide the starter rope back into the recoil housing. Never allow rope to snap back. After the engine starts, move the engine speed control to the “FAST” position. 8. Allow a brief warm-up until the engine runs smooth. www.snapper.com...
-
Page 11: Engaging Mower Blade
3 seconds, the blade brake must be adjusted. Refer to Section “BLADE BRAKE ADJUSTMENT” for adjustment pro- cedures or return machine to an authorized SNAPPER deal- er for adjustment. DO NOT CONTINUE to operate machine until blade brake is adjusted and functioning properly. -
Page 12: Stopping Engine, Wheel Drive, Blade
3 seconds, the blade brake must be adjusted. Refer to Section “BLADE BRAKE ADJUSTMENT” for adjustment pro- cedures or return machine to an authorized SNAPPER deal- er for adjustment. DO NOT CONTINUE to operate machine until blade brake is adjusted and functioning properly. -
Page 13: Setting Park Brake
Operation (Continued) Stopping - Engine, Wheel Drive, Blade (Continued) Park Brake 1. To set the park brake, press the clutch/brake pedal (A, Figure 16) all the way down, slide the park brake latch (B) all the way in to the engaged position, and release the clutch/brake pedal. -
Page 14: Reverse Lockout Mechanism
With the blade pedals depressed, the shift lever must not go into reverse. DO NOT operate machine if Reverse Lockout Mechanism is not functioning properly. Contact your local Snapper dealer for assistance. DANGER LOOK and SEE behind and down for children, pets and hazards before and while backing. -
Page 15: Check Mower Blade
SNAPPER dealer annually for inspection and addition of any new devices, which might upgrade the safety of the Rear Engine Rider. For the nearest SNAPPER dealer in your area, check the yellow pages under the heading LAWN MOWERS. For engine parts and service, look for the engine manufactur- er’s dealers under the heading, ENGINES - gasoline. -
Page 16: Blade Brake
2. If the blade continues to rotate longer than 3 seconds do not operate the machine. Refer to the section entitled “BLADE BRAKE ADJUSTMENT”, or contact your SNAPPER dealer for assistance. Service Brake / Park Brake 1. Check the machine brake for proper function: Engage the park brake, and push the machine. -
Page 17: Service - Every 25 Operating Hours
3. With Steps 1 and 2 performed, the shift lever must not go into reverse. WARNING DO NOT operate machine if Reverse Lockout Mechanism is not functioning properly. Contact your SNAPPER dealer immediately for assistance. Lubrication – Grease Fittings The following components on the Rear Engine Rider are equipped with grease fittings and require periodic lubrica- tion. - Page 18 Figure 25: Front wheel grease fitting Shift Lever - Lubrication Lubricate the shift lever grease fitting (A, Figure 26) with two shots of general purpose grease from a grease gun. Figure 26: Shift lever grease fitting www.snapper.com...
-
Page 19: Rear Axle Bearing - Lubrication
4. To check lubricant in the chain case, remove the fill/level plug and look for lubricant on the internal components of the chain case. If no lubricant is visible, add SNAPPER transmission grease as needed. Figure 29: Chain case lubricant check Engine Service Check the MAINTENANCE SCHEDULE section of the Engine Manual for additional engine service. -
Page 20: Service - Annually
3. Transmission shift lever and detent. 4. Clutch disc. 5. Clutch yoke. 6. Mower deck linkage and pivot areas. Replace worn or damaged parts with genuine SNAPPER replacement parts available from an authorized SNAPPER dealer. Storage (Out of Season) If desired, the Rear Engine Rider can be stored on the rear bumper. -
Page 21: Engine Adjustments And Repairs
DO NOT operate machine until blade brake is adjusted and functioning properly. If blade stop time can not be achieved with the adjustment procedure described above, take machine immediately to an authorized Snapper dealer. Figure 32: Measuring blade brake clearance Figure 33: Adjusting blade brake tension... -
Page 22: Mower Deck Adjustment (Side-To-Side Levelness)
3. Reinstall the rear hanger chains and measure the blade tips again. 4. Repeat Steps 1 through 3 until proper levelness is obtained. Front Floor Figure 35: Adjusting the mower deck (front-to-rear) Rear X-1/8” (28, 33”) X+1/8” (30”) www.snapper.com... - Page 23 Retighten the hardware that secures the clamp. Make sure the hardware is tightened securely. IMPORTANT: The SNAPPER Rear Engine Rider Models with 33” decks do not require belt tension adjustment. But, if the front frame assembly clamp is loosened for any reason, recheck the belt spacing between the idler pulley and belt.
-
Page 24: Rear Engine Rider Drive Components
Rear Engine Rider Drive Components Your Snapper rider is equipped with a patented smooth start clutch. The clutch should operate smoothly and provide ample traction. If problems are experienced, contact your Snapper dealer for repair. -
Page 25: Mower Blade Replacement
Maintenance (Continued) WARNING DO NOT attempt any adjustments, maintenance, service or repairs with the engine running. STOP engine. STOP blade. Engage parking brake. Remove key. Remove spark plug wire from spark plug and secure away from plug. Engine and components are HOT. Avoid serious burns, allow all parts to cool before working on machine. -
Page 26: Mower Drive Belt Replacement
(28” & 30” decks only). Refer to the Section enti- tled “MOWER DRIVE BELT ADJUSTMENT”. 13. Reinstall the mower drive belt cover. Figure 46: Belt routing for 28 and 30 inch decks Figure 47: Belt routing for 33 inch decks www.snapper.com... -
Page 27: Battery
Maintenance (Continued) WARNING DO NOT attempt any adjustments, maintenance, service or repairs with the engine running. Stop engine. Stop blade. Engage parking brake. Remove key. Remove spark plug wire from spark plug and secure away from plug. Engine and components are HOT. Avoid serious burns, allow all parts to cool before working on machine. - Page 28 WARNING Shield the positive terminal with the terminal cover located on the battery harness. This prevents metal from touching the positive terminal, which could cause sparks. www.snapper.com...
-
Page 29: Snapper Rear Engine Rider Accessories
7061916 Broadcast Spreader * WARNING Catcher bags used on SNAPPER products are made of woven fabric, and thus are subject to deterioration and wear during normal usage. Check condition of bags before each use. Immediately replace worn or damaged catcher bags with only bags recommended by SNAPPER. -
Page 30: Service Schedule
Engine Manual Engine Manual Engine Manual Page 18 Engine Manual Page 26 Pages 25, 26 Page 6 Pages 14, 24 Page 23 Page 6 Pages 15-17 Page 17 Pages 14, 19 Pages 14, 22 Pages 6, 12, 15 EACH SEASON www.snapper.com... -
Page 31: Maintenance/Replacement Parts
Maintenance (Continued) Maintenance/Replacement Parts Engine Speed Control (Briggs Engine) Engine Speed Control (Kohler Engine) Engine Speed Control (Honda Engine) Clutch/Brake Cable Clutch/Brake Cable (33” Deck Models Only) Brake Cable 28” Cutter Blade (Standard - Not Air Lift Compatible) 28” Cutter Blade (Standard - Air Lift Compatible) 28”... -
Page 32: Troubleshooting
1. Fill fuel tank with fresh fuel to proper level. 2. Move choke control to “CHOKE” position. 3. Place spark plug wire onto spark plug. 4. Contact authorized SNAPPER dealer. 5. Engage park brake. 6. Turn ignition switch to the RUN position. - Page 33 2. Leaking engine block. CORRECTIVE ACTION 1. Replace drive disc. 2. Adjust rubber drive disc. 3. Replace with SNAPPER tapered bolt & nut. 4. Contact authorized SNAPPER dealer. 5. Contact authorized SNAPPER dealer. 1. Move lever to the “ON” position.
-
Page 34: Warranty
For two (2) years from purchase date for the original purchaser’s residential, non-commercial use, SNAPPER, through any authorized SNAPPER dealer will replace, free of charge (except for taxes where applicable), any part or parts found upon examination by the factory at McDonough, Georgia, to be defective in material or workmanship or both. -
Page 35: Slope Guide
Slope Guide... - Page 36 Notes www.snapper.com...
- Page 37 Notes...
- Page 38 Notes www.snapper.com...
- Page 39 Notes...
-
Page 40: Product Specifications
1.0 - 4.6 / 0 - 1.9 1.0 - 4.6 / 0 - 1.9 11.5 12.5 Part Number 1-800-935-2967 3012523BVE 3317523BVE 1.5 - 4.0 1.5 - 4.0 5-Spd Disc Drive 5-Spd Disc Drive 1.0 - 4.6 / 0 - 1.9 1.0 - 4.6 / 0 - 1.9...
Need help?
Do you have a question about the 3317523BVE and is the answer not in the manual?
Questions and answers