
Summary of Contents for Dräger Medical D-Vapor
- Page 1 D-Vapor ® Desflurane Vaporiser Instructions for Use Because you care Emergency Care · Perioperative Care · Critical Care · Perinatal Care · Home Care...
-
Page 2: Table Of Contents
Filling D-Vapor........ -
Page 3: Registered Trademarks
— Vapor — D-Vapor ® are registered trademarks of Dräger. — Suprane ® is a registered trademark of Baxter. — Selectatec ® is a registered trademark of Datex-Ohmeda. — Saf-T-Fill™ is a registered trademark of Baxter. Instructions for Use D-Vapor... -
Page 4: For Your Safety And That Of Your Patients
The apparatus is not approved for use in explosive environments. Coupling with electrical devices safely Contact the manufacturer or a technical expert before coupling the apparatus to electrical devices other than those mentioned in these Instructions for Use. Instructions for Use D-Vapor... -
Page 5: Recommendations For Safe Use
High Desflurane settings reduce the O concentration in the fresh gas. Do not use a D-Vapor that has been dropped! High Desflurane concentrations can influence the hot- A D-Vapor that toppled over must be tested (see wire volume gauge! The volume displayed is too high. -
Page 6: Intended Use
Desflurane (Suprane ) in concentrations of 2 to 18 vol.% in anaesthesia delivery systems. D-Vapor is inserted in the fresh-gas line of an anaesthesia delivery system. The vaporiser is connected between the fresh-gas flow-control unit and the fresh-gas outlet. -
Page 7: Operation Concept
LED on the display. Modes that occur outside of normal operation, e.g. alarm modes, are described in the chapter 'Displays and Acoustic Signals'. 1 – Apparatus is switched off D-Vapor's power cable is not connected to the power supply. All LEDs are off. Alarm Silence... - Page 8 2 min Operational No Output Delivery Low Fill up Battery 4 – Apparatus is delivering The apparatus is ready for use. Control dial ≥2 vol.% Alarm Silence 2 min Operational No Output Delivery Low Fill up Battery Instructions for Use D-Vapor...
-
Page 9: Control Dial
1 Press the »0« button. 2 Turn the control dial anticlockwise to the concentration of anaesthetic agent required. An acoustic signal is emitted if D-Vapor is not ready for use, see ’Alarms’, page 15. Concentration values above 12 vol.% are shown in reverse order to draw attention to the danger of a high delivery and restricted flow range. - Page 10 2 Turn the control dial clockwise to transport setting »T« – the »0« button engages. 3 For plug-in adapters, engage the locking lever in the control dial. When set to »T«, a full D-Vapor may be transported in any position. Instructions for Use D-Vapor...
-
Page 11: Connecting And Interlock Systems
1 To connect/remove, the control dial must be in the »T« position and the locking lever must be engaged in the control dial. 2 The holes in the plug-in adapter on D-Vapor fit onto the pins on the plug-in connector on the anaesthesia delivery system. - Page 12 By sliding the locking bar, which can only be engaged in the control dial when set to »0«, only one vaporiser can be used at a time. Illustration: left D-Vapor locked, right D-Vapor operational. Plug-in S-2000 adapter with Interlock S ®...
- Page 13 The levers are activated when a vaporiser is switched on. This prevents other vaporisers on adjacent connectors from being switched on. Illustration: middle D-Vapor in use, right and left D-Vapors locked. Other Interlock systems are used, such as Interlock 1, which are very similar to Interlock NMD, but on which vaporisers with Interlock NMD do not fit.
-
Page 14: Desflurane Filling System
Desflurane, see ’Filling D-Vapor’, page 22. The D-Vapor has a level indicator with minimum and maximum level marks as well as a third (middle) mark that shows when it can be refilled with a whole bottle (240 mL) of Desflurane. -
Page 15: Alarms
Operation Concept Alarms D-Vapor has an optical and an acoustic alarm system in accordance with EN 475/ISO 9703. In addition, D-Vapor has a secondary acoustic alarm system. Alarm Priorities D-Vapor has two alarm priorities and an indication. The priorities have different optical and acoustic signals*:... - Page 16 ≥7 s Delivery requirement if D-Vapor is not Turn the control dial to »0«. Connect connected to the power supply. D-Vapor to the power supply, wait for the heating phase. Set the selected Continuous tone concentration. Instructions for Use D-Vapor...
- Page 17 The start and the end of the self-test are displayed by an indication signal. All of the LEDs glow during the self-test. Do not put D-Vapor into operation if one or more LEDs do not glow. Operational all LEDs are No Output Call DrägerService.
-
Page 18: Preparation
Preparation Preparation D-Vapor must not be operated without a battery or with a defective battery. If the battery is missing or defective (see ’Recommenda- tions’, page 17), the secondary alarm system is not availa- ble (see ’Secondary Acoustic Alarm System’, page 16). - Page 19 Before Putting the Apparatus into Operation for the First Time and when Detached from the Mains for a Prolonged Period of Time Connect D-Vapor to the mains for 1 hour. This charges the battery for the emergency power supply. Set the control dial to »T«.
-
Page 20: Fitting Connectors
Remove the cap, if present, from the gas inlet/outlet at the back of the apparatus. Always connect D-Vapor in such a way that the gas flow matches the illustration and the arrow on the back of D-Vapor. An incorrect direction of flow leads to an incorrect... - Page 21 D-Vapor is suspended, fits flush with surface of the housing. Check that D-Vapor fits flush with the lower installation points and, when viewed from the side, is suspended from the machine in a vertical position.
-
Page 22: Filling D-Vapor
If liquids other than Desflurane get into D-Vapor, the apparatus could get damaged and the patient harmed. Do not use a D-Vapor that has been filled with other agents. Contact DrägerService immediately! Use only Desflurane bottles with the Saf-T-Fill™ valve to fill... - Page 23 (however, the filling process then takes longer). When filling during operation, use only Desflurane that has an ambient temperature. When D-Vapor is not connected to the anaesthesia delivery system, leave the control dial switched to »T«. Instructions for Use D-Vapor...
- Page 24 Monitor the increasing fill level on the sight glass. If D-Vapor is filled when it has been heated up, the content of the reservoir also bubbles. Interrupt the filling process to check the filling level. To do so, hold the bottle without pressing it down.
- Page 25 Press the unlocking button. Pull the bottle out of the filling inlet. Screw the cap back on to the bottle. Place the sealing plug in the filling system and press it down. The locking device locks audibly into place. Instructions for Use D-Vapor...
-
Page 26: Connecting D-Vapor To The Connector System
Observe the anaesthesia delivery system's Instructions for Use. The control dial must be engaged at »T«. If D-Vapor is going to be used on SA2 or Titus anaesthesia delivery systems, check that they have been modified for use with D-Vapor (see page 21). - Page 27 Risk of injury. Make sure that only one vaporiser is used at any one time, or that only one D-Vapor is connected at any one time. This may otherwise result in the delivery of mixtures or concentrations that may be too high.
-
Page 28: Connecting The Power Cable To The Power Supply
Connect power cable. Establishing the Potential Equalisation e.g. for intracardiac or intracranial operations 1 Remove the protective cap. Connect one end of the ground wire to the connecting bolt. Connect the other end to a central connecting bolt. Instructions for Use D-Vapor... -
Page 29: Operation
May not be used in a magnetic field (e.g. in rooms with magnetic resonance tomographs). At an angle of more than 10°, an unsecured D-Vapor can topple over. Operating D-Vapor at an angle of more than 10° can result in uncontrolled concentrations and is therefore not allowed. - Page 30 Checking: Check the apparatus for visible damage. Check the power cable for visible damage. The power cable must not be squeezed between D-Vapor and the anaesthesia delivery system. Filling level in sight glass must be high enough above the minimum mark, but must not exceed the maximum mark.
- Page 31 Operation Switch off D-Vapor – Engage control dial at »0«. Make sure that D-Vapor, the connector, and the fresh-gas lines are leak-tight (see the anaesthesia delivery system's Instructions for Use): — Set the control dial to »0« and »T« — Set the control dial to ≥2 vol.%.
-
Page 32: Switching On The Apparatus; Self Test
Operation Switching on the Apparatus; Self Test Only use fully functional D-Vapors! Do not use D-Vapor if one of the six LEDs did not glow during the self-test and/or the acoustic signal was not emitted! Plugging the power cable into the power outlet completes the self-test. -
Page 33: Delivering The Anaesthetic Agent
Do not set between »0« and »2 vol.%«! The concentration is not calibrated for this range. Do not use D-Vapor if the control dial turns too easily or with difficulty. The exceedance of 12 vol.% is secured by a lock. -
Page 34: Changing The Anaesthetic Agent
If only one Vapor is connected or if one of the connected Vapors is to be replaced: See ’Removing D-Vapor’, page 37. Connect the new D-Vapor, see ’Connecting D-Vapor to the Connector System’, page 26. Two Vapors with Interlock 2: 1 Lock the slide valve on Interlock 2 into the control dial on the vaporiser that was in use. -
Page 35: Ending The Delivery Of An Anaesthetic Agent
Operation Ending the Delivery of an Anaesthetic Agent 1 Switch off D-Vapor: Engage the control dial at »0« to prevent it from being switched on accidentally. Then, if required: Switch off the fresh gas flow on the anaesthesia delivery system. -
Page 36: Emergency Power System During Power Failures
LED »No Output« and the amber LED »Battery« flash. D-Vapor may not be refilled during battery operation. Interrupting Operation D-Vapor does not have to be drained during prolonged periods of inoperation. If D-Vapor remains on the machine: Interrupt D-Vapor's power supply. -
Page 37: Removing D-Vapor
Operation Removing D-Vapor Do not drop D-Vapor. Do not use a D-Vapor that has been dropped. Damage could result in the delivery of incorrect concentrations. Do not carry by the control dial, control dial caps or locking lever for the plug-in adapter. -
Page 38: Transporting When Full
Remove detachable D-Vapors from the anaesthesia delivery system and transport separately. Anaesthesia delivery systems with a permanently attached D-Vapor can be moved in or between buildings when the control dial is set to »0« or »T«. Instructions for Use D-Vapor... -
Page 39: Fault-Cause-Remedy
Call DrägerService. »No Output« Red LED is flashing »Operational« Green LED Control dial is open while D-Vapor Turn the control dial to »0«. Wait until is flashing is heating up. the green LED »Operational« glows permanently. Malfunction »Operational«... - Page 40 Control dial set to »0« or »T« No D-Vapor connected and/or Connect D-Vapor and/or close the open one of several connections is connection to D-Vapor or close direct gas unoccupied and open. connection. Gas is flowing through D-Vapor in Check the connector system, see the wrong direction.
- Page 41 Leakage at connector, e.g. D-Vapor Have modifications carried out by connected to an SA2 or Titus that DrägerService. has not been modifed for D-Vapor, see page 21. Seal on filling system is defective. Disconnect D-Vapor from the power supply; repair...
- Page 42 Anaesthetic agent is leaking from the The seal on the Desflurane bottle Use another bottle. filling system. is damaged or missing. * to be carried out by skilled personnel only If D-Vapor still does not function properly, call DrägerService! Instructions for Use D-Vapor...
-
Page 43: Processing
Do not allow detergents to get into the gas inlet or outlet, or the filling system. If liquids other than Desflurane get into D-Vapor, the apparatus could get damaged and the patient harmed. Do not sterilise D-Vapor! Internal damage could result in the delivery of incorrect concentrations! Do not use solvents on D-Vapor. -
Page 44: Checking Readiness For Operation
Accompanying documents/Instructions for Use are present. No damage to or loose parts on D-Vapor. The anaesthetic agent display on D-Vapor, the colour code on the cover plate, and other anaesthetic agent-specific codes, in so far present (e.g. identification letters or codes on the plug-in adapter), all match. - Page 45 7 Drop-in pin on the locking lever is tight and straight. 8 Both valve control pins are present. 9 Sealing surfaces are undamaged. 10 The manufacturer's plate on the back of D-Vapor is present and securely fastened. Conical connector The male cone is connected to the D-Vapor inlet.
-
Page 46: Checking The Concentration
The weekly check must be documented. Preparation Fill D-Vapor at least to the middle level indicator. Heat up the filled D-Vapor and let it rest for half an hour in 'Operational' mode. Check the anaesthetic agent monitor. Carry out zero calibration with the desired gas (air or O Connect the monitor to the fresh-gas outlet or Y-piece. - Page 47 After the check Switch off D-Vapor: set the control dial to »0« and engage. If D-Vapor is not on the anaesthesia delivery system: Press the »0« button and engage the control dial at »T«.
- Page 48 For the corrected measured value of 8.28 vol.%, this results in a tolerance of ±0.41 vol.%. The allowable range is increased by this amount to 6.39 to 9.61 vol.%. The corrected measured value of 8.28 is within the allowable range. Instructions for Use D-Vapor...
-
Page 49: Shut-Down
Repeat the procedure if necessary. Replace the sealing plug. The sealing plug makes an audible click sound when it locks into place. A residue of 30 mL of Desflurane remains in D-Vapor, see 'Blowing out D-Vapor'. Mark the bottle: 'Used anaesthetic agent'. -
Page 50: Disposal
Before putting the apparatus back into operation, inspect it, service it, and test it for operational readiness. Despatching Completely drain D-Vapor and blow it out (see page 49), clean and disinfect (see page 43) it as best possible. Disconnect D-Vapors from anaesthesia delivery systems for despatching –... -
Page 51: Maintenance Intervals
Maintenance Intervals Maintenance Intervals Clean and disinfect D-Vapor prior to each service before despatch! (See page 43) Inspection and Service Yearly, together with an anaesthetic delivery system, by skilled personnel. A record of the findings must be kept. Recommendation: Call DrägerService for inspection and service. -
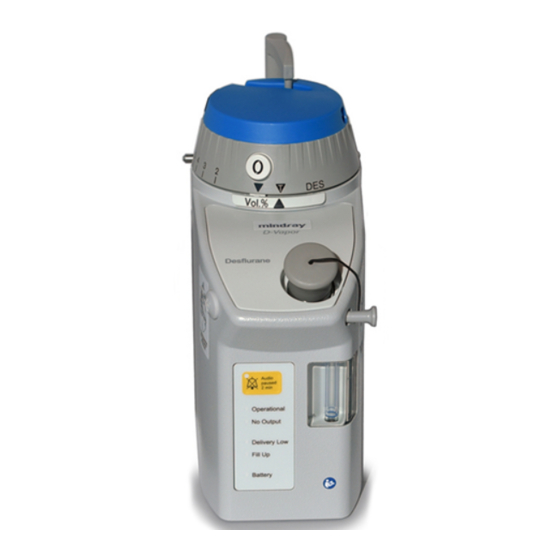
Page 52: What's What
3 »0« button for the control dial 4 Sealing plug 5 Unlocking lever for the sealing plug 6 Button to suppress the acoustic alarm for 2 minutes 7 Level indicator 8 Display panel 9 Protective cap for equipotential bonding pin Instructions for Use D-Vapor... -
Page 53: Display Panel
No Output min. Delivery Low Fill up Battery 1 Amber LED »Alarm Silence« 2 Green LED »Operational« 3 Red LED »No Output« 4 Red LED »Delivery Low« 5 Amber LED »Fill up« 6 Amber LED »Battery« Instructions for Use D-Vapor... -
Page 54: Technical Data
Relative humidity 30 to 75 %, non condensation Performance values D-Vapor is calibrated at a temperature of 22 °C (72 °F) and an atmospheric pressure of 1013 mbar (14.69 psi) (Carrier gas = air, flow 2.5 L/min) Concentration range 2 to 18 vol.% Scaling 1 vol.% division from 2 to 10 vol.%... - Page 55 2.5 L/min air) (The requirements according to EN 740 apply outside of the calibration conditions) When D-Vapor is used in range 2 (see diagram ’Flow Dependency’, page 59), D-Vapor delivers at least 1.2 L/min saturated steam. Liquid capacity 300 mL (total), of which 40 mL are reserve capacity...
- Page 56 3.000 3.16 9.49 is the 'equivalent isotropic radiated power' of the adjacent RF transmitter EIRP ** 3 V/m distance to transmitters with frequencies ranging from 150 kHz to 2.5 GHz, otherwise 1 V/m distance. Instructions for Use D-Vapor...
-
Page 57: Description
3. Control dial set to »0« or »T« (switched off) Desflurane vapour (saturated vapour 4) flows from the heated The mixed gas flows directly from the D-Vapor inlet to the reservoir 5 through the flow control 6. D-Vapor outlet. -
Page 58: Calibration
22 °C (72 °F) and 1013 hPa (14.69 psi) at 2.5 L/min dry air. Ambient Temperature Dependency D-Vapor's performance characteristics are not substantially influenced by temperature fluctuations within the specified range (see ’Technical Data’, page 54). Instructions for Use D-Vapor... -
Page 59: Flow Dependency
Flow (L/min) The concentration delivered by D-Vapor is slightly dependent on the flow (fresh gas flow). In range 1 (range with mit continuous lines), D-Vapor delivers concentrations with at least the accuracy required in accordance with EN 740. In range 2 (range with dotted lines), with both a high flow and high concentration, D-Vapor delivers less than set at the control dial, see ’Concentration accuracy’, page 55. -
Page 60: Ambient Pressure And Altitude Dependency
Desired partial pressure setting at 1013 hPa Ambient pressure hPa The table displays how D-Vapor's control dial is to be set at an altitude of 1000 m and 2000 m above sea level. Normal control dial Required vol.% control dial settings vol.% settings... -
Page 61: Correcting The Flow Measurement Under The Influence Of Desflurane
V 100 – 2 x Desflurane Concentration Displayed V Corrected Example: Desflurane concentration 8 vol.% displayed minute volume MV = 10 L/min 100 – 2 x 8 Corrected x 0.84 = 8.4 L/min Instructions for Use D-Vapor... -
Page 62: Order List
18 56 561 18 56 588 Australia 18 51 810 Italy 18 56 618 18 51 829 D-Vapor power cable (IEC-IEC, 0.75 m) 18 60 925 Extension 18 56 928 Ground wire (3.2 m) 83 01 349 O-ring for the connector system... -
Page 63: Abbreviations
On the control dial or on DW-2000 plug-in adapter. First letter of the name of the anaesthetic agent for which D-Vapor is calibrated, or for which the plug-in adapter is coded. min. Minimum permissible filling level on sight glass. -
Page 64: Symbols
The direction of flow of D-Vapor is indicated on the back of D-Vapor or on the connector. »Alarm Silence« button Alarm Suppresses the alarm for 2 minutes... -
Page 65: Index
Self-test ......... . . 32 Draining D-Vapor ........49 Service . - Page 66 What's What ........52 Instructions for Use D-Vapor...
- Page 68 These instructions are only valid for D-Vapor with the serial number: If no serial number has been filled in by Dräger these instructions are provided for general information only! Directive 93/42/EEC concerning medical devices Dräger Medical AG & Co. KGaA Germany Moislinger Allee 53 –...
Need help?
Do you have a question about the D-Vapor and is the answer not in the manual?
Questions and answers