Table of Contents
Advertisement
Available languages
Available languages
Quick Links
Advertisement
Table of Contents

Related Manuals for Prestige medical 79

Summary of Contents for Prestige medical 79
- Page 1 Aneroid Sphygmomanometers Instructions & Warranty...
- Page 2 Thank you for your purchase Thank you for choosing a Prestige Medical® aneroid sphygmomanometer. Prestige Medical® is very proud of its fine reputation for supplying preci- sion medical products while delivering the highest level of service to the health care professional.
-
Page 3: Gauge Calibration
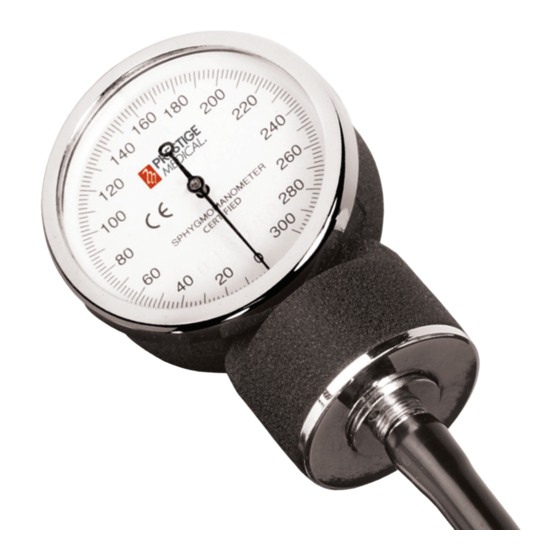
Gauge Calibration The indicator needle should always rest within the rectangular calibration area. If this is not the case, your gauge needs to be recalibrated to within 3mmHg when compared to a certified reference standard. If recalibration is required, please refer to your warranty and return instructions on page 13. - Page 4 Aneroid Sphygmomanometer Anatomy Range Marking Index Hook & Loop (reverse side) Marking Closure Gauge Holder Cuff Cuff Size Aneroid Artery Manometer Indicator Gauge Label Inflation Valve Bulb Bladder Air Release Tube (Hose) Valve...
- Page 5 Manometer Gauge Anatomy Lens Lens Retaining Faceplate Ring (Rim) Needle Gauge Clip (reverse side) Graduation Marks Serial Number Calibration Rectangle (or Oval) Bellow Chamber Air Stem (Connects to Bladder Tube)
- Page 6 Position the bottom edge of the cuff at approximately one inch above the antecubital fold. Wrap the fabric portion of the cuff around the arm snugly and smoothly, engaging the adhesive system (hook-and-loop). All Prestige Medical® cuffs have index and range markings to ensure an accurate fit. Smaller Cuff...
- Page 7 Position of the Patient The patient should sit or lie comfortably so that the arm is firmly supported at heart level. The observer should be sure to have a view of the manometer in a direct line to avoid parallax error (i.e. a mis-reading due to skewed visual perception).
- Page 8 Cuff Inflation • Turn the thumbscrew clockwise to close the air release valve. • Palpate the radial artery while quickly inflating the cuff. • Inflate cuff to 20 to 30mmHg above the point at which the radial pulse disappears. Never inflate the cuff past 300mmHg. This will damage the gauge and void the warranty.
- Page 9 Measurement Record the onset of Korotkoff sounds (systolic pressure) and their disappearance (diastolic pressure). For greatest accuracy this instrument should be used in a temperature range between 50°F (10°C) and 104°F (40°C). Use in temperatures outside of that range may result in an inaccurate reading.
-
Page 10: Cleaning And Maintenance
Cleaning and Maintenance Cuff and Nylon Case: Wipe with a damp sponge or cloth. If necessary, wash in cool water with mild soap. Remove bladder prior to washing. Rinse & air dry. Do not iron. Bladder and Bulb: Wipe with a damp sponge or cloth. To protect from cracking or discoloring, wipe with a soft cloth moistened with ethanol. - Page 11 • Envuelva el brazo en la parte de tela del brazalete neumático, de manera que se sienta una compresión cómoda y suave, y ciérrela con el sistema adhesivo. Todos los brazaletes neumáticos de Prestige Medical® cuentan con marcas de índice y rango para asegurar un ajuste preciso.
- Page 12 Colocación del estetoscopio Coloque la parte plana del estetoscopio en la región antecubital por debajo del borde inferior del brazalete neumático, usando el lado de la campana si se trata de un estetoscopio de combinación. No coloque el estetoscopio debajo del brazalete neumático, ya que esto evitaría que la lectura fuera precisa.
-
Page 13: Limpieza Y Mantenimiento
Calibración Del Instrumento La aguja del indicador deberá descansar siempre dentro del área rectangular de calibración. De no ser así, su aparato necesita recalibrarse a 3 mmHg cuando se compara con el estándar de referencia certificado. Si se requiere una recalibración consulte la documentación de su garantía y las instrucciones de devolución que se incluyen en este paquete. -
Page 14: Warranty Information
Lifetime Warranty on the Gauge: If your manometer gauge is out of adjustment during normal use (the needle is outside the calibration rectangle or oval), Prestige Medical® will replace the gauge for the lifetime of the unit. Excludes some models (see below for details). -
Page 15: Contact Information
Contact Information USA Service Center Europe Service Center Prestige Medical NCD Medical Attn: Parts Warranty Program Attn: Parts Warranty Program 8600 Wilbur Ave. Dermotstown, Naul Northridge, California 91324 Co. Dublin, Ireland Contact Us : cs@prestigemedical.com Email: www.prestigemedical.com Web: Follow Us :... - Page 16 Aneroids Manual PLEASE 03/17 RECYCLE...
Need help?
Do you have a question about the 79 and is the answer not in the manual?
Questions and answers