
Related Manuals for Dometic RUC Series


Summary of Contents for Dometic RUC Series
- Page 1 REFRIGERATION RUC SERIES RUC5208X, RUC6408X, RUC8408X Compressor refrigerator Installation and Operating Manual...
-
Page 3: Table Of Contents
RUC5208X, RUC6408X, RUC8408X Please read this instruction manual carefully before installation and first use, and store it in a safe place. If you pass on the product to another person, hand over this instruction manual along with it. Table of contents Explanation of symbols . -
Page 4: Explanation Of Symbols
Explanation of symbols RUC5208X, RUC6408X, RUC8408X Explanation of symbols DANGER! Safety instruction: Failure to observe this instruction will cause death or serious injury. WARNING! Safety instruction: Failure to observe this instruction can cause death or serious injury. CAUTION! Safety instruction: Failure to observe this instruction can lead to injury. NOTICE! Failure to observe this instruction can cause material damage and impair the function of the product. - Page 5 RUC5208X, RUC6408X, RUC8408X Safety instructions WARNING! • Have a qualified technician perform the installation in wet rooms. • Do not operate the device if it is visibly damaged. • If this device's power cable is damaged, it must be replaced by the manufacturer, customer service or a similarly qualified person in order to prevent safety hazards.
- Page 6 Safety instructions RUC5208X, RUC6408X, RUC8408X • Make sure that the refrigerator circuit is not damaged during transpor- tation. The refrigerant in the refrigerator circuit has a low potential to become flammable. In the event of any damage to the refrigerator circuit: –...
-
Page 7: Scope Of Delivery
RUC5208X, RUC6408X, RUC8408X Scope of delivery Scope of delivery Quantity Description Refrigerator Drain hose Bottom trim piece Sealing strip (fitted underneath during installation) Installation and Operating Manual Accessories Available as accessories (not included in the scope of delivery): Description LS300 ventilation grille (W x H: 490 x 249 mm, open ventilation area 667 cm RUC5208X only: Door reversing kit Accessories are available from specialist dealers. -
Page 8: Technical Description
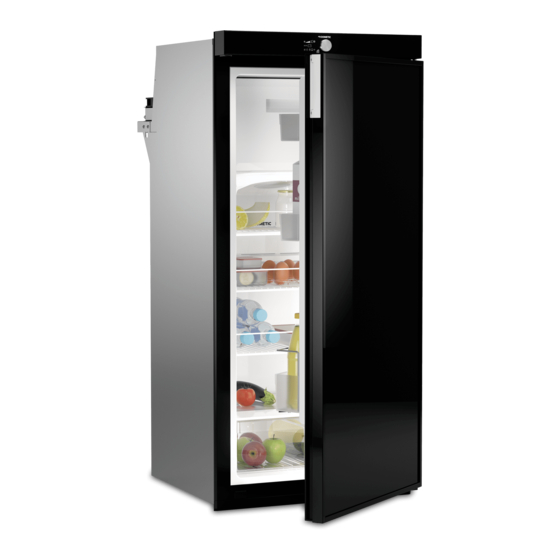
Technical description RUC5208X, RUC6408X, RUC8408X Technical description Description The device can refrigerate goods to +8 °C to 0 °C and keep them cool. Products can be frozen to –10 °C to –20 °C in the freezer compartment. You can use the control display to set the desired temperature. - Page 9 RUC5208X, RUC6408X, RUC8408X Technical description Components RUC5208X Quantity No. in fig. 1 Description RUC5208X Refrigerator door Top door bin Bottom door bin with bottle holder Fruit and vegetable section Refrigerator shelf Refrigerator compartment Internal light Freezer compartment Control and display elements...
- Page 10 Technical description RUC5208X, RUC6408X, RUC8408X RUC6408X, RUC8408X Quantity No. in fig. 2 Description RUC6408X RUC8408X Freezer compartment door Freezer door rack Refrigerator door Top door bin Bottom door bin with bottle holder Fruit and vegetable section Refrigerator shelf Refrigerator compartment Air duct cover plate Internal light...
- Page 11 RUC5208X, RUC6408X, RUC8408X Technical description Quantity No. in fig. 2 Description RUC6408X RUC8408X Control and display elements Freezer shelf Freezer compartment Control and display The refrigerator has a display and a control knob above the refrigerator door (fig. 3). Function of the control knob (fig. 3): •...
-
Page 12: Installing The Refrigerator
Installing the refrigerator RUC5208X, RUC6408X, RUC8408X Installing the refrigerator Preparing the installation When installing the refrigerator, note the following: • Ensure that the floor is solid and level. • Ensure that the refrigerator is level. • The refrigerator must be installed so that it is easily accessible for service work, easy to de-install and install and can be easily removed from the vehicle. - Page 13 RUC5208X, RUC6408X, RUC8408X Installing the refrigerator • The refrigerator must be installed in a recess so that it stands secure when the vehicle is in motion. Note the following dimensions (fig. 4 and fig. 5): RUC5208X RUC6408X RUC8408X Refrigerator Overall dimension in mm Height (A) 1191 1447...
- Page 14 Installing the refrigerator RUC5208X, RUC6408X, RUC8408X Installation with two rear vents • The air inlet and outlet vents must not be covered by vehicle parts (such as an open door or by installing accessories such as bicycle racks) while operating. •...
- Page 15 RUC5208X, RUC6408X, RUC8408X Installing the refrigerator The outer wall must be fitted with one air inlet ventilation grille (fig. 6 2a, • page 14) and one outlet ventilation grille (fig. 6 2b, page 14) so that the heat generated can be easily released to the outside: –...
- Page 16 Installing the refrigerator RUC5208X, RUC6408X, RUC8408X Pos. in Description fig. 7, page 15 Maximum height is equal to 100 mm below the compressor shelf LS300 ventilation grille Roof vent • A roof vent may be installed instead of the air outlet vent. –...
- Page 17 RUC5208X, RUC6408X, RUC8408X Installing the refrigerator ➤ Apply the sealing strip to all four sides of the bottom surface of the refrigerator (1. in fig. 8 and fig. 9). ➤ Push the refrigerator into position (2. in fig. 8 and fig. 9). This then seals the space behind the refrigerator to the interior of the vehicle.
- Page 18 Installing the refrigerator RUC5208X, RUC6408X, RUC8408X – Push the bottom trim piece with the four plugs (fig. a 1) into the holes on the front frame of the refrigerator. – Snap the three catches (fig. a 2) into the holes under the bottom frame of the refrigerator.
- Page 19 RUC5208X, RUC6408X, RUC8408X Installing the refrigerator Installing the ventilation grille No. in Description fig. b Slider Ventilation grille Installation frame ➤ Make a cut out in the wall to fit an appropriate upper and lower vent system, choose LS300 check the dimensions required for the vent. See chapter “Prepar- ing the installation”...
- Page 20 Installing the refrigerator RUC5208X, RUC6408X, RUC8408X ➤ Insert the installation frame and screw it down tightly (fig. d). Use all the fixing holes for this. ➤ Fit the ventilation grille (1. and 2. in fig. e). ➤ Insert the slider and lock the ventilation grille with it (3. in fig. e). Install the roof vent No.
- Page 21 RUC5208X, RUC6408X, RUC8408X Installing the refrigerator ➤ Cut out a section in the roof. Refer to the roof vent instruction manual for the required dimensions. When doing so, observe the information, see chapter “Pre- paring the installation” on page 12. ➤...
- Page 22 Installing the refrigerator RUC5208X, RUC6408X, RUC8408X ➤ Push the screws (fig. i 1) through the plastic bushes in the sides of the refrigerator, and fasten into the recess walls. ➤ Fit the caps (fig. i 2) into the bushes.
-
Page 23: Connecting The Refrigerator
RUC5208X, RUC6408X, RUC8408X Connecting the refrigerator Connecting the refrigerator Connecting the refrigerator to 12 – 24 V NOTICE! • To avoid voltage drops and loss of performance, keep the connection cable as short as possible and uninterrupted. Therefore avoid additional switches, plugs or power strips. The refrigerator can be operated with a 12 V or 24 V DC voltage supply. - Page 24 Connecting the refrigerator RUC5208X, RUC6408X, RUC8408X Key to the figure Coordinate axis Meaning Unit Cable length ∅ Cable cross section mm² NOTICE! Make sure the polarity is correct. ➤ Before starting up the device for the first time, check whether the operating voltage and the battery voltage match (see type plate).
-
Page 25: Using The Refrigerator
RUC5208X, RUC6408X, RUC8408X Using the refrigerator Proceed as follows when you connect the refrigerator to the AC mains: ➤ Plug the connector into the AC socket. Using the refrigerator NOTICE! • Make sure that you only put items in the refrigerator which may be kept at the selected temperature. - Page 26 Using the refrigerator RUC5208X, RUC6408X, RUC8408X • Protect the refrigerator from direct sunlight (e.g. sunshades in the windows). • Voltage fluctuations can have a negative effective on the cooling capacity. Check the cooling performance of refrigerator regularly – when using DC current during the journey –...
- Page 27 RUC5208X, RUC6408X, RUC8408X Using the refrigerator Menu overview and navigation ➤ Turn/press the control knob on preferred setting and user mode option. ✓ The colour turns blue when selected. ➤ Press again to deselect.
- Page 28 Using the refrigerator RUC5208X, RUC6408X, RUC8408X Display By default the display shows the following main menu: No. in Description fig. m The temperature bars show the set temperature: Lowest bar: lowest cooling function (warmest inner temperature) Highest bar: highest cooling function (coldest inner temperature) Blue snowflake: compressor is on.
- Page 29 RUC5208X, RUC6408X, RUC8408X Using the refrigerator No. in Description fig. m The child lock is selectable by user to prevent accidental adjust- ments or children from using the controls. The lock activates approx. 10 seconds after the last control knob touch and the display dims.
- Page 30 Using the refrigerator RUC5208X, RUC6408X, RUC8408X No. in Description fig. m Turbo mode: The coldest setting (level 5) is activated. The outer fan and com- pressor operate at high speed and the defrost function is disa- bled. Turbo mode is active for 12 hours or until the refrigerator reaches a temperature of –2 °C.
- Page 31 RUC5208X, RUC6408X, RUC8408X Using the refrigerator User modes The following table shows the user modes and their settings: Compres- Outer Temperature User mode Symbol Defrost Duration sor speed setting Performance Auto Auto Auto Levels 1 – 5 ongoing Silent Limited Auto Levels 1 –...
- Page 32 Using the refrigerator RUC5208X, RUC6408X, RUC8408X Opening the refrigerator door/freezer compartment door CAUTION! • Always close and lock the refrigerator before starting the journey. • Open the refrigerator doors carefully, because goods may have shifted and could fall out. ➤ Press the handle and pull the door open. 9.10 Locking the refrigerator door/freezer compartment door...
- Page 33 RUC5208X, RUC6408X, RUC8408X Using the refrigerator...
- Page 34 Using the refrigerator RUC5208X, RUC6408X, RUC8408X No. in Food fig. q and fig. r Frozen food Dairy products, ready-made meals Meat, fish, items for defrosting Salad, vegetables, fruit Eggs, butter Dressing, ketchup, jam Drinks in bottles or cartons Please observe the following instructions for storing items: NOTE •...
- Page 35 RUC5208X, RUC6408X, RUC8408X Using the refrigerator 9.13 Using the Door Airing Function NOTE Use the door airing function if you do not intend to use the refrigerator for a prolonged period of time. This prevents mould from forming when the refrigerator is not in use or put into storage. 180°...
- Page 36 Using the refrigerator RUC5208X, RUC6408X, RUC8408X 9.14 Removing and refitting the shelves Removing the shelves ➤ Push the shelf locks off the left end of the wire shelf (1.). ➤ Slide the shelf to the left until it is clear on the right side (2.). ➤...
- Page 37 RUC5208X, RUC6408X, RUC8408X Using the refrigerator Refitting the shelves ➤ Position the shelf in the desired location. ➤ Insert the ends of the shelf on the left (1.). ➤ Slide the shelf into the holes on the right (2.). ➤ Slide the plastic plugs into the holes in the wall (3.).
- Page 38 Using the refrigerator RUC5208X, RUC6408X, RUC8408X ➤ Snap the shelf locks onto the shelf. Positioning the bottle shelf NOTE The two bottom shelf positions can be fitted into an optional bottle shelf configuration which slopes down toward the rear. 180° ➤...
- Page 39 RUC5208X, RUC6408X, RUC8408X Using the refrigerator 9.15 Defrosting the refrigerator manually NOTICE! Never use mechanical tools to remove ice or to loosen objects stuck to the device. NOTE • The refrigerator compartment has an automatic cyclic defrost system, which prevents excessive frost forming on the evaporator fins.
- Page 40 Using the refrigerator RUC5208X, RUC6408X, RUC8408X 9.16 Replacing the door panel Removing the door panel Proceed as follows (fig. x): ➤ Open the door 90 degrees. ➤ Remove the door top decoration strip by gently pushing upward by hand (1.). ➤...
- Page 41 RUC5208X, RUC6408X, RUC8408X Using the refrigerator Installing the new door panel Proceed as follows (fig. y): ➤ Push the new panel downwards into the door. Ensure, that the vertical edges fit into the grooves of the door frame (1.). ➤ Push the new panel downwards until the lower horizontal edge of the panel fits into the bottom groove.
- Page 42 NOTE For RUC5208X door reversal, an accessory hinge and latch kit is required (not included). Contact your Dometic dealer for details. ➤ Open the door. ➤ Remove the top hinge pin cover (fig. z 1) using a small blade screwdriver.
- Page 43 RUC5208X, RUC6408X, RUC8408X Using the refrigerator NOTE Carefully lift up the refrigerator door to prevent damaging the door bushing. ➤ Place the refrigerator door on soft material in order to prevent scratches. ➤ Remove the three screws from the lower hinge (2. in fig. A) and discard the old hinge.
- Page 44 Using the refrigerator RUC5208X, RUC6408X, RUC8408X ➤ Remove the locking catch screw (fig. C 1). ➤ Take off the locking catch and top cover (fig. C 1). ➤ Remove the cover and bush on the hinge side with a small screwdriver (fig.
- Page 45 RUC5208X, RUC6408X, RUC8408X Using the refrigerator ➤ Use the latch assembly from the door reversing kit (not included, see chapter “Accessories” on page 7). ➤ Fit the new latch assembly and the original latch blank to the opposite side. ➤ Position the refrigerator door on the hinge pin of the newly mounted lower hinge (1.
- Page 46 Using the refrigerator RUC5208X, RUC6408X, RUC8408X 9.18 Reversing the doors for RUC6408X, RUC8408X ≥90° ➤ Open the freezer door more than 90 degrees. ➤ Remove the three screws (fig. G 1) from the upper hinge. ➤ Pull the upper hinge upwards out of the bushing and away from the freezer door (2.
- Page 47 RUC5208X, RUC6408X, RUC8408X Using the refrigerator ➤ Remove the refrigerator door by lifting it up until it clears the lower pin (1. in fig. H). NOTE Carefully lift up the refrigerator door to prevent damaging the door bushing. ➤ Place the refrigerator door on soft material in order to prevent scratches. ➤...
- Page 48 Using the refrigerator RUC5208X, RUC6408X, RUC8408X ➤ Remove the locking catch screws (fig. I 1). ➤ Take off the locking catches (fig. I 1). ➤ Remove the hinge bushes on the hinge side with a small screwdriver (fig. I 2). ➤...
- Page 49 RUC5208X, RUC6408X, RUC8408X Using the refrigerator ➤ Remove the two screws (1. in fig. K) from the latch assembly on both doors. ➤ Push the spring bolt (2. in fig. K) inwards with a small screwdriver, until the latch assembly (fig. K 1) is released. ➤...
- Page 50 Using the refrigerator RUC5208X, RUC6408X, RUC8408X ➤ Remove the covers from the upper and lower hinge points (1. in fig. L). ➤ Install the covers on the opposite side (2. in fig. L). ➤ Turn the former upper hinge 180 degrees and mount it to the new lower hinge position with the three screws.
- Page 51 RUC5208X, RUC6408X, RUC8408X Using the refrigerator ➤ Turn the former lower hinge 180 degrees and hold it in the new upper hinge posi- tion. Take care that the hinge pin fits into the upper bushing of the freezer door (1. and 2. in fig. N). ➤...
-
Page 52: Cleaning And Maintenance
Cleaning and maintenance RUC5208X, RUC6408X, RUC8408X Cleaning and maintenance WARNING! Always disconnect the refrigerator from the mains before you clean and service it. NOTICE! • Do not use abrasive cleaning agents or hard objects during cleaning as these can damage the refrigerator. •... - Page 53 RUC5208X, RUC6408X, RUC8408X Troubleshooting In case of multiple faults, the error code will be rolling. The beep will last for 2 minutes and repeat every 30 minutes until the fault is restored. Error type faults must be manually reset by pressing and holding the control knob between 2 s and 4 s.
- Page 54 Troubleshooting RUC5208X, RUC6408X, RUC8408X Influence on Code Fault Type Icon Beep cooling Compressor Error No flashing overloaded Thermal cut-out Error No flashing of controller unit Compressor does not run (battery connection) Fault Possible cause Remedy Device does not The connection between the battery Establish a connection.
- Page 55 RUC5208X, RUC6408X, RUC8408X Troubleshooting Fault Possible cause Remedy Start attempt with Ambient temperature too high – ≥ U Term Insufficient ventilation Clean existing ventilation or install sufficient ventilation. Condenser is dirty Clean the condenser. Fan defective Replace the fan. Electric circuit between Defective compressor This can only be repaired the pins in the...
- Page 56 Troubleshooting RUC5208X, RUC6408X, RUC8408X Fault Possible cause Remedy Electric circuit between Defective compressor This can only be repaired the pins in the by an authorised repair compressor interrupted centre. Interior temperature too low on warmest control setting Fault Possible cause Remedy Compressor runs Control sensor faulty...
-
Page 57: Warranty
RUC5208X, RUC6408X, RUC8408X Warranty Water in or under the refrigerator Fault Possible cause Remedy Water is leaking into the The water drain system is clogged. Clean the drain. inside of the Foodstuffs are preventing the water Make sure that foodstuffs refrigerator. -
Page 58: Disposal
Disposal RUC5208X, RUC6408X, RUC8408X Disposal WARNING! Children beware! Before disposing of your old refrigerator: • Dismantle the drawers. • Leave the shelves in the refrigerator so that children cannot climb inside. NOTICE! An insulating gas is used in the device (see type plate). Check with the relevant local government authority or your local waste disposal company about proper disposal and make sure that the device and all materials are disposed of professionally. - Page 59 RUC5208X, RUC6408X, RUC8408X Technical data RUC5208X RUC6408X RUC8408X Power consumption 240 Vw: 240 Vw: 240 Vw: at ambient temperature of 0.76 kWh/24 h 0.95 kWh/24 h 1.02 kWh/24 h 32 °C, +3 °C refrigerator: 12 Vg: 2.4 Ah/h 12 Vg: 2.8 Ah/h 12 Vg: 3.0 Ah/h Cooling temperature range Refrigerator compartment:...
- Page 60 1800 212121 · +61 7 55076001 Mail: sales@dometic.com.au AUSTRIA MEXICO SOUTH AFRICA Dometic Austria GmbH Dometic Mx, S. de R. L. de C. V. Dometic (Pty) Ltd. Neudorferstraße 108 Circuito Médicos No. 6 Local 1 Regional Office A-2353 Guntramsdorf Colonia Ciudad Satélite...
Need help?
Do you have a question about the RUC Series and is the answer not in the manual?
Questions and answers