Table of Contents
Advertisement
Advertisement
Table of Contents

Related Manuals for MFB Tanzbar 2


Summary of Contents for MFB Tanzbar 2
- Page 1 Tanzbär 2 Hybrid-Drumcomputer Operating Manual...
- Page 2 First we would like to thank you for buying the Tanzbär 2. To guarantee this machine to never gets boring, we advise you to read the following instructions carefully and in all peace. IMPRESSUM MFB – Ingenieurbüro Manfred Fricke Neue Straße 13 14163 Berlin-Germany www.mfberlin.de WWW.FACEBOOK.COM/MFBERLIN...
- Page 3 Disclaimer The content of this manual has been compiled with meticulous care and to the best of our knowledge. However, MFB does not assume any liability for up-to-dateness, completeness or accuracy for any of the pages in this manual. We reserve the right to change any of the terms and contents at any time without advance notice.
- Page 4 • Make sure no objects get inside the device. Should this happen, switch off the device and remove it from the receptacle. Consult a qualified dealer or MFB next. Maintenance • Do not open the device. Repairing and servicing must only be carried out by qualified personnel.
- Page 5 MIDI- and USB- specifications. Any further use is not allowed and will preclude any warranty claims against MFB. Disposal This unit has been manufactured RoHS-conforming in compliance with the requirements of the European parliament and council and thus is free from lead, mercury, cadmium and hexavalent chromium.
-
Page 6: Table Of Contents
Table of Contents: Page Quick-Start User-interface Legend Operating modes Manual-Mode Step-Mode Sequencer modes Pattern programming Manual-Trigger-Mode Record-Mode Pattern selection Pattern chaining Knob Record Accent Sample-key Flams Mute LFO Mute Tempo Play BAR A,B,C,D Synthesizer Programming Shift-Functions Shuffle, Last Step,Scale, Copy BAR Paste BAR, Saving Patterns, Clear BAR, Pattern Dump, Man/Step Real Time Note Record, MIDI Learn,... -
Page 7: Quick-Start
Quick-Start Here you will find a brief explanation of some of the basic functions so that you can program your first patterns as quick as possible. Tempo: Hold down the TEMPO-key and use the DATA1-encoder to select and set, the desired tempo in BPM, as shown on the display. Play: Pressing the PLAY-key will start the internal sequencer. Pattern Select: Hold down the Pattern-key. Press one of the upper black buttons (marked 0-9). -
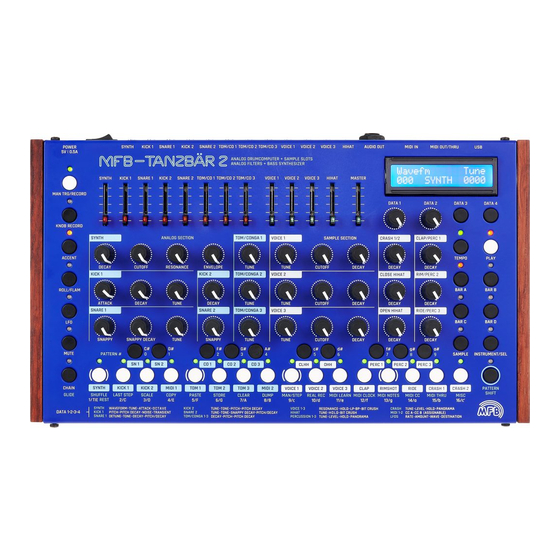
Page 8: User-Interface
User-Interface... -
Page 9: Legend
LEGEND Number Labeling Function Shift-Function (P. 15-17) MAN TRG/Record Switch between Manual-Trigger- Mode and Record-Mode KNOB RECORD Records the movement of each parameter ACCENT Adjusts the pitch of each Instrument ROLL/FLAM Set rolls or flams A LFO can be assigned to each Mute LFO instruments MUTE... -
Page 10: Operating Modes
Operating Modes The mentioned Sequencer Mode Record Mode will be further explained on the next Page. Manual-Mode This operation mode is preset ex factory. If Manual Mode is turned on and Record-Mode is selected, accents and flams can be programmed, as well samples be selected. Step-Mode Unlike Manual-Mode if Step-Mode is turned on and Record-Mode is selected. -
Page 11: Sequencer Modes
Sequencer-Modes (Pattern Programming) There are two different sequencer modes available to program(record/write) a pattern: Manual- Trigger-Mode and Record-Mode. Manual-Trigger-Mode The LED of the MAN TRG/RECORD key lights up green. While the sequencer is not running, instruments can be triggered by the corresponding keys (prelisten). -
Page 12: Record-Mode
Record-Mode Please Note! The previously mentioned operating modes Manual-Mode and Step- Mode apply to this sequencer-mode. In this mode, triggers are set for the desired steps. These can be edited by their corresponding parameters. Newly set steps are automatically in Edit-Mode (they flash red). Already existing steps can be edited by holding down the INSTRUMENT/SEL(Select) key in conjunction with the step to be edited. -
Page 13: Pattern Selection
• Alternatively, patterns can be selected using the DATA1 encoder. Please note! It is not possible to select an empty pattern . How to save patterns can be found under Shift Functions. The first 16 patterns are preset by MFB. Try these out to test the device functions. Pattern Chains 16 chains of patterns can be programmed consecutively. -
Page 14: Knob Record
Knob Recording Parameter movements of currently selected instruments can be recorded (Motion Record). The knob record function is only usable if Step- Mode is selected, and Record-Mode being turned on: • Make sure Record-Mode is turned on. If this is not the case, please refer to page 10. •... -
Page 15: Sample-Key
Sample Key If you have selected one of the sample-based instruments in Record-Mode (LEDs of selected steps flash), the preset sample can be changed as followed. In order to change the sample of previously set steps, these have to be set in Edit-Mode(p.12). -
Page 16: Lfo
LFOs Press the LFO key to turn on an LFO track. The parameters shown in the display shown, Rate and Amount, can be adjusted using the encoders DATA1 and DATA2. The waveform can be changed by using of the DATA3 key and the first eight white keys (see list below). -
Page 17: Mute
Mute Muting individual instruments succeeds as follows: • Press the Mute key (LED lights red) • Press the desired instrument key to be muted. The LED above lights red. For the black instrument keys the LED on the left underneath lights up green. •... -
Page 18: Tempo
Tempo To set the tempo to the desired BPM value. Hold down the Tempo key and turn the DATA1 encoder to the desired value. Play The LED above the Play key indicates whether an internal (red) or an external (green) clock is being used. -
Page 19: Synthesizer Programming
Synthesizer-Programming To program the internal Bass Synth, Record mode needs to be activated (p. 9). The keys now work as a keyboard. After setting a step (note), the next step (note) is always awaited. Notation is carried just like on a regular keyboard. -
Page 20: Shift-Functions
Shift-Functions All Shift functions are marked blue on the white instrument keys and can only be accessed via Shift (also marked blue) . As soon as you’ve chosen the desired function, it will be shown in the Display. This always works the same way : Shift+Shift function (key 1-16) and confirm with INSTRUMENT/SEL(Select) key. 1. Shuffle After selecting the shuffle-menu as described above, the shuffle intensity can be increased by pressing steps 2 to 16. No shuffle is set by pressing step 1. The shuffle equally applies to all(!)tracks, both in Manual- as well as in Step-Mode. - Page 21 5. Paste Bar Press one of the four bar keys to place the previously copied bar. 6. Saving patterns The patterns are saved using the black numbered buttons as already mentioned.The system for entering a pattern location is the same procedure as calling up a pattern (p.13).
- Page 22 10. Real Time Note Record With the sequencer running and instruments being triggered, these events are being recorded or can be triggered by MIDI notes. 11. MIDI Learn: With this mode being selected, Tanzbär expects a MIDI note for each instrument. The note number and the corresponding MIDI channel are saved.
- Page 23 14. MIDI CC: Transmission and reception of MIDI controller values can be turned on and off using the DATA3 and DATA4 keys. The encoders DATA1 and DATA2 can not be controlled via MIDI CC. 15. MIDI Thru: As soon as this function is activated, no internal MIDI functions will be sent to the output.
-
Page 24: Sample Transfer
Sample Transfer All samplebased instruments can replaced by you own samples. To transfer your samples, please download on the MFB-Homepage the the Sample- Transfer-Tool which comes with the newest OS, as well the Update-Tool. ATTENTION! Please be aware that the maximum length of a Sample can be 8 seconds.Are all Sampleslots full nothing will be indicating,neither the Display or something else. Be aware that there are already saved Samples inside that take Storagespace. To transfer samples from your Computer to the Tanzbär 2 please follow these Instructions:... -
Page 25: Software Update
Software Update To update the device with a new Software please use the Bootloader Software downloadable on www.mfberlin.de. Update can only be done using a MIDI interface. • To update the device: Turn on your Tanzbär 2 and hold DATA3 and DATA4 key. •... -
Page 26: Midi-Cc-List
MIDI-CC-Tabelle Analoge Instruments Instrument Note Channel Synth Parameter DECAY CUTOFF RESONANCE ENVELOPE Instrument Note Channel KICK1 Parameter: ATTACK DECAY TUNE Instrument Note Channel KICK2 Parameter DECAY Instrument Note Channel SNARE1 Parameter SNAPPY SNAPPY DECAY TUNE Instrument Note Channel SNARE2 Parameter SNAPPY Instrument Note... - Page 27 Samplebased Instruments Instrument Note Channel VOICE1 Parameter TUNE CUTOFF DECAY Channel Instrument Note VOICE2 Parameter TUNE CUTOFF DECAY Channel Instrument Note VOICE3 Parameter TUNE CUTOFF DECAY Instrument Note Channel OPEN HIHAT Parameter DECAY Channel Instrument Note CLOSED HIHAT Parameter DECAY Instrument Note Channel...
- Page 28 Tanzbär 2...
Need help?
Do you have a question about the Tanzbar 2 and is the answer not in the manual?
Questions and answers