
Related Manuals for Linak TwinDrive TD3.2


Summary of Contents for Linak TwinDrive TD3.2
- Page 1 U S E R M A N U A L ® TWINDRIVE TD3.2 / TD3.3 To learn more about LINAK please visit: W W W . L I N A K . C O M...
-
Page 3: Table Of Contents
Accessories ..............................18 Changing of batteries ..........................20 Emergency lowering function: (optional) ....................20 Welding the twist bracket on the frame ....................22 Labels .................................23 Disposal of LINAK’s products ..........................23 Disposal of batteries ............................25 Drawing appendix ..............................25 Manufacturer’s declaration ..........................30 LINAK application policy ............................31... -
Page 4: Preface
Preface We are delighted that you have chosen a product from LINAK A/S. LINAK systems are high-tech products based on many years of experience in the manufacture and development of actuators, electric control boxes, controls, and chargers. We are also constantly improving our products to meet customer requirements. - Page 5 This device complies with part 15 of the FCC Rules. Operation is subject to the following two conditions: (1) This device may not cause harmful interference, and (2) This device must accept any interference received, including interference that may cause undesired operation.
-
Page 6: Important Information
Important information Important information on LINAK ® products can be found under the following headings. Please read and understand these instructions for proper operation. Be sure to keep this instruction manual handy for future reference. Warning! Failure to comply with these instructions may result in accidents involving serious personal injury. -
Page 7: During Operation
In order to avoid the risk of malfunction, all TWINDRIVE repairs must only be carried out by authorised LINAK workshops or repairers, as special tools must be used and special gaskets must be fi tted. TWINDRIVE under warranty must also be returned to authorised LINAK workshops. -
Page 8: Misc. On The Td3 Twindrive System
(see label). LINAK A/S’ warranty is only valid in so far as the equipment has been used and main- tained correctly and has not been tampered with. Furthermore, the system must not be exposed to violent treatment. -
Page 9: Mounting Guidelines For The Twindrive System
® Mounting guidelines for the TWINDRIVE system Place the TD3 below the twist brackets/“arms” of the bed Mount the TD3 and slide the closing devices over the gaps and make sure that the closing devices are in place before the TD3 is used. -
Page 10: Functional Description
Functional description Transmitter HB10: Up – down head motor Up – down foot motor Simultaneous up/down Transmitter HB20: Up – down head motor Up – down foot motor up to 3 extra channels common operation up/down (option) Memory positions (3 positions) Store Button Light Button How to store... -
Page 11: Handset For Massage
Handset for massage HB22RF2000 Usage: Enter/exit massage command mode Sets the control in massage mode for controlling the massage functions (LED fl ashing) or returns to normal mode for controlling the bed adjustment (LED off). Pressing this key has no infl uence on the TWINDRIVE unit except from waking it up to make its response time to massage commands shorter. - Page 12 Short key press on the right key turns off both massage motors no matter if they are running in a massage program, or separately. Keep key pressed to adjust the motor, change speed up or down (left key down, right key up.) Store and recall massage settings.
-
Page 13: Child Lock
Child lock To enable the function, the position of the switch in the front of the transmitter must be changed. To unlock the handset press up and down keys of the 2 at the same time for one sec. When the blue LED turns on the handset is unlocked for 10 sec. -
Page 14: Start-Up - How To Install The Rf Handset
Start-up - How to install the RF handset: Please be aware that if you use the TD3 for the fi rst time or it has been disconnected from the mains, the receiver integrated in the TD3 needs approx. 20 sec. before being able to receive a signal. The TD3 can accept commands from up to 2 RF handsets. -
Page 15: Disturbance Of Rf Signals
Disturbance of RF signals: Please be aware that other equipments (as e.g. doorbells), which use the 433 MHz can disturb the RF signal. Under some circumstances it is not possible to run 2 or more TD3 at the same time. Please observe that if you place 2 beds/2 x TD3 at a distance below 0.8 m the RF signals they may interfere each other and the TD3’s can run irregularly. -
Page 16: Connections
Connections Ch.1 Ch.2 Ch.3 Mains inlet (HB connection) Battery cable/connection Battery drawer Reset Connection of massage motors: Footrest Headrest Connection of LA27 actuators: The TD3 will as default detect and run the LA27 using plug and play rules as illustrated in the table below. The idea is that the Headrest is the fi rst actuator, the Footrest second and then Extra function. -
Page 17: Mounting Instructions For The Massage Motor
Mounting instructions for the massage motor: Mounting on plate: Is mounted with 4 screws The massage unit is mounted with 4 x 4 mm round-head wood screws with fl at underside. The head must be 8 mm in diameter and in length 19 mm + the thickness of the plate on which the massage motor is mounted. - Page 18 Mounted on one slat: The massage motor is mounted on to the slat by using 2 brackets 0761009 and 4 x M6 screws of good quality. Inside the motor 4 self-locking nuts avoid the mounting screws to get loose. Mounted on three slats:...
-
Page 19: Accessories
Accessories: The TD3 can handle different kinds of accessories. The 3 main types are: 1. LED Lightbox : A light unit 2. DC Connector: Connection possibilities of units with DC plugs 3. USB Connector: Connection possibilities with units with USB plugs Cable for connection to the TD3 is a separate unit: 0617101, 205 mm long 1. - Page 20 3. USB Connector Connect the USB Connector to the TD3 system via the motor cable. Before use the system must be confi gured via the TD3 confi gurator to be able to handle the mounted USB unit. The TD3 confi gurator is a PC software program. Via this unit you can connect a range of different accessories and gadgets with a USB plug, just as long as the device works in accordance with the general USB charger standard (max.
-
Page 21: Changing Of Batteries
Changing of batteries 1. Remove the battery cover (see Figure 1). 2. Use a blunt instrument to remove the battery. 3. Place 3 new batteries type R03 or LR03 (AAA) in the transmitter. Press a button for 3 sec. If above procedure not is performed the handset will function anyway after app. - Page 22 Connection of Emergency lowering: Please observe that if you order the TD3 with 2 x 9V batteries mounted, the batteries will not be connected. The customer needs to connect the cable from the battery drawer to the TD3 when installing the bed and connecting the mains.
-
Page 23: Welding The Twist Bracket On The Frame
Welding the twist bracket on the frame e frame 1) For the TD3 it is important that it is not welded welded on the outside of the twist bracket because there is not room for a welding seam in the motor housing. -
Page 24: Labels
Label for Massage Motor Label for TD3 TWINDRIVE ® System Label for HB20 Label for HB12 The shown TD3 label is an example for one model part number. Label for LED Lightbox The power ratings for other models are: For TD3x10xxxxxxx U in: 230V, 50 Hz P in: 250W For TD3x11xxxxxxx... -
Page 25: Disposal Of Linak's Products
Disposal of LINAK’s products As LINAK’s customers often ask us how our products can be disposed of or scrapped we have prepared this guidance that enables a classifi cation to different waste fractions for recycling or combustion. Guidance We recommend to disassemble our product into as many fractions as possible at the disposal and try to make it recycable. -
Page 26: Disposal Of Batteries
Details regarding safe disposal of used and leaking batteries: Batteries should be disposed in accordance with appropriate federal, state and local regulations. LINAK recommends that used or leaking batteries are disposed through the local recycling system. Please do not throw used or leaking batteries in normal household waste or in nature. -
Page 27: Drawing Appendix
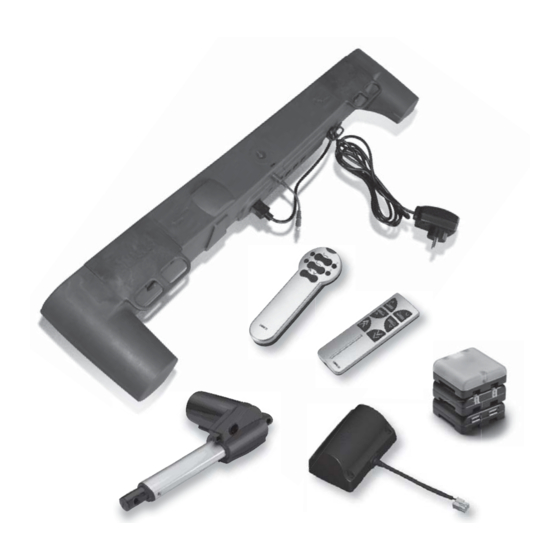
DRAWING APPENDIX ® TWINDRIVE TD3 System LA27... - Page 28 HB10 Transmitter HB20 Transmitter Massage motor MD1 otor MD1...
- Page 29 LED Lightbox DC Connector Ø4...
- Page 30 USB Connector...
-
Page 31: Manufacturer's Declaration
LINAK shall be responsible solely that the LINAK products comply with the specifi cations set out by LINAK and it shall be the responsibility of the LINAK customer to ensure that the specifi c LINAK product can be used for the application... -
Page 32: Linak Application Policy
LINAK cannot guarantee the correct and actual status of said information on its products. JAPAN While LINAK uses its best efforts to fulfi l orders, LINAK LINAK K.K. Phone: +81 45 533 0802 . Fax: +81 45 533 0803 cannot, for the same reasons as mentioned above, guarantee E-mail: linak@linak.jp .
Need help?
Do you have a question about the TwinDrive TD3.2 and is the answer not in the manual?
Questions and answers