
Related Manuals for TC-Helicon PERFORM-VE


Summary of Contents for TC-Helicon PERFORM-VE
- Page 1 PERFORM-VE Revolutionary Vocal Manipulator with MIDI-Pitch-Controlled Sampling, Vocal Synth and One-Button Drum Looper User Manual Rev. 1.2 A50-XXXXX-XXXXX...
-
Page 2: Table Of Contents
PERFORM-VE User Manual Table of Contents Important Safety Instructions ........3 Legal Disclaimer ............. 3 Limited warranty ............3 1. Introduction ............... 4 2. Update your Device! ..........4 3. Connection Diagram ..........5 4. Front Panel ..............6 4.1 The Set Button ..............6 4.2 The Headphone Button ........... -
Page 3: Important Safety Instructions
PERFORM-VE User Manual 9. Do not defeat the safety purpose of the polarized 20. Please keep the environmental aspects of battery Important Safety or grounding-type plug. A polarized plug has two blades disposal in mind. Batteries must be disposed-of at a Instructions with one wider than the other. -
Page 4: Introduction
If you’ve read the Quick Start Guide that came in the box, hooked up a microphone, and can hear your music and vocals coming through the outputs, you are already skimming the top features of Perform-VE. If you want to get into Perform-VE’s deeper capabilities with this reference manual, we’ll need to do a... -
Page 5: Connection Diagram
Alternatively, your MIDI keyboard can be connected via USB cable to a laptop running music software that features a MIDI soft THRU capability. You would then connect Perform-VE to the laptop via a second USB cable and configure your DAW to take incoming MIDI from the USB MIDI keyboard and pass it on to Perform-VE’s... -
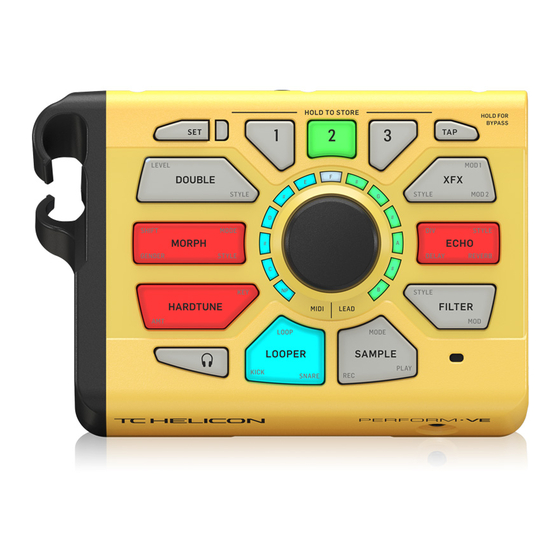
Page 6: Front Panel
By default, Perform-VE’s Control Knob edits the mix between the MIDI Voices and your Lead Voice. It applies to all three presets and is not stored when Perform-VE • The pressed FX button will pulse on and off. At this point you won’t need to is turned off. - Page 7 MIDI Channel bit more pronounced in the mix. The MIDI channel that Perform-VE responds to is set if a MIDI note event is received Gate “shuts off” an audio input when it falls below a certain volume. This works while the SET button is held down.
-
Page 8: The Headphone Button
The loop needs to be erased to be able to adjust the headphone level. Right toggles FILTER. • Now that the basics are out of the way, let’s check out Perform-VE’s effects! • Bottom toggles XFX. NOTE: If you have a TC-Helicon MP-76 connected but choose MP-75 mode instead, the lower three buttons will not operate. -
Page 9: Effects
(Wikipedia) Perform-VE’s Morph effect does exactly this to your voice: you can morph your lead voice into a giant, a mouse, or a spaced out alien (and beyond) using the Shift and Gender parameters, while also morphing your MIDI voices into choirs of angels, robots, zombies or whatever you dream up using the Mode and Style parameters. - Page 10 Synth Vocoder Perform-VE has a dual oscillator synth vocoder hidden inside. When Synth Vocoder styles are chosen, the synthesizer will generate up to eight articulated synth voices to render the MIDI notes you play, and will also generate a ninth Lead synth voice that follows the pitch of your voice.
- Page 11 PERFORM-VE User Manual Morph Mode Green LED selections set the MIDI voices to Poly mode, and adjust their release time (how long voices will take to fade out after you release their controlling Morph Mode controls the Mono/Poly setting of the Notes, Vocoder and Sample key).
-
Page 12: Hardtune
Here it is in the key of C#, just one semitone up from C. When using the Pop Major Scale, Perform-VE should be set to the correct key for your composition. You can set this manually, or you can set the key to NaturalPlay to have Perform-VE automatically set the correction key based on the chords it detects in the incoming MIDI or audio (Aux input). -
Page 13: Xfx
PERFORM-VE User Manual 5.4 XFX XFX stands for ‘EXTREME EFFECTS’ … it lives up to the name, as we’ll now explain. Applies to: Lead Vocal, MIDI Voices Looper Audio (Flange, SideChain Pumping & LPF/HPF only) Looper Drums (Flange & LPF/HPF only) XFX Style There are seven different XFX styles: Stutter effect, Chopper effect, Ring Modulation, Flanging and even a SideChain Pumping Compressor. - Page 14 There are two Chopper styles: Mono Chopper and Stereo Chopper. At full depth, Mono will gate the level of the audio, while Stereo will alternate (ping-pong) the audio between Perform-VE’s left and right stereo outputs. Both Chopper styles are beat-synchronized, of course! Chopper Mod 1: Division Chopper Mod 1 controls the size of the Chopper’s rhythmic division in real time.
- Page 15 PERFORM-VE User Manual Ring Mod, Mod 1: Frequency Ring Mod, Mod 1 controls the frequency (pitch) of the modulating sine wave. Sweep it across its range to apply a vintage radio tuning sound on your fixed pitch signal, or keep the frequency fixed while singing a melody to hear that 1950’s UFO/Raygun sound.
-
Page 16: Echo
PERFORM-VE User Manual XFX Style: SideChain Pumping The SideChain Pumping Compressor is meant to be used with the LOOPER’s built in drum sequencer. When you are playing a beat, the SideChain Compressor will momentarily throttle back (compress) the volume of your Lead, MIDI and audio loop mix whenever the drums hit a certain threshold volume. -
Page 17: Filter
PERFORM-VE User Manual Echo Div Echo Division controls both the Delay’s rhythmic division and its type. Blue LED selections are Ping-Pong delays in which echoes ‘bounce’ between left and right in the stereo field, while green LED selections are delays in which echoes are heard on both sides of the stereo field. The red LED selection is a short single-repeat echo called a Slapback delay, useful for dialing in a retro 50’s pop song vibe. -
Page 18: Tap (Tempo)
PERFORM-VE User Manual Filter Mod (LPF/HPF) When the LPF/HPF Style is active, Filter Mod controls the cutoff frequency of either the LowPass or HighPass filter (LPF and HPF). Range: 0 to 100% Filter Style: Transducer Styles The remaining four Filter Styles are filter transducer effects that alter your signal to sound like it is coming through various-sized amps and enclosures. The LOOPER Drum sounds will not be affected. -
Page 19: Looper
When the loop is playing, press loop again to overdub drums and audio. Once a loop has been recorded Perform-VE derives its tempo from the loop so that all effects are in sync. The derived tempo will be between 80 and 160 BPM (Beats Per Minute). - Page 20 The alternative looper setup is to have MIDI clock coming in from an external instrument or a computer running audio workstation software. In this situation, Perform-VE is the slave to the external device and any loops you record will need to be made in time with the pulses shown on the TAP button.
- Page 21 The Looper Cookbook Now you know where all the kitchen utensils are, here are some simple recipes for cooking up loops on Perform-VE. How to make an initial drum loop: • Arm loop by tapping the loop corner.
-
Page 22: Sample
Sample Management with the Perform-VE App The Perform-VE App for iOS allows you to back up, manage and restore Perform-VE samples. Please check out the app for more details. Note: The Android version of the Perform-VE App does not support samples owing to OS limitations. -
Page 23: Presets
Preset Management with the Perform-VE App The Perform-VE App for iOS and Android is available as a free download from each platform’s respective app stores. This app allows you to back up, manage and restore all three of Perform-VE’s onboard presets. Please check out the app for more details. -
Page 24: I/O Section
– this could be a smartphone, pod device, music player, Perform-VE has 5 input and 6 output channels for USB audio. A driver is required secondary laptop or any device connecting via a 1/8th inch stereo jack. -
Page 25: Roomsense
PERFORM-VE User Manual 9.4 RoomSense Did you notice that little hole on the front of the unit? It’s a microphone! It’s there for two reasons: 1. If you don’t plug in a microphone and have headphones connected, you can sing into the onboard mic. It’s a great way to practice with virtually no other equipment. -
Page 26: Appendix A: Effect Quick Reference Chart
PERFORM-VE User Manual Appendix A: Effect Quick Reference Chart Double Style 1. Unison 2. Octave Down 3. Octave Up 4. Octave Up/Down Morph Style 1. Natural Shift 2. Warp Shift 3. to 11. Analog Synth Modeled Vocoder Mode Green: Poly + release time... -
Page 27: Appendix B: Midi Implementation
PERFORM-VE User Manual Appendix B: MIDI Implementation Perform-VE responds to Control Change (CC), Program Change (PC) and MIDI Tempo (not MIDI Clock) information. MIDI PC Messages The product’s 3 presets correspond to Program Change: 0, 1, 2 MIDI CC List... -
Page 28: Appendix C: General
Factory Reset MIDI Tempo To reset the unit back to factory settings, press and hold the DOUBLE and HARDTUNE buttons while powering up. Perform-VE responds to incoming MIDI tempo and will adjust system Tap Tempo accordingly. Support Split Point and Transpose If you’ve read through this manual and still need a little help, you can contact us... - Page 29 PERFORM-VE User Manual...
- Page 30 PERFORM-VE User Manual...
- Page 31 PERFORM-VE User Manual...
Need help?
Do you have a question about the PERFORM-VE and is the answer not in the manual?
Questions and answers