Table of Contents
Advertisement
Advertisement
Table of Contents

Summary of Contents for Mueller UltraPot
- Page 1 Happiness is Homemade! UltraPot Instruction Manual...
- Page 2 Happiness is Homemade! The Mueller UltraPot uses advanced technology so you and your family can enjoy the bene ts of better, faster and healthier cooking. Your pressure cooker seals in steam to cook hotter and faster while maintaining important nutrients for healthier meals. Cooking fast and...
-
Page 3: Table Of Contents
TABLE OF CONTENTS SAFETY FIRST! IMPORTANT FEATURES MÜELLER ULTRAPOT SAFETY FEATURES MÜELLER ULTRAPOT PARTS HOW TO USE THE CONTROL PANEL CONTROL PANEL LCD DISPLAY LCD DISPLAY MESSAGES ULTRAPOT ASSEMBLY AND SETUP BEFORE THE FIRST USE PRESSURE COOKING SELECTING THE PRESSURE LEVEL... -
Page 4: Safety First
WHEN USING THE ULTRAPOT PRESSURE COOKER, BASIC SAFETY PRECAUTIONS SHOULD ALWAYS BE FOLLOWED. The UltraPot cooks under pressure. Improper use may result in scalding injury to your body if exposed to steam. KEEP AWAY from the steam when releasing pressure or when opening the lid. - Page 5 If there is any malfunction of the cooker during the cooking process, please stop using the device. Do not operate this appliance with a damaged cord or plug or after it malfunctions or has been damaged in any manner. CAPACITY UltraPot 6 liters 6.8 kg 328*328*380mm...
-
Page 6: Important Features
IMPORTANT FEATURES Müeller UltraPot Pressure Cooker uses advanced technology so you and your family can enjoy the bene ts of better, faster and healthier cooking. Your pressure cooker seals the food in steam to cook hotter and faster while maintaining important nutrients for healthier meals. -
Page 7: Müeller Ultrapot Safety Features
MÜELLER ULTRAPOT SAFETY FEATURES Mueller UltraPot pressure cooker uses most advanced technology to provide you safety while cooking. With our safety features, cooking is now more safe than ever and you can be at peace, knowing that our best team of engineers developed one of the... -
Page 8: Müeller Ultrapot Parts
MÜELLER ULTRAPOT PARTS It is important for you to know all the parts of the pressure cooker, so you could understand how it's functioning and how to properly use the cooker, how to dissemble and assemble it for maintenance and cleaning. -
Page 9: How To Use The Control Panel
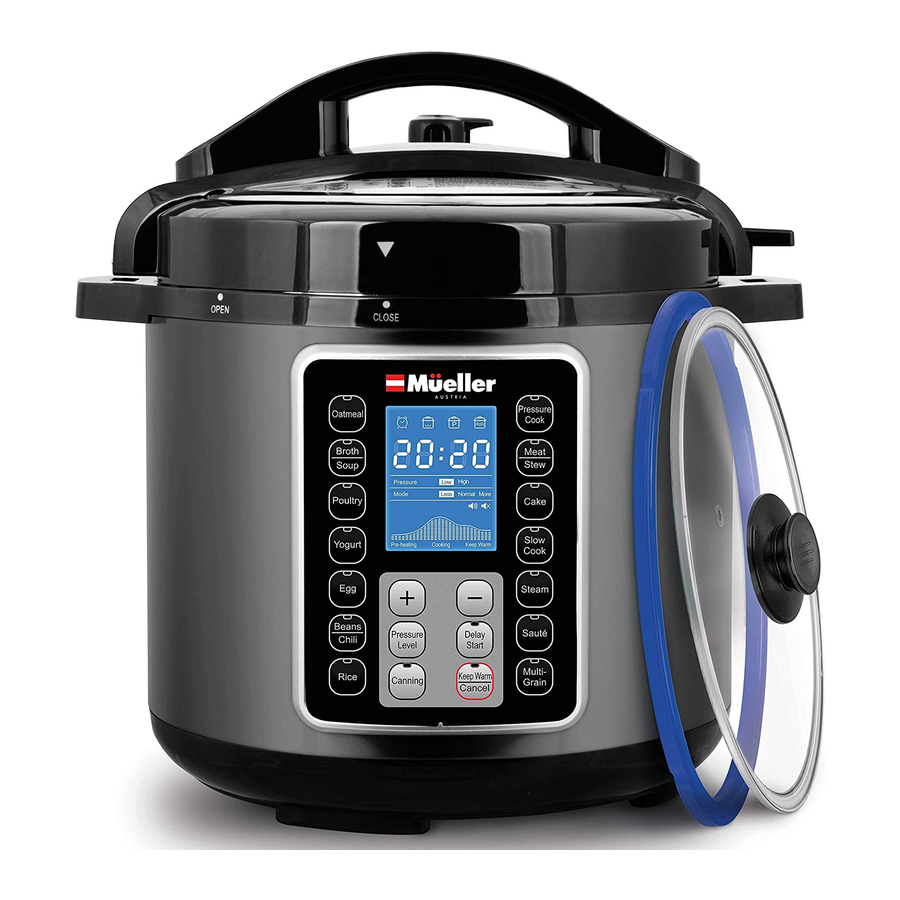
HOW TO USE THE CONTROL PANEL UltraPot FOOD MENU BUTTONS: Manual Pressure Cooking Preset Pressure Preset PressureCooking Program Cooking Programs Preset Pressure Cooking Program YOGURT FUNCTION: Manual slow cooking Including two steps, Pasteurize and Culture Sterilize and boils water Preset Pressure Heats Inner Pot for Sautéing... -
Page 10: Control Panel Lcd Display
CONTROL PANEL LCD DISPLAY The LCD display uses icons, words, and numbers to depict time, pressure levels, modes, cooking progress and messages. Keep Warm Delay Start Pre-Heating Pressurized Icon Icon Icon Icon Low, Normal, or More... -
Page 11: Lcd Display Messages
LCD DISPLAY MESSAGES Yogurt program is complete UltraPot is plugged in, but still no and ready for Pasteurizing. programs are selected. Ready to use and to chose a program. Your UltraPot is ready to use and Pasteurizing. it is preheating. -
Page 12: Ultrapot Assembly And Setup
ULTRAPOT ASSEMBLY AND SETUP Remove packaging materials such as cardboard, plastics or Styrofoam and discard appropriately. Clean all the parts by wiping with a soft damp cloth or sponge and dry thoroughly. Thoroughly clean the cooking pot in the dishwasher or with warm soapy water. - Page 13 2. How to CLOSE the lid: Observe the Rubber Seal Ring inside the Lid and ensure that it is tted onto the lid all the way around. Pay attention if the Rubber Seal Ring inside the Lid ts onto the lid all the way around. Caution: If the rubber seal ring is damaged, do not use the pressure cooker.
-
Page 14: Before The First Use
Before the st use of the cooker, it is recommended for you to perform WATER TEST, in order to ensure correct assembly of the Rubber Seal Ring and to familiarize yourself with the cooker. UltraPot UltraPot 2. Fill in 3 cups of water. - Page 15 UltraPot AFTER CYCLE COMPLETES, TURN TO EXHAUST FOR QUICK RELEASE REMOVING LID AFTER PRESSURE COOKING When the pressure cooking cycle has completed, the unit will automatically switch to keep Warm. At this point you may release pressure in one of two ways - Natural Pres- sure Release or Quick Pressure Release.
- Page 16 During this time cooking continues so it is recommended for certain cuts of meats, soups, rice, and some desserts. When pressure has fully released, the Float Valve will drop and the lid will unlock to open. As a safety feature, the lid will not open unless all pressure is released.
-
Page 17: Pressure Cooking
PRESSURE COOKING There are 14 Menu functions programmed for your pressure cooker. They are Oatmeal, Soup/Broth, Poultry, Yogurt, Egg, Bean/Chili, Rice, Meat/Stew, Cake, Slow Cook, Steam, Saute, Multigrain, Canning. The default times are programmed for quick and easy cooking for portions of food less than 3lbs. You can also manually set your own custom program by using the Pressure Cook button. - Page 18 6. Using the same Rice example, while the unit is building up pressure the LCD display will show ON. Once it begins to pressure cook, the Pressurized Icon will illuminate. The LCD display will show a solid 00:12 and begin countdown. 7.
-
Page 19: Selecting The Pressure Level
SELECTING THE PRESSURE LEVEL The PRESSURE LEVEL button is used in combination with the Menu buttons. The default working pressure is High pressure, the "PRESSURE LEVEL" button toggles the pressure setting between“High Pressure”(50-60KPa) and“Low Pressure”(30-40KPa) for the pressure cooking functions. Using Soup as an example, rst press the Soup button and set the pressure cooking time, the Soup indicator will blink and High pressure indicator will be highlight, press the Pressure Level once, the Low pressure indicator will light up. -
Page 20: Cooking Pot / Inner Pot Makings
COOKING POT / INNER POT MAKINGS Inside the removable cooking pot, there are two sets of markings. Side, marked with "2/3 MAX PRESSURE COOK", indicates the maximum ll line when cooking any food, other than rice in the pressure cooker. The other marking is MAX RICE CUP and is used when cooking rice. -
Page 21: Pressure Cooking Information Sheet
PRESSURE COOKING INFORMATION SHEET in ℃ Keep Keep Setting High temper. ℃ Amount Expected Time Delayed Temper. warm warm Function Mode the time Pressure pressure of food of Cooking start manually Cooking Cooking up to 12 minutes on Small High pressure Portion Normal 15 minutes on... - Page 22 Keep Keep Setting High Amount Delayed Expected Time Temper. warm warm Function Mode the time Pressure pressure of food start of Cooking up to temper. manually Cooking Cooking minutes on Small Portion High pressure Normal minutes on 1-99 min 50~60 kpa 30 -40KPa 0.5 -24h 60 -80...
-
Page 23: How To Use The Saute Function
How to use the SAUTE function This setting allows cooking over high heat, without the lid, before pressure cooking. Before Pressure Cooking, most recipes will bene t from the golden color, richer avors and moist results gained from Sautéing. To Sauté your meats or vegetables prior to pressure cooking: 1. -
Page 24: How To Use The Slow Cook Function
How to use the SLOW COOK function 1. Prepare desired food and place into Inner Pot. 2. Use the Glass Lid on the unit when slow cooking. NOTE: The SLOW COOK function cooks without pressure. 3. Select SLOW COOK function and the display will show the default SLOW COOK time of 06:00. -
Page 25: How To Make Yogurt. Step One: Pasteurizing
How to make YOGURT. STEP ONE: PASTEURIZING Making Yogurt is simple and fun using your pressure cooker. All you need is some milk and a bit of active culture yogurt!The process consists of two parts: Pasteurizing the milk and culturing the yogurt. Complete the following steps to make yogurt: PASTEURIZE TURN TO AIRTIGHT... -
Page 26: How To Make Yogurt. Step Two: Making Yogurt Culture
How to make YOGURT. STEP TWO: MAKING YOGURT CULTURE 1. Stir active culture into warm milk according to your recipe. Return steel pot to pressure cooker base. 2. Lock the lid in place. Turn the vent position to “AIRTIGHT”. 3. Select Yogurt; Press Yogurt button again until Normal displays with an 8 hour timer on the LCD screen. -
Page 27: How To Delay The Start Of Pressure Cooking
How to DELAY THE START of pressure cooking If you wish to Program your pressure cooker to automatically cook prepared food at a later time, you can program the pressure cooker to delay cooking by up to 24-hours. This setting is used in combination with the menu functions and the manual setting func- tion. -
Page 28: How To Clean And Maintain The Pressure Cooker
How to CLEAN and MAINTAIN the pressure cooker Always make sure the Pressure Cooker is UNPLUGGED, DE-PRESSURIZED and COMPLETELY COOLED DOWN before cleaning it. Use a non-abrasive sponge or damp wash cloth to clean the outer body. NEVER immerse the outer body in any liquids or pour liquid into it. Remove the Condensation Cup and rinse it thoroughly and let dry. -
Page 29: What If There Is A Problem
What if there is a PROBLEM Please read some of the most frequent troubleshooting questions from our previous customers. If you can't nd solution to your problem in this chart, please contact Mueller customer support for further steps. POSSIBLE REASON PROBLEM... - Page 30 POSSIBLE REASON PROBLEM SOLUTION...
-
Page 31: Led Error Indicators
LED ERROR INDICATORS If any of the below error codes appear on the pressure cooker display, unplug the power cord and check if the pressure cooker is properly assembled, if the food is properly and evenly positioned, and if there is enough liquid in th cooker. Then, let it cool for at least 10 minutes and plug it back into the outlet and turn it on. -
Page 32: Cooking Time Chart
COOKING TIME CHART Please note that the information below is for your reference only and can be adjusted according to the user’s preference. MEAT / POULTRY • Always cook meat or poultry with at least 1-3 cups of liquid. If the cooking time exceeds 15 minutes, use 2 cups of liquid. - Page 33 SEAFOOD • Cooking times may vary according to the type of seafood being cooked. • Cook seafood on a cooking rack with a trivet on the bottom of the pot (if avail- able), and add at least 3/4 cup of liquid. Lightly grease cooking rack with vegeta- ble oil when cooking sh.
- Page 34 TYPE OF VEGETABLE APPROX. COOKING MINUTES PRESSURE RELEASE Asparagus, thick whole Quick Release Asparagus, thin whole Quick Release Beans, fava, shelled Quick Release Beans, green, whole 1.5 lbs Quick Release Beans, lima, shelled Quick Release Beets, small, whole Quick Release Beets, large whole Quick Release Beets, 1-inch slices...
- Page 35 RISE & GRAINS Before cooking, soak certain grains, such as wheat berries and pearl barley in four times their volume of lukewarm water for at least four (4) hours or overnight if required. Do not soak rice. Do not add salt to water, since it may toughen the grains and inhibit hydration. Rice and grains are best slightly undercooked if they are to be added to soups or casseroles.
- Page 36 DRIED BEANS AND OTHER LEGUMES • Before cooking dried beans, pick over and discard any broken or shriveled beans or bits of dirt and debris. Rinse beans and drain. • Beans may be soaked overnight, but the pressure cooker allows you to cook beans without presoaking.
- Page 37 APPROX. COOKING APPROX. COOKING MINUTES MINUTES TYPE OF LEGUME PRESSURE RELEASE (Soaked overnight) (Unsoaked ) Azuki 10-15 Natural Release Black Beans 20-25 28-32 Natural Release Black Eyed Peas 11-12 Natural Release Chick Peas (garbanzo) 35-40 50-60 Natural Release Gandules (pigeon peas) 8-10 11-13 Natural Release...
-
Page 38: Limited Warranty
LIMITED WARRANTY Müeller USA warrants this appliance to be free from defects in workmanship and material, under normal residen- tial use, for a period of two (2) year from the date of purchase. This warranty extends only to the original purchas- er and use in USA and Canada. -
Page 39: Warranty Service
• A copy of the original purchase receipt with order number, the model and serial number • Description of the product defect, pictures or video if possible All contents in this document have been checked carefully. Mueller Company reserves the right to interpret any printing mistake or misunderstanding of content. - Page 40 Happiness is Homemade! 2-Year Limited Warranty This product is warranted to be free from defects in material and work- manship under normal use and service for 2 years from the date of YEAR original purchase with receipt. The manufacturer's obligation shall be limited to repairing or replacing, FOB, NY, any part of the product that is defective.
Need help?
Do you have a question about the UltraPot and is the answer not in the manual?
Questions and answers
I need a float valve for my UltraPot GT601-1709. Mine disappeared.