Table of Contents
Advertisement
Quick Links
Advertisement
Table of Contents

Related Manuals for Viofo A129

Summary of Contents for Viofo A129
- Page 1 Copyright (c) 2018,Viofo Ltd, All rights reserved.
-
Page 2: Table Of Contents
Table of Contents Product Overview Table of Contents Product Overview Product Overview Standard Items Standard Items Optional Accessory Product Diagram Inserting / Removing the memory card LED Indicators Buttons and Icons Front Camera Car Charger 4m Car Charger Installation Adapter USB Cable Front Camera Installation Rear Camera Installation... -
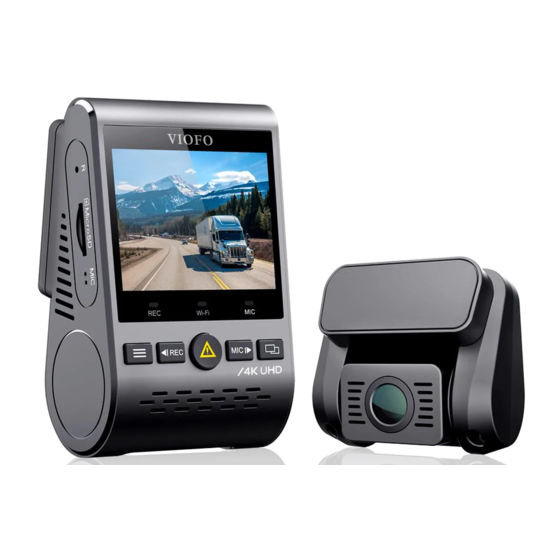
Page 3: Product Diagram
Product Overview Product Overview Product Diagram 1) Front Camera USB Power Port Mount Rear Camera USB Port Lens AV Out Power In / Mass Storage (computer) Menu / Power On | O Rear Camera Microphone On | O Recording On | O / Menu Up / Menu Down Power In + Video Out Video Protect / Playback... -
Page 4: Inserting / Removing The Memory Card
Product Overview Product Overview Note: Inserting / Removing the memory card The Micro SD card is sold separately. The microSD card must have a Class-10 or UHS-I rating and the capacity up to 128GB. Inserting the memory card 64 / 128GB micro SD cards must be formatted with the FAT32 file Push the memory card into the card slot until you hear a click, system, either on a computer or in the camera. -
Page 5: Buttons And Icons
Product Overview Product Overview Buttons and Icons Buttons Mode Behavior Mode Buttons Behavior Back to previous menu / Stop playback Click once to enter the menu Menu up / Change playback speed / Delete the video Click once to start recording Playlist Select the current / Play / Pause Standby... -
Page 6: Installation
Installation Installation Installation Front camera installation 1) Insert the clips, then slide the mount horizontally into the slot on the back of camera. 5) Fix the front camera on the selected location. 6) Adjust the lens angle - Look at the live view on the LCD. - Adjust the angle of the lens up / down if necessary. -
Page 7: Cable Connection
Installation Installation 2) Connecting with Rear Camera Use the 6M / 20ft rear camera USB port Cable (with an L-shaped connector at one end) to connect the two cameras. The L-shaped connector plugs into the rear camera USB port of the front camera, while the other end plugs into the USB port of the rear camera. -
Page 8: Operation
Installation Operation Display Overview Tips Recording Mode 00:00:20 Recording Time 00:00:00 1. Do not install / mount the camera in a location that interferes with 1080P60 Video Resolution 1080P6 0 the driver’s visibility and safety. Recording Status Emergency Lock 2. Install / mount the camera close to the rearview mirror so that Microphone both sides of the scene being recorded are equally covered by the camera’s FOV (field of view). -
Page 9: Emergency Recording
Operation Operation Emergency Recording Motion Detection Automatic emergency recording When the G-sensor is activated by a collision, the current footage If turned ON, the camera will start recording on detecting any will be locked automatically to avoid being overwritten by loop movement within its FOV (field of view). -
Page 10: Pip Mode
Operation Operation PIP Mode Firmware Upgrade There are four modes for live preview on the A129 LCD screen and Follow the instructions on this website to upgrade the firmware: via Wi-Fi while the rear camera is attached. (http://support.viofo.com/solution/folders/19000140970) Note: Picture in picture (PIP) mode is available only while the rear camera Note: is attached. -
Page 11: System Settings
Setting Setting System Settings • Parking Mode: To use the parking mode, it requires the camera to connect to the vehicle via the hardwiring cable (optional). The hardwiring cable must be professionally installed to the vehicle by a • Resolution: Setting video resolution of footage recorded, trained mechanic. - Page 12 Setting Setting • Wi-Fi: Set it On / O . Press the [ ] button for 3 or 5 seconds to unrecoverable. Make sure to back up all files that you needed before enable Wi-Fi quickly. formatting. • Bluetooth Remote: Set it On / O . •...
-
Page 13: Review And Control On Smartphone
Review and Control on Smartphone Bluetooth Remote Control The VIOFO app allows you to control your camera remotely by using Enable Bluetooth in the menu, and press the remote control for 3 a smartphone. Features include full camera control, live preview, seconds to pair with camera. -
Page 14: Notice
Shenzhen Viofo Technology Co.,Ltd, declares that this Radio interference to radio communications. However, there is no Frequency peripheral is in compliance with the essential guarantee that interference will not occur in a particular installation.
Need help?
Do you have a question about the A129 and is the answer not in the manual?
Questions and answers