
Related Manuals for Belkin F1UP0001


Summary of Contents for Belkin F1UP0001
- Page 1 Wireless USB Print Server Share your USB printers wirelessly with your networked computers User Manual F1UP0001...
-
Page 2: Table Of Contents
Adding a Belkin Port Monitor and Configuring It for a Specific Print Server ..25 Belkin Port Monitor Advanced Menu ......28 Opening the Belkin Port Monitor Advanced Menu . -
Page 3: Introduction
INTRODUCTION Thank you for purchasing the Belkin Wireless USB Print Server. Now you can share your USB-equipped printers around the home or office—without using cables. This product adds the convenience of wireless connection to conventional print-server functionality. It offers an easy installation and setup to have you sharing printers wirelessly in minutes. -
Page 4: Overview
Features This device complies with the IEEE 802.11g standard in order to communicate with other 802.11b- and 802.11g-compliant wireless devices at 11Mbps and 54Mbps. 802.11g products run at speeds of up to 54Mbps and operate on the same 2.4GHz frequency band as 802.11b Wi-Fi products. •... -
Page 5: Product Specifications
companies that need additional printers for a peak activity period. • SOHO (Small Office/Home Office) networking needs Provides easy and quick small network installations that SOHO users need. Product Specifications Standards: IEEE 802.3 IEEE 802.3u IEEE 802.11g IEEE 802.11b Wireless: Radio Technology Data Rate Modulation... -
Page 6: Knowing Your Print Server
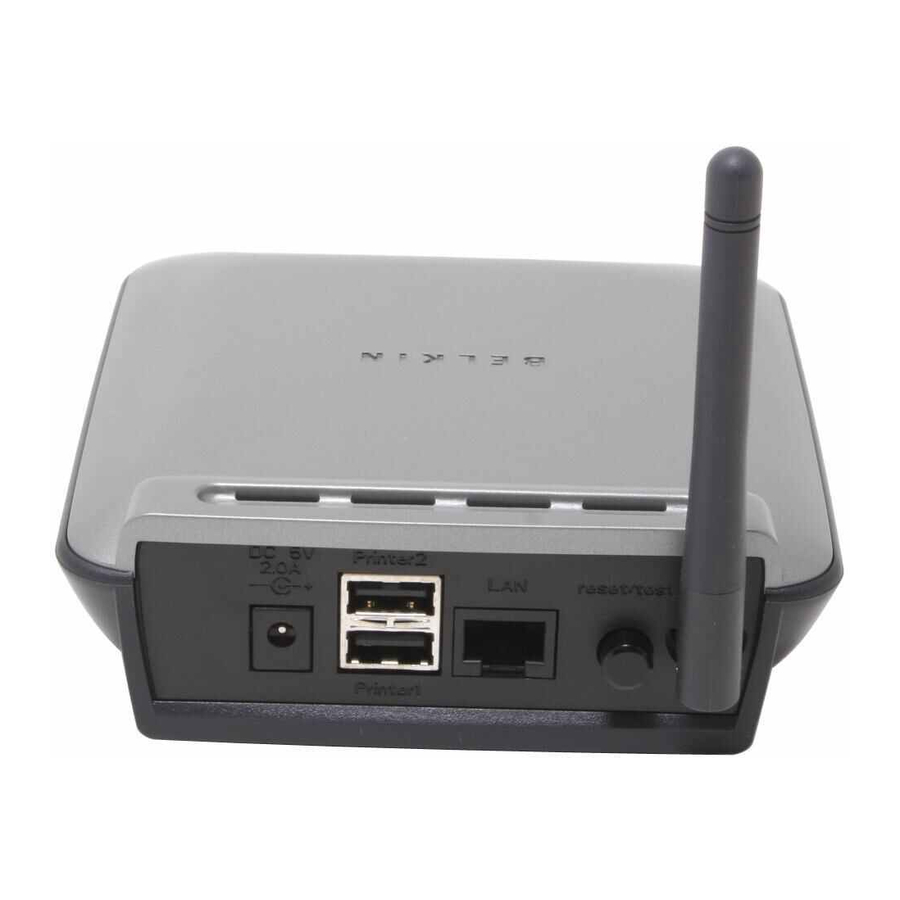
Knowing your Print Server a. Power LED Solid: Server is ON Off: Server is OFF b. LAN LED Solid: Connected to Ethernet Off: Ethernet disconnected Blinking: Transferring data Green: 10Mbps device connected Amber: 100Mbps device connected c. WLAN Link LED Solid: Print Server is LINKED to a wireless network Blinking:... - Page 7 a. Printer 1/Printer 2 These ports are used to connect one or two USB printers. Note: These ports cannot be expanded using a USB hub. b. Ethernet Port This port is used to connect the Print Server to an Ethernet network via CAT5 cable. Note: Using this port will automatically disable wireless functionality in the Print Server.
-
Page 8: Connecting The Print Server Using The Setup Wizard
CONNECTING THE PRINT SERVER USING THE SETUP WIZARD Make sure that each computer can print to the USB printer before installing the Wireless USB Print Server. 1. Connect your printer directly to each computer on the network and install USB printer drivers (see your printer documentation for detailed instructions). - Page 9 CONNECTING THE PRINT SERVER USING THE SETUP WIZARD 4. Follow instructions from each screen of the Print Server Setup Wizard. 5. When you see the following screen, installation is complete for that PC. Click “Quit” and remove the CD from your computer. Important: Repeat Steps 2-5 for each additional PC you would like to print from.
-
Page 10: Setup For Advanced Users
Install Print Drivers Be sure to install the necessary print drivers on each computer that will be accessing the Print Server. Set Up Print Server 1. Plug your printer (power on) into the Print Server. 2. Power up the Print Server within wireless range of your 802.11g or 802.11b wireless network. - Page 11 6. Verify that the computer is in the same subnet as the Print Server (The first three octets of the IP addresses are the same). 7. Type the Print Server’s IP address into your Internet browser from any computer. For example, if your IP address is 192.168.2.225, type “192.168.2.225”...
- Page 12 1. Install Port Monitor software on each computer by running “instport.exe” from the CD. 2. Configure the Belkin Port Monitor on each computer printer driver to point to the correct Print Server as follows: a) In Windows, select the printer’s properties for the printer connected to the Print Server and select the “Port”...
- Page 13 Click “OK” to close. On the “Belkin Port: Properties” window, the name of the Print Server you selected will appear. Click “OK” to close. e) On the Ports tab, disable bidirectional support if currently enabled. Click “Apply”. f) Click “OK” to close.
-
Page 14: Web Configuration
Accessing the Web Configuration Menus 1. Power up the Print Server that is within wireless range of your wireless network or is connected to your network using an Ethernet cable. 2. Allow approximately one minute for the Print Server to boot and obtain an IP address. -
Page 15: Home Page
WEB CONFIGURATION Web Interface – Home Page After entering the IP address of the Print Server, you will see the screen illustrated below. This page shows most critical configuration information for the Print Server. To modify settings, choose a topic from the menu on the left of the screen. -
Page 16: Ip Address
This menu allows the user to set a Static IP address, or to set the Print Server to obtain an IP address automatically as a DHCP client. Although Belkin designs the Print Server to obtain an IP address automatically, running the Wizard will change the IP address to static. -
Page 17: Channel And Ssid
Web Interface – Channel and SSID This menu allows the user to program the wireless settings. • “Enable Wireless Networking” is on by default. Connecting the Print Server via an Ethernet cable to the network will automatically disable wireless networking. •... -
Page 18: Encryption
Web Interface – Encryption IMPORTANT: Use the following encryption information only if your network is encrypted. If it is not, leave the encryption mode (“WEP Mode” in the dialog box illustrated below) set to its default, “Disabled”. This menu allows you to activate your Print Server’s encryption feature, which is determined by your existing LAN encryption setting. - Page 19 • 128-bit automatically: Selecting this setting will allow you to enter a pass phrase and the Print Server will determine the keys automatically. (Warning: Choosing “automatically” will generate new keys that may not function with an existing network. If your network keys [in your router] are already set, use “manually”...
- Page 20 WEB Interface – Encryption (64-bit automatically) This menu allows the user to enter keys for 64-bit encryption. This mode is exactly like 64-bit manually, (above) except: • Pass Phrase: Entering a phrase here, for example “Jack and Jill went up the hill”...
- Page 21 WEB Interface – Encryption (128-bit manually) This menu allows the user to enter keys for 128-bit encryption. To set 128-bit encryption for your Print Server: • WEP Mode: Select encryption mode from the drop-down menu. • WEP Key: Enter hex digits into all 13 fields consistent with your existing wireless network settings.
- Page 22 WEB Interface – Encryption (128-bit automatically) This menu allows the user to enter keys for 128-bit encryption. This mode is exactly like 128-bit manually, except: • Pass Phrase: Entering a phrase here, for example “Jack and Jill went up the hill”...
-
Page 23: Site Survey
Web Interface – Site Survey This menu allows the user to see all wireless networks in the area and connect to one. WEB CONFIGURATION... -
Page 24: Print Server Configuration
• Raw Printing: This feature allows clients to print to the Print Server using the standard TCP/IP printer port built into Windows XP and 2000 instead of the Belkin Port Monitor. Using Raw Printing requires the user to configure all port parameters manually and is not recommended for users unfamiliar with TCP/IP printing. -
Page 25: Upgrade Firmware
This menu allows the user to upgrade the Print Server’s firmware. Before running this application, download the new firmware from the Belkin website at www.belkin.com. Be careful to take note of the location of the downloaded file on your computer’s hard disk. After downloading, click “Browse” on the screen shown below, select the file name of the downloaded firmware, then click “Apply Changes”. -
Page 26: System Settings (Changing Password)
WEB CONFIGURATION Web Interface – System Settings (Changing Password) The Print Server ships with NO preset password. If you wish to set a password for greater security, be sure to choose a password that you will remember, and make a note of it. This utility will require you to enter the new password twice. -
Page 27: Printing To Multiple Print Servers
Print Server, you will need to install the included Belkin Port Monitor (a virtual printer port) software on your PC. The Belkin Port Monitor can then be configured to select different Print Servers on your network to handle specific print jobs. - Page 28 3. In the “Enter New Port” window, enter a unique name for the port and click “OK”. 4. Click “Close” on the “Printer Ports” window. 5. On the “Ports” tab, select the newly created port; click “Configure Port”. 6. On the next window (Belkin Port 2: Properties), click the “Locate Servers” button.
- Page 29 7. On the “Available Servers” window, select the Print Server to which you want to print. 8. Click “OK” to close. In the “Belkin Port 2: Properties” window, the name of the Print Server you selected will appear in the window.
-
Page 30: Belkin Port Monitor Advanced Menu
BELKIN PORT MONITOR ADVANCED MENU In most cases, the Belkin Port Monitor (a virtual printer port) software will be automatically installed and configured by the Print Server Setup Wizard. Some advanced users may choose to manually configure the Belkin Port Monitor software. -
Page 31: Adding A Second Belkin Port Monitor And Configuring It For A Specific Print Server
Note: The port number field by default is 515. In most cases, the port number should not be changed. Adding a Second Belkin Port Monitor and Configuring It for a Specific Print Server 1. In Windows, select the printer’s properties and select the “Ports” tab. - Page 32 BELKIN PORT MONITOR ADVANCED MENU 2. Click “Add Port”. A window showing the printer ports installed on the PC will open. Select “Belkin Port” and click “New Port”. 3. On the “New Port” window, enter a unique name for the port and click “OK”.
- Page 33 BELKIN PORT MONITOR ADVANCED MENU 7. Add the Print Server’s IP address and the queue name of the printer you want to select for the port. The queue name “lp1” will point the port to the printer connected to the printer 1 USB port on the Print Server. The queue name “lp2”...
-
Page 34: Using The Print Server For Ftp Printing
USING THE PRINT SERVER FOR FTP PRINTING Sending Print Jobs to Printers Connected to the Print Server Using FTP 1. In Windows, select the printer’s properties. 2. Set the printer port to “File”, click “Apply”. - Page 35 USING THE PRINT SERVER FOR FTP PRINTING 3. Print the document using the printer that you configured. A dialogue box will open prompting you to name the print file. After naming the file, click “OK”. A file will be saved to the user’s default Windows directory (typically “C:\”...
- Page 36 USING THE PRINT SERVER FOR FTP PRINTING 5. At the prompt, type “ftp” followed by the IP address of the Print Server; press the “Enter” key to create an FTP connection with the Print Server. 6. When the connection is made, the user will be prompted to enter a user name and a password.
-
Page 37: Troubleshooting
Cannot find Print Server If the Wizard cannot find your Print Server even though it appears to be functioning properly, the problem may be that there is another wireless network in the area and the Print Server has associated with it. In this case, you can: •... - Page 38 Print Servers in Windows XP or 2000, but not Windows 98. Check the Belkin website for compatibility issues at: http://web.belkin.com/support/F1UP0001. • If none of the computers can access the Print Server, then either: 1. The Print Server has not been configured correctly (in this case, rerun the Setup Wizard);...
- Page 39 In any of these cases, restore the printer to functionality, then, if necessary, reboot the Print Server. If those issues are addressed and the problem still exists, Belkin recommends that the user disable the Printer Driver Status Monitor on the computer. The status monitor, a convenient checkpoint for the user, usually requires a direct connection between the computer and the printer.
-
Page 40: Technical Support
TECHNICAL SUPPORT Find technical support information at support.belkin.com or www.belkin.com through the tech support link. For updated information on troubleshooting tips or for printer compatibility, use: http://web.belkin.com/support/F1UP0001. Contact Belkin Technical Support by phone at 877-736-5771. -
Page 41: Information
FCC Statement DECLARATION OF CONFORMITY WITH FCC RULES FOR ELECTROMAGNETIC COMPATIBILITY We, Belkin Corporation, of 501 West Walnut Street, Compton, CA 90220, declare under our sole responsibility that the product, to which this declaration relates, complies with Part 15 of the FCC Rules. Operation is subject to the following two conditions: (1) this device may not cause harmful interference, and (2) this device must accept any interference received, including interference that may cause undesired operation. -
Page 42: Canada-Industry Canada (Ic)
• EN 300 328 Technical requirement for radio equipment • ETS 300 826 General EMC requirements for radio equipment. To determine the type of transmitter, check the identification label on your Belkin product. Products with the CE marking comply with the EMC Directive (89/336/EEC) and the Low Voltage Directive (72/23/EEC) issued by the Commission of the European Community. - Page 43 Belkin Corporation warrants this product against defects in materials and workmanship for its lifetime. If a defect is discovered, Belkin will, at its option, repair or replace the product at no charge provided it is returned during the warranty period, with transportation charges prepaid, to the authorized Belkin dealer from whom you purchased the product.
- Page 44 Fax: +61 (0) 2 4372 8603 P74390-A © 2003 Belkin Corporation. All rights reserved. All trade names are registered trademarks of respective manufacturers listed. The 54g logo is a trademark of Broadcom Corporation in the United States and/or other countries.
Need help?
Do you have a question about the F1UP0001 and is the answer not in the manual?
Questions and answers