Table of Contents
Advertisement
Advertisement
Table of Contents

Summary of Contents for Systemline SE0120
- Page 1 SE0120 SE0150 E100 User Guide Built-in DAB+, FM & Bluetooth® Hi-Fi sound system...
-
Page 2: Important Safety Instructions
1.0 Important Safety Instructions CAUTION: To reduce the risk of electric shock, do not remove the cover. No user-serviceable parts inside. Refer to qualified personnel. WARNING: To reduce the risk of fire or electric shock, do not expose this appliance to rain or moisture. The lightning flash with arrowhead within an equilateral triangle is intended to alert the user to the presence of an uninsulated “dangerous voltage”... - Page 3 International, Ltd. Qualcomm® and aptX™ are registered trademarks of Qualcomm Incorporated, registered in the United States and other countries, used with permission. Systemline and Q Acoustics are registered trademarks of Armour Home Electronics Limited. All other product names are trademarks or registered trademarks of their respective owners.
- Page 4 2.0 First switching ON - Important information – tuning the DAB radio When the E100 is first switched on after installation, it will automatically perform a scan to detect all available DAB radio stations. This may take a few minutes to complete.. Once the scan is complete, the E100 will return to normal operation Note1: If power to the E100 is interrupted during the DAB scan process, the scan will need to be repeated when the power is restored.
-
Page 5: Front Panel Controls
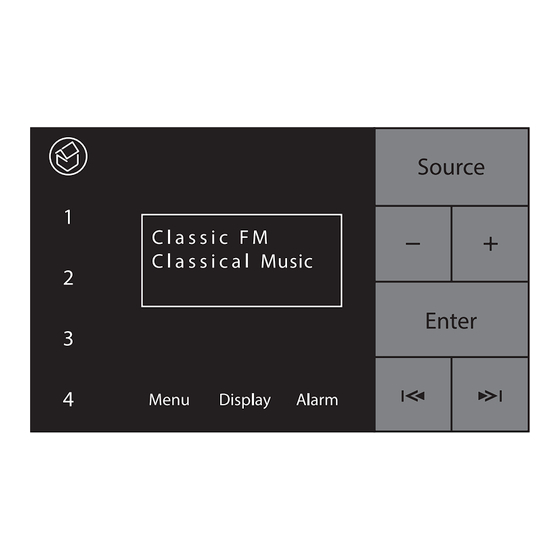
3.0 Front panel controls 1. Standby Illuminates red to indicate the unit has entered standby. 2. Pre-set 1-4 Touch here to choose or set pre-sets 3. Source selection Touch here to switch between DAB/FM/Bluetooth/Line input 4. Volume keys Touch here to increase or decrease the volume. 5. -
Page 6: Pairing A Bluetooth Device
4.0 Pairing a Bluetooth device Systemline E100 Note: Number will be different... - Page 7 5.0 Listening to a connected Bluetooth music source Systemline E100 Enter will Play/ Skip functions Pause are available...
-
Page 8: Listening To Dab Radio
6.0 Listening to DAB Radio B B C R a d i o 2 S t e v e W r i g h t i n t h e a f t e r n o o n... -
Page 9: Storing Presets
7.0 Storing pre-sets B B C R a d i o 2 A U X I N S t e v e W r i g h t i n t h e a f t e r n o o n Hold 4 seconds Hold 4 seconds B B C R a d i o 2... - Page 10 8.0 Infrared handset control In addition to the front panel controls, the E100 can also be controlled via the included infrared handset. 1. Pre-sets 1-4 2. Power (standby/on) 3. SOURCE 4. Volume controls 5. Mute...
-
Page 11: Turning The Alarm On/Off
9.0 Using the ALARM function for alarm 1 9.1 Turning the alarm on/off A l a r m s A l a r m s < A l a r m 1 : 0 6 : 0 0 > < A l a r m 1 : O f f >... - Page 12 9.2 Setting the alarm time and day A l a r m s A l a r m 1 : 0 0 : 0 0 S e t a l a r m t i m e 0 0 : 0 0 S e t a l a r m t i m e 0 6 : 0 0 A l a r m...
- Page 13 A l a r m s A l a r m 1 : 0 6 : 1 5 D a y s : < D a i l y > Press Twice A l a r m d e t a i l <...
- Page 14 9. Setting the alarm mode and volume A l a r m s A l a r m 1 : 0 6 : 1 5 M o d e : < B u z z e r > Press 3 times A l a r m d e t a i l <...
- Page 15 A l a r m s A l a r m 1 : 0 6 : 1 5 A l a r m V o l u m e 0 3 Press 4 times A l a r m v o l u m e 0 7 A l a r m S a v e d...
-
Page 16: Using The Menu Function
10.0 Using the ALARM function for alarm 2 You can set a second alarm for different days and time, simply select Alarm2 at the beginning of the alarm setup and then follow the instructions outline above. 11.0 Using the MENU function The MENU function is mainly used for set-up purposes and provides access to the following settings. -
Page 17: Time Setup
11.1 Time set up M a i n m e n u T i m e s e t u p < T i m e s e t u p > < S e t c l o c k >... -
Page 18: Date Setup
11.2 Date setup M a i n m e n u < T i m e s e t u p > S e t d a t e T i m e s e t u p 0 0 - 0 0 - 2 0 0 0 <... - Page 19 11.3 Setting the date and time using auto updates from radio Note: This is the recommended setting to use. M a i n m e n u < T i m e s e t u p > T i m e s e t u p A u t o u p d a t e <...
- Page 20 11.4 Setting the EQ < M a i n M e n u > E Q s e t t i n g s M a i n m e n u < T r e b l e > <...
- Page 21 < M a i n M e n u > M a i n m e n u E Q s e t t i n g s < E Q s e t t i n g s > <...
-
Page 22: Bluetooth Name
11.5 Bluetooth Name < M a i n M e n u > B l u e t o o t h n a m e M a i n m e n u < S y s t e m l i n e - 0 0 >... -
Page 23: Sleep Timer
11.6 Sleep timer < M a i n M e n u > M a i n m e n u S l e e p t i m e r < S l e e p > < S l e e p o f f >... -
Page 24: Language Setting
11.7 Language setting < M a i n M e n u > M a i n m e n u L a n g u a g e < L a n g u a g e > < E n g l i s h >... -
Page 25: Factory Reset
11.8 Factory reset < M a i n M e n u > P r e s s ‘ D I S P L AY ’ M a i n m e n u t o c o n f i r m r e s e t <... -
Page 26: Changing The Display
12.0 Changing the display 12.1 Display B B C R a d i o 2 Radio S t e v e W r i g h t i n t h e a f t e r n o o n Program B B C R a d i o 2 Music... -
Page 27: Display Brightness
12.2 Display brightness B B C R a d i o 2 S t e v e W r i g h t i n t h e a f t e r n o o n Hold 3 seconds B B C R a d i o 2 B B C R a d i o 2 S t e v e W r i g h t i n t h e a f t e r n o o n... -
Page 28: Wiring Diagram
13.0 Wiring diagram... -
Page 29: Rear Panel Connections
14.0 Rear panel connections 1. Power input Use ONLY the power supply provided with the unit. Failure to do so may cause irreparable damage to the E100. 2. Analogue auxiliary input An analogue input can be connected using a suitable stereo audio cable available separately. -
Page 30: Technical Specification
Technical Specification Radio 1DAB/DAB+ and FM with RDS. 4 preset station. Bluetooth Class 2 Bluetooth 2.1. Apt-x for CD-quality transmission. Secure pairing Passcode. Selectable device name to allow multiple units to be used in close proximity. Range up to 10m. Aux input 725mV Normal Gain or 250mV Boost Gain. - Page 32 Bishops Stortford Hertfordshire CM23 5GZ United Kingdom www.systemline.co.uk ©2018 Armour Home Electronics, all rights reserved. Our policy is one of continuous improvement and we reserve the right to change the designs and specifications without notice. All information is given in good faith. The manufacturer accepts no responsibility for errors, omissions or incorrect assumptions.
Need help?
Do you have a question about the SE0120 and is the answer not in the manual?
Questions and answers