Table of Contents
Advertisement
Advertisement
Table of Contents

Related Manuals for Intermatic Grasslin DTAV40E


Summary of Contents for Intermatic Grasslin DTAV40E
- Page 1 Instruction Manual 20 memories time switches...
- Page 3 page Safety precautions ..............2 Program structure ..............3 Symbols, keys ................5 reset Menu Setting the timer ................ 6 Prog Setting 24h or am/pm clock, time and weekday .....7 Prog. Pre-set programs ............... 9 Selecting pre-set programs P01 to P03 ........10 prog User defined programs ..............
- Page 4 Safety precautions · The connection and installation of electrical devices may only be carried out by a qualified electrician. · Interventions in and changes to the device result in the voiding of the warranty claim. · Observe your national regulations and the respective safety provisions.
- Page 5 Press Reset Button First installation setting Review/adjust Menu Set time: Format 24h or am/pm 24h blinking, using +/- to select, then OK Set time: Hour Hour blinking, using +/- to select, then OK Set time: Minute Minute blinking, using +/- to select, then OK Set time: Day Monday blinking, using +/- to select, then OK Note:...
- Page 6 Set switching ON time: Hour Hour blinking, using +/- to select, then OK Set switching ON time: Minute Minutes blinking, using +/- to select, then OK Set switching ON time: Days Mo-Su blinking, using +/- to select, then OK Set switching OFF time: Hour Hour blinking, using +/- to select, then OK Set switching OFF time: Minute Minutes blinking, using +/- to select, then OK/Menu...
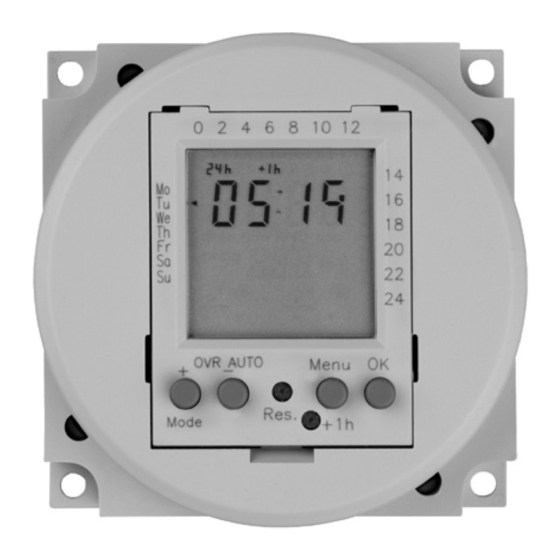
- Page 7 reset : Overview of daily switching program : Setting of 24h or am/pm : Summer/winter clock changes : Weekday display : Switching status display ON/OFF OVR AUTO Menu Res. : Adjustment keys: By pressing the key longer than 2 sec. you can adjust the timer in steps of 5 units Res.
- Page 8 Menu Prog Setting of this programmable timer is depending of the user preference to use pre-set programs or defining own programming. Using Pre-set programs (first time installation) Using Reset key you can adjust the following values: OVR AUTO Menu OK 24h or am/pm: see pg 6 Res.
- Page 9 Sequence to follow after selecting programming by pre-set programs or Menu mode. Set display format 24h or am/pm OVR AUTO Menu OK Res. Mode Select 24h or am/pm (+/- ) and con - firm with OK. Set hour OVR AUTO Menu OK Res.
- Page 10 Set minutes OVR AUTO Menu OK Res. Mode Select minutes (+/- ) and confirm with OK. Set week day OVR AUTO Menu OK Res. Mode Select week day (+/- ) and confirm with OK.
- Page 11 Prog. P01: Mo - Su, 1 x ON/OFF Programs P01-03 The switching on and off times for programs P01 to P03 are preset (pre). The user can change these pro- grams. P01: Mo - Su, 2 x ON/OFF Individual program, P-- Under the menu option P-- you have the option of creating a user-defined program.
- Page 12 prog Sequence to follow after setting time in the Reset mode. OVR AUTO Menu OK Res. Mode Select pre-set program (+/- ). OVR AUTO Menu OK Res. Mode Once selected the program desired there are following options: Menu : terminate programming OK: Going through pre-set programs to modify selection (any program ON or OFF can be modified by using...
- Page 13 prog Sequence to follow after setting time and week day while running Menu mode or adding programs to the pre-set P01 to P03. Select program ON OVR AUTO Menu OK Res. Mode and confirm with OK. Set hour ON OVR AUTO Menu OK Res.
- Page 14 prog Set week day ON OVR AUTO Menu OK Res. Mode Select week day (+/- ) and confirm with OK. Possible week blocks and individual days...
- Page 15 prog Set hour OFF OVR AUTO Menu OK Res. Mode Select hour (+/- ) and confirm with OK. Set minutes OFF OVR AUTO Menu OK Res. Mode Select minutes (+/- ) and confirm with OK. Set week day OFF OVR AUTO Menu OK Res.
- Page 16 prog Shift Should the OFF command be the following day of ON command then select '' + ''key then select Menu or OK. Example: Mo-Fr Mo-Fr 20:00 p.m. - 03:00 a.m. ON 20:00 p.m. - 03:00 a.m. ON 03:00 a.m. - 20:00 p.m. OFF Tu-Sa 03:00 a.m.
- Page 17 OVR AUTO Menu OK Res. Mode Select Menu , then select OK key until getting onto the ON time of the program you want to delete. OVR AUTO Menu OK Res. Mode Select '' - -'' with (+/- ) key and con - firm with OK.
- Page 18 OVR AUTO Menu OK Res. Mode The +1h key is for the change to daylight savings time. · By pressing the +1h key 1 hour is added to the current time. · +1h is shown on the display. · By pressing +1h again 1 hour is subtracted from the current time.
- Page 19 Mode OVR AUTO Menu OK Res. Mode The '' + ''key serves to change over between automatic, AUTO to over- ride (OVR) ON and override (OVR) OFF (CH1). OVR AUTO OVR AUTO...
- Page 20 WARRANTY If within one (1) year from the date of purchase, this product fails due to a defect in material or workmanship, Intermatic Incorporated will repair or replace it, at its sole option, free of charge. This warranty is extended to the original household purchaser only and is not transferable.
Need help?
Do you have a question about the Grasslin DTAV40E and is the answer not in the manual?
Questions and answers