NOCO Genius Boost HD GB70 User Manual
Hide thumbs
Also See for Boost HD GB70:
- User manual ,
- User manual & warranty (25 pages) ,
- Important product information manual and limited warranty (132 pages)
Table of Contents
Advertisement
GB70
User Guide
DANGER
PRIOR TO USE, READ AND UNDERSTAND
PRODUCT SAFETY INFORMATION.
Failure to follow the instructions may result
in ELECTRICAL SHOCK, EXPLOSION,
or FIRE, which may result in SERIOUS
INJURY, DEATH, DAMAGE TO DEVICE or
PROPERTY. Do not discard this information.
Welcome.
Thank you for buying the NOCO Genius
Boost™ GB70. Read and understand the User Guide
before operating the product. For questions regarding our
jump starter, view our comprehensive support information
at www.no.co/support. To contact NOCO for personalized
support (not available in all areas), visit www.no.co/connect.
What's In The Box.
• GB70 Lithium Jump Starter w/HD Battery Clamps
• Micro USB Cable
• 12V Female Plug (OUT)
• 12V Male Plug (IN)
• 12V XGC Cable
• User Guide & Information Guide and Warranty
INT
®
Advertisement
Table of Contents

Related Manuals for NOCO Genius Boost HD GB70


Summary of Contents for NOCO Genius Boost HD GB70
- Page 1 INJURY, DEATH, DAMAGE TO DEVICE or PROPERTY. Do not discard this information. Welcome. ® Thank you for buying the NOCO Genius Boost™ GB70. Read and understand the User Guide before operating the product. For questions regarding our jump starter, view our comprehensive support information at www.no.co/support.
-
Page 2: Getting Started
Glenwillow, OH 44139 United States of America About GB70. ® The NOCO Genius Boost™ GB70 is an ultra-compact and portable lithium-ion jump starter for high- displacement gas and diesel engines in cars, trucks, boats and more. Safe to use on engines of any size. It’s extremely safe for anyone to use. -
Page 3: Jump Starting
2.) Connect the negative (black) HD battery clamp to the negative (NEG,N,-) battery terminal or vehicle chassis. 3.) When disconnecting, disconnect in the reverse sequence, removing the negative first (or positive first for positive ground systems). Jump Starting. 1.) Verify the voltage and chemistry of the battery. 2.) Confirm the HD battery clamps are connected to the correct polarity battery terminals. -
Page 4: Low Voltage Batteries & Manual Override
Low Voltage Batteries & Manual Override The GB70 is designed to jump start 12-volt lead-acid batteries down to 2-volts. If your battery is below 2-volts, the Boost LED will be “Off”. This is an indication that the GB70 can not detect a battery. If you need to jump start a battery below 2-volts there is a Manual Override feature, which allows you to force “On”... -
Page 5: Understanding Charge Leds
before starting. If the vehicle does not start right away, wait 20-30 seconds and try again. Do not attempt more than five (5) consecutive jump starts within a fifteen (15) minute period. Allow the GB70 to rest for fifteen (15) minutes before attempting to jump start the vehicle again. -
Page 6: Error Conditions
When Recharging the GB70. Explanation The 25% Charge LED will slowly Red LED pulse “On” and “Off”, when the battery is less than 25% charged. 25% 50% 75% 100% When the battery is 25% charged, the Red Charge LED will be solid. The 50% Charge LED will slowly Red LED pulse “On”... -
Page 7: Charging/Times
Error Reason/Solution Error LED The internal battery is too hot/ Blinking Red Allow the unit to cool. w/Cables Connected Bring the unit into cooler environment. Properly Boost Light Does Connected battery is below 2-volts/ Not Come On Remove all loads, and try again, or use Manual w/Cables Connected Override Mode. -
Page 8: Led Flashlight
Charging Your USB Devices. You can recharge virtually any USB device, like a smartphone. Connect the included USB Charge Cable to the USB OUT port and connect to your USB device. The number of times you can recharge a USB device will vary between devices. - Page 9 Technical Specifications. Internal Battery: Lithium Ion Peak Current Rating: 2000A joules 15700+ Operating Temperature: -30°C to +50°C Charging Temperature: 0ºC to +40ºC Storage Temperature: -20ºC to +50ºC (Avg Temp.) Micro USB (Input): 5V, 2.1A USB (Output): 5V, 2.1A 12V (Input) 12V, 3A 12V (Output) 12V, 15A...
-
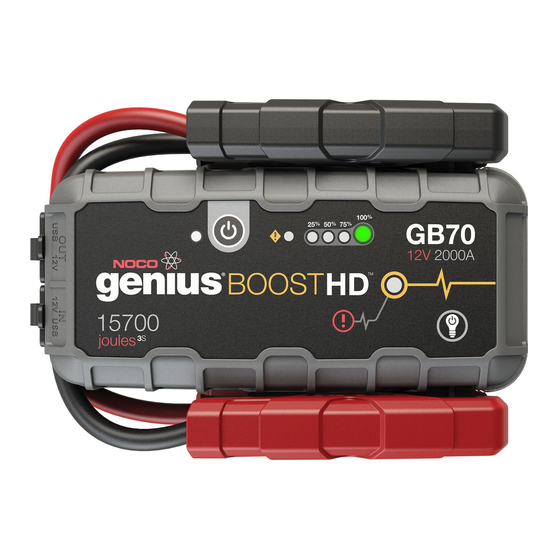
Page 11: User Interface
User Interface. 1. Internal Battery Level Indicates the charge level of the internal battery. 2. Error LED Illuminates Red if reverse polarity is detected, or blinks “On” and “Off” when the internal battery temperature is too high. 3. Power Button Push to turn unit “On”... - Page 12 1.800.456.6626 support@no.co 30339 Diamond Parkway, #102 Glenwillow, OH 44139 United States of America no.co GB70.07282015A...
- Page 13 Important Product Information Guide and Limited Warranty DANGER READ AND UNDERSTAND ALL SAFETY INFORMATIOIN BEFORE USING THIS PRODUCT. Failure to follow these safety instructions may result in ELECTRICAL SHOCK, EXPLOSION, FIRE which may result in a SERIOUS INJURY, DEATH, or PROPERTY DAMAGE.
-
Page 14: Important Safety Warnings
DANGER Eye Injury. Wear eye protection when operating charger. Batteries can explode and cause flying debris. Battery acid can cause eye and skin irritation. In the case of contamination of eyes or skin, flush affected area with running clean water and contact poison control immediately. -
Page 15: Choking Hazard
Minors. If the charger is intended by “Purchaser” to be used by a minor, purchasing adult agrees to provide detailed instructions and warnings to any minor prior to use. Failure to do so is the sole responsibility of the “Purchaser,” who agrees to indemnify NOCO for any unintended use or misuse by a minor. -
Page 16: Extension Cords
Extension Cords. Using an improper extension cord could result in fire and electrical shock which may result in injury, death or damage to device and property. If extension cord must be used, make sure that: (1) The pins on the extension cord plug have the same number, size, and shape as those of the AC power cord plug on the charger;... -
Page 17: Operating Temperature
Location. Locate the charger as far away from the battery as possible. Do not place the charger directly above the battery as gases from battery will corrode and damage charger. Prevent battery acid from coming in contact with the charger. Do not operate the charger in a closed-in area or an area with restricted ventilation. -
Page 18: Explosive Atmospheres
NOCO Genius Battery Charger Five (5) Year Limited Warranty. The NOCO Company (“NOCO”) warrants that its products (the “Product”) will be free from defects in material and workmanship for a period of five (5) years from the date of purchase (the “Warranty Period”). - Page 19 THE FOREGOING LIMITED WARRANTY IS IN LIEU OF AND EXCLUDES ALL OTHER WARRANTIES NOT EXPRESSLY SET FORTH HEREIN, WHETHER EXPRESS OR IMPLIED BY OPERATION OF LAW OR OTHERWISE, INCLUDING, BUT NOT LIMITED TO, ANY IMPLIED WARRANTIES OF MERCHANTABILITY OR FITNESS FOR A PARTICULAR PURPOSE. NOCO’S LIABILITY UNDER THIS LIMITED WARRANTY IS EXPRESSLY LIMITED TO REPLACEMENT (IN THE FORM AND UNDER THE TERMS ORIGINALLY...
-
Page 20: Limited Warranty
Limited Warranty. This Limited Warranty is made to the original purchaser from NOCO and does NOT extend to any other person or entity and is NOT assignable. It is the obligation of the original purchaser to: 1.) Request and obtain a return merchandise authorization (RMA) number from NOCO Support at support@no.co. - Page 21 THIS LIMITED WARRANTY DOES NOT COVER: 1.) Normal wear and tear. 2.) Cosmetic damage that does NOT affect functionality. 3.) Products where the NOCO serial number is missing, altered, or defaced. LIMITED WARRANTY FEES These fees apply only to Product during the Warranty Period.
- Page 22 1.800.456.6626 support@no.co 30339 Diamond Parkway, #102 Glenwillow, OH 44139 United States of America no.co NPD02042014B...
Need help?
Do you have a question about the Boost HD GB70 and is the answer not in the manual?
Questions and answers
how do you charge the gb70
The NOCO Genius Boost HD GB70 can be charged using the included Micro USB cable or the 12V input (IN) connector. Before first use, it should be fully charged.
This answer is automatically generated