
Related Manuals for Marzhauser Sensotech TANGO 3 mini

Summary of Contents for Marzhauser Sensotech TANGO 3 mini
- Page 1 Operating Manual TANGO 3 mini Stepper Motor Controller for Micropositioning Systems...
- Page 2 Document version Original operating manual Version 3.1, Date: 09.01.2018 First published: 13.10.2016 Product TANGO 3 mini Order no.: 00-76-100-5800 Manufacturer Märzhäuser Sensotech GmbH An den Fichten 35 35579 Wetzlar (Germany) Tel.: +49 6441 67106-24 Fax: +49 6441 67106-28 info@marzhauser-st.com www.marzhauser-st.com ©...
-
Page 3: Table Of Contents
TANGO Desktop Table of Contents Table of Contents Basics of the Operating Manual ......................... 5 Safety ................................5 Intended Use ............................5 Installation Requirements ........................5 Hazard Symbols ............................ 5 General Safety Notes .......................... - Page 4 Basics of the Operating Manual Operating Manual...
-
Page 5: Basics Of The Operating Manual
This operating manual provides you with the information required for trouble-free and safe use of the stepper motor controller TANGO 3 mini, termed controller from here on in this document. You must have fully read and understood this operating manual and especially the safety instructions before you unpack, put into service, operate, clean, take out of service or dispose of the controller. -
Page 6: General Safety Notes
Safety Operating Manual Danger due to substances which are harmful to health Possible damage of devices and parts 2.4 General Safety Notes The controller may only be used for the purposes which are described in this operating manual. The operating manuals of connected peripheral devices (positioning systems, microscope, operating elements, PC etc.) must be heeded. - Page 7 TANGO Desktop Safety Ensure that no chips, liquids or other objects can get into the housing of the controller or the power supply. Protect the controller and the power supply from dirt and dust as far as possible. The controller and accessories are not protected against corrosive, infectious, radioactive or other substances which are harmful to health.
-
Page 8: Scope Of Delivery
Scope of Delivery Operating Manual Scope of Delivery Standard scope of delivery Quantity TANGO 3 mini Mounting plate (pre-fitted) USB interface cable 1.8 m Start-up adapter AUX mini External 24 V power supply incl. mains cable Operating manual Optional components Article no. -
Page 9: Compliance With Directives And Standards
TANGO Desktop Product Description 4.3 Compliance with Directives and Standards We hereby declare that the controller is not a device ready for use or connection in the sense of the EMC, Low Voltage or Machinery Directive, or the Equipment and Product Safety Act, rather that it is a component. The final mode of function is only defined when the controller is integrated in the overall system. -
Page 10: Putting Into Service
Putting into Service Operating Manual Putting into Service 5.1 Putting the Controller into Service 1 Read and make sure you understand chapter 2 Safety before you start putting the controller into service. 2 Mount the controller using the mounting plate (see chapter 8.5 Mounting Plate, page 28) or use the optional mounting adapter for 35 mm top-hat rail (see chapter 8.6 Mounting Adapter for 35 mm Top-Hat Rail (optional), page 29). -
Page 11: Establishing Connection To A Pc
TANGO Desktop Putting into Service 6 Check whether the mains voltage specified on the power supply corresponds to your mains voltage. If they do correspond, connect the cable of the power supply to the port 24V DC/4A max. on the controller. 7 Then connect the power supply to the mains. - Page 12 Putting into Service Operating Manual 5.2.2 Establishing an RS-232 connection Note: To be able to use the port AUX mini as an RS-232 interface, you require a special RS-232 cable. Please contact our Customer Service Center in this case. 1 Disconnect the controller from the power supply. 2 Switch the PC off.
-
Page 13: Installing Switchboard
TANGO Desktop Putting into Service 5.3 Installing SwitchBoard 1 Download the current version of SwitchBoard from the Märzhäuser website. Note: You will find the download section at www.marzhauser.com/downloads. 2 Execute the file SwitchBoard_XXX_Setup.exe (file name depends on the version). 3 Follow the on-screen installation instructions. As soon as the installation has been completed you can start SwitchBoard. - Page 14 Putting into Service Operating Manual Establishing a connection to the controller 1 Start SwitchBoard. 2 Select the identified COM port from the Serial Port drop-down list. 3 Enable the check box Show protocol window and Scan for ETS when connecting. 4 Enable the radio button Read out setup from controller.
-
Page 15: Port Assignment
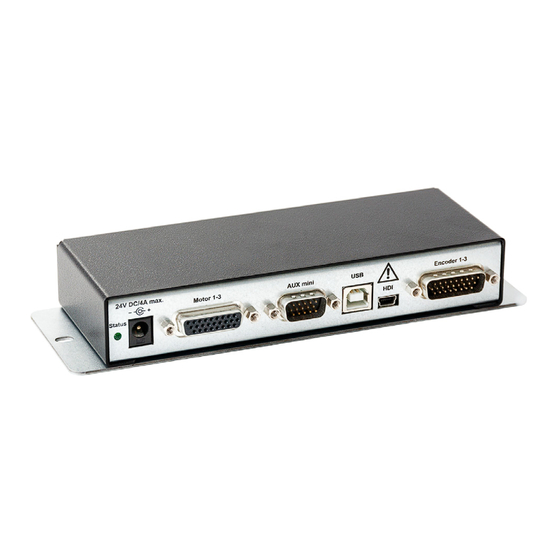
TANGO Desktop Port Assignment Port Assignment Note: With all connections, the cable shield is connected to the controller housing. 6.1 Motor 1-3: D-Sub 26-Pin Socket Designation Function MOT1PH1+ Motor 1, phase 1+ MOT1PH1- Motor 1, phase 1- MOT1PH2+ Motor 1, phase 2+ MOT1PH2- Motor 1, phase 2- END10... -
Page 16: Hdi: 5-Pin Mini-Usb
Port Assignment Operating Manual 6.2 HDI: 5-Pin Mini-USB HDI = Human Device Interface (Joystick digital or ERGODRIVE digital) HDI designation Controller designation VCC (+5V) VCC_HDI (+5V) RXHDI (IN) TX (OUT) TXHDI (OUT) RX (IN) – – max. load: 500 mA 6.3 USB: 4-Pin USB Socket, Type B Designation USBDM... - Page 17 TANGO Desktop Port Assignment +U0X3 Axis 3, reference signal, positive input, 150 Ω Pin 25 for differential input voltages from 0.6...5 Vpp, input voltage range Pin GND = 0...5 V, Filter: each 470 Ω + 1nF from Pin GND Error signal is inactive on delivery, 1 kΩ...
-
Page 18: Aux Mini: Hd D-Sub 15-Pin Plug
Port Assignment Operating Manual 6.5 AUX mini: HD D-Sub 15-Pin Plug Possible device damage caused by insertion/removal of the plug at the port AUX mini with 24VBUS port active (pin 15). If a plug is inserted or removed at the port AUX mini with the port 24VBUS active, pin 15 (24 V) may be applied first. -
Page 19: Technical Data
TANGO Desktop Technical Data Technical Data General data Dimensions Approx. 165 × 29 × 67 mm (W × H × D, without mounting accessories) Weight Approx. 500 g (incl. mounting plate, without cables/plugs) Motor unit Number of axes Motor type 2-/4-phase stepper motor, e.g. - Page 20 Technical Data Operating Manual Brake connection Output brake (24 V, max. 0.5 A, short-circuit proof), switches off in the case (Port Motor 1-3) of excess load, can be controlled by software Temperature monitoring Temperature measurement of the board by software, switch-off of the output stages in the event of over-temperature Interfaces Human Device Interface...
- Page 21 TANGO Desktop Technical Data Power supply Motor voltage 20.1…28.9 V DC Starting current limitation Starting current limitation makes "hot plugging" of the external power supply possible Measurement of current Current consumption can be read by software consumption The current consumption depends on motor type, motor current, voltage supply, number of motors, number of revolutions, current consumption of peripherals etc..
-
Page 22: Accessories
Accessories Operating Manual Accessories 8.1 External Power Supply Model: Adapter Technology ATS072T-P240, 24 V, 3 A, C14 mains plug Note: Protective ground and GND are connected. Fig. 2: Data sheet for external power supply... -
Page 23: Start-Up Adapter Aux Mini
TANGO Desktop Accessories 8.2 Start-up Adapter AUX mini The start-up adapter AUX mini connects Pin 5 (PSE) to Pin 3 +5V at the port AUX mini. If the start-up adapter AUX mini has been inserted the output stages can be enabled. ... -
Page 24: Joystick Digital (Optional)
Accessories Operating Manual 8.3 Joystick Digital (Optional) Product description In connection with the controller, the joystick is used for the manual movement of motorized micropositioning systems and is available in the following 4 versions: Fig. 4: 2-Axes Joystick digital Fig. 5: 3-Axes Joystick digital Art. - Page 25 TANGO Desktop Accessories The deflection of control stick and rotary potentiometer is in relation to speed (e.g. small deflection – low speed, large deflection – high speed). Rotation of the multi-function wheel is synchronous to travel (e.g. 1 revolution on the multi-function wheel ≙ 0.1 mm change in position in the Z-axis).
-
Page 26: Ergodrive Digital (Optional)
Accessories Operating Manual 8.4 ERGODRIVE Digital (Optional) Product description In connection with the controller, the ERGODRIVE is used for the manual movement of motorized micropositioning systems and is available in the following 2 versions: Fig. 9: ERGODRIVE 2 digital Fig. 10: ERGODRIVE 3 digital Art. - Page 27 TANGO Desktop Accessories Functional scope On delivery, the operating elements of the ERGODRIVE are configured as follows: Operating element Assigned function F1 key No assignment Switch over XY-travel speed XY-key Value 1 (preset): 1.0 mm/rev Value 2: 14.0 mm/rev Switch over Z-travel speed Z-key Value 1 (preset): 0.1 mm/rev...
-
Page 28: Mounting Plate
Accessories Operating Manual 8.5 Mounting Plate Fig. 12: Mounting plate for screw attachment Fig. 13: Dimensions of the mounting plate Dimensions (controller incl. mounting plate): 189.6 × 31.5 × 62 mm (W × H × D) Dimensions (slotted holes): 4.5 × 7 mm... -
Page 29: Mounting Adapter For 35 Mm Top-Hat Rail (Optional)
TANGO Desktop Accessories 8.6 Mounting Adapter for 35 mm Top-Hat Rail (optional) Fig. 14: Mounting adapter for 35 mm top-hat rail Dimensions (controller incl. mounting adapter): 164 × 48 × 62 mm (W × H × D) Märzhäuser Sensotech GmbH... -
Page 30: Cleaning
Cleaning Operating Manual Cleaning Danger to life and possible equipment damage due to improper cleaning. Liquids which penetrate the power supply can cause an electric shock, a short-circuit and damage to the power supply itself, the controller and connected devices. Liquids which penetrate the controller can cause a short-circuit and damage to the controller and connected devices. -
Page 31: Service
TANGO Desktop Service 11 Service If you notice a fault or malfunction during operation, check the outer circuitry first (voltage supply, cabling etc.). If the fault or malfunction persists, please contact our Customer Service Center. The staff at our Customer Service Center will be happy to help with support queries, complaints and suggestions about our products and services. -
Page 32: Disposal
Disposal Operating Manual 13 Disposal The adjacent symbol means that the controller is classified as electrical or electronic equipment in accordance with the EU Directive 2012/19/EU (WEEE) and thus cannot be disposed of with household waste. Since the equipment is used commercially, it may not be disposed of via a communal collection point for electrical and electronic equipment. -
Page 33: Declaration Of Conformity
TANGO Desktop Declaration of Conformity 14 Declaration of Conformity Fig. 15: Declaration of Conformity Märzhäuser Sensotech GmbH... - Page 34 Declaration of Conformity Operating Manual...
Need help?
Do you have a question about the TANGO 3 mini and is the answer not in the manual?
Questions and answers